Hyundai Elantra GT 2017 Workshop Manual
Manufacturer: HYUNDAI, Model Year: 2017, Model line: Elantra GT, Model: Hyundai Elantra GT 2017Pages: 493, PDF Size: 11.53 MB
Page 51 of 493
Safety features of your vehicle
32
3
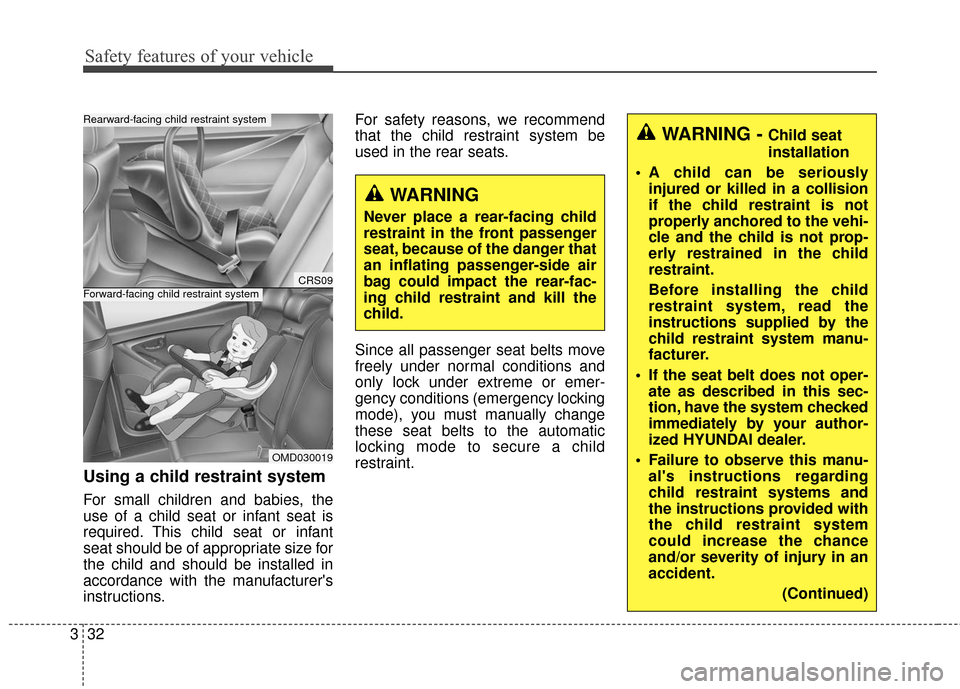
Using a child restraint system
For small children and babies, the
use of a child seat or infant seat is
required. This child seat or infant
seat should be of appropriate size for
the child and should be installed in
accordance with the manufacturer's
instructions. For safety reasons, we recommend
that the child restraint system be
used in the rear seats.
Since all passenger seat belts move
freely under normal conditions and
only lock under extreme or emer-
gency conditions (emergency locking
mode), you must manually change
these seat belts to the automatic
locking mode to secure a child
restraint.
WARNING - Child seat
installation
A child can be seriously injured or killed in a collision
if the child restraint is not
properly anchored to the vehi-
cle and the child is not prop-
erly restrained in the child
restraint.
Before installing the child
restraint system, read the
instructions supplied by the
child restraint system manu-
facturer.
If the seat belt does not oper- ate as described in this sec-
tion, have the system checked
immediately by your author-
ized HYUNDAI dealer.
Failure to observe this manu- al's instructions regarding
child restraint systems and
the instructions provided with
the child restraint system
could increase the chance
and/or severity of injury in an
accident.
(Continued)
WARNING
Never place a rear-facing child
restraint in the front passenger
seat, because of the danger that
an inflating passenger-side air
bag could impact the rear-fac-
ing child restraint and kill the
child.
CRS09
OMD030019
Forward-facing child restraint system
Rearward-facing child restraint system
Page 52 of 493
333
Safety features of your vehicle
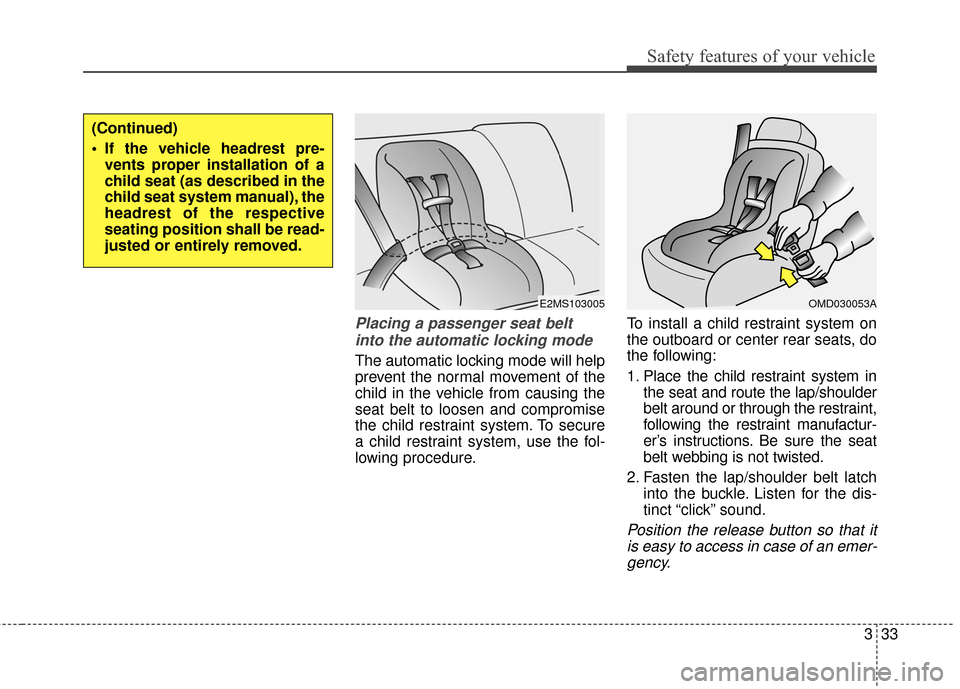
Placing a passenger seat beltinto the automatic locking mode
The automatic locking mode will help
prevent the normal movement of the
child in the vehicle from causing the
seat belt to loosen and compromise
the child restraint system. To secure
a child restraint system, use the fol-
lowing procedure. To install a child restraint system on
the outboard or center rear seats, do
the following:
1. Place the child restraint system in
the seat and route the lap/shoulder
belt around or through the restraint,
following the restraint manufactur-
er’s instructions. Be sure the seat
belt webbing is not twisted.
2. Fasten the lap/shoulder belt latch into the buckle. Listen for the dis-
tinct “click” sound.
Position the release button so that itis easy to access in case of an emer-gency.
(Continued)
If the vehicle headrest pre- vents proper installation of a
child seat (as described in the
child seat system manual), the
headrest of the respective
seating position shall be read-
justed or entirely removed.
OMD030053AE2MS103005
Page 53 of 493
Safety features of your vehicle
34
3
If the vehicle headrest prevents prop-
er installation of a child seat (as
described in the child seat system
manual), the headrest of the respec-
tive seating position shall be read-
justed or entirely removed.
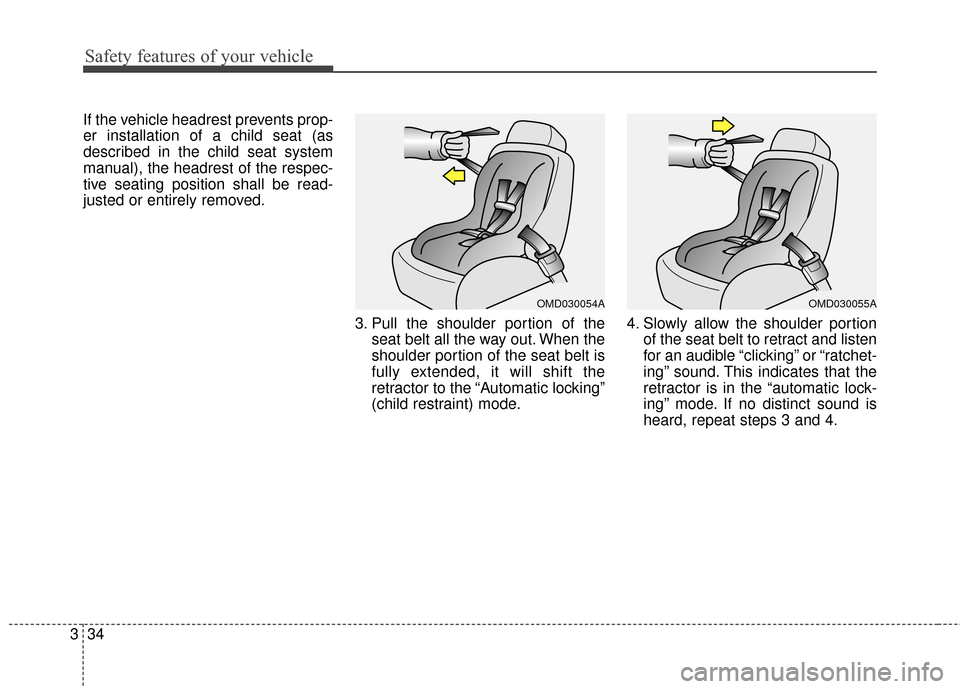
3. Pull the shoulder portion of theseat belt all the way out. When the
shoulder portion of the seat belt is
fully extended, it will shift the
retractor to the “Automatic locking”
(child restraint) mode. 4. Slowly allow the shoulder portion
of the seat belt to retract and listen
for an audible “clicking” or “ratchet-
ing” sound. This indicates that the
retractor is in the “automatic lock-
ing” mode. If no distinct sound is
heard, repeat steps 3 and 4.
OMD030054AOMD030055A
Page 54 of 493
335
Safety features of your vehicle
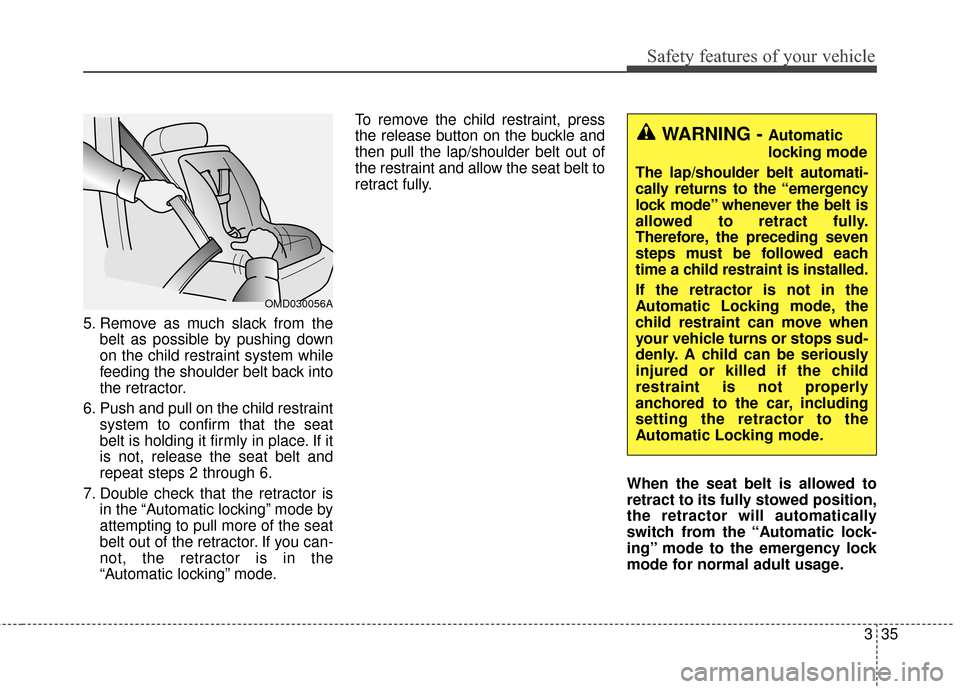
5. Remove as much slack from thebelt as possible by pushing down
on the child restraint system while
feeding the shoulder belt back into
the retractor.
6. Push and pull on the child restraint system to confirm that the seat
belt is holding it firmly in place. If it
is not, release the seat belt and
repeat steps 2 through 6.
7. Double check that the retractor is in the “Automatic locking” mode by
attempting to pull more of the seat
belt out of the retractor. If you can-
not, the retractor is in the
“Automatic locking” mode. To remove the child restraint, press
the release button on the buckle and
then pull the lap/shoulder belt out of
the restraint and allow the seat belt to
retract fully.
When the seat belt is allowed to
retract to its fully stowed position,
the retractor will automatically
switch from the “Automatic lock-
ing” mode to the emergency lock
mode for normal adult usage.
OMD030056A
WARNING - Automatic
locking mode
The lap/shoulder belt automati-
cally returns to the “emergency
lock mode” whenever the belt is
allowed to retract fully.
Therefore, the preceding seven
steps must be followed each
time a child restraint is installed.
If the retractor is not in the
Automatic Locking mode, the
child restraint can move when
your vehicle turns or stops sud-
denly. A child can be seriously
injured or killed if the child
restraint is not properly
anchored to the car, including
setting the retractor to the
Automatic Locking mode.
Page 55 of 493
Safety features of your vehicle
36
3
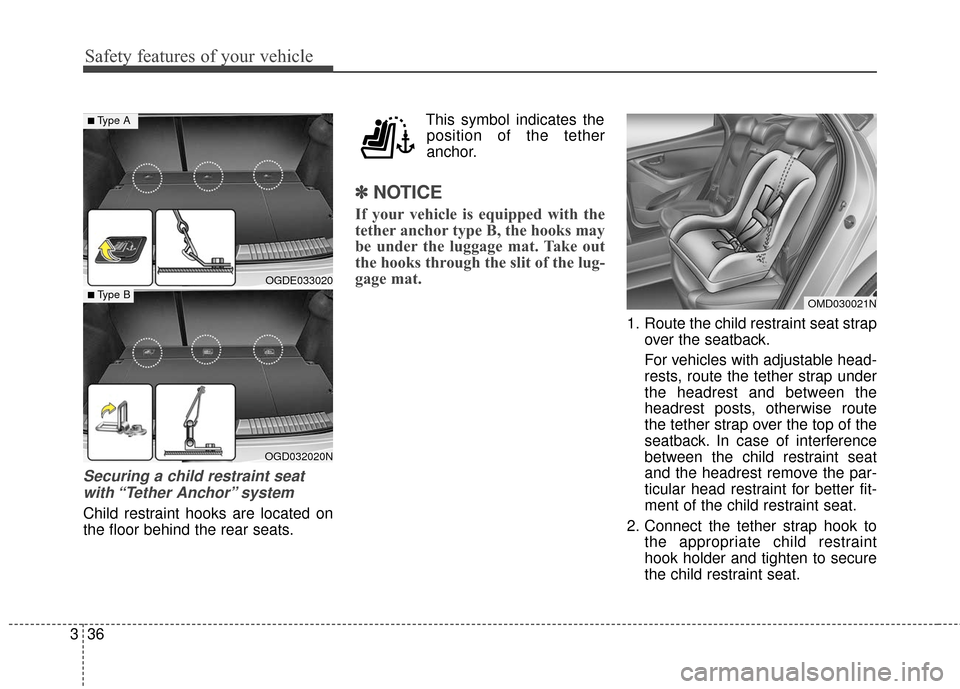
Securing a child restraint seat
with “Tether Anchor” system
Child restraint hooks are located on
the floor behind the rear seats. This symbol indicates the
position of the tether
anchor.
✽ ✽ NOTICE
If your vehicle is equipped with the
tether anchor type B, the hooks may
be under the luggage mat. Take out
the hooks through the slit of the lug-
gage mat.
1. Route the child restraint seat strap
over the seatback.
For vehicles with adjustable head-
rests, route the tether strap under
the headrest and between the
headrest posts, otherwise route
the tether strap over the top of the
seatback. In case of interference
between the child restraint seat
and the headrest remove the par-
ticular head restraint for better fit-
ment of the child restraint seat.
2. Connect the tether strap hook to the appropriate child restraint
hook holder and tighten to secure
the child restraint seat.
OGDE033020
OGD032020N
■Type A
■ Type BOMD030021N
Page 56 of 493
337
Safety features of your vehicle
WARNING - Tether strap
Never mount more than one
child restraint to a single tether
anchor or to a single lower
anchorage point. The increased
load caused by multiple seats
may cause the tethers or
anchorage points to break,
causing serious injury or death.
WARNING
A child can be seriously injured
or killed in a collision if the
child restraint is not properly
anchored to the car and the
child is not properly restrained
in the child restraint. Always fol-
low the child seat manufactur-
er’s instructions for installation
and use.
WARNING
When using the vehicle's "Tether Anchor" system to
install a child restraint system
in the rear seat, all unused
vehicle rear seat belt metal
latch plates or tabs must be
latched securely in their seat
belt buckles and the seat belt
webbing must be retracted
behind the child restraint to
prevent the child from reaching
and taking hold of unretracted
seat belts. Unlatched metal
latch plates or tabs may allow
the child to reach the unretract-
ed seat belts which may result
in strangulation and a serious
injury or death to the child in
the child restraint.
Do not place anything around the lower anchors. Also make
sure that the seat belt is not
caught in the lower anchors.
WARNING - Child restraint
check
Check that the child restraint
system is secure by pushing
and pulling it in different direc-
tions. Incorrectly fitted child
restraints may swing, twist, tip
or separate causing death or
serious injury.
Page 57 of 493
Safety features of your vehicle
38
3
Securing a child restraint seat
with child seat lower anchor sys-tem
Some child seat manufacturers
make child restraint seats that are
labeled as LATCH or LATCH-com-
patible child restraint seats. LATCH
stands for "Lower Anchors and
Tethers for Children". These seats
include two rigid or webbing mount-
ed attachments that connect to two
LATCH anchors at specific seating
positions in your vehicle. This type of
child restraint seat eliminates the
need to use seat belts to attach the
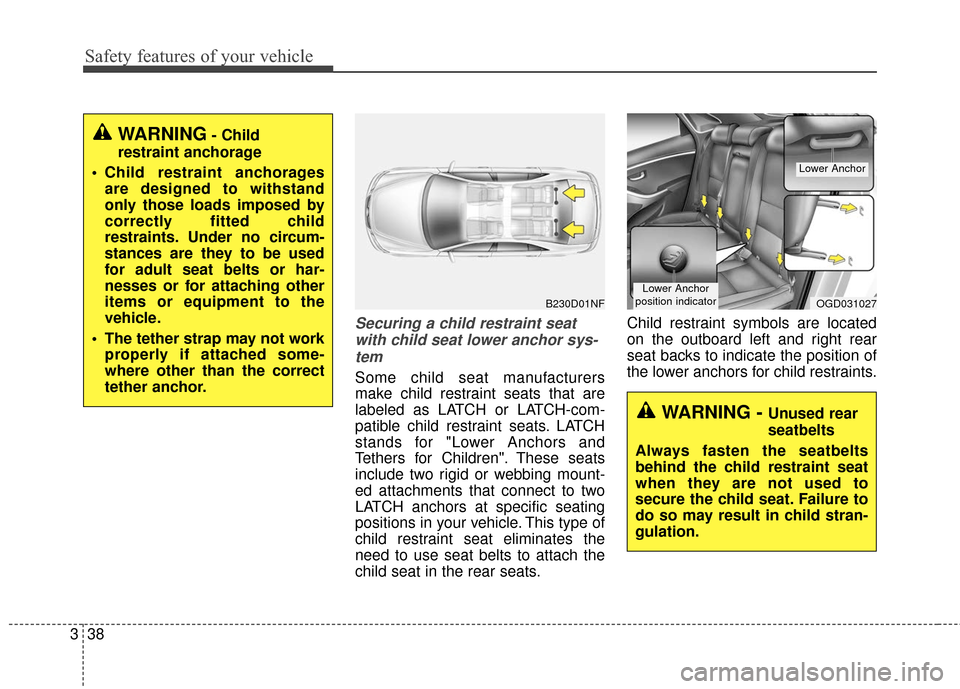
child seat in the rear seats. Child restraint symbols are located
on the outboard left and right rear
seat backs to indicate the position of
the lower anchors for child restraints.
B230D01NFOGD031027
Lower Anchor
position indicator
Lower Anchor
WARNING- Child
restraint anchorage
Child restraint anchorages are designed to withstand
only those loads imposed by
correctly fitted child
restraints. Under no circum-
stances are they to be used
for adult seat belts or har-
nesses or for attaching other
items or equipment to the
vehicle.
The tether strap may not work properly if attached some-
where other than the correct
tether anchor.
WARNING - Unused rear
seatbelts
Always fasten the seatbelts
behind the child restraint seat
when they are not used to
secure the child seat. Failure to
do so may result in child stran-
gulation.
Page 58 of 493
339
Safety features of your vehicle
LATCH anchors have been provided
in your vehicle. The LATCH anchors
are located in the left and right out-
board rear seating positions. Their
locations are shown in the illustration.
There is no LATCH anchor provided
for the center rear seating position.
The LATCH anchors are located
between the seatback and the seat
cushion of the rear seat left and right
outboard seating positions.
Follow the child seat manufacturer’s
instructions to properly install child
restraint seats with LATCH or
LATCH-compatible attachments.
Once you have installed the LATCH
child restraint, assure that the seat is
properly attached to the LATCH and
tether anchors.Also, test the child restraint seat
before you place the child in it. Tilt
the seat from side to side. Also try to
tug the seat forward. Check to see if
the anchors hold the seat in place.
✽ ✽
NOTICE
The recommended weight for the
LATCH system is under 65lb (30 kg).
How to calculate the child restraint
weight :
Child restraint weight =
65lb (30 kg) - Child weightWARNING
If the child restraint is not
anchored properly, the risk of a
child being seriously injured or
killed in a collision greatly
increases.
WARNING - LATCH lower
anchors
LATCH lower anchors are only
to be used with the left and right
rear outboard seating positions.
Never attempt to attach a LATCH
equipped seat in the center
seating position. You may dam-
age the anchors or the anchors
may fail and break in a collision.
CAUTION
Do not allow the rear seat belt webbing to get scratched orpinched by the child-seat latchand LATCH anchor during theinstallation.
WARNING
Do not place anything around
the lower anchors. Also make
sure that the seat belt is not
caught in the lower anchors.
Page 59 of 493
Safety features of your vehicle
40
3
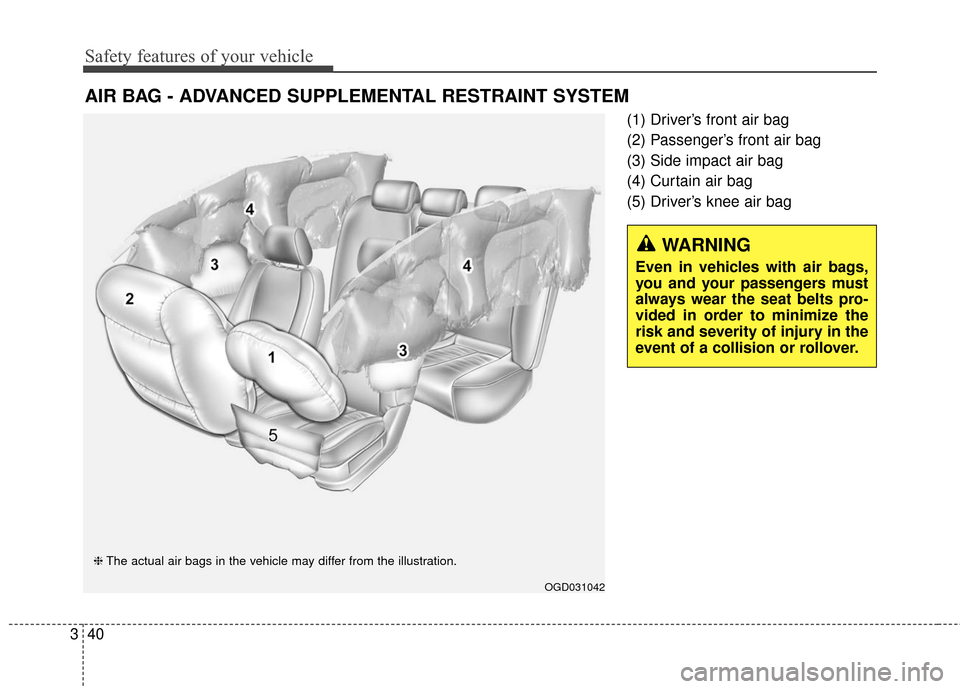
(1) Driver’s front air bag
(2) Passenger’s front air bag
(3) Side impact air bag
(4) Curtain air bag
(5) Driver’s knee air bag
AIR BAG - ADVANCED SUPPLEMENTAL RESTRAINT SYSTEM
WARNING
Even in vehicles with air bags,
you and your passengers must
always wear the seat belts pro-
vided in order to minimize the
risk and severity of injury in the
event of a collision or rollover.
OGD031042
❈ The actual air bags in the vehicle may differ from the illustration.
Page 60 of 493
341
Safety features of your vehicle
How does the air bag system
operate
Air bags are activated (able toinflate if necessary) only when the
ignition switch is turned to the ON
or START position.
Air bags inflate instantly in the event of serious frontal or side col-
lision in order to help protect the
occupants from serious physical
injury.
There is no single speed at which the air bags will inflate.
Generally, air bags are designed to
inflate by the severity of a collision
and its direction. These two factors
determine whether the sensors
send out an electronic deployment/
inflation signal.
Air bag deployment depends on a number of factors including vehicle
speed, angles of impact and the
density and stiffness of the vehi-
cles or objects which your vehicle
hits in the collision. Though, factors
are not limited to those mentioned
above. The front air bags will completely
inflate and deflate in an instant.
It is virtually impossible for you to
see the air bags inflate during an
accident.
It is much more likely that you will
simply see the deflated air bags
hanging out of their storage com-
partments after the collision.
In order to help provide protection in a severe collision, the air bags
must inflate rapidly. The speed of
air bag inflation is a consequence
of the extremely short time in
which a collision occurs and the
need to get the air bag between
the occupant and the vehicle struc-
tures before the occupant impacts
those structures. This speed of
inflation reduces the risk of serious
or life-threatening injuries in a
severe collision and is thus a nec-
essary part of air bag design. However, air bag inflation can also
cause injuries which normally can
include facial abrasions, bruises
and broken bones because the
inflation speed also causes the air
bags to expand with a great deal of
force.
There are even circumstances under which contact with the air
bag can cause fatal injuries, espe-
cially if the occupant is positioned
excessively close to the air bag.