parking brake HYUNDAI ELANTRA HYBRID 2022 Workshop Manual
[x] Cancel search | Manufacturer: HYUNDAI, Model Year: 2022, Model line: ELANTRA HYBRID, Model: HYUNDAI ELANTRA HYBRID 2022Pages: 529, PDF Size: 38.79 MB
Page 427 of 529

Emergency Situations
8-6
NOTICE
External power source using 12V battery
The use of external power accessories
may reduce performance and function
of the vehicle. Especially, the use of
dash cameras may shut off the power of
the vehicle prior to the dash camera’s
automatic shut-down.
If the power of the vehicle is shut off,
start the vehicle as explained. (refer to
“Using the 12V Battery Reset Switch”)
Jump Starting
In the event vehicle still does not have a
functional 12V battery (check if interior
lights will not turn on) then you can try
a jump start to the engine compartment
jumper terminals using a 12V booster
pack or jumper cables from another
vehicle’s 12V battery according to the
following instructions.
CAUTION
Jump starting can be dangerous if
done incorrectly. Follow the jump
starting procedure in this section to
avoid serious injury or damage to
your vehicle. If in doubt about how to
properly jump start your vehicle, have a
service technician or towing service do
it for you.
1. Position the vehicles close enough that the jumper cables will reach, but
do not allow the vehicles to touch.
Avoid fans or any moving parts in the
engine compartment at all times, even
when the vehicles are turned off.
2. Turn off all electrical devices such as radios, lights, air conditioning, etc.
Put the vehicles in P (Park) and set the
parking brake. Turn both vehicles OFF.
OCN7H070001
3. Connect the jumper cables in the exact sequence shown in the
illustration. First connect one jumper
cable to the red, positive (+) jumper
terminal of your vehicle (1).
4. Connect the other end of the jumper
cable to the red, positive (+) battery/
jumper terminal of the assisting
vehicle (2).
5. Connect the second jumper cable to the black, negative (-) battery/chassis
ground of the assisting vehicle (3).
6. Connect the other end of the second jumper cable to the black, negative (-)
chassis ground of your vehicle (4).
Do not allow the jumper cables to
contact anything except the correct
battery or jumper terminals or the
correct ground. Do not lean over the
battery when making connections.
Page 429 of 529

Emergency Situations
8-8
If your temperature gauge indicates
overheating, you experience a loss of
power, or hear loud pinging or knocking,
the engine may be overheating. If this
happens, you should:
1. Pull off the road and stop as soon as it
is safe to do so.
2. Shift the gear to P (Park) and set the parking brake
3. Turn off the air conditioner.
4. When the coolant or hot steams gush
out of the reservoir, stop the engine
and call an authorized HYUNDAI
dealer for assistance. If the coolant
does not flow out, leave the engine
compartment opened, while running
the engine. Check the coolant
temperature gauge on the instrument
cluster and turn off the engine to
make sure the coolant temperature is
sufficiently cooled down. 5. Cool down the engine sufficiently
and check the coolant level. When it
is insufficient, check its connection
with the radiator, the heater hose,
and the water pump for any leakage.
When there is no leakage, add the
coolant. However, if the problems
persists, such as the coolant leakages,
the cooling-fan malfunction or the
water pump drive belt damages,
immediately stop the engine, and
have your vehicle checked by an
authorized HYUNDAI dealer.
• You should mix antifreeze and water in
a proper ratio to make coolant. If the
antifreeze ratio is too high or low, it
may cause overheating due to the lack
of cooling function.
(Refer to the Mix Ratio in “Checking
the coolant level” in chapter 9.)
• If overheating happens repeatedly,
have your vehicle to be checked by an
authorized HYUNDAI dealer.
WARNING
While the engine is running,
keep hands, clothing and tools
away from the moving parts
such as the cooling fan and
drive belt to prevent serious
injury.
iF tHe engine overHeats
Page 442 of 529

08
8-21
1. Model Name
2. Maximum allowable load
3. When using the jack, set your parking
brake.
4. When using the jack, stop the engine.
5. Do not get under a vehicle that is supported by a jack.
6. The designated locations under the frame
7. When supporting the vehicle, the base
plate of jack must be vertical under
the lifting point. 8. Shift into Reverse gear on vehicles
with manual transmission or move the
shift button to the P (Park) position on
vehicles with automatic transmission.
9. The jack should be used on firm level
ground.
10. Jack manufacture
11. Production date
12. Representative company and address
Jack label
„„Example
OHYK065011
The actual Jack label in the vehicle may differ from the illustration.
For more detailed specifications, refer to the label attached to the jack.
Page 444 of 529

08
8-23
WARNING
If your vehicle is equipped with a
rollover sensor, place the ignition
switch in the LOCK/OFF or ACC position
when the vehicle is being towed. The side impact and curtain air bag
may deploy if the sensor detects the
situation as a rollover.
OCN7H080004
When towing your vehicle in an
emergency without wheel dollies:
1. Place the ignition switch in the ACC position.
2. Place the shift button in N (Neutral).
3. Release the parking brake.
CAUTION
Failure to place the shift button in N
(Neutral) when being towed with the
front wheels on the ground can cause
internal damage to the transmission.
Emergency Towing
If towing is necessary, have it done by
an authorized HYUNDAI dealer or a
commercial tow truck service.
Page 446 of 529

08
8-25
CAUTION
The driver must be in the vehicle for
steering and braking operations when
the vehicle is being towed. Passengers
other than the driver must not be in the
vehicle.
Always follow these emergency towing
precautions: • Place the ignition switch in the ACC
position so the steering wheel is not
locked.
• Place the shift button in N (Neutral).
• Release the parking brake.
• Depress the brake pedal with more
force than normal since you will have
reduced braking performance.
• More steering effort will be required
because the power steering system will be disabled.
• Use a vehicle heavier than your own to
tow your vehicle.
• The drivers of both vehicles should
communicate with each other
frequently.
• Before emergency towing, check that
the hook is not broken or damaged.
• Fasten the towing cable or chain
securely to the hook.
• Do not jerk the hook. Apply steady
and even force.
5m
OCN7H080006
• Use a towing cable or chain less than
5 m (16 feet) long. Attach a white or
red cloth (about 30 cm (12 inches)
wide) in the middle of the cable or
chain for easy visibility.
• Drive carefully so the towing cable or
chain remains tight during towing.
• Before towing, check the Dual clutch
transmission for fluid leaks under
your vehicle. If the Dual clutch
transmission fluid is leaking, flatbed
equipment or a towing dolly must be used.
NOTICE
Accelerate or decelerate the vehicle
in a slow and gradual manner while
maintaining tension on the tow rope
or chain to start or drive the vehicle,
otherwise tow hooks and the vehicle
may be damaged.
Page 459 of 529
Maintenance
9-10
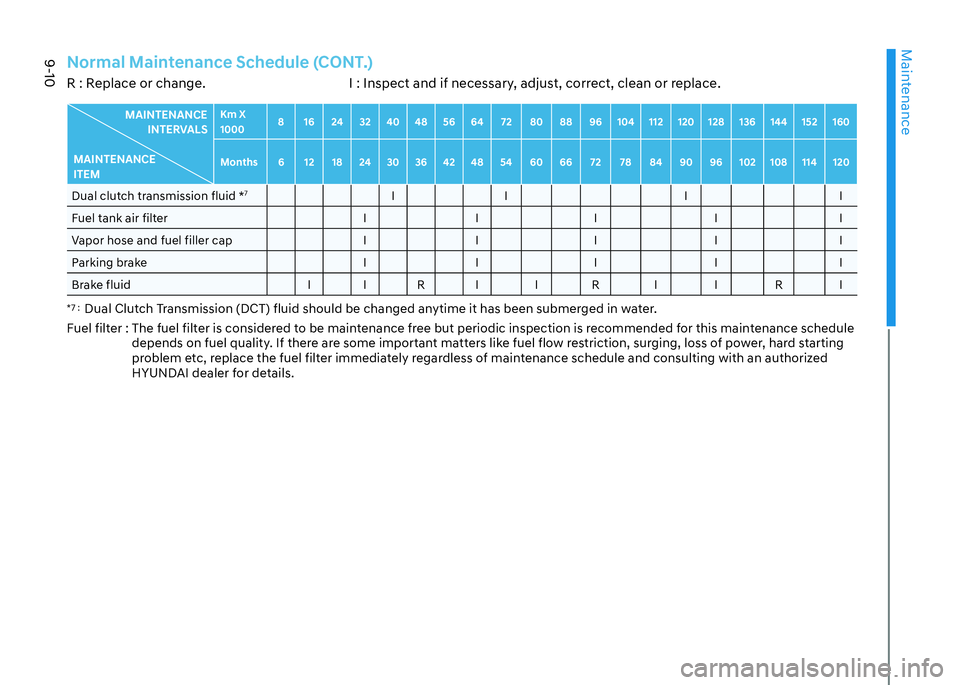
Normal Maintenance Schedule (CONT.)R : Replace or change. I : Inspect and if necessary, adjust, correct, clean or replace.
MAINTENANCE INTERVALS
MAINTENANCE ITEM Km X 1000
8 16 24 32 40 48 56 64 72 80 88 96 104 112 120 128 136 144 152 160
Months 6 12 18 24 30 36 42 48 54 60 66 72 78 84 90 96 102 108 114 120
Dual clutch transmission fluid * 7
II I I
Fuel tank air filter I I I I I
Vapor hose and fuel filler cap I I I I I
Parking brake I I I I I
Brake fluid I I R I I R I I R I
*7 : Dual Clutch Transmission (DCT) fluid should be changed anytime it has been submerged in water.
Fuel filter : The fuel filter is considered to be maintenance free but periodic inspection is recommended for this maintenance schedule
depends on fuel quality. If there are some important matters like fuel flow restriction, surging, loss of power, hard starting
problem etc, replace the fuel filter immediately regardless of maintenance schedule and consulting with an authorized
HYUNDAI dealer for details.
Page 462 of 529
09
9-13
Checking the Engine Oil Level
Engine oil is used for lubricating,
cooling, and operating various hydraulic
components in the engine. Engine oil
consumption while driving is normal,
and it is necessary to check and refill the
engine oil regularly. Also, check and refill
the oil level within the recommended
maintenance schedule to prevent
deterioration of oil performance.
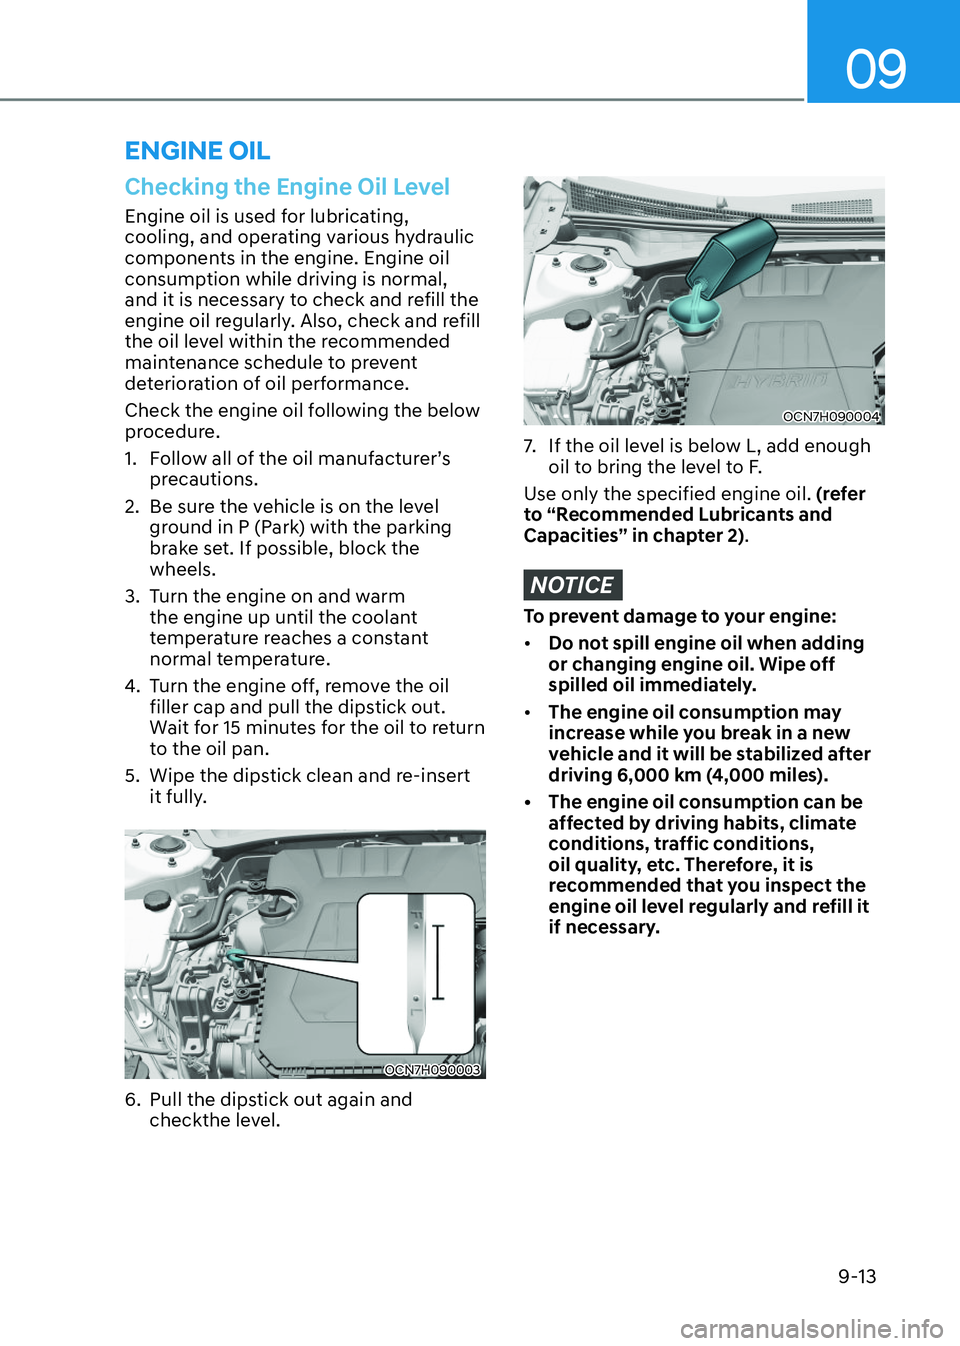
Check the engine oil following the below
procedure.
1. Follow all of the oil manufacturer’s precautions.
2. Be sure the vehicle is on the level ground in P (Park) with the parking
brake set. If possible, block the wheels.
3. Turn the engine on and warm the engine up until the coolant
temperature reaches a constant
normal temperature.
4. Turn the engine off, remove the oil filler cap and pull the dipstick out.
Wait for 15 minutes for the oil to return
to the oil pan.
5. Wipe the dipstick clean and re-insert it fully.
OCN7H090003OCN7H090003
6. Pull the dipstick out again and checkthe level.
OCN7H090004OCN7H090004
7. If the oil level is below L, add enough oil to bring the level to F.
Use only the specified engine oil. (refer
to “Recommended Lubricants and
Capacities” in chapter 2) .
NOTICE
To prevent damage to your engine:
Page 520 of 529

I
I-3
Brake System ....................................................................................................... 6-24
Auto Hold ......................................................................................................... 6-29
Disc Brakes Wear Indicator .............................................................................. 6-24
Electronic Parking Brake (EPB) ...................................................................... 6-25
Power Brakes .................................................................................................... 6-24
Brake/Clutch Fluid .............................................................................................. 9-20
Checking the Brake/Clutch Fluid Level ...........................................................9-20
Bulb Wattage .......................................................................................................... 2-8
CABIN Air Filter ................................................................................................. 9-24
Filter Inspection ................................................................................................ 9-24
Filter Replacement ........................................................................................... 9-24
C Child Restraint System (CRS) ............................................................................. 3-28
Children Always in the Rear ............................................................................ 3-28
Installing a Child Restraint System (CRS) .......................................................3-30
Selecting a Child Restraint System (CRS) .......................................................3-29
Climate Control Additional Features ................................................................... 5-85
Auto Comfort Control (for driver’s seat) ........................................................5-85
Automatic Ventilation ...................................................................................... 5-85
Sunroof Inside Air Recirculation ...................................................................... 5-85
Coasting Guide .................................................................................................... 6-23
Cruise Control (CC) ............................................................................................ 7-61
DDeclaration of Conormity .................................................................................. 7-124
Dimensions ............................................................................................................ 2-7
Door Locks .......................................................................................................... 5-16
Automatic Door Lock and Unlock Features ....................................................5-20
Child-Protector Rear Door Locks .................................................................... 5-20
Operating Door Locks from Inside the Vehicle................................................ 5-17
Operating Door Locks from Outside the Vehicle .............................................5-16
Drive Mode Integrated Control System ............................................................... 6-38
Drive Mode ...................................................................................................... 6-38
Smart shift on trip computer ............................................................................. 6-41
Driver Attention Warning (DAW) ...................................................................... 7-55
Detecting sensor ............................................................................................... 7-55
Limitations of Driver Attention Warning ........................................................7-58
Driver position memory system........................................................................... 5-23