parking brake HYUNDAI ELANTRA SEL 2021 Workshop Manual
[x] Cancel search | Manufacturer: HYUNDAI, Model Year: 2021, Model line: ELANTRA SEL, Model: HYUNDAI ELANTRA SEL 2021Pages: 570, PDF Size: 52.21 MB
Page 462 of 570
07
7-149
Reverse Parking Collision-Avoidance
Assist may unnecessarily warn the driver
or assist with braking even if there are
no pedestrians or objects under the
following circumstances:
• Any non-factory equipment or
accessory is installed
• Your vehicle is unstable due to an
accident or other causes
• Bumper height or rear ultrasonic
sensor installation has been modified
• Your vehicle height is low or high
due to heavy loads, abnormal tire
pressure, etc.
• Rear view camera or the rear
ultrasonic sensor(s) is stained with
foreign material, such as snow, dirt,
etc.
• The pattern on the road is mistaken
for a pedestrian
• There is shadow or light reflecting on
the ground
• Pedestrians or objects are around the
path of the vehicle
• Objects generating excessive
noise, such as vehicle horns, loud
motorcycle engines or truck air
brakes, are near your vehicle
• Your vehicle is backing towards a
narrow passage or parking space
• Your vehicle is backing towards an
uneven road surface, such as an
unpaved road, gravel, bump, gradient,
etc.
• A trailer or carrier is installed on the
rear of your vehicle
• An ultrasonic sensor with similar
frequency is near your vehicle
Page 466 of 570
08
8-3
If you Have a Flat Tire While
Driving
If a tire goes flat while you are driving:
• Take your foot off the accelerator
pedal and let the vehicle slow down
while driving straight ahead. Do not
apply the brakes immediately or
attempt to pull off the road as this
may cause loss of vehicle control
resulting in an accident. When the
vehicle has slowed to such a speed
that it is safe to do so, brake carefully
and pull off the road. Drive off the
road as far as possible and park on
firm, level ground. If you are on a
divided highway, do not park in the
median area between the two traffic
lanes.
• When the vehicle is stopped, press the
hazard warning flasher button, move
the shift button into P (Park), and
apply the parking brake, and place
the ignition switch in the LOCK/OFF
position.
• Have all passengers get out of the
vehicle. Be sure they all get out on the
side of the vehicle that is away from
traffic.
• When changing a flat tire, follow the
instructions provided later in this
chapter.
If the engIne WIll not
sta r
t
If the Engine Doesn’t Turn Over
or Turns Over Slowly
• Be sure the shift button is in N
(Neutral) or P (Park). The engine starts
only when the shift button is in N
(Neutral) or P (Park).
• Check the battery connections to be
sure they are clean and tight.
• Turn on the interior light. If the light
dims or goes out when you operate
the starter, the battery is drained.
Do not push or pull the vehicle to start it.
This could cause damage to your vehicle.
See instructions for “Jump Starting”
provided in this chapter.
CAUTION
Push or pull starting the vehicle may
cause the catalytic converter to
overload which can lead to damage to
the emission control system.
If the Engine Turns Over
Normally but Doesn’t Start
Check the fuel level and add fuel if
necessary.
If the engine still does not start, have
your vehicle checked by an authorized
HYUNDAI dealer.
Page 468 of 570
08
8-5
Jump starting procedure
1. Position the vehicles close enough
that the jumper cables will reach, but
do not allow the vehicles to touch.
2.
Av
oid fans or any moving parts in the
engine compartment at all times, even
when the vehicles are turned off.
3.
Turn o
ff all electrical devices such as
radios, lights, air conditioning, etc.
Put the vehicle in P (Park), and set the
parking brakes. Turn both vehicles
OFF.
OCN7070002
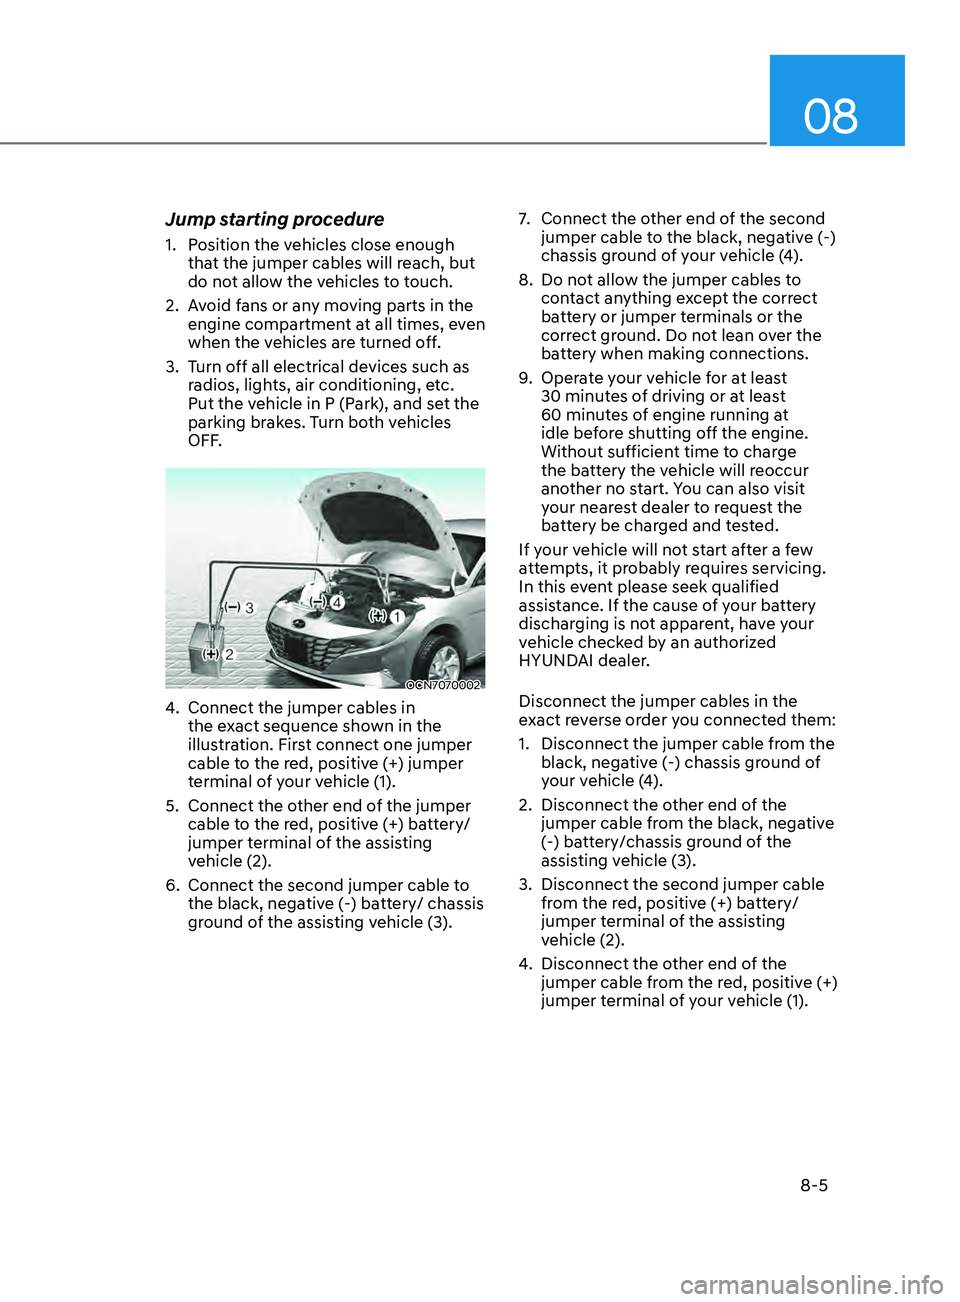
4. Connect the jumper cables in
the ex act sequence shown in the
illustration. First connect one jumper
cable to the red, positive (+) jumper
terminal of your vehicle (1).
5.
Connect the other end o
f the jumper
cable to the red, positive (+) battery/
jumper terminal of the assisting
vehicle (2).
6.
Connect the second jumper cable to
the black, nega
tive (-) battery/ chassis
ground of the assisting vehicle (3). 7.
Connect the other end o
f the second
jumper cable to the black, negative (-)
chassis ground of your vehicle (4).
8.
Do not allo
w the jumper cables to
contact anything except the correct
battery or jumper terminals or the
correct ground. Do not lean over the
battery when making connections.
9.
Opera
te your vehicle for at least
30 minutes of driving or at least
60 minutes of engine running at
idle before shutting off the engine.
Without sufficient time to charge
the battery the vehicle will reoccur
another no start. You can also visit
your nearest dealer to request the
battery be charged and tested.
If your vehicle will not start after a few
attempts, it probably requires servicing.
In this event please seek qualified
assistance. If the cause of your battery
discharging is not apparent, have your
vehicle checked by an authorized
HYUNDAI dealer.
Disconnect the jumper cables in the
exact reverse order you connected them:
1.
Disconnect the jumper cable from the
black, nega
tive (-) chassis ground of
your vehicle (4).
2.
Disconnect the other end o
f the
jumper cable from the black, negative
(-) battery/chassis ground of the
assisting vehicle (3).
3.
Disconnect the second jumper cable
from the r
ed, positive (+) battery/
jumper terminal of the assisting
vehicle (2).
4.
Disconnect the other end o
f the
jumper cable from the red, positive (+)
jumper terminal of your vehicle (1).
Page 469 of 570
Emergency Situations
8-6
If your temperature gauge indicates
overheating, you experience a loss of
power, or hear loud pinging or knocking,
the engine may be overheating. If this
happens, you should:
1.
Pull off the r
oad and stop as soon as it
is safe to do so.
2.
Put the vehicle in P (P
ark), and set the
parking brake. If the air conditioning is
ON, turn it OFF.
3.
If engine coolant is running out under
the v
ehicle or steam is coming out
from the hood, stop the engine. Do
not open the hood until the coolant
has stopped running or the steaming
has stopped. If there is no visible
loss of engine coolant and no steam,
leave the engine running and check
to be sure the engine cooling fan is
operating. If the fan is not running,
turn the engine off.
WARNING
While the engine is running,
keep hands, clothing and tools
away from the moving parts
such as the cooling fan and
drive belt to prevent serious
injury. 4.
Check to see if the w
ater pump drive
belt is missing.
(1)
If it is not missing, check t
o see that
it is tight.
(2)
If the drive belt seems t
o be
satisfactory, check for coolant leaking
from the radiator, hoses or under
the vehicle. (If the air conditioning
had been in use, it is normal for cold
water to be draining from it when you
stop.)
5.
If the wa
ter pump drive belt is
broken or engine coolant is leaking
out, stop the engine immediately
and we recommend that you call
an authorized HYUNDAI dealer for
assistance.
WARNING
NEVER remove the radiator
cap or the drain plug while
the engine and radiator are
hot. Hot coolant and steam
may blow out under pressure,
causing serious injury.
Turn the engine off and wait until the
engine cools down. Use extreme care
when removing the radiator cap. Wrap
a thick towel around it, and turn it
counterclockwise slowly to the first
stop. Step back while the pressure is
released from the cooling system. When
you are sure all the pressure has been
released, press down on the cap, using
a thick towel, and continue turning
counterclockwise to remove it.
If the engIne overheats
Page 482 of 570
08
8-19
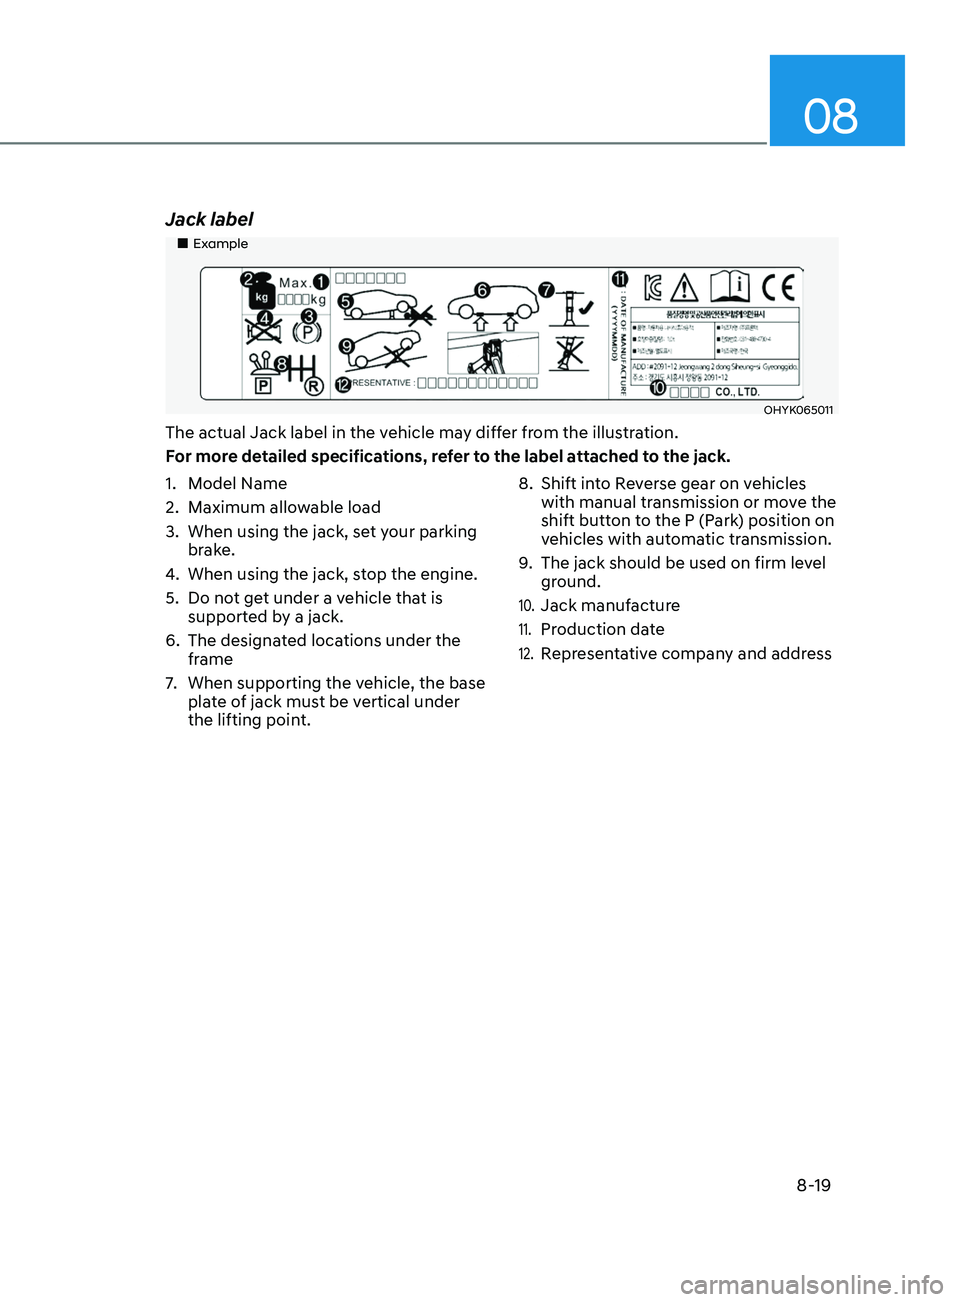
Jack label
„„Example
OHYK065011
The actual Jack label in the vehicle may differ from the illustration.
For more detailed specifications, refer to the label attached to the jack.
1.
Model Name
2.
Maximum allow
able load
3.
When using the jack, set y
our parking
brake.
4.
When using the jack, st
op the engine.
5.
Do not ge
t under a vehicle that is
supported by a jack.
6.
The designat
ed locations under the
frame
7.
When supporting the vehicle, the base
pla
te of jack must be vertical under
the lifting point. 8.
Shift int
o Reverse gear on vehicles
with manual transmission or move the
shift button to the P (Park) position on
vehicles with automatic transmission.
9.
The jack should be used on firm lev
el
ground.
10. Jack manufacture
11. Production date
12. Representative company and address
Page 485 of 570
Emergency Situations
8-22
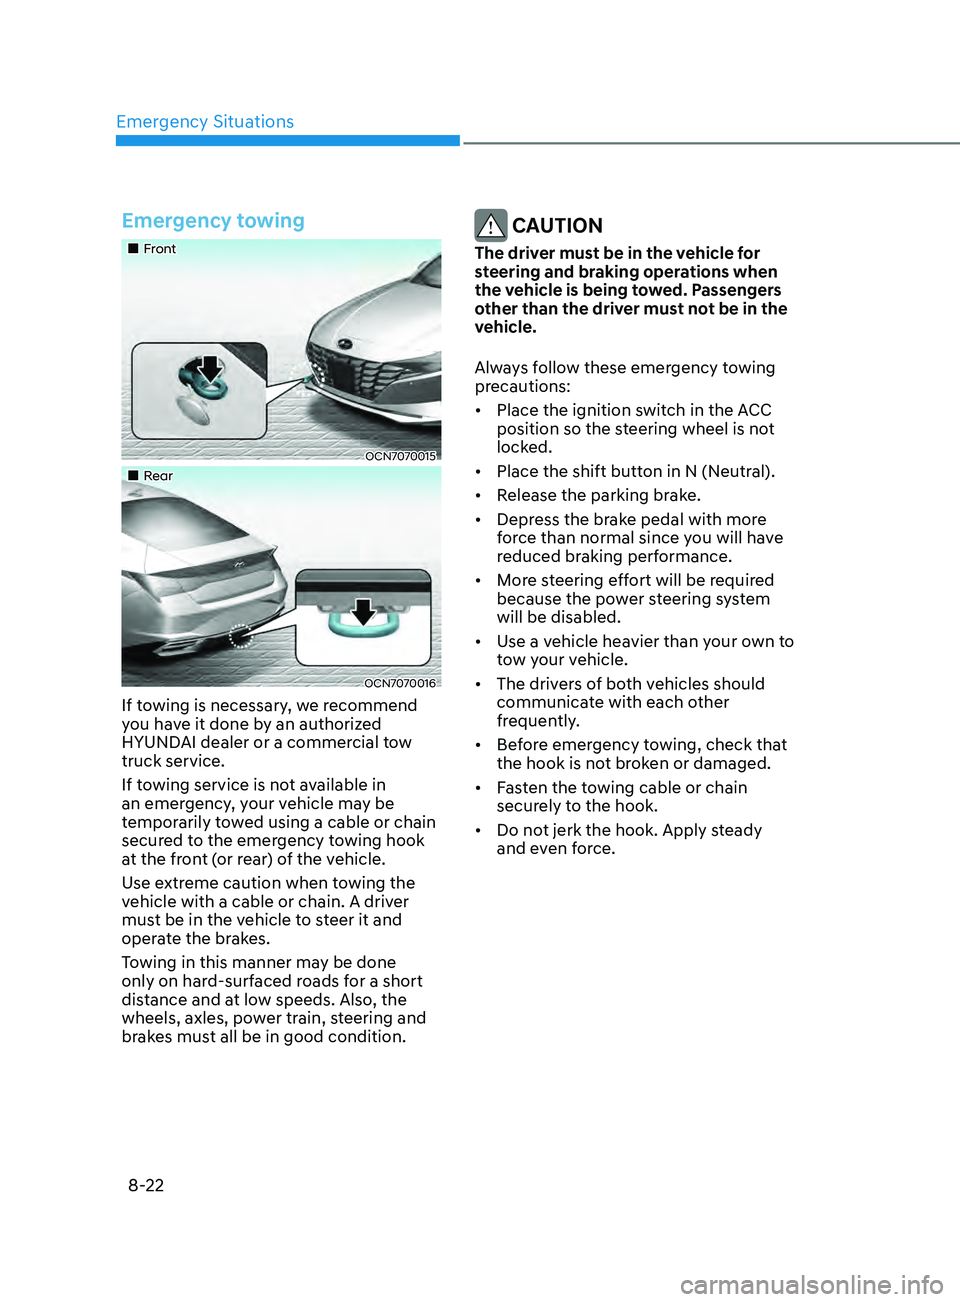
Emergency towing
„„Front
OCN7070015
„„Rear
OCN7070016
If towing is necessary, we recommend
you have it done by an authorized
HYUNDAI dealer or a commercial tow
truck service.
If towing service is not available in
an emergency, your vehicle may be
temporarily towed using a cable or chain
secured to the emergency towing hook
at the front (or rear) of the vehicle.
Use extreme caution when towing the
vehicle with a cable or chain. A driver
must be in the vehicle to steer it and
operate the brakes.
Towing in this manner may be done
only on hard-surfaced roads for a short
distance and at low speeds. Also, the
wheels, axles, power train, steering and
brakes must all be in good condition.
CAUTION
The driver must be in the vehicle for
steering and braking operations when
the vehicle is being towed. Passengers
other than the driver must not be in the
vehicle.
Always follow these emergency towing
precautions:
• Place the ignition switch in the ACC
position so the steering wheel is not
locked.
• Place the shift button in N (Neutral).
• Release the parking brake.
• Depress the brake pedal with more
force than normal since you will have
reduced braking performance.
• More steering effort will be required
because the power steering system
will be disabled.
• Use a vehicle heavier than your own to
tow your vehicle.
• The drivers of both vehicles should
communicate with each other
frequently.
• Before emergency towing, check that
the hook is not broken or damaged.
• Fasten the towing cable or chain
securely to the hook.
• Do not jerk the hook. Apply steady
and even force.
Page 487 of 570
Engine Compartment ........................................................................\
............9-3
Main tenance Services
........................................................................\
........... 9-4
Owner’s Responsibility ........................................................................\
.................... 9-4
Owner Maint enance Precautions ........................................................................\
.... 9-4
Owner Maintenance ........................................................................\
.............. 9-5Owner Maintenance Schedule ........................................................................\
........9-5
Scheduled Maintenance Services ................................................................9 -7Normal Maintenance Schedule (Smartstream G2.0 Atkinson) .............................9-8
Maint enance Under Severe Usage Conditions ..................................................... 9-
11
Explanation of Scheduled Maintenance Items ...........................................9-13
E ngine Oil
........................................................................\
.............................. 9-
15
Checking the Engine Oil Level ........................................................................\
........9-15
Checking the E ngine Oil and Filter ........................................................................\
9-
15
Engine Coolant ........................................................................\
.....................9-16Checking the Engine Coolant Level .......................................................................9- 16
Changing Engine Coolant ........................................................................\
............... 9-
17
Brake fluid ........................................................................\
............................9-18Checking the brake fluid level ........................................................................\
........9-18
Washer Fluid ........................................................................\
......................... 9-19Checking the Washer Fluid Level ........................................................................\
...9-19
Parking brake ........................................................................\
....................... 9-19Checking the parking brake ........................................................................\
...........9-19
Air cleaner ........................................................................\
............................ 9-20Filter replacement ........................................................................\
..........................9-20
CABIN Air Filter ........................................................................\
.....................9-21
Filt er Inspection
........................................................................\
.................... 9-
21
Filter replacement ........................................................................\
...........................9-21
Wiper Blades ........................................................................\
........................9-22Blade Inspection ........................................................................\
............................ 9-22
Blade R eplacement ........................................................................\
........................ 9-
22
Battery ........................................................................\
..................................9-2 4
For Best Battery Service ........................................................................\
................9-25
Ba ttery capacity label ........................................................................\
.................... 9-
25
Battery Recharging
........................................................................\
........................ 9-
26
Reset items
........................................................................\
..................................... 9-
26
Maintenance
9. Maintenance
9
Page 492 of 570

Maintenance
9-6
While operating your vehicle:
• Note any changes in the sound of the
exhaust or any smell of exhaust fumes
in the vehicle.
• Check for vibrations in the steering
wheel. Notice if there is any increased
steering effort or looseness in the
steering wheel, or change in its
straight-ahead position.
• Notice if your vehicle constantly turns
slightly or “pulls” to one side when
traveling on smooth, level road.
• When stopping, listen and check for
unusual sounds, pulling to one side,
increased brake pedal travel or “hard-
to-push” brake pedal.
• If any slipping or changes in the
operation of your transmission occurs,
check the transmission fluid level.
• Check the intelligent variable
transmission P (Park) function.
• Check the parking brake.
• Check for fluid leaks under your
vehicle (water dripping from the air
conditioning system during or after
use is normal).
At least monthly:
• Check coolant level in the engine
coolant reservoir.
• Check the operation of all exterior
lights, including the brake lights, turn
signals and hazard warning flashers.
• Check the inflation pressures of all
tires including the spare for tires that
are worn, show uneven wear, or are
damaged.
• Check for loose wheel lug nuts.
At least twice a year:
(i.e., every Spring and Autumn)
• Check radiator, heater and air
conditioning hoses for leaks or
damage.
• Check windshield washer spray and
wiper operation. Clean wiper blades
with a clean cloth dampened with
washer a fluid.
• Check headlamp alignment.
• Check muffler, exhaust pipes, shields
and clamps.
• Check the seat belts for wear and
function.
At least once a year:
• Clean body and door drain holes.
• Lubricate door hinges and hood
hinges.
• Lubricate door and hood locks and
latches.
• Lubricate door rubber weather strips.
• Lubricate door checker.
• Check the air conditioning system.
• Inspect and lubricate intelligent
variable transmission linkage and
controls.
• Clean the battery and terminals.
• Check the brake fluid level.
Page 496 of 570

Maintenance
9-10
Normal Maintenance Schedule (Smartstream G2.0 Atkinson) (CONT)
MAINTENANCE INTERVALS
MAINTENANCE
ITEM Months 12 24 36 48 60 72 84 96 108 120 132 144 156
Miles×1,000 8 16 24 32 40 48 56 64 72 80 88 96 104 Km×1,000 13 26 39 52 65 78 91 104 117 130 143 156 169
Vapor hose, fuel filler cap and fuel tank I I I I I I
Fuel tank air filter *
1
I I I I I I
Fuel filter *
1
I I I I I I
Fuel lines, hoses and connections I I I I I I
Parking brake I I I I I I
Brake fluid Inspect every 8,000 miles (13,000 km) or 12 months,
Replace every 48,000 miles (78,000 km) or 48 months
R: Replace or change.
I : Inspect and if necessary, adjust, correct, clean or replace.*1 : Fuel filter & Fuel tank air filter are considered to be maintenance free but periodic inspection is recommended for this
maintenance schedule depends on fuel quality. If there are some important safety matters like fuel flow restriction, surging,
loss of power, hard starting problem, etc. replace the fuel filter immediately regardless of maintenance schedule and consult an
authorized HYUNDAI dealer for details.
Page 497 of 570
09
9-11
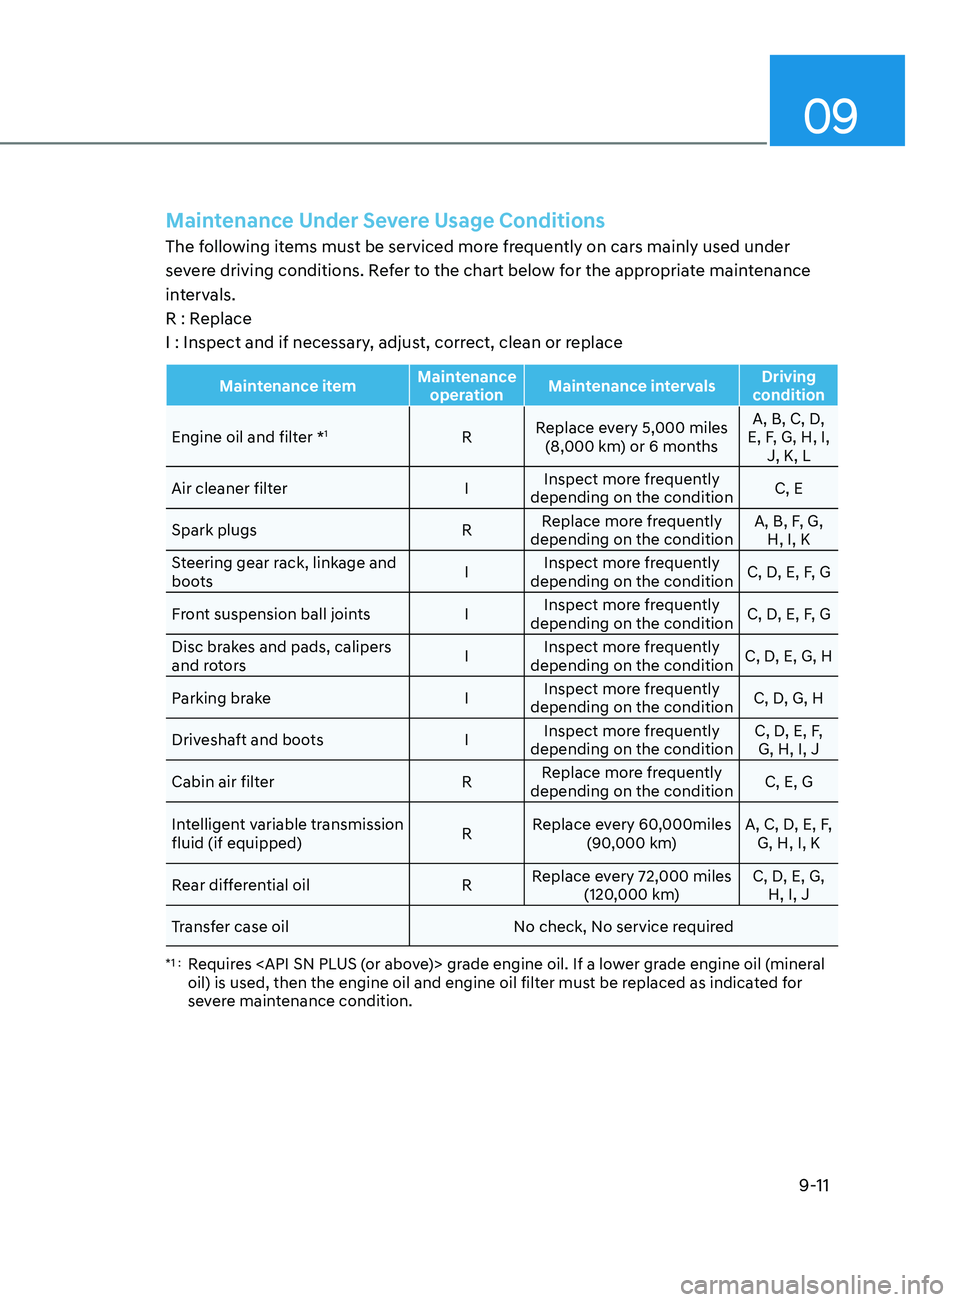
Maintenance Under Severe Usage Conditions
The following items must be serviced more frequently on cars mainly used under
severe driving conditions. Refer to the chart below for the appropriate maintenance
intervals.
R : Replace
I : Inspect and if necessary, adjust, correct, clean or replace
Maintenance itemMaintenance
operation Maintenance intervals Driving
condition
Engine oil and filter *
1R Replace every 5,000 miles
(8,000 km) or 6 months A, B, C, D,
E, F, G, H, I, J, K, L
Air cleaner filter IInspect more frequently
depending on the condition C, E
Spark plugs RReplace more frequently
depending on the condition A, B, F, G,
H, I, K
Steering gear rack, linkage and
boots IInspect more frequently
depending on the condition C, D, E, F, G
Front suspension ball joints IInspect more frequently
depending on the condition C, D, E, F, G
Disc brakes and pads, calipers
and rotors IInspect more frequently
depending on the condition C, D, E, G, H
Parking brake IInspect more frequently
depending on the condition C, D, G, H
Driveshaft and boots IInspect more frequently
depending on the condition C, D, E, F,
G, H, I, J
Cabin air filter RReplace more frequently
depending on the condition C, E, G
Intelligent variable transmission
fluid (if equipped) RReplace every 60,000miles
(90,000 km) A, C, D, E, F,
G, H, I, K
Rear differential oil RReplace every 72,000 miles
(120,000 km) C, D, E, G,
H, I, J
Transfer case oil No check, No service required
*1 : Requires
oil) is used, then the engine oil and engine oil filter must be replaced as indicated for
severe maintenance condition.