ECU HYUNDAI ELANTRA SPORT 2018 Owner's Guide
[x] Cancel search | Manufacturer: HYUNDAI, Model Year: 2018, Model line: ELANTRA SPORT, Model: HYUNDAI ELANTRA SPORT 2018Pages: 534, PDF Size: 51.51 MB
Page 263 of 534
5-22
Driving your vehicle
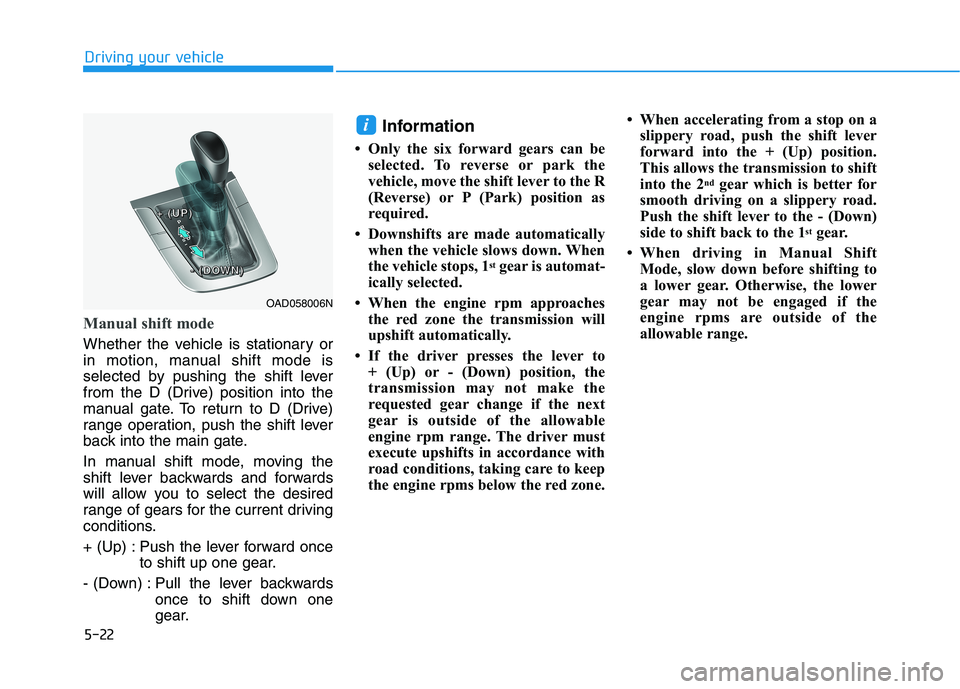
Manual shift mode
Whether the vehicle is stationary or
in motion, manual shift mode is
selected by pushing the shift lever
from the D (Drive) position into the
manual gate. To return to D (Drive)
range operation, push the shift lever
back into the main gate.
In manual shift mode, moving the
shift lever backwards and forwards
will allow you to select the desired
range of gears for the current driving
conditions.
+ (Up) : Push the lever forward onceto shift up one gear.
- (Down) : Pull the lever backwards once to shift down one
gear. Information
Only the six forward gears can be selected. To reverse or park the
vehicle, move the shift lever to the R
(Reverse) or P (Park) position as
required.
Downshifts are made automatically when the vehicle slows down. When
the vehicle stops, 1 st
gear is automat-
ically selected.
When the engine rpm approaches the red zone the transmission will
upshift automatically.
If the driver presses the lever to + (Up) or - (Down) position, the
transmission may not make the
requested gear change if the next
gear is outside of the allowable
engine rpm range. The driver must
execute upshifts in accordance with
road conditions, taking care to keep
the engine rpms below the red zone. When accelerating from a stop on a
slippery road, push the shift lever
forward into the + (Up) position.
This allows the transmission to shift
into the 2 nd
gear which is better for
smooth driving on a slippery road.
Push the shift lever to the - (Down)
side to shift back to the 1 st
gear.
When driving in Manual Shift Mode, slow down before shifting to
a lower gear. Otherwise, the lower
gear may not be engaged if the
engine rpms are outside of the
allowable range.
i
OAD058006N
++++ ((((UUUUPPPP))))
---- ((((DDDDOOOOWWWWNNNN))))
Page 276 of 534
5-35
Driving your vehicle
5
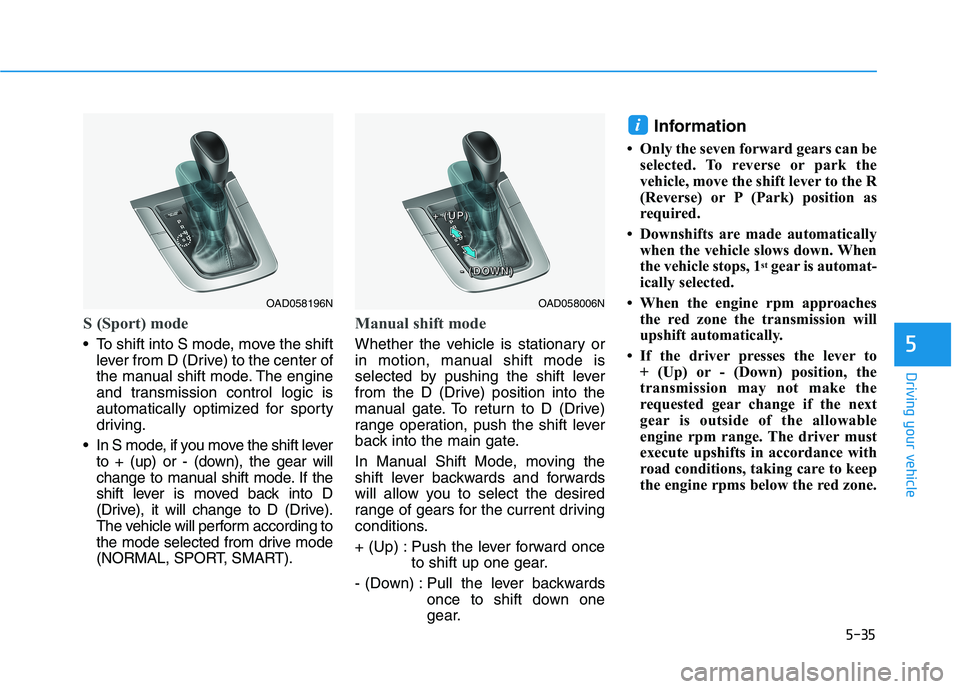
S (Sport) mode
To shift into S mode, move the shiftlever from D (Drive) to the center of
the manual shift mode. The engine
and transmission control logic is
automatically optimized for sporty
driving.
In S mode, if you move the shift lever to + (up) or - (down), the gear will
change to manual shift mode. If the
shift lever is moved back into D
(Drive), it will change to D (Drive).
The vehicle will perform according to
the mode selected from drive mode
(NORMAL, SPORT, SMART).
Manual shift mode
Whether the vehicle is stationary or
in motion, manual shift mode is
selected by pushing the shift lever
from the D (Drive) position into the
manual gate. To return to D (Drive)
range operation, push the shift lever
back into the main gate.
In Manual Shift Mode, moving the
shift lever backwards and forwards
will allow you to select the desired
range of gears for the current driving
conditions.
+ (Up) : Push the lever forward once to shift up one gear.
- (Down) : Pull the lever backwards once to shift down one
gear. Information
Only the seven forward gears can be selected. To reverse or park the
vehicle, move the shift lever to the R
(Reverse) or P (Park) position as
required.
Downshifts are made automatically when the vehicle slows down. When
the vehicle stops, 1 st
gear is automat-
ically selected.
When the engine rpm approaches the red zone the transmission will
upshift automatically.
If the driver presses the lever to + (Up) or - (Down) position, the
transmission may not make the
requested gear change if the next
gear is outside of the allowable
engine rpm range. The driver must
execute upshifts in accordance with
road conditions, taking care to keep
the engine rpms below the red zone.
i
OAD058006N
++++ ((((UUUUPPPP))))
---- ((((DDDDOOOOWWWWNNNN))))
OAD058196N
Page 322 of 534
5-81
Driving your vehicle
5
The FCA is only a supplemen-
tal system for the driver’s con-
venience. The driver shouldhold the responsibility to con-
trol the vehicle operation. Do
not solely depend on the FCA
system. Rather, maintain a
safe braking distance, and, if
necessary, depress the brakepedal to reduce the drivingspeed.
In certain instances and
under certain driving condi-
tions, the FCA system may
activate prematurely. This ini-
tial warning message appears
on the LCD display with a
warning chime.
Also, in certain instances the
front camera recognition sys-
tem may not detect the vehi-
cle ahead. The FCA system
may not activate and the
warning message will not be
displayed.
WARNING If there is a malfunction with
the FCA system, the Forward
Collision avoidance assist
system is not applied eventhough the braking system is
operating normally.
If the vehicle in front stops
suddenly, you may have less
control of the brake system.
Therefore, always keep a safe
distance between your vehicle
and the vehicle in front of you.
The FCA system may activate during braking and the vehi-
cle may stop suddenly shift-
ing loose objects toward the
passengers. Always keeploose objects secured.
The FCA system may not acti-
vate if the driver applies the
brake pedal to avoid a colli-sion.
The brake control may be
insufficient, possibly causing
a collision, if a vehicle in front
abruptly stops. Always pay
extreme caution.
The FCA system may not acti-
vate according to the road
conditions, inclement weath-
er, driving conditions or trafficconditions.
Occupants may get injured, if
the vehicle abruptly stops by
the activated FCA system. Pay
extreme caution.
The FCA system does not
detect all vehicles.
Page 335 of 534
5-94
Driving your vehicle
System Malfunction
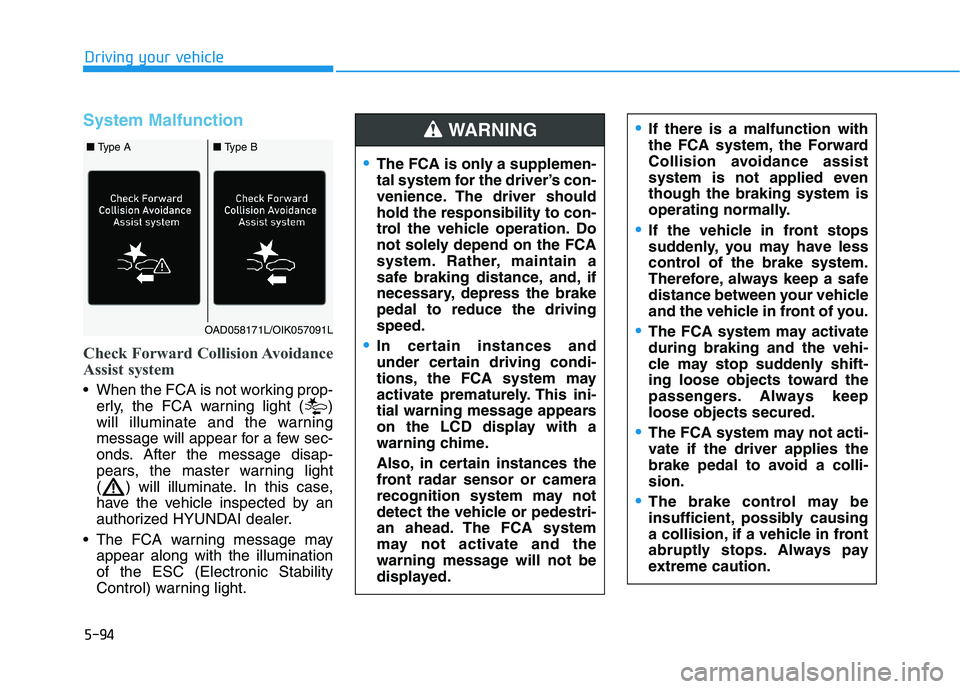
Check Forward Collision Avoidance
Assist system
When the FCA is not working prop-erly, the FCA warning light ( )
will illuminate and the warning
message will appear for a few sec-
onds. After the message disap-
pears, the master warning light
( ) will illuminate. In this case,
have the vehicle inspected by an
authorized HYUNDAI dealer.
The FCA warning message may appear along with the illuminationof the ESC (Electronic Stability
Control) warning light.
The FCA is only a supplemen-
tal system for the driver’s con-
venience. The driver shouldhold the responsibility to con-
trol the vehicle operation. Do
not solely depend on the FCA
system. Rather, maintain a
safe braking distance, and, if
necessary, depress the brakepedal to reduce the drivingspeed.
In certain instances and
under certain driving condi-
tions, the FCA system may
activate prematurely. This ini-
tial warning message appears
on the LCD display with a
warning chime.
Also, in certain instances the
front radar sensor or camera
recognition system may not
detect the vehicle or pedestri-
an ahead. The FCA system
may not activate and the
warning message will not be
displayed.
WARNING If there is a malfunction with
the FCA system, the Forward
Collision avoidance assist
system is not applied eventhough the braking system is
operating normally.
If the vehicle in front stops
suddenly, you may have less
control of the brake system.
Therefore, always keep a safe
distance between your vehicle
and the vehicle in front of you.
The FCA system may activate during braking and the vehi-
cle may stop suddenly shift-
ing loose objects toward the
passengers. Always keeploose objects secured.
The FCA system may not acti-
vate if the driver applies the
brake pedal to avoid a colli-sion.
The brake control may be
insufficient, possibly causing
a collision, if a vehicle in front
abruptly stops. Always pay
extreme caution.
OAD058171L/OIK057091L
■ Type A■ Type B
Page 388 of 534
5-147
Driving your vehicle
5
Certification label
The certification label is located on
the driver’s door sill at the center pil-
lar and shows the maximum allow-
able weight of the fully loaded vehi-
cle. This is called the GVWR (Gross
Vehicle Weight Rating). The GVWR
includes the weight of the vehicle, all
occupants, fuel and cargo.
This label also tells you the maxi-
mum weight that can be supported
by the front and rear axles, called
Gross Axle Weight Rating (GAWR).
The total weight of the vehicle,
including all occupants, accessories,
cargo, and trailer tongue load must
not exceed the Gross Vehicle WeightRating (GVWR) or the Gross Axle
Weight Rating (GAWR). To find out
the actual loads on your front and
rear axles, you need to go to a weigh
station and weigh your vehicle. Be
sure to spread out your load equally
on both sides of the centerline.Overloading your vehicle may
cause damage. Repairs would not
be covered by your warranty. Do
not overload your vehicle.
NOTICE
If you carry items inside your
vehicle (e.g., suitcases, tools,
packages, or anything else),
they are moving as fast as the
vehicle. If you have to stop or
turn quickly, or if there is a
crash, the items will keep going
and can cause an injury if they
strike the driver or a passenger.
Put items in the cargo area of
your vehicle. Try to spread the
weight evenly.
Do not stack items, like suit-
cases, inside the vehicle
above the tops of the seats.
Do not leave an unsecured
child restraint in your vehicle.
When you carry something
inside the vehicle, secure it.
WARNING
Overloading
Never exceed the GVWR for
your vehicle, the GAWR for
either the front or rear axle
and vehicle capacity weight.Exceeding these ratings can
affect your vehicle's handling
and braking ability, and causean accident.
Do not overload your vehicle.
Overloading your vehicle can
cause heat buildup in your
vehicle's tires and possible
tire failure, increased stop-ping distances and poor vehi-
cle handling-all of which mayresult in a crash.
WARNING
Page 402 of 534
6-13
What to do in an emergency
6
If you have a tire gauge, check the tire pressure (see "Tires and
Wheels" in chapter 8 for tire pressure
instructions.). If the pressure is lower
or higher than recommended, drive
slowly to the nearest service stationand adjust it to the recommended
pressure. Always reinstall the valve
cap after checking or adjusting tire
pressure. If the cap is not replaced,
air may leak from the tire. If you lose
a valve cap, buy another and install it
as soon as possible. After changing
tires, secure the flat tire and return
the jack and tools to their proper stor-
age locations.
Check the tire pressure as soon
as possible after installing a spare
tire. Adjust it to the recommended
pressure.If any of the equipment such as the
jack, lug nuts, studs, or other equip-ment is damaged or in poor condi-tion, do not attempt to change the
tire and call for assistance.Use of compact spare tires
Compact spare tires are designed for
emergency use only. Drive carefullyon the compact spare tire and
always follow the safety precautions.
NOTICE
Your vehicle has metric threads
on the studs and lug nuts. Make
certain during tire changing
that the same nuts that were
removed are reinstalled. If you
have to replace your lug nuts
make sure they have metric
threads to avoid damaging thestuds and ensure the wheel is
properly secured to the hub.
Consult an authorized
HYUNDAI dealer for assistance.
CAUTION
To prevent compact spare tire
failure and loss of control pos-
sibly resulting in an accident:
Use the compact spare tire
only in an emergency.
NEVER operate your vehicle
over 80 km/h (50 mph).
Do not exceed the vehicle's
maximum load rating or the
load carrying capacity shown
on the sidewall of the com-
pact spare tire.
Do not use the compact spare
tire continuously. Repair orreplace the original tire as
soon as possible to avoid fail-
ure of the compact spare tire.
WARNING
Page 409 of 534
6-20
What to do in an emergency
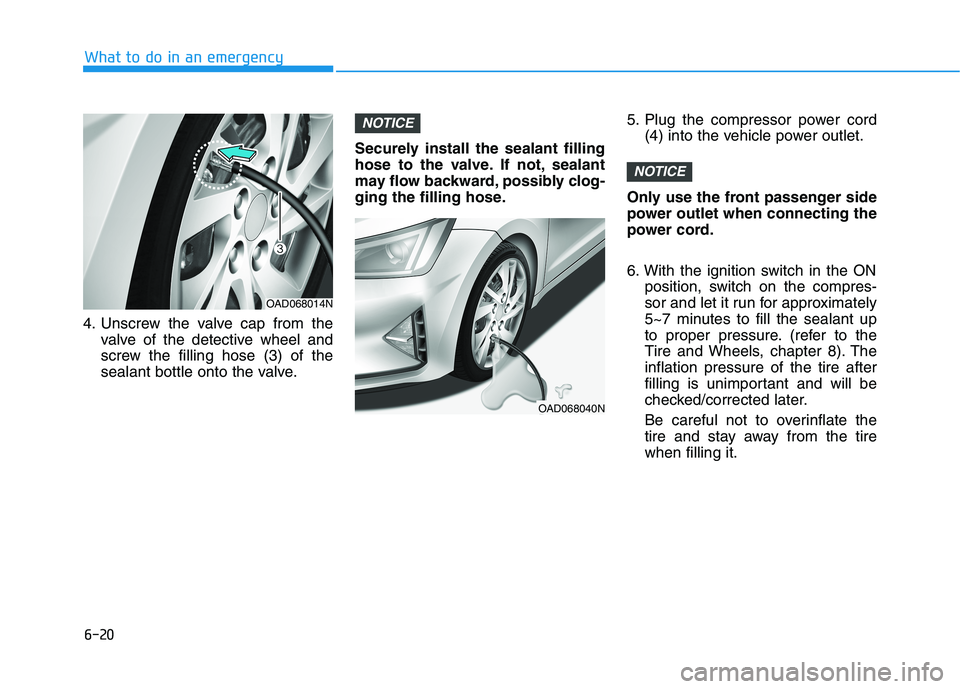
4. Unscrew the valve cap from thevalve of the detective wheel and
screw the filling hose (3) of the
sealant bottle onto the valve. Securely install the sealant filling
hose to the valve. If not, sealant
may flow backward, possibly clog-
ging the filling hose.
5. Plug the compressor power cord
(4) into the vehicle power outlet.
Only use the front passenger side
power outlet when connecting the
power cord.
6. With the ignition switch in the ON position, switch on the compres-
sor and let it run for approximately
5~7 minutes to fill the sealant up
to proper pressure. (refer to the
Tire and Wheels, chapter 8). Theinflation pressure of the tire after
filling is unimportant and will be
checked/corrected later.
Be careful not to overinflate the
tire and stay away from the tirewhen filling it.
NOTICE
NOTICE
OAD068014N
OAD068040N
Page 416 of 534
6-27
What to do in an emergency
Using the Tire Mobility Kit
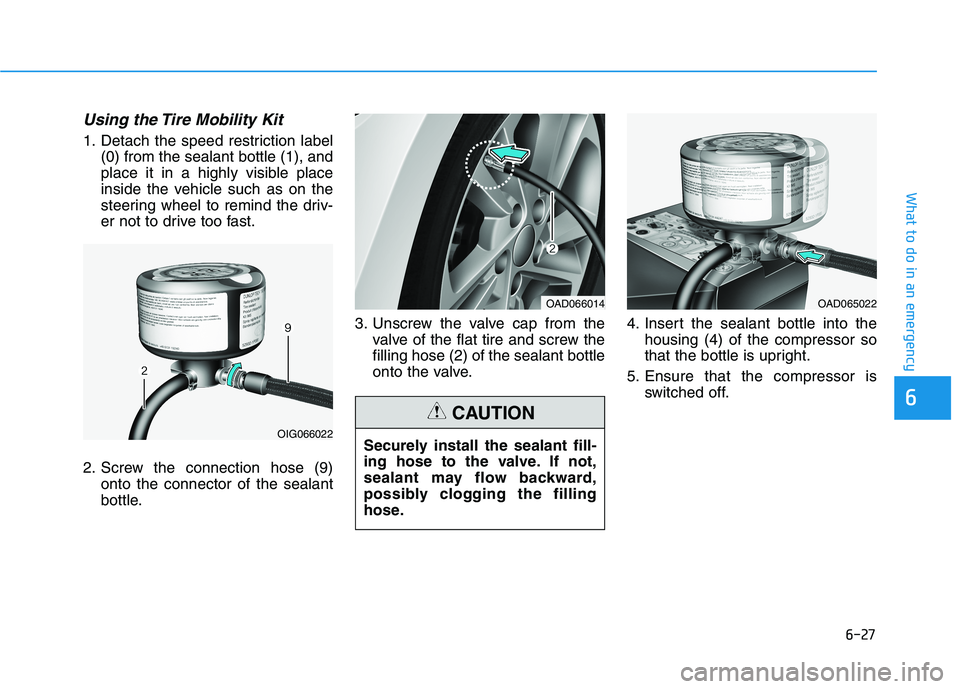
1. Detach the speed restriction label(0) from the sealant bottle (1), and
place it in a highly visible place
inside the vehicle such as on the
steering wheel to remind the driv-
er not to drive too fast.
2. Screw the connection hose (9) onto the connector of the sealant
bottle. 3. Unscrew the valve cap from the
valve of the flat tire and screw thefilling hose (2) of the sealant bottle
onto the valve. 4. Insert the sealant bottle into the
housing (4) of the compressor so
that the bottle is upright.
5. Ensure that the compressor is switched off.
6
OIG066022
OAD066014
Securely install the sealant fill-
ing hose to the valve. If not,
sealant may flow backward,
possibly clogging the filling
hose.
CAUTION
OAD065022
Page 421 of 534
6-32
What to do in an emergency
Removable Towing Hook
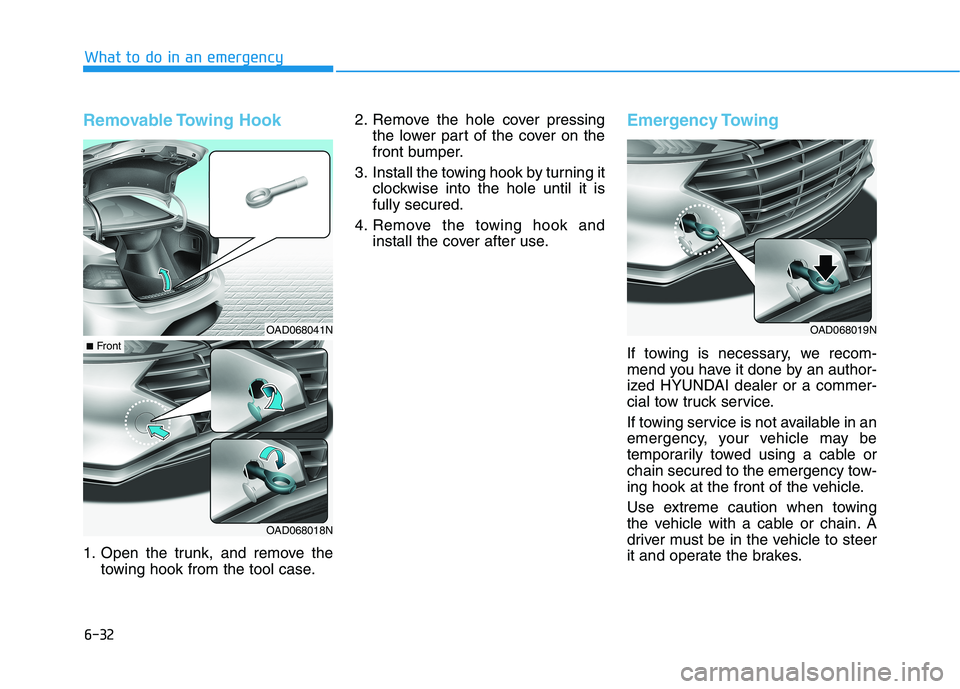
1. Open the trunk, and remove thetowing hook from the tool case. 2. Remove the hole cover pressing
the lower part of the cover on the
front bumper.
3. Install the towing hook by turning it clockwise into the hole until it isfully secured.
4. Remove the towing hook and install the cover after use.
Emergency Towing
If towing is necessary, we recom-
mend you have it done by an author-
ized HYUNDAI dealer or a commer-
cial tow truck service.
If towing service is not available in an
emergency, your vehicle may be
temporarily towed using a cable or
chain secured to the emergency tow-
ing hook at the front of the vehicle.
Use extreme caution when towing
the vehicle with a cable or chain. A
driver must be in the vehicle to steer
it and operate the brakes.
OAD068041N
OAD068018N
■Front
OAD068019N
Page 422 of 534
6-33
What to do in an emergency
6
Towing in this manner may be done
only on hard-surfaced roads for a
short distance and at low speeds.
Also, the wheels, axles, power train,
steering and brakes must all be ingood condition.Always follow these emergency tow-ing precautions:
Place the ignition switch in the
ACC position so the steering
wheel is not locked. (if equipped)
Place the shift lever in N (Neutral).
Release the parking brake.
Depress the brake pedal with more force than normal since you will
have reduced braking perform-
ance.
More steering effort will be required because the power steer-
ing system will be disabled.
Use a vehicle heavier than your own to tow your vehicle.
The drivers of both vehicles should communicate with each other fre-
quently.
Before emergency towing, check that the hook is not broken or dam-aged.
Fasten the towing cable or chain securely to the hook.
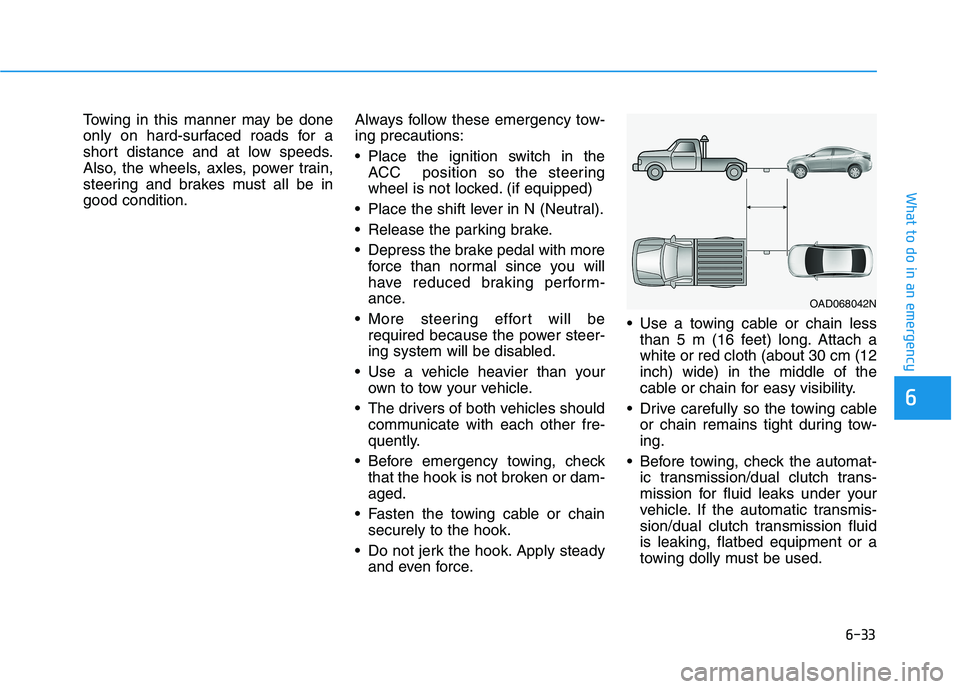
Do not jerk the hook. Apply steady and even force. Use a towing cable or chain less
than 5 m (16 feet) long. Attach awhite or red cloth (about 30 cm (12inch) wide) in the middle of the
cable or chain for easy visibility.
Drive carefully so the towing cable or chain remains tight during tow-ing.
Before towing, check the automat- ic transmission/dual clutch trans-
mission for fluid leaks under your
vehicle. If the automatic transmis-
sion/dual clutch transmission fluidis leaking, flatbed equipment or a
towing dolly must be used.
OAD068042N