Hyundai Elantra Touring 2011 Owner's Manual
Manufacturer: HYUNDAI, Model Year: 2011, Model line: Elantra Touring, Model: Hyundai Elantra Touring 2011Pages: 402, PDF Size: 37.54 MB
Page 361 of 402
Maintenance
46 7
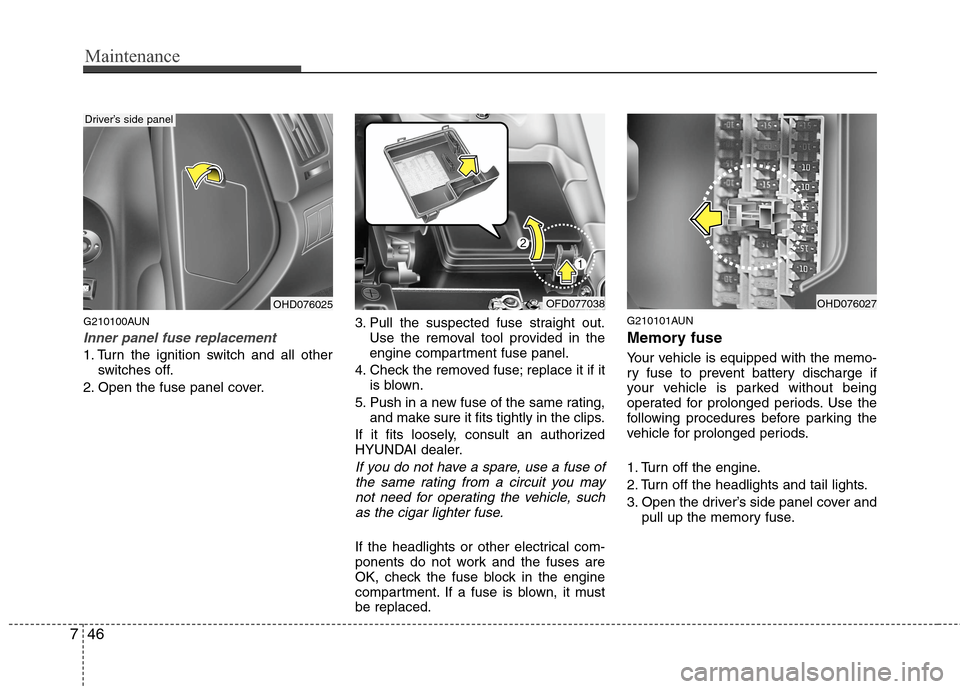
G210100AUN
Inner panel fuse replacement
1. Turn the ignition switch and all other
switches off.
2. Open the fuse panel cover.3. Pull the suspected fuse straight out.
Use the removal tool provided in the
engine compartment fuse panel.
4. Check the removed fuse; replace it if it
is blown.
5. Push in a new fuse of the same rating,
and make sure it fits tightly in the clips.
If it fits loosely, consult an authorized
HYUNDAI dealer.
If you do not have a spare, use a fuse of
the same rating from a circuit you may
not need for operating the vehicle, such
as the cigar lighter fuse.
If the headlights or other electrical com-
ponents do not work and the fuses are
OK, check the fuse block in the engine
compartment. If a fuse is blown, it must
be replaced.
G210101AUN
Memory fuse
Your vehicle is equipped with the memo-
ry fuse to prevent battery discharge if
your vehicle is parked without being
operated for prolonged periods. Use the
following procedures before parking the
vehicle for prolonged periods.
1. Turn off the engine.
2. Turn off the headlights and tail lights.
3. Open the driver’s side panel cover and
pull up the memory fuse.
OHD076025
Driver’s side panel
OFD077038OHD076027
Page 362 of 402
747
Maintenance
✽ ✽
NOTICE
• If the memory fuse is pulled up from
the fuse panel, the warning chime,
audio, clock and interior lamps, etc.,
will not operate. Some items must be
reset after replacement. Refer to
“Battery” in this section.
• Even though the memory fuse is
pulled up, the battery can still be dis-
charged by operation of the head-
lights or other electrical devices.
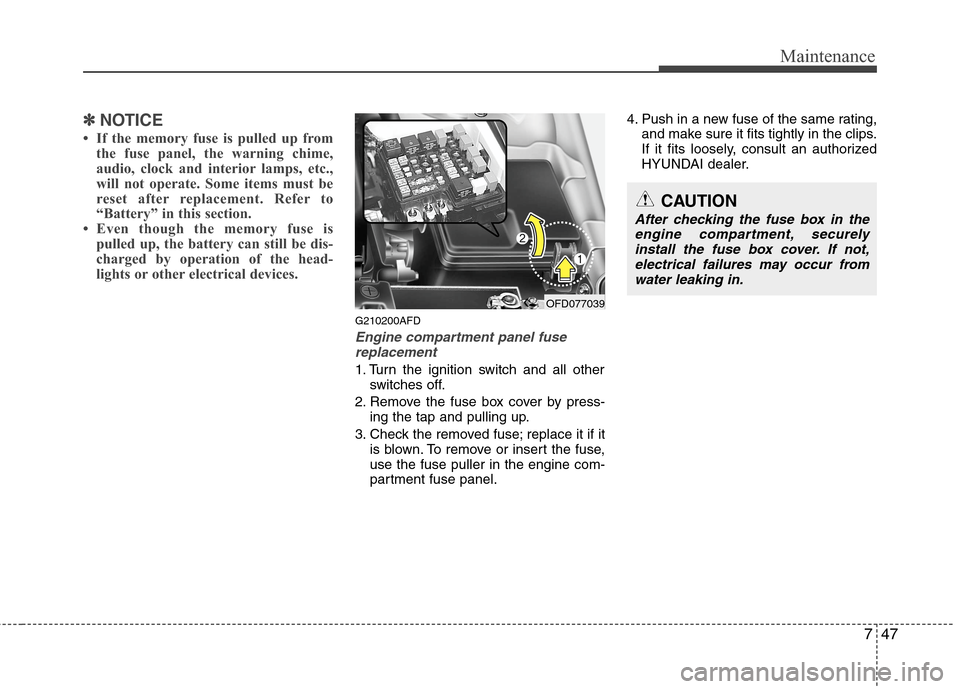
G210200AFD
Engine compartment panel fuse
replacement
1. Turn the ignition switch and all other
switches off.
2. Remove the fuse box cover by press-
ing the tap and pulling up.
3. Check the removed fuse; replace it if it
is blown. To remove or insert the fuse,
use the fuse puller in the engine com-
partment fuse panel.4. Push in a new fuse of the same rating,
and make sure it fits tightly in the clips.
If it fits loosely, consult an authorized
HYUNDAI dealer.
OFD077039
CAUTION
After checking the fuse box in the
engine compartment, securely
install the fuse box cover. If not,
electrical failures may occur from
water leaking in.
Page 363 of 402
Maintenance
48 7
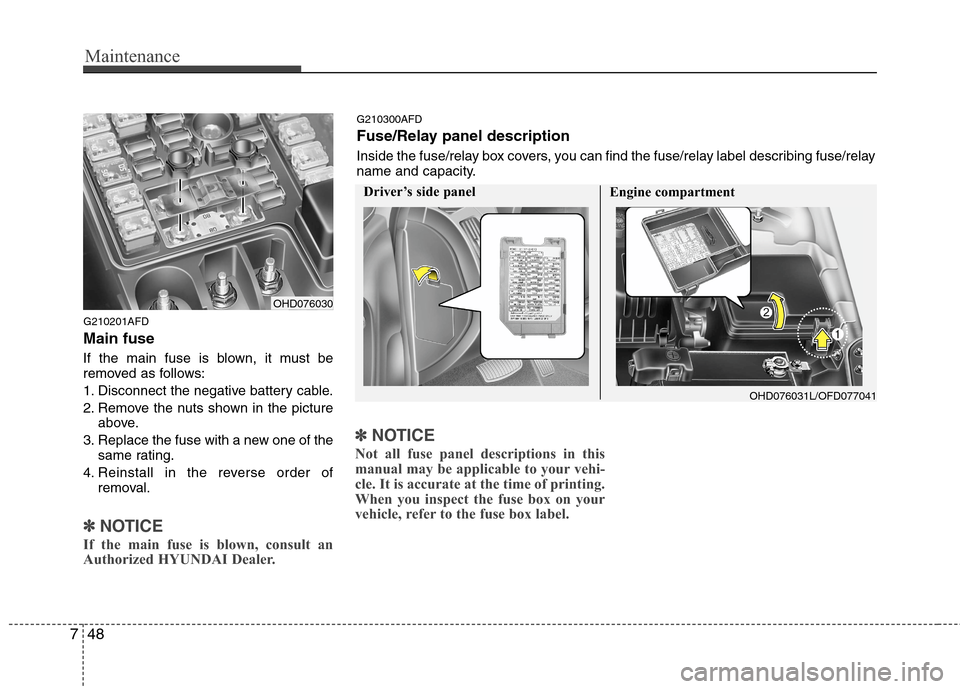
G210201AFD
Main fuse
If the main fuse is blown, it must be
removed as follows:
1. Disconnect the negative battery cable.
2. Remove the nuts shown in the picture
above.
3. Replace the fuse with a new one of the
same rating.
4. Reinstall in the reverse order of
removal.
✽ ✽
NOTICE
If the main fuse is blown, consult an
Authorized HYUNDAI Dealer.
✽ ✽
NOTICE
Not all fuse panel descriptions in this
manual may be applicable to your vehi-
cle. It is accurate at the time of printing.
When you inspect the fuse box on your
vehicle, refer to the fuse box label.
OHD076030
Engine compartment
OHD076031L/OFD077041 G210300AFD
Fuse/Relay panel description
Inside the fuse/relay box covers, you can find the fuse/relay label describing fuse/relay
name and capacity.
Driver’s side panel
Page 364 of 402
749
Maintenance
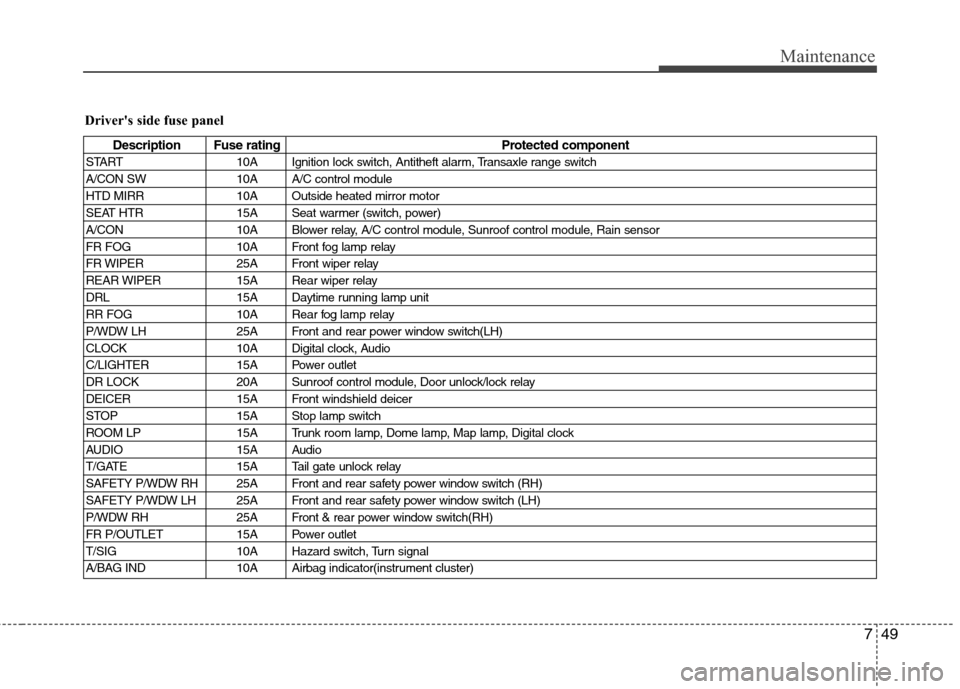
Driver's side fuse panel
Description Fuse rating Protected component
START 10A Ignition lock switch, Antitheft alarm, Transaxle range switch
A/CON SW 10A A/C control module
HTD MIRR 10A Outside heated mirror motor
SEAT HTR 15A Seat warmer (switch, power)
A/CON 10A Blower relay, A/C control module, Sunroof control module, Rain sensor
FR FOG 10A Front fog lamp relay
FR WIPER 25A Front wiper relay
REAR WIPER 15A Rear wiper relay
DRL 15A Daytime running lamp unit
RR FOG 10A Rear fog lamp relay
P/WDW LH 25A Front and rear power window switch(LH)
CLOCK 10A Digital clock, Audio
C/LIGHTER 15A Power outlet
DR LOCK 20A Sunroof control module, Door unlock/lock relay
DEICER 15A Front windshield deicer
STOP 15A Stop lamp switch
ROOM LP 15A Trunk room lamp, Dome lamp, Map lamp, Digital clock
AUDIO 15A Audio
T/GATE 15A Tail gate unlock relay
SAFETY P/WDW RH 25A Front and rear safety power window switch (RH)
SAFETY P/WDW LH 25A Front and rear safety power window switch (LH)
P/WDW RH 25A Front & rear power window switch(RH)
FR P/OUTLET 15A Power outlet
T/SIG 10A Hazard switch, Turn signal
A/BAG IND 10A Airbag indicator(instrument cluster)
Page 365 of 402
Maintenance
50 7
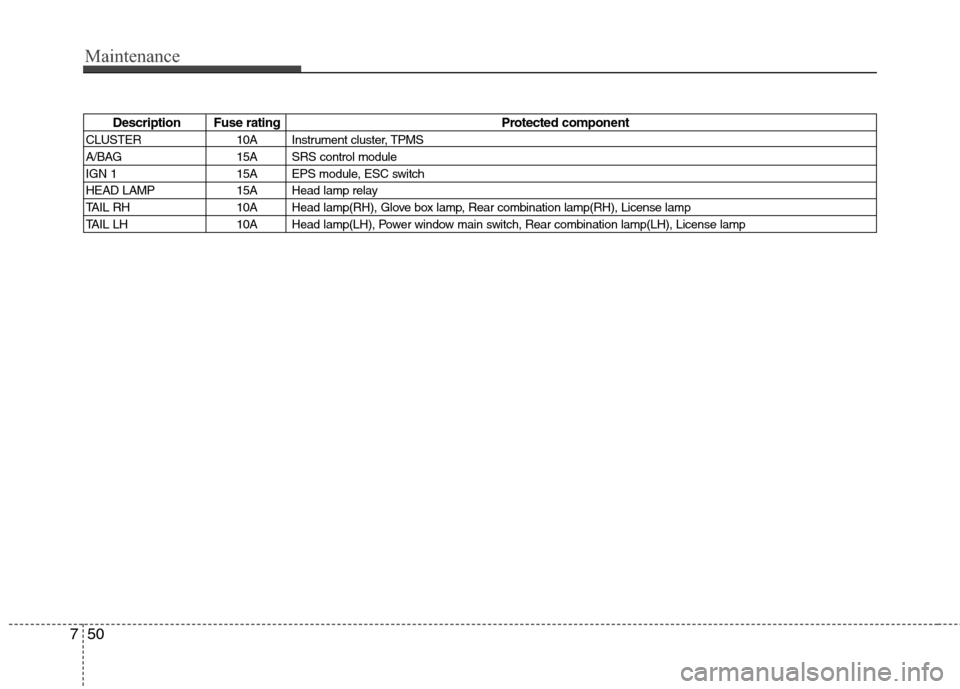
Description Fuse rating Protected component
CLUSTER 10A Instrument cluster, TPMS
A/BAG 15A SRS control module
IGN 1 15A EPS module, ESC switch
HEAD LAMP 15A Head lamp relay
TAIL RH 10A Head lamp(RH), Glove box lamp, Rear combination lamp(RH), License lamp
TAIL LH 10A Head lamp(LH), Power window main switch, Rear combination lamp(LH), License lamp
Page 366 of 402
751
Maintenance
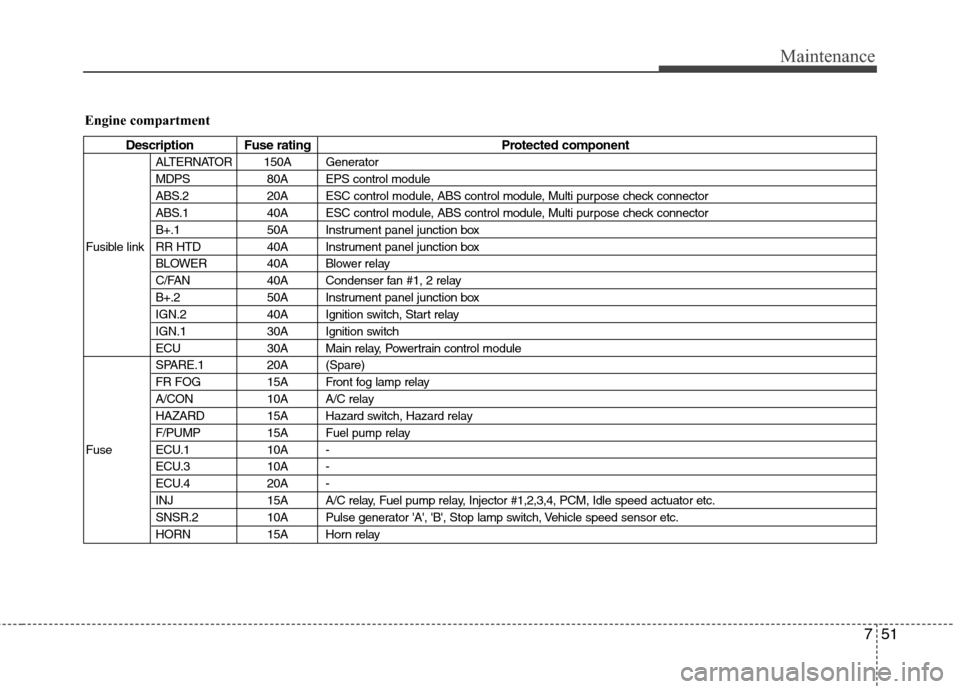
Engine compartment
Description Fuse rating Protected component
ALTERNATOR 150A Generator
MDPS 80A EPS control module
ABS.2 20A ESC control module, ABS control module, Multi purpose check connector
ABS.1 40A ESC control module, ABS control module, Multi purpose check connector
B+.1 50A Instrument panel junction box
Fusible link RR HTD 40A Instrument panel junction box
BLOWER 40A Blower relay
C/FAN 40A Condenser fan #1, 2 relay
B+.2 50A Instrument panel junction box
IGN.2 40A Ignition switch, Start relay
IGN.1 30A Ignition switch
ECU 30A Main relay, Powertrain control module
SPARE.1 20A (Spare)
FR FOG 15A Front fog lamp relay
A/CON 10A A/C relay
HAZARD 15A Hazard switch, Hazard relay
F/PUMP 15A Fuel pump relay
Fuse ECU.1 10A -
ECU.3 10A -
ECU.4 20A -
INJ 15A A/C relay, Fuel pump relay, Injector #1,2,3,4, PCM, Idle speed actuator etc.
SNSR.2 10A Pulse generator 'A', 'B', Stop lamp switch, Vehicle speed sensor etc.
HORN 15A Horn relay
Page 367 of 402
Maintenance
52 7
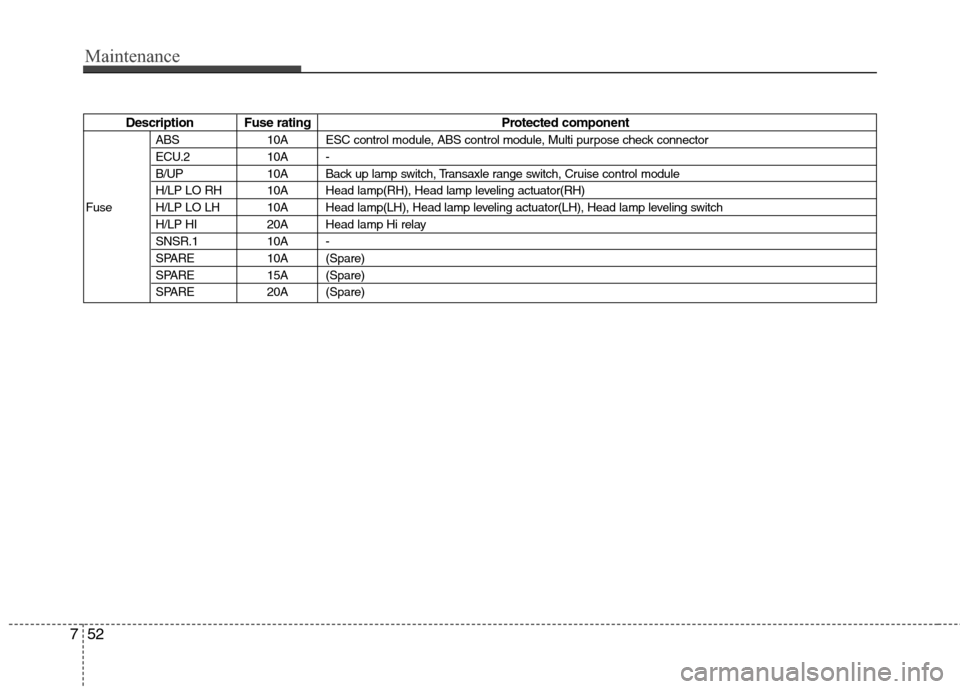
Description Fuse rating Protected component
ABS 10A ESC control module, ABS control module, Multi purpose check connector
ECU.2 10A -
B/UP 10A Back up lamp switch, Transaxle range switch, Cruise control module
H/LP LO RH 10A Head lamp(RH), Head lamp leveling actuator(RH)
Fuse H/LP LO LH 10A Head lamp(LH), Head lamp leveling actuator(LH), Head lamp leveling switch
H/LP HI 20A Head lamp Hi relay
SNSR.1 10A -
SPARE 10A (Spare)
SPARE 15A (Spare)
SPARE 20A (Spare)
Page 368 of 402
753
Maintenance
LIGHT BULBS
G220000AFD
Use only the bulbs of the specified
wattage.
✽ ✽
NOTICE
After heavy, driving rain or washing,
headlight and taillight lenses could
appear frosty. This condition is caused by
the temperature difference between the
lamp inside and outside. This is similar
to the condensation on your windows
inside your vehicle during the rain and
doesn’t indicate a problem with your
vehicle. If the water leaks into the lamp
bulb circuitry, have the vehicle checked
by an authorized HYUNDAI dealer.
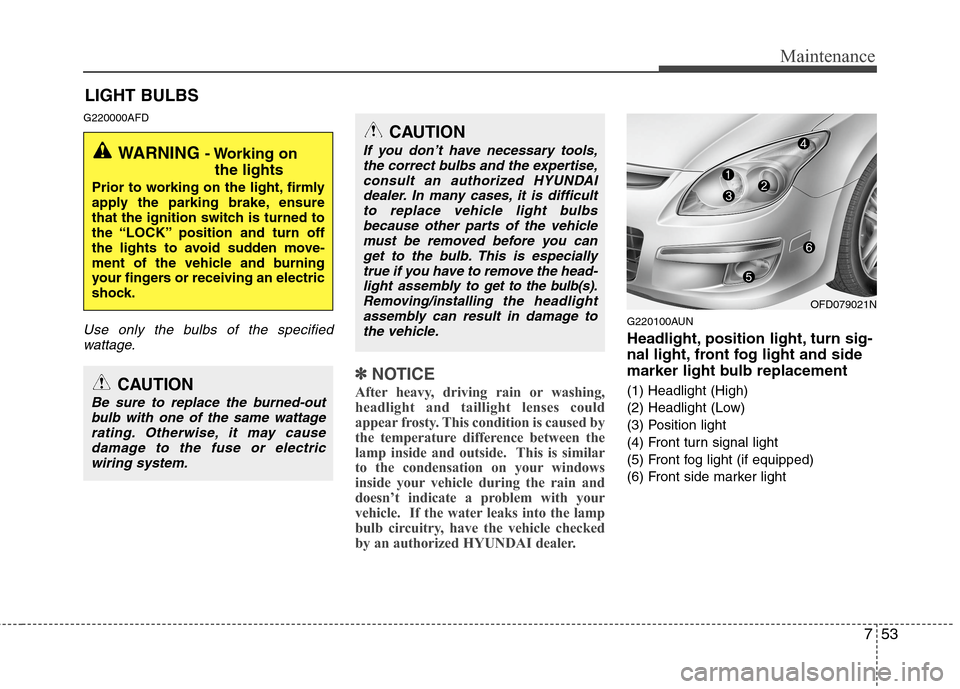
G220100AUN
Headlight, position light, turn sig-
nal light, front fog light and side
marker light bulb replacement
(1) Headlight (High)
(2) Headlight (Low)
(3) Position light
(4) Front turn signal light
(5) Front fog light (if equipped)
(6) Front side marker light
WARNING - Working on
the lights
Prior to working on the light, firmly
apply the parking brake, ensure
that the ignition switch is turned to
the “LOCK” position and turn off
the lights to avoid sudden move-
ment of the vehicle and burning
your fingers or receiving an electric
shock.
CAUTION
Be sure to replace the burned-out
bulb with one of the same wattage
rating. Otherwise, it may cause
damage to the fuse or electric
wiring system.
CAUTION
If you don’t have necessary tools,
the correct bulbs and the expertise,
consult an authorized HYUNDAI
dealer. In many cases, it is difficult
to replace vehicle light bulbs
because other parts of the vehicle
must be removed before you can
get to the bulb. This is especially
true if you have to remove the head-
light assembly to
get to the bulb(s).
Removing/installingthe headlight
assembly can result in damage to
the vehicle.OFD079021N
Page 369 of 402
Maintenance
54 7
G220101AFD
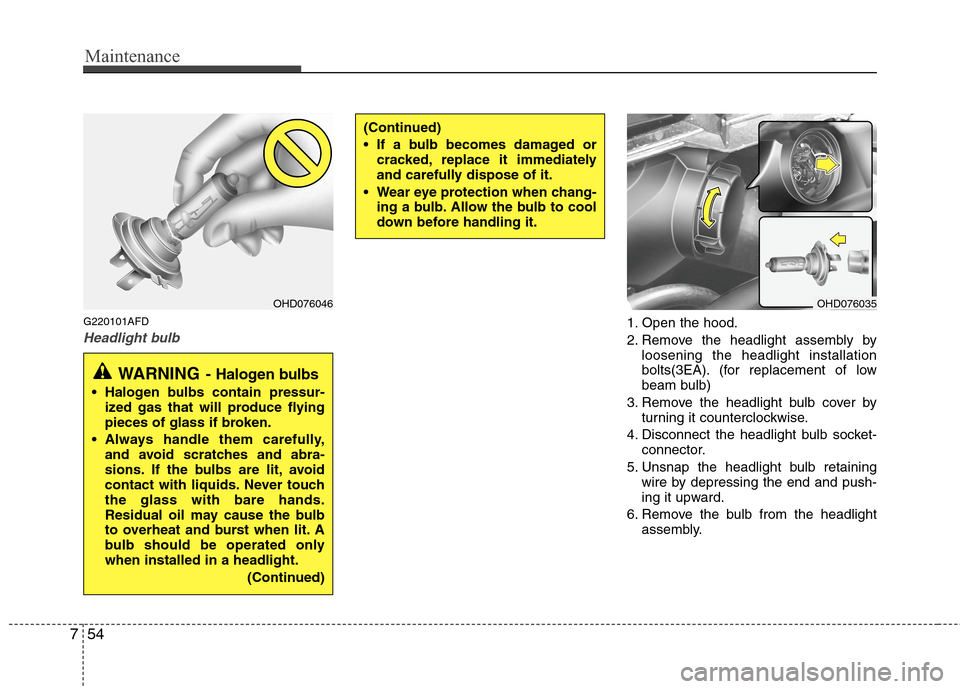
Headlight bulb1. Open the hood.
2. Remove the headlight assembly by
loosening the headlight installation
bolts(3EA). (for replacement of low
beam bulb)
3. Remove the headlight bulb cover by
turning it counterclockwise.
4. Disconnect the headlight bulb socket-
connector.
5. Unsnap the headlight bulb retaining
wire by depressing the end and push-
ing it upward.
6. Remove the bulb from the headlight
assembly.
OHD076046
WARNING- Halogen bulbs
Halogen bulbs contain pressur-
ized gas that will produce flying
pieces of glass if broken.
Always handle them carefully,
and avoid scratches and abra-
sions. If the bulbs are lit, avoid
contact with liquids. Never touch
the glass with bare hands.
Residual oil may cause the bulb
to overheat and burst when lit. A
bulb should be operated only
when installed in a headlight.
(Continued)
(Continued)
If a bulb becomes damaged or
cracked, replace it immediately
and carefully dispose of it.
Wear eye protection when chang-
ing a bulb. Allow the bulb to cool
down before handling it.
OHD076035
Page 370 of 402
755
Maintenance
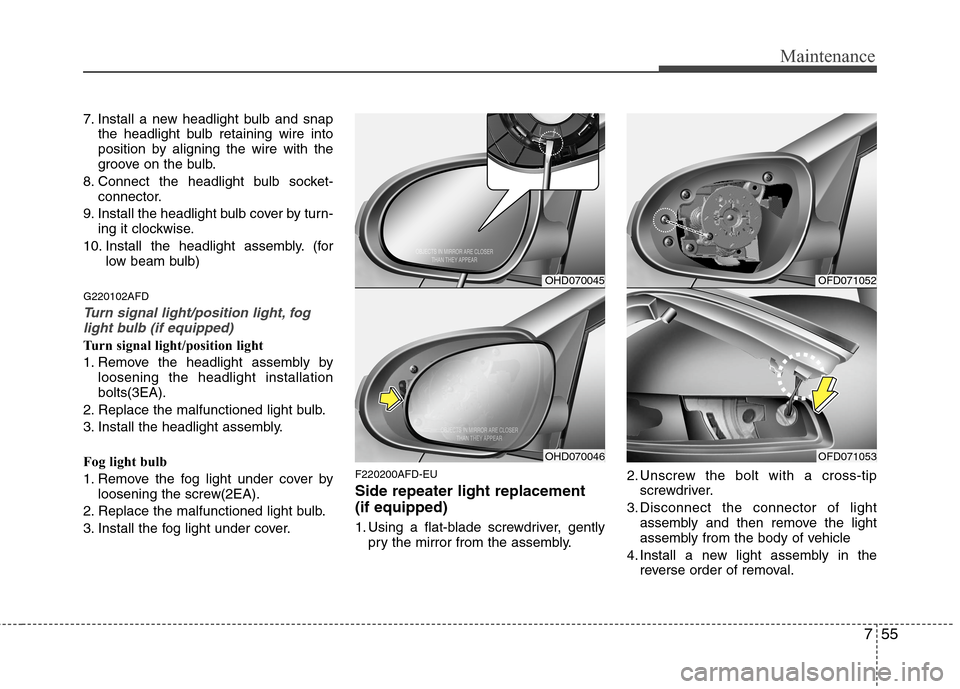
7. Install a new headlight bulb and snap
the headlight bulb retaining wire into
position by aligning the wire with the
groove on the bulb.
8. Connect the headlight bulb socket-
connector.
9. Install the headlight bulb cover by turn-
ing it clockwise.
10. Install the headlight assembly. (for
low beam bulb)
G220102AFD
Turn signal light/position light, fog
light bulb (if equipped)
Turn signal light/position light
1. Remove the headlight assembly by
loosening the headlight installation
bolts(3EA).
2. Replace the malfunctioned light bulb.
3. Install the headlight assembly.
Fog light bulb
1. Remove the fog light under cover by
loosening the screw(2EA).
2. Replace the malfunctioned light bulb.
3. Install the fog light under cover.
F220200AFD-EU
Side repeater light replacement
(if equipped)
1. Using a flat-blade screwdriver, gently
pry the mirror from the assembly.2. Unscrew the bolt with a cross-tip
screwdriver.
3. Disconnect the connector of light
assembly and then remove the light
assembly from the body of vehicle
4. Install a new light assembly in the
reverse order of removal.
OHD070045
OHD070046
OFD071052
OFD071053