HYUNDAI ENTOURAGE 2009 Owners Manual
Manufacturer: HYUNDAI, Model Year: 2009, Model line: ENTOURAGE, Model: HYUNDAI ENTOURAGE 2009Pages: 402, PDF Size: 9.08 MB
Page 211 of 402
3195
Features of your vehicle
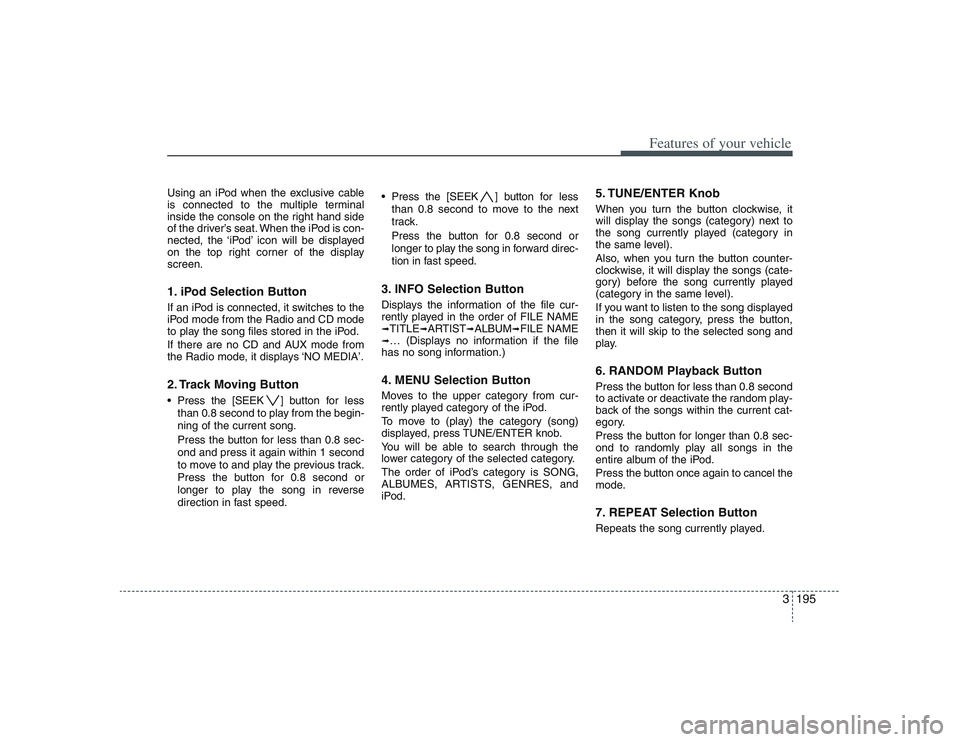
Using an iPod when the exclusive cable
is connected to the multiple terminal
inside the console on the right hand side
of the driver’s seat. When the iPod is con-
nected, the ‘iPod’ icon will be displayed
on the top right corner of the display
screen.1. iPod Selection ButtonIf an iPod is connected, it switches to the
iPod mode from the Radio and CD mode
to play the song files stored in the iPod.
If there are no CD and AUX mode from
the Radio mode, it displays ‘NO MEDIA’.2. Track Moving Button Press the [SEEK ] button for less
than 0.8 second to play from the begin-
ning of the current song.
Press the button for less than 0.8 sec-
ond and press it again within 1 second
to move to and play the previous track.
Press the button for 0.8 second or
longer to play the song in reverse
direction in fast speed. Press the [SEEK ] button for less
than 0.8 second to move to the next
track.
Press the button for 0.8 second or
longer to play the song in forward direc-
tion in fast speed.
3. INFO Selection ButtonDisplays the information of the file cur-
rently played in the order of FILE NAME➟TITLE
➟ARTIST
➟ALBUM
➟FILE NAME
➟… (Displays no information if the file
has no song information.)4. MENU Selection ButtonMoves to the upper category from cur-
rently played category of the iPod.
To move to (play) the category (song)
displayed, press TUNE/ENTER knob.
You will be able to search through the
lower category of the selected category.
The order of iPod’s category is SONG,
ALBUMES, ARTISTS, GENRES, and
iPod.
5. TUNE/ENTER KnobWhen you turn the button clockwise, it
will display the songs (category) next to
the song currently played (category in
the same level).
Also, when you turn the button counter-
clockwise, it will display the songs (cate-
gory) before the song currently played
(category in the same level).
If you want to listen to the song displayed
in the song category, press the button,
then it will skip to the selected song and
play.6. RANDOM Playback ButtonPress the button for less than 0.8 second
to activate or deactivate the random play-
back of the songs within the current cat-
egory.
Press the button for longer than 0.8 sec-
ond to randomly play all songs in the
entire album of the iPod.
Press the button once again to cancel the
mode.7. REPEAT Selection ButtonRepeats the song currently played.
Page 212 of 402
Features of your vehicle196 3✽
✽
NOTICE FOR USING iPod
DEVICE• Some iPod models might not sup-
port the communication protocol
and the files will not be played.
(iPod models supported: Mini, 4G,
Photo, Nano, 5G)
• The order of search or playback of
songs in the iPod can be different
from the order searched in the
audio system.
• If the iPod crashes due to its own
trouble, reset the iPod. (Reset:
Refer to iPod manual)
• An iPod may not operate normally
on low battery.
CAUTION IN USING
iPod DEVICE
You need the power cable exclu-
sive for an iPod in order to oper-
ate an iPod with the buttons on
the audio system. The PC cable
provided by Apple may cause a
malfunction and do not use it for
vehicle use.
When connecting the device with
an iPod cable, push in the jack
fully to not interfere with commu-
nication.
When adjusting the sound effects
of an iPod and the audio system,
the sound effects of both devices
will overlap and might reduce or
distort the quality of the sound.
Deactivate (turn off) the equalizer
function of an iPod when adjust-
ing the audio system’s volume,
and turn off the equalizer of the
audio system when using the
equalizer of an iPod.
(Continued)
(Continued)
When the iPod cable is connected,
the system can be switched to the
AUX mode even without the iPod
device and can cause noise.
Disconnect the iPod cable when
you are not using the iPod device.
When the iPod is not used for the
audio system, the iPod cable has
to be separate from iPod devies.
Origin display of iPod may not be
displayed.
Page 213 of 402
3197
Features of your vehicle
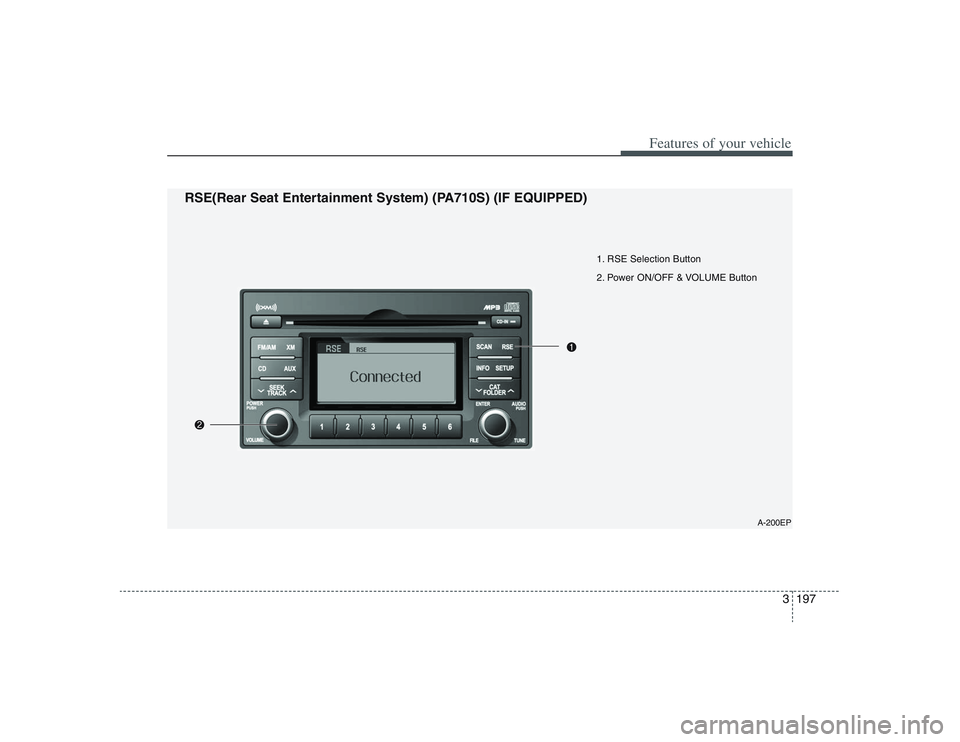
1. RSE Selection Button
2. Power ON/OFF & VOLUME Button
A-200EP
RSE(Rear Seat Entertainment System) (PA710S) (IF EQUIPPED)
Page 214 of 402
Features of your vehicle198 31. RSE Selection ButtonPlay the RSE, and "RSE" Icon is dis-
played. After pressing the RSE button,
you can enjoy the RSE audio through the
speakers in RSE mode and "Connected"
is appeared at the same time.
At the state of NO RSE Icon, the RSE
button is pressed and "RSE Not Ready"
is appeared at the window.
The speaker volume level is adjustable
by VOLUME(+,-) knob on HEAD unit,
RSE unit and remote controler.
Refer to the "RSE" in this section for
details RSE operation.
RSE : Rear Seat Entertainment System
(A/V).2. Power ON/OFF & Volume
Control ButtonTurns the set on/off when the IGNITION
SWITCH is on ACC or ON. If the button
is turned to the right, it increases the vol-
ume and left, decreases the volume.
Page 215 of 402
3199
Features of your vehicle
A-300EP
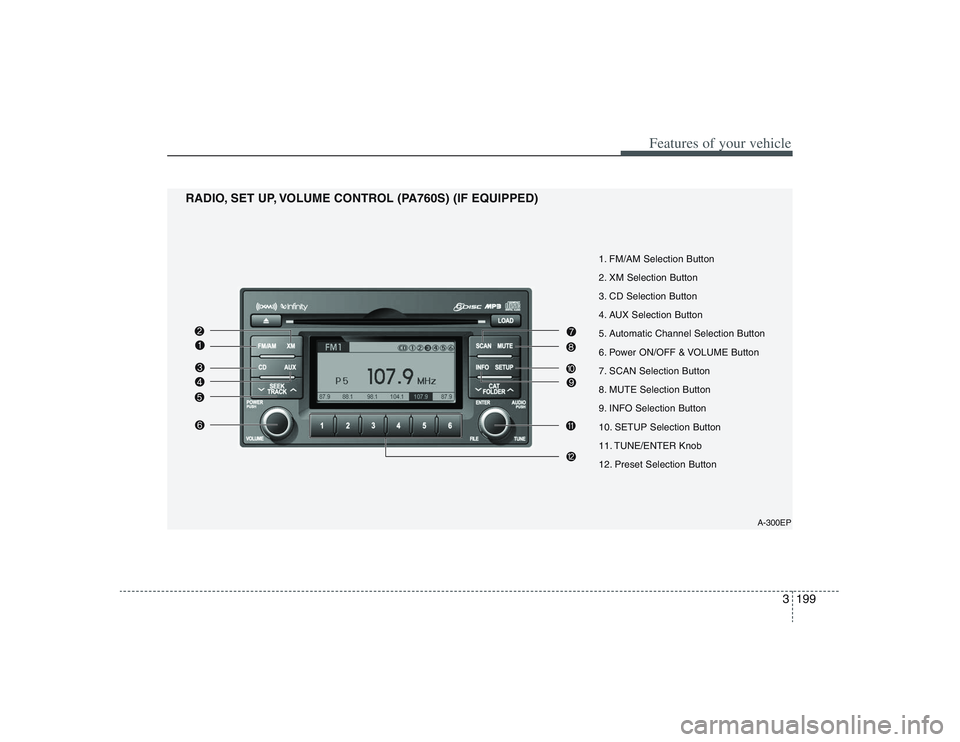
1. FM/AM Selection Button
2. XM Selection Button
3. CD Selection Button
4. AUX Selection Button
5. Automatic Channel Selection Button
6. Power ON/OFF & VOLUME Button
7. SCAN Selection Button
8. MUTE Selection Button
9. INFO Selection Button
10. SETUP Selection Button
11. TUNE/ENTER Knob
12. Preset Selection Button
RADIO, SET UP, VOLUME CONTROL (PA760S) (IF EQUIPPED)
Page 216 of 402
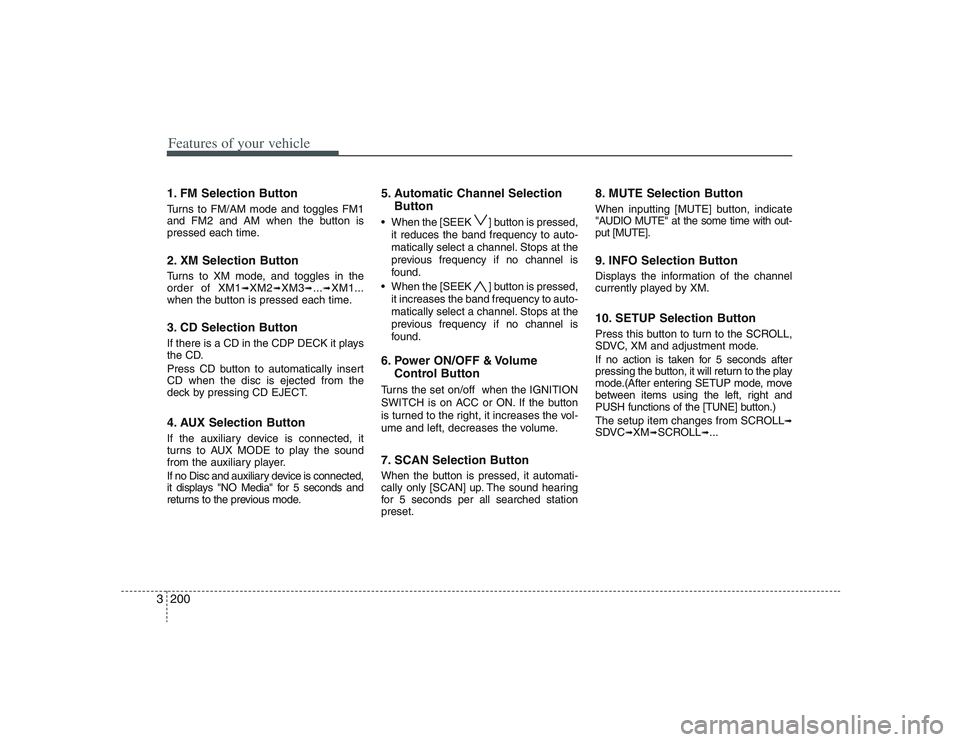
Features of your vehicle200 31. FM Selection ButtonTurns to FM/AM mode and toggles FM1
and FM2 and AM when the button is
pressed each time.2. XM Selection ButtonTurns to XM mode, and toggles in the
order of XM1
➟XM2
➟XM3
➟...➟XM1...
when the button is pressed each time.
3. CD Selection ButtonIf there is a CD in the CDP DECK it plays
the CD.
Press CD button to automatically insert
CD when the disc is ejected from the
deck by pressing CD EJECT.4. AUX Selection ButtonIf the auxiliary device is connected, it
turns to AUX MODE to play the sound
from the auxiliary player.
If no Disc and auxiliary device is connected,
it displays "NO Media" for 5 seconds and
returns to the previous mode.
5. Automatic Channel Selection
Button When the [SEEK ] button is pressed,
it reduces the band frequency to auto-
matically select a channel. Stops at the
previous frequency if no channel is
found.
When the [SEEK ] button is pressed,
it increases the band frequency to auto-
matically select a channel. Stops at the
previous frequency if no channel is
found.6. Power ON/OFF & Volume
Control ButtonTurns the set on/off when the IGNITION
SWITCH is on ACC or ON. If the button
is turned to the right, it increases the vol-
ume and left, decreases the volume.7. SCAN Selection ButtonWhen the button is pressed, it automati-
cally only [SCAN] up. The sound hearing
for 5 secondsper all searched station
preset.
8. MUTE Selection ButtonWhen inputting [MUTE] button, indicate
"AUDIO MUTE" at the some time with out-
put [MUTE].9. INFO Selection ButtonDisplays the information of the channel
currently played by XM.10. SETUP Selection ButtonPress this button to turn to the SCROLL,
SDVC, XM and adjustment mode.
If no action is taken for 5 seconds after
pressing the button, it will return to the play
mode.(After entering SETUP mode, move
between items using the left, right and
PUSH functions of the [TUNE] button.)
The setup item changes from SCROLL
➟
SDVC
➟XM
➟SCROLL
➟...
Page 217 of 402
3201
Features of your vehicle
11. TUNE/ENTER KnobTurn this button clockwise by one notch
to increase frequency by 200kHz(AM:
10KHz) from current frequency.
Turn this button counterclockwise by one
notch to decrease frequency by 200kHz
(AM:10KHz)from current frequency.
Press this button while holding SETUP
button to activate / inactivate the item to.
Select SETUP item using left and right
function of the Tune button.12. Preset Selection ButtonPush [1]~[6] buttons less than 0.8 second
to play the channel saved in each button.
Push preset button for 0.8 second or
longer to save the current channel to the
respective button with a beep.
Page 218 of 402
Features of your vehicle202 3
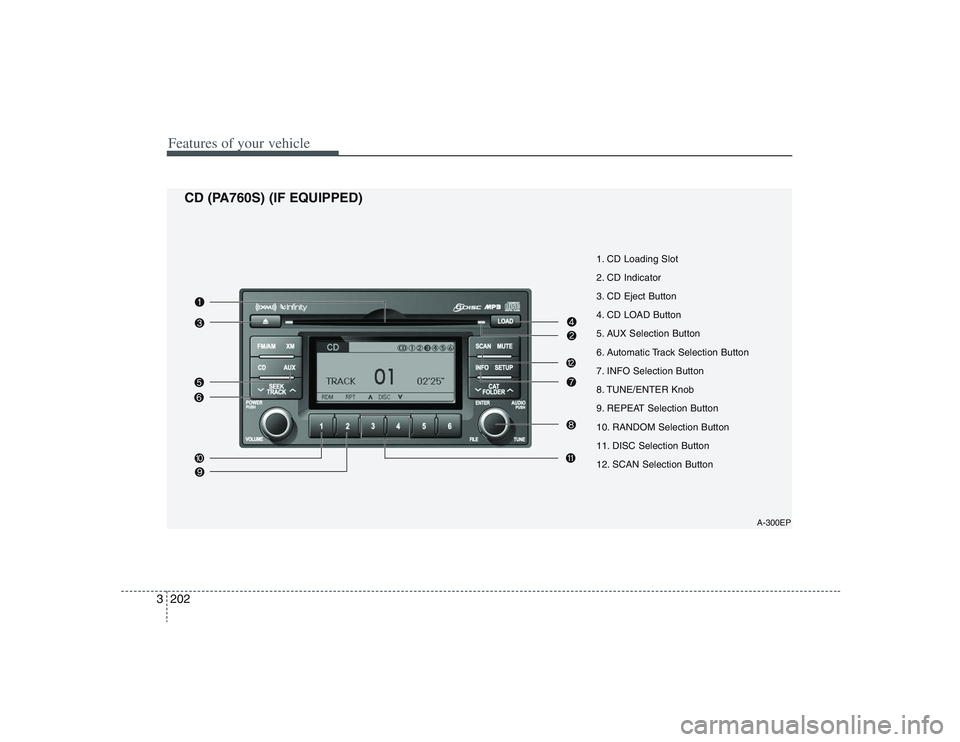
1. CD Loading Slot
2. CD Indicator
3. CD Eject Button
4. CD LOAD Button
5. AUX Selection Button
6. Automatic Track Selection Button
7. INFO Selection Button
8. TUNE/ENTER Knob
9. REPEAT Selection Button
10. RANDOM Selection Button
11. DISC Selection Button
12. SCAN Selection Button
A-300EP
CD (PA760S) (IF EQUIPPED)
Page 219 of 402
3203
Features of your vehicle
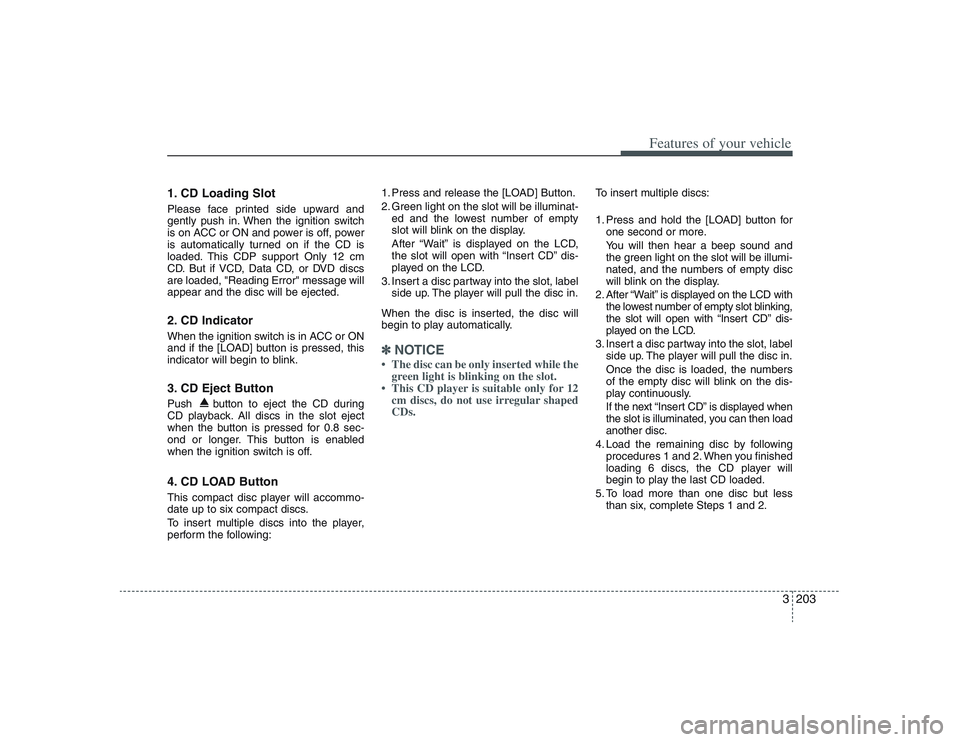
1. CD Loading SlotPlease face printed side upward and
gently push in. When the ignition switch
is on ACC or ON and power is off, power
is automatically turned on if the CD is
loaded. This CDP support Only 12 cm
CD. But if VCD, Data CD, or DVD discs
are loaded, "Reading Error" message will
appear and the disc will be ejected.2. CD Indicator When the ignition switch is in ACC or ON
and if the [LOAD] button is pressed, this
indicator will begin to blink.3. CD Eject ButtonPush button to eject the CD during
CD playback. All discs in the slot eject
when the button is pressed for 0.8 sec-
ond or longer. This button is enabled
when the ignition switch is off.4. CD LOAD ButtonThis compact disc player will accommo-
date up to six compact discs.
To insert multiple discs into the player,
perform the following:1. Press and release the [LOAD] Button.
2. Green light on the slot will be illuminat-
ed and the lowest number of empty
slot will blink on the display.
After “Wait” is displayed on the LCD,
the slot will open with “Insert CD” dis-
played on the LCD.
3. Insert a disc partway into the slot, label
side up. The player will pull the disc in.
When the disc is inserted, the disc will
begin to play automatically.
✽ ✽
NOTICE• The disc can be only inserted while the
green light is blinking on the slot.
• This CD player is suitable only for 12
cm discs, do not use irregular shaped
CDs.
To insert multiple discs:
1. Press and hold the [LOAD] button for
one second or more.
You will then hear a beep sound and
the green light on the slot will be illumi-
nated, and the numbers of empty disc
will blink on the display.
2. After “Wait” is displayed on the LCD with
the lowest number of empty slot blinking,
the slot will open with “Insert CD” dis-
played on the LCD.
3. Insert a disc partway into the slot, label
side up. The player will pull the disc in.
Once the disc is loaded, the numbers
of the empty disc will blink on the dis-
play continuously.
If the next “Insert CD” is displayed when
the slot is illuminated, you can then load
another disc.
4. Load the remaining disc by following
procedures 1 and 2. When you finished
loading 6 discs, the CD player will
begin to play the last CD loaded.
5. To load more than one disc but less
than six, complete Steps 1 and 2.
Page 220 of 402
![HYUNDAI ENTOURAGE 2009 Owners Manual Features of your vehicle204 3When you have finished loading discs,
press [LOAD] button to cancel the load-
ing function or wait for 10 seconds. The
CD player will begin to play the last CD
loaded. As HYUNDAI ENTOURAGE 2009 Owners Manual Features of your vehicle204 3When you have finished loading discs,
press [LOAD] button to cancel the load-
ing function or wait for 10 seconds. The
CD player will begin to play the last CD
loaded. As](/img/35/58883/w960_58883-219.png)
Features of your vehicle204 3When you have finished loading discs,
press [LOAD] button to cancel the load-
ing function or wait for 10 seconds. The
CD player will begin to play the last CD
loaded. As each CD starts to play, the
DISC number will appear on the display.✽ ✽
NOTICEThe disc player takes up to six discs. Do
not try to load more than six.5. AUX Selection ButtonIf the auxiliary device is connected, it
turns to AUX MODE to play the sound
from the auxiliary player.
If no auxiliary device is connected, it dis-
plays "NO MEDIA" for 5 seconds and
returns to the previous mode.6. Automatic Track Selection
Button Push [SEEK ] button for less than
0.8 second to play from the beginning
of the current song.
Push [SEEK ] button for less than
0.8 second and press again within 3
seconds to play the previous song.
Push [SEEK ] button for 0.8 or longer
to initiate reverse direction high speed
sound search of the current song. Push [SEEK ] button for less than
0.8 second to play the next song.
Push [SEEK ] button for 0.8 or
longer to initiate high speed sound
search of the current song.
7. INFO Selection ButtonDisplays the information of the current
CD TRACK in the order of DISC TITLE
➟
DISC ARTIST
➟TRACK TITLE
➟TRACK
ARTIST
➟TOTAL TRACK
➟Play Screen
➟
DISC TITLE
➟... (not displayed if the infor-
mation is not available on the DISC.)
8. TUNE/ENTER KnobTurn this button clockwise to display
songs after current song.
Also, turn this button counterclockwise to
display songs before current song.
To listen to the displayed song, press the
button to skip to the song and play.9. REPEAT Selection ButtonRepeats the current song when the but-
ton is pressed for less than 0.8 second.
Repeats the entire DISC when the button
is pressed for 0.8 second or longer.
10. RANDOM Selection ButtonTurns on/off the randomization of the play
list of files in the currently played DISC.
To cancel the mode, press the button
once again.11. DISC Selection Button [DISC ] Change Button
Changes disc to the previous disc.
[DISC ] Change Button
Changes disc to the next disc.12. SCAN Selection ButtonPlays first 10 seconds of each song in the
DISC.
To cancel the mode, press the button
once again.