HYUNDAI ENTOURAGE 2009 Owners Manual
Manufacturer: HYUNDAI, Model Year: 2009, Model line: ENTOURAGE, Model: HYUNDAI ENTOURAGE 2009Pages: 402, PDF Size: 9.08 MB
Page 371 of 402
653
Maintenance
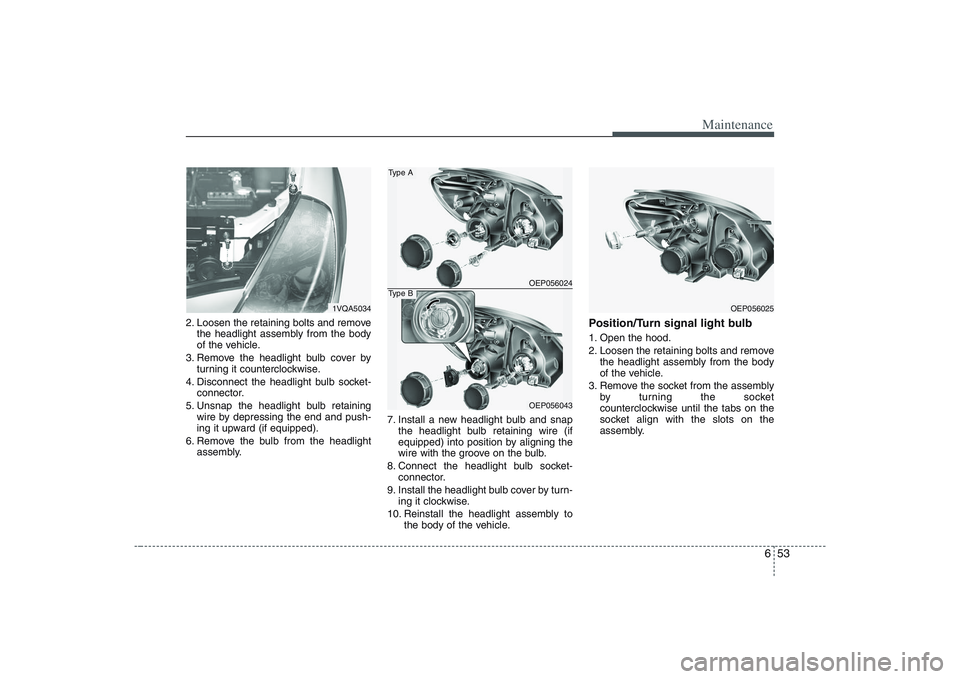
2. Loosen the retaining bolts and remove
the headlight assembly from the body
of the vehicle.
3. Remove the headlight bulb cover by
turning it counterclockwise.
4. Disconnect the headlight bulb socket-
connector.
5. Unsnap the headlight bulb retaining
wire by depressing the end and push-
ing it upward (if equipped).
6. Remove the bulb from the headlight
assembly.7. Install a new headlight bulb and snap
the headlight bulb retaining wire (if
equipped) into position by aligning the
wire with the groove on the bulb.
8. Connect the headlight bulb socket-
connector.
9. Install the headlight bulb cover by turn-
ing it clockwise.
10. Reinstall the headlight assembly to
the body of the vehicle.
Position/Turn signal light bulb1. Open the hood.
2. Loosen the retaining bolts and remove
the headlight assembly from the body
of the vehicle.
3. Remove the socket from the assembly
by turning the socket
counterclockwise until the tabs on the
socket align with the slots on the
assembly.
OEP056025
1VQA5034
OEP056024OEP056043
Type AType B
Page 372 of 402
Maintenance54 64. Remove the bulb from the socket by
pressing it in and rotating it until the
tabs on the bulb align with the slots in
the socket. Pull the bulb out of the
socket.
5. Insert a new bulb by inserting it into
the socket and rotating it until it locks
into place.
6. Install the socket in the assembly by
aligning the tabs on the socket with the
slots in the assembly. Insert the socket
into the assembly and turn the socket
clockwise.
7. Reinstall the headlight assembly to the
body of the vehicle.
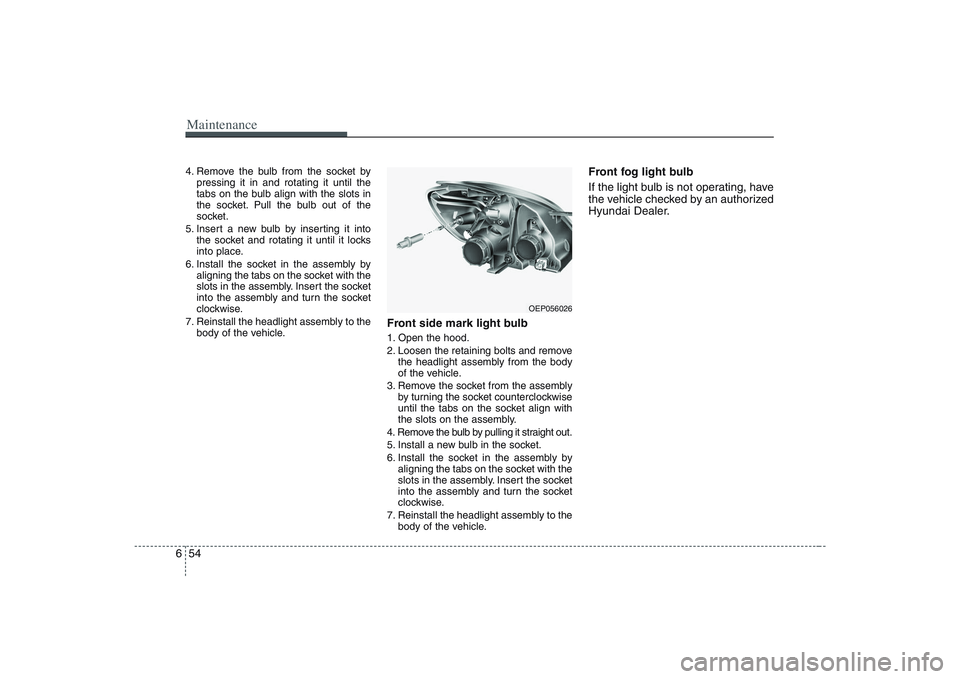
Front side mark light bulb1. Open the hood.
2. Loosen the retaining bolts and remove
the headlight assembly from the body
of the vehicle.
3. Remove the socket from the assembly
by turning the socket counterclockwise
until the tabs on the socket align with
the slots on the assembly.
4. Remove the bulb by pulling it straight out.
5. Install a new bulb in the socket.
6. Install the socket in the assembly by
aligning the tabs on the socket with the
slots in the assembly. Insert the socket
into the assembly and turn the socket
clockwise.
7. Reinstall the headlight assembly to the
body of the vehicle.
Front fog light bulb
If the light bulb is not operating, have
the vehicle checked by an authorized
Hyundai Dealer.
OEP056026
Page 373 of 402
655
Maintenance
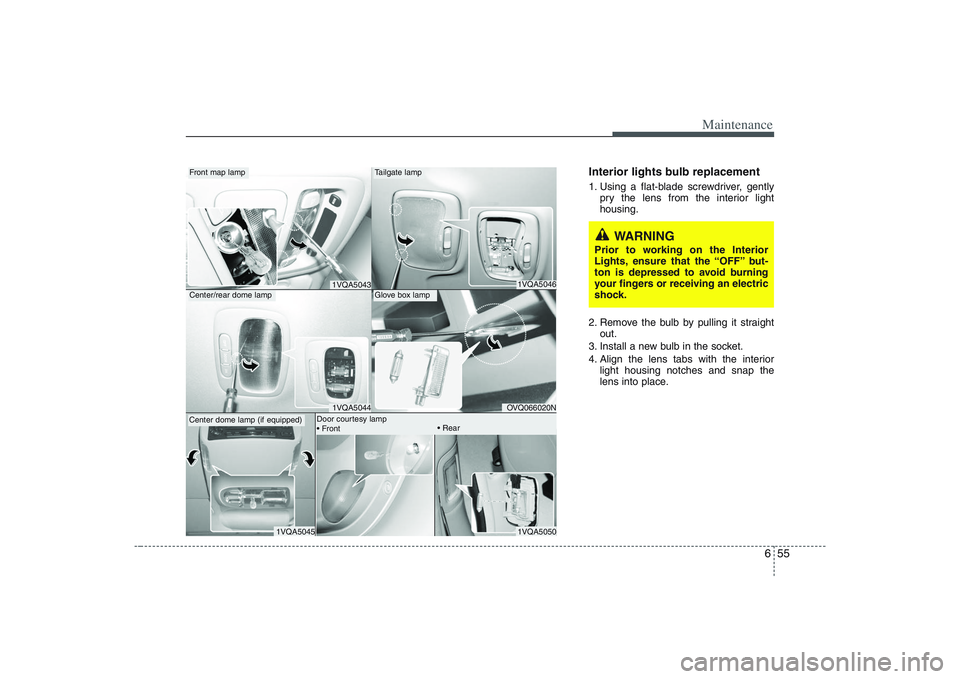
Interior lights bulb replacement1. Using a flat-blade screwdriver, gently
pry the lens from the interior light
housing.
2. Remove the bulb by pulling it straight
out.
3. Install a new bulb in the socket.
4. Align the lens tabs with the interior
light housing notches and snap the
lens into place.
1VQA5046OVQ066020N
Tailgate lampGlove box lamp
1VQA50431VQA5044
Front map lampCenter/rear dome lampCenter dome lamp (if equipped)
1VQA5050
1VQA5045
Door courtesy lamp
WARNING
Prior to working on the Interior
Lights, ensure that the “OFF” but-
ton is depressed to avoid burning
your fingers or receiving an electric
shock.
Page 374 of 402
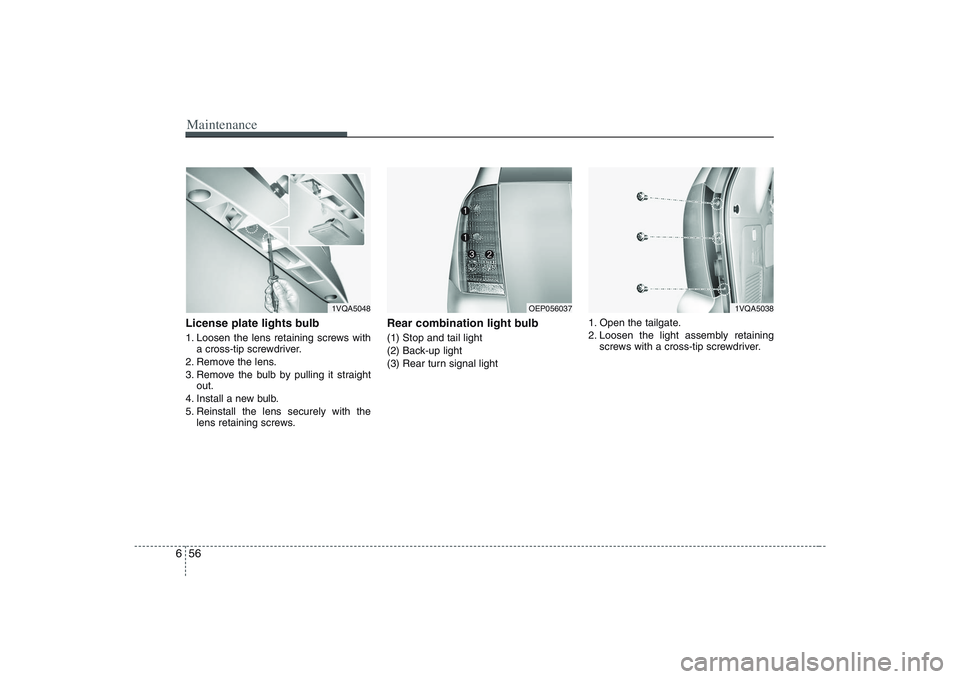
Maintenance56 6License plate lights bulb 1. Loosen the lens retaining screws with
a cross-tip screwdriver.
2. Remove the lens.
3. Remove the bulb by pulling it straight
out.
4. Install a new bulb.
5. Reinstall the lens securely with the
lens retaining screws.
Rear combination light bulb (1) Stop and tail light
(2) Back-up light
(3) Rear turn signal light1. Open the tailgate.
2. Loosen the light assembly retaining
screws with a cross-tip screwdriver.
1VQA5048
OEP056037
1VQA5038
Page 375 of 402
657
Maintenance
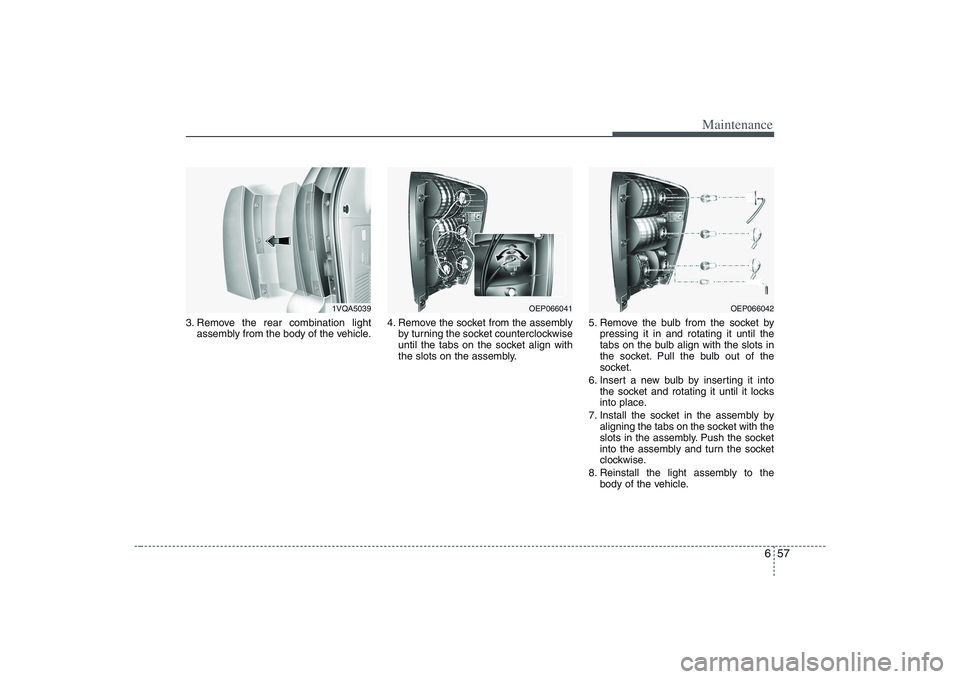
3. Remove the rear combination light
assembly from the body of the vehicle.4. Remove the socket from the assembly
by turning the socket counterclockwise
until the tabs on the socket align with
the slots on the assembly.5. Remove the bulb from the socket by
pressing it in and rotating it until the
tabs on the bulb align with the slots in
the socket. Pull the bulb out of the
socket.
6. Insert a new bulb by inserting it into
the socket and rotating it until it locks
into place.
7. Install the socket in the assembly by
aligning the tabs on the socket with the
slots in the assembly. Push the socket
into the assembly and turn the socket
clockwise.
8. Reinstall the light assembly to the
body of the vehicle.
1VQA5039
OEP066041
OEP066042
Page 376 of 402
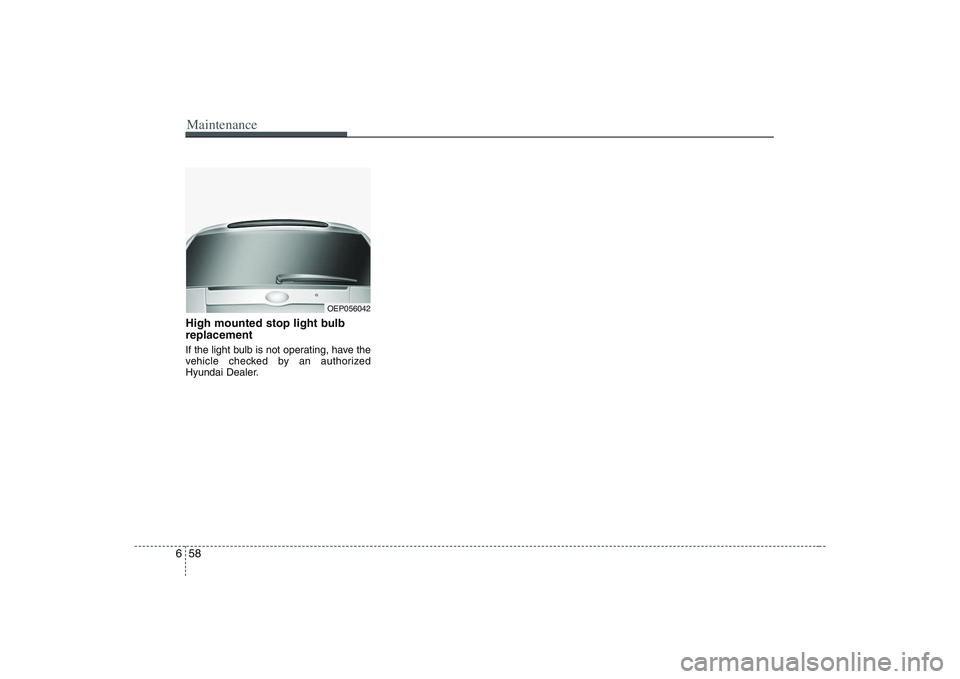
Maintenance58 6High mounted stop light bulb
replacementIf the light bulb is not operating, have the
vehicle checked by an authorized
Hyundai Dealer.
OEP056042
Page 377 of 402
659
Maintenance
LUBRICANT
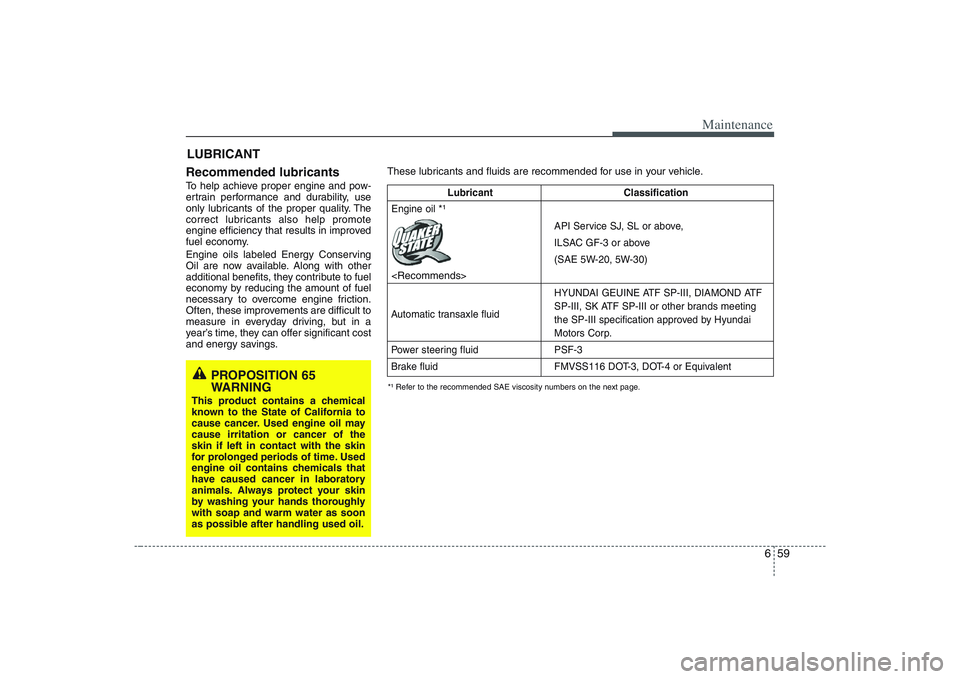
Recommended lubricants To help achieve proper engine and pow-
ertrain performance and durability, use
only lubricants of the proper quality. The
correct lubricants also help promote
engine efficiency that results in improved
fuel economy.
Engine oils labeled Energy Conserving
Oil are now available. Along with other
additional benefits, they contribute to fuel
economy by reducing the amount of fuel
necessary to overcome engine friction.
Often, these improvements are difficult to
measure in everyday driving, but in a
year’s time, they can offer significant cost
and energy savings.
These lubricants and fluids are recommended for use in your vehicle.*¹ Refer to the recommended SAE viscosity numbers on the next page.
Lubricant Classification
API Service SJ, SL or above,
ILSAC GF-3 or above
(SAE 5W-20, 5W-30)
HYUNDAI GEUINE ATF SP-III, DIAMOND ATF
Automatic transaxle fluidSP-III, SK ATF SP-III or other brands meeting
the SP-III specification approved by Hyundai
Motors Corp.
Power steering fluid PSF-3
Brake fluid FMVSS116 DOT-3, DOT-4 or Equivalent
Engine oil
*¹
PROPOSITION 65
WARNING
This product contains a chemical
known to the State of California to
cause cancer. Used engine oil may
cause irritation or cancer of the
skin if left in contact with the skin
for prolonged periods of time. Used
engine oil contains chemicals that
have caused cancer in laboratory
animals. Always protect your skin
by washing your hands thoroughly
with soap and warm water as soon
as possible after handling used oil.
Page 378 of 402
Maintenance60 6Recommended SAE viscosity
number
Engine oil viscosity (thickness) has an
effect on fuel economy and cold weather
operating (starting and oil flow). Lower
viscosity engine oils can provide better
fuel economy and cold weather perform-
ance, however, higher viscosity engine
oils are required for satisfactory lubrica-
tion in hot weather. Using oils of any vis-
cosity other than those recommended
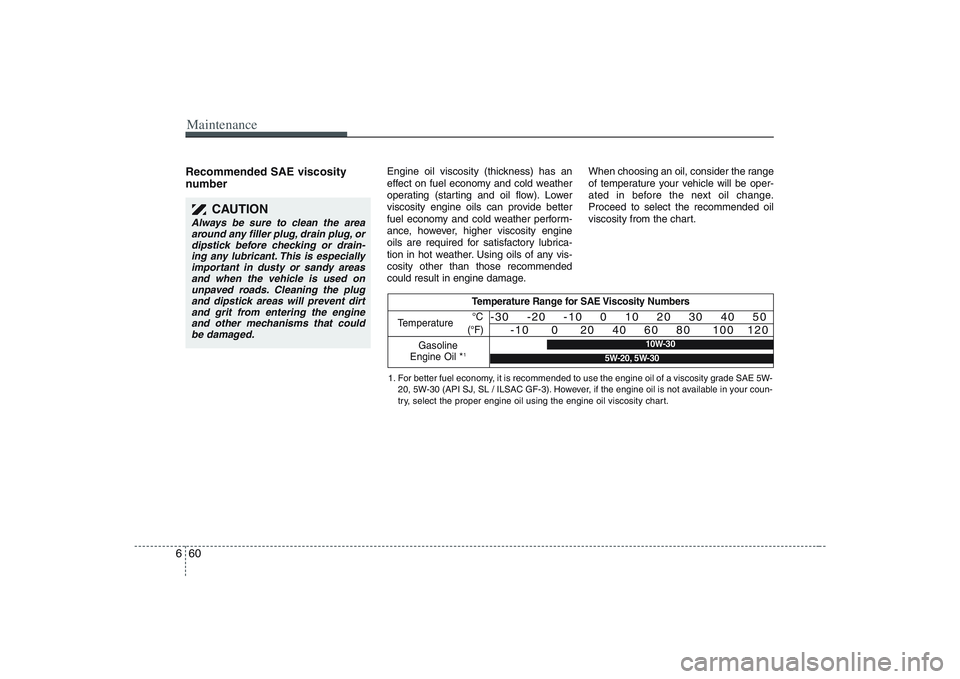
could result in engine damage.When choosing an oil, consider the range
of temperature your vehicle will be oper-
ated in before the next oil change.
Proceed to select the recommended oil
viscosity from the chart.
Temperature Range for SAE Viscosity Numbers
Temperature
Gasoline
Engine Oil *
1°C
(°F)
-30 -20 -10 0 10 20 30 40 50
-10 0 20 40 60 80 100 120
1. For better fuel economy, it is recommended to use the engine oil of a viscosity grade SAE 5W-
20, 5W-30 (API SJ, SL / ILSAC GF-3). However, if the engine oil is not available in your coun-
try, select the proper engine oil using the engine oil viscosity chart.
10W-30
5W-20, 5W-30
CAUTION
Always be sure to clean the area
around any filler plug, drain plug, or
dipstick before checking or drain-
ing any lubricant. This is especially
important in dusty or sandy areas
and when the vehicle is used on
unpaved roads. Cleaning the plug
and dipstick areas will prevent dirt
and grit from entering the engine
and other mechanisms that could
be damaged.
Page 379 of 402
661
Maintenance
CORROSION PROTECTIONProtecting your Hyundai from
corrosionBy using the most advanced design and
construction practices to combat corro-
sion, Hyundai produces cars of the high-
est quality. However, this is only part of
the job. To achieve the long-term corro-
sion resistance your Hyundai can deliver,
the owner's cooperation and assistance
is also required.Common causes of corrosionThe most common causes of corrosion
on your car are:
allowed to accumulate underneath the
car.
Removal of paint or protective coatings
by stones, gravel, abrasion or minor
scrapes and dents which leave unpro-
tected metal exposed to corrosion.
High-corrosion areasIf you live in an area where your car is
regularly exposed to corrosive materials,
corrosion protection is particularly impor-
tant. Some of the common causes of
accelerated corrosion are road salts,
dust control chemicals, ocean air and
industrial pollution.
Moisture breeds corrosionMoisture creates the conditions in which
corrosion is most likely to occur. For
example, corrosion is accelerated by
high humidity, particularly when tempera-
tures are just above freezing. In such
conditions, the corrosive material is kept
in contact with the car surfaces by mois-
ture that is slow to evaporate.
Mud is particularly corrosive because it is
slow to dry and holds moisture in contact
with the vehicle. Although the mud
appears to be dry, it can still retain the
moisture and promote corrosion.
High temperatures can also accelerate
corrosion of parts that are not properly
ventilated so the moisture can be dis-
persed. For all these reasons, it is par-
ticularly important to keep your car clean
and free of mud or accumulations of
other materials. This applies not only to
the visible surfaces but particularly to the
underside of the car.
Page 380 of 402
Maintenance62 6To help prevent corrosionYou can help prevent corrosion from get-
ting started by observing the following:Keep your car cleanThe best way to prevent corrosion is to
keep your car clean and free of corrosive
materials. Attention to the underside of
the car is particularly important.
If you live in a high-corrosion area —
where road salts are used, near the
ocean, areas with industrial pollution,
acid rain, etc.—, you should take extra
care to prevent corrosion. In winter,
hose off the underside of your car at
least once a month and be sure to
clean the underside thoroughly when
winter is over.
give particular attention to the compo-
nents under the fenders and other
areas that are hidden from view. Do a
thorough job; just dampening the accu-
mulated mud rather than washing it
away will accelerate corrosion rather
than prevent it. Water under high pres-
sure and steam are particularly effec-
tive in removing accumulated mud and
corrosive materials.
rocker panels and frame members, be
sure that drain holes are kept open so
that moisture can escape and not be
trapped inside to accelerate corrosion.
Keep your garage dryDon't park your car in a damp, poorly
ventilated garage. This creates a favor-
able environment for corrosion. This is
particularly true if you wash your car in
the garage or drive it into the garage
when it is still wet or covered with snow,
ice or mud. Even a heated garage can
contribute to corrosion unless it is well
ventilated so moisture is dispersed.
Keep paint and trim in good condi-
tionScratches or chips in the finish should be
covered with "touch-up" paint as soon as
possible to reduce the possibility of cor-
rosion. If bare metal is showing through,
the attention of a qualified body and paint
shop is recommended.
Bird droppings : Bird droppings are high-
ly corrosive and may damage painted
surfaces in just a few hours. Always
remove bird droppings as soon as possi-
ble.Don't neglect the interiorMoisture can collect under the floor mats
and carpeting to cause corrosion. Check
under the mats periodically to be sure
the carpeting is dry. Use particular care if
you carry fertilizers, cleaning materials or
chemicals in the car.
These should be carried only in proper
containers and any spills or leaks should
be cleaned up, flushed with clean water
and thoroughly dried.