height HYUNDAI ENTOURAGE 2009 Owners Manual
[x] Cancel search | Manufacturer: HYUNDAI, Model Year: 2009, Model line: ENTOURAGE, Model: HYUNDAI ENTOURAGE 2009Pages: 402, PDF Size: 9.08 MB
Page 52 of 402
Features of your vehicle36 3
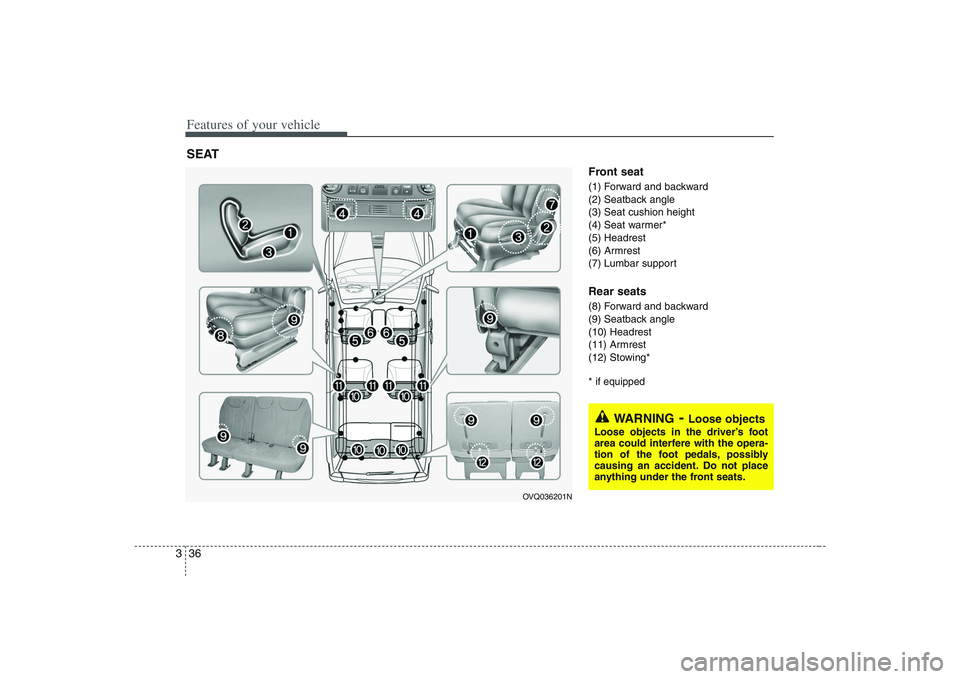
Front seat(1) Forward and backward
(2) Seatback angle
(3) Seat cushion height
(4) Seat warmer*
(5) Headrest
(6) Armrest
(7) Lumbar supportRear seats(8) Forward and backward
(9) Seatback angle
(10) Headrest
(11) Armrest
(12) Stowing** if equipped
SEAT
OVQ036201N
WARNING
- Loose objects
Loose objects in the driver’s foot
area could interfere with the opera-
tion of the foot pedals, possibly
causing an accident. Do not place
anything under the front seats.
Page 55 of 402
339
Features of your vehicle
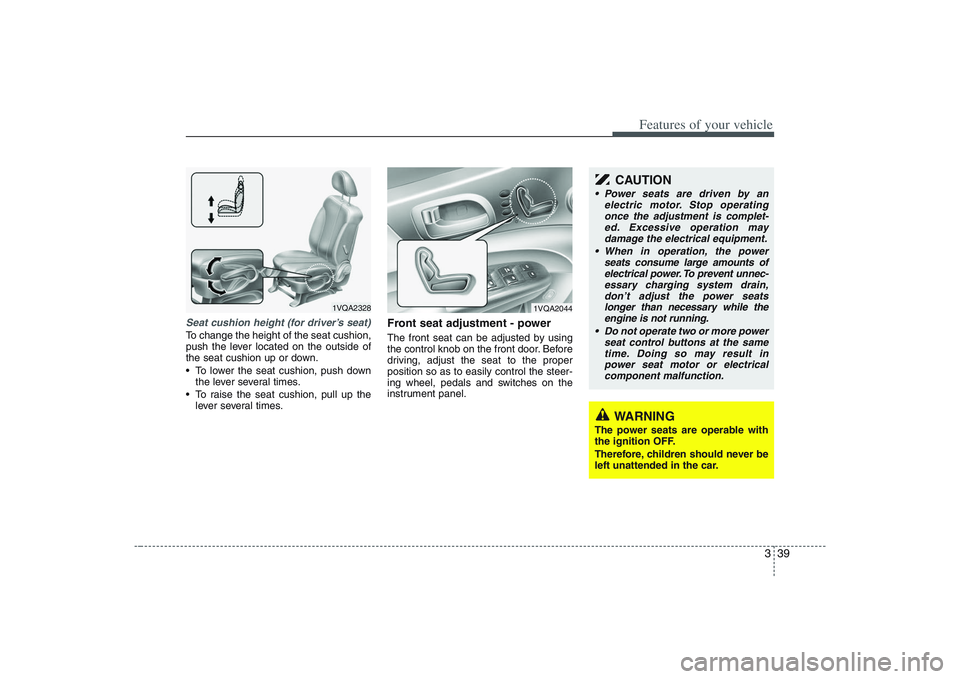
Seat cushion height (for driver’s seat)To change the height of the seat cushion,
push the lever located on the outside of
the seat cushion up or down.
To lower the seat cushion, push down
the lever several times.
To raise the seat cushion, pull up the
lever several times.
Front seat adjustment - powerThe front seat can be adjusted by using
the control knob on the front door. Before
driving, adjust the seat to the proper
position so as to easily control the steer-
ing wheel, pedals and switches on the
instrument panel.
1VQA2328
WARNING
The power seats are operable with
the ignition OFF.
Therefore, children should never be
left unattended in the car.
CAUTION
Power seats are driven by an
electric motor. Stop operating
once the adjustment is complet-
ed. Excessive operation may
damage the electrical equipment.
When in operation, the power
seats consume large amounts of
electrical power. To prevent unnec-
essary charging system drain,
don’t adjust the power seats
longer than necessary while the
engine is not running.
Do not operate two or more power
seat control buttons at the same
time. Doing so may result in
power seat motor or electrical
component malfunction.
1VQA2044
Page 57 of 402
341
Features of your vehicle
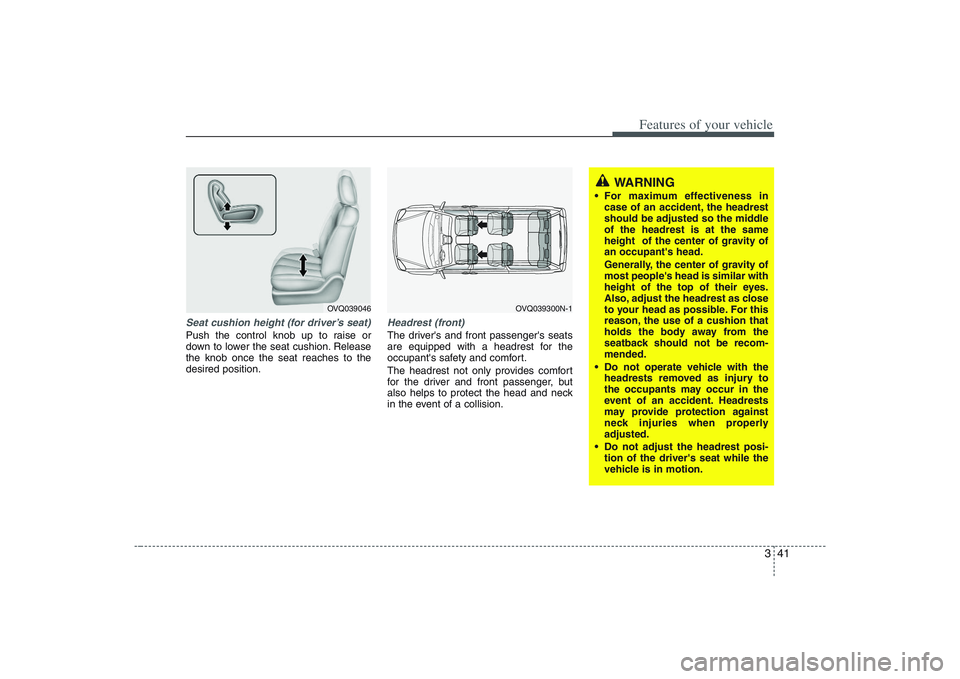
Seat cushion height (for driver’s seat)Push the control knob up to raise or
down to lower the seat cushion. Release
the knob once the seat reaches to the
desired position.
Headrest (front)The driver's and front passenger's seats
are equipped with a headrest for the
occupant's safety and comfort.
The headrest not only provides comfort
for the driver and front passenger, but
also helps to protect the head and neck
in the event of a collision.
OVQ039046
OVQ039300N-1
WARNING
For maximum effectiveness in
case of an accident, the headrest
should be adjusted so the middle
of the headrest is at the same
height of the center of gravity of
an occupant's head.
Generally, the center of gravity of
most people's head is similar with
height of the top of their eyes.
Also, adjust the headrest as close
to your head as possible. For this
reason, the use of a cushion that
holds the body away from the
seatback should not be recom-
mended.
Do not operate vehicle with the
headrests removed as injury to
the occupants may occur in the
event of an accident. Headrests
may provide protection against
neck injuries when properly
adjusted.
Do not adjust the headrest posi-
tion of the driver's seat while the
vehicle is in motion.
Page 58 of 402
Features of your vehicle42 3Active headrest (if equipped)
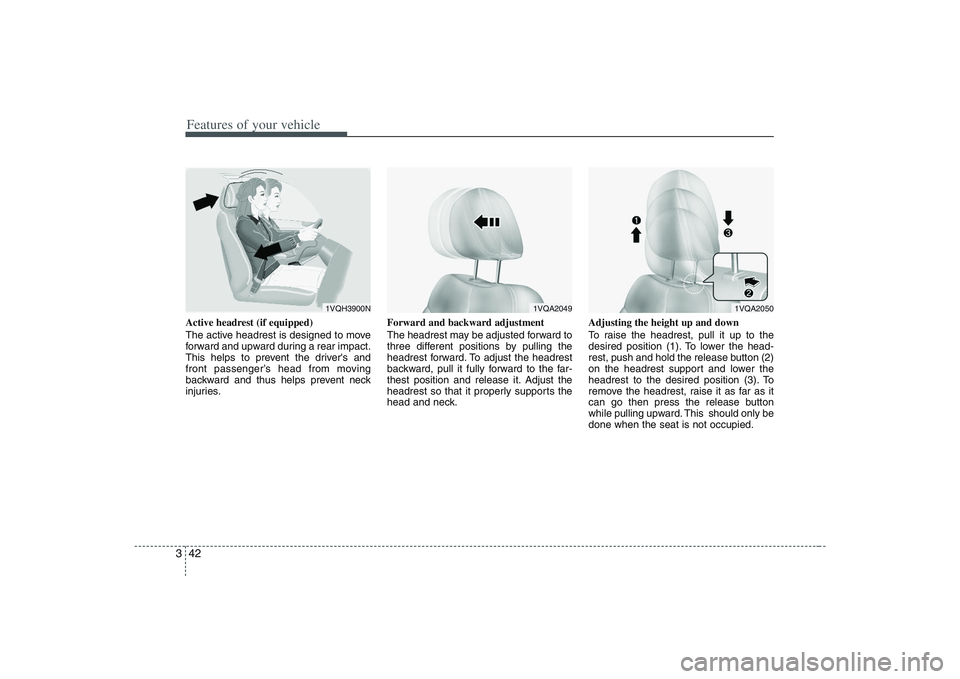
The active headrest is designed to move
forward and upward during a rear impact.
This helps to prevent the driver's and
front passenger’s head from moving
backward and thus helps prevent neck
injuries.Forward and backward adjustment
The headrest may be adjusted forward to
three different positions by pulling the
headrest forward. To adjust the headrest
backward, pull it fully forward to the far-
thest position and release it. Adjust the
headrest so that it properly supports the
head and neck.Adjusting the height up and down
To raise the headrest, pull it up to the
desired position (1). To lower the head-
rest, push and hold the release button (2)
on the headrest support and lower the
headrest to the desired position (3). To
remove the headrest, raise it as far as it
can go then press the release button
while pulling upward. This should only be
done when the seat is not occupied.
1VQA2050
1VQA2049
1VQH3900N
Page 59 of 402
343
Features of your vehicle
Removal
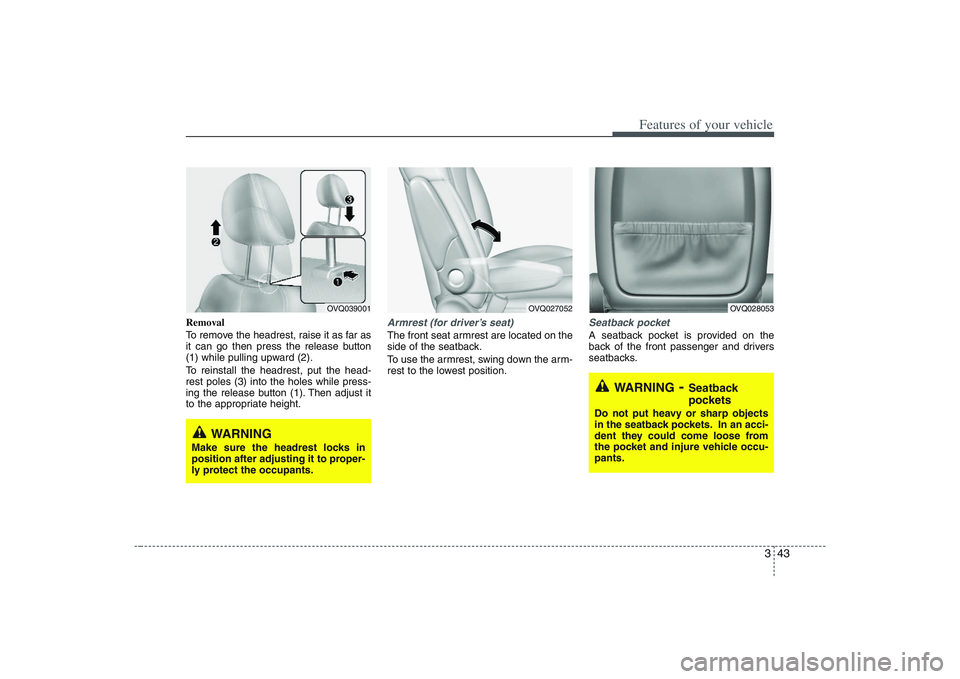
To remove the headrest, raise it as far as
it can go then press the release button
(1) while pulling upward (2).
To reinstall the headrest, put the head-
rest poles (3) into the holes while press-
ing the release button (1). Then adjust it
to the appropriate height.
Armrest (for driver’s seat)The front seat armrest are located on the
side of the seatback.
To use the armrest, swing down the arm-
rest to the lowest position.
Seatback pocketA seatback pocket is provided on the
back of the front passenger and drivers
seatbacks.
OVQ039001
WARNING
Make sure the headrest locks in
position after adjusting it to proper-
ly protect the occupants.
OVQ027052
WARNING
- Seatback
pockets
Do not put heavy or sharp objects
in the seatback pockets. In an acci-
dent they could come loose from
the pocket and injure vehicle occu-
pants.
OVQ028053
Page 63 of 402
347
Features of your vehicle
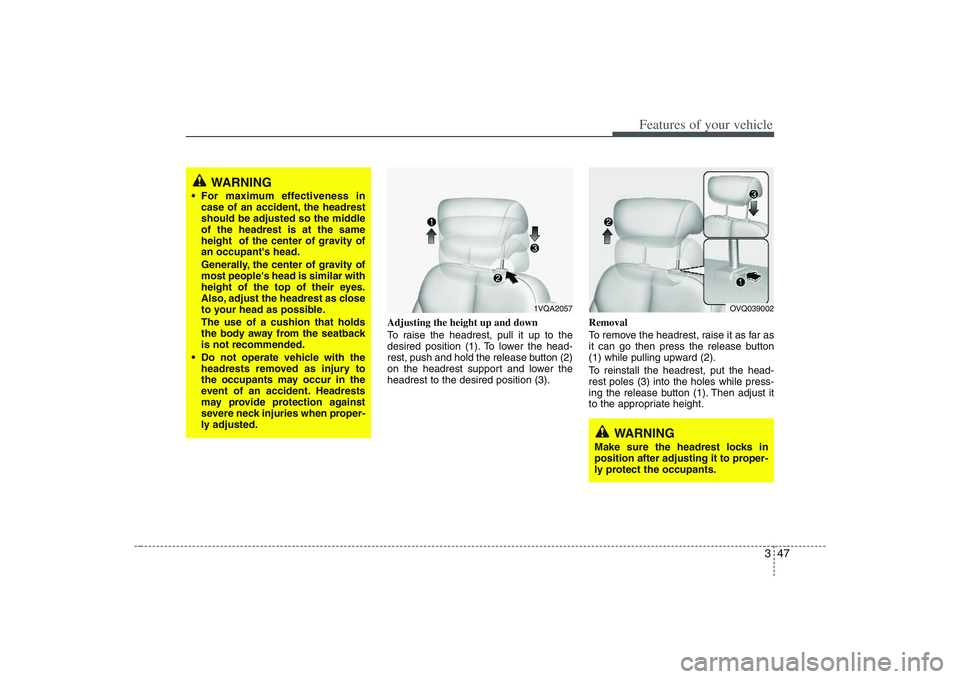
Adjusting the height up and down
To raise the headrest, pull it up to the
desired position (1). To lower the head-
rest, push and hold the release button (2)
on the headrest support and lower the
headrest to the desired position (3).Removal
To remove the headrest, raise it as far as
it can go then press the release button
(1) while pulling upward (2).
To reinstall the headrest, put the head-
rest poles (3) into the holes while press-
ing the release button (1). Then adjust it
to the appropriate height.
OVQ039002
1VQA2057
WARNING
Make sure the headrest locks in
position after adjusting it to proper-
ly protect the occupants.
WARNING
For maximum effectiveness in
case of an accident, the headrest
should be adjusted so the middle
of the headrest is at the same
height of the center of gravity of
an occupant's head.
Generally, the center of gravity of
most people's head is similar with
height of the top of their eyes.
Also, adjust the headrest as close
to your head as possible.
The use of a cushion that holds
the body away from the seatback
is not recommended.
Do not operate vehicle with the
headrests removed as injury to
the occupants may occur in the
event of an accident. Headrests
may provide protection against
severe neck injuries when proper-
ly adjusted.
Page 76 of 402
Features of your vehicle60 3✽
✽
NOTICESmall children are best protected from
injury in an accident when properly
restrained in the rear seat by a child
restraint system that meets the require-
ments of the Federal Motor Vehicle
Safety Standards. Before buying any
child restraint system, make sure that it
has a label certifying that it meets
Federal Motor Vehicle Safety Standard
213. The restraint must be appropriate
for your child's height and weight.
Check the label on the child restraint for
this information. See page 3-71.
Larger childrenChildren who are too large for child
restraint systems should always occupy
the rear seat and use the available
lap/shoulder belts. The lap portion should
be fastened snug on the hips and as low
as possible. Check belt fit periodically. A
child's squirming could put the belt out of
position. Children are afforded the most
safety in the event of an accident when
they are restrained by a proper restraint
system in the rear seat. If a larger child
(over age 13) must be seated in the front
seat, the child should be securely
restrained by the available lap/shoulder
belt and the seat should be placed in the
rearmost position. Children under the
age of 13 should be restrained securely
in the rear seat. NEVER place a child
under the age of 13 in the front seat.
NEVER place a rear facing child seat in
the front seat of a vehicle.
If the shoulder belt portion slightly touch-
es the child’s neck or face, try placing the
child closer to the center of the vehicle. If
the shoulder belt still touches their face
or neck they need to be returned to a
child restraint system. In addition, after-
market devices are available from inde-
pendent manufacturers which help pull
the shoulder belt down and away from
the child’s face or neck.
Pregnant womenThe use of a seat belt is recommended
for pregnant women to lessen the chance
of injury in an accident. When a seat belt
is used, the lap belt portion should be
placed as low and snugly as possible on
the hips, not across the abdomen. For
specific recommendations, consult a
physician.Injured personA seat belt should be used when an
injured person is being transported.
When this is necessary, you should con-
sult a physician for recommendations.One person per beltTwo people (including children) should
never attempt to use a single seat belt.
This could increase the severity of
injuries in case of an accident.
WARNING
Every person in your vehicle needs
to be properly restrained at all
times, including infants and chil-
dren. Never hold a child in your
arms or lap when riding in a vehicle.
The violent forces created during a
crash will tear the child from your
arms and throw the child against
the interior. Always use a child
restraint appropriate for your
child's height and weight, see page
3-71.
WARNING
- Shoulder belts
on small children
Never allow a shoulder belt to be
in contact with a child’s neck or
face while the vehicle is in
motion.
If safety belts are not properly
worn and adjusted on children,
there is a risk of death or serious
injury.
Page 78 of 402
Features of your vehicle62 3Height adjustable shoulder belt
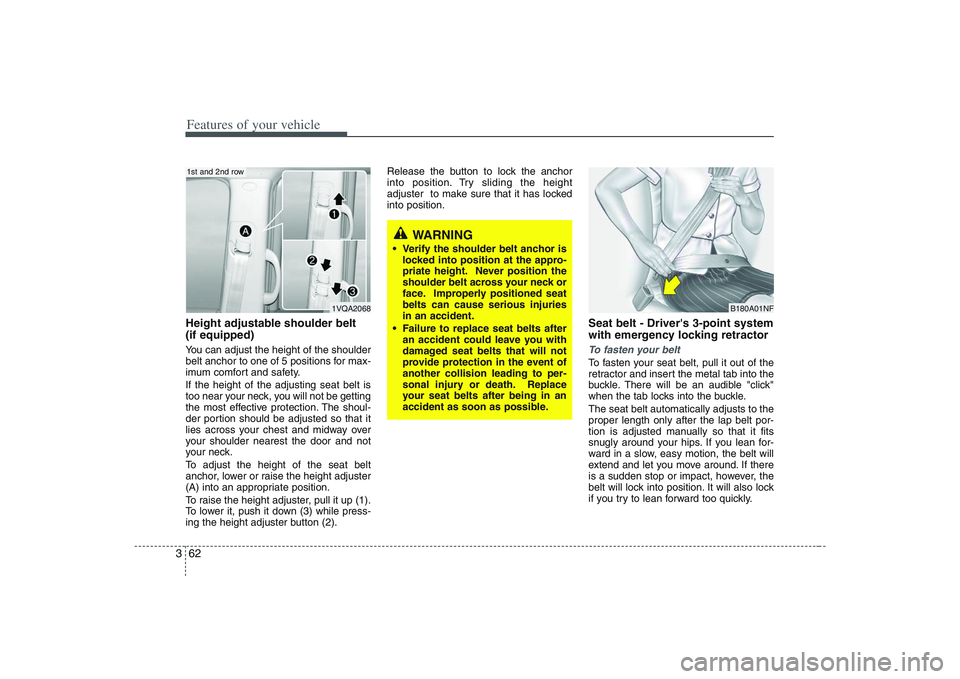
(if equipped)You can adjust the height of the shoulder
belt anchor to one of 5 positions for max-
imum comfort and safety.
If the height of the adjusting seat belt is
too near your neck, you will not be getting
the most effective protection. The shoul-
der portion should be adjusted so that it
lies across your chest and midway over
your shoulder nearest the door and not
your neck.
To adjust the height of the seat belt
anchor, lower or raise the height adjuster
(A) into an appropriate position.
To raise the height adjuster, pull it up (1).
To lower it, push it down (3) while press-
ing the height adjuster button (2).Release the button to lock the anchor
into position. Try sliding the height
adjuster to make sure that it has locked
into position.
Seat belt - Driver's 3-point system
with emergency locking retractorTo fasten your beltTo fasten your seat belt, pull it out of the
retractor and insert the metal tab into the
buckle. There will be an audible "click"
when the tab locks into the buckle.
The seat belt automatically adjusts to the
proper length only after the lap belt por-
tion is adjusted manually so that it fits
snugly around your hips. If you lean for-
ward in a slow, easy motion, the belt will
extend and let you move around. If there
is a sudden stop or impact, however, the
belt will lock into position. It will also lock
if you try to lean forward too quickly.
WARNING
Verify the shoulder belt anchor is
locked into position at the appro-
priate height. Never position the
shoulder belt across your neck or
face. Improperly positioned seat
belts can cause serious injuries
in an accident.
Failure to replace seat belts after
an accident could leave you with
damaged seat belts that will not
provide protection in the event of
another collision leading to per-
sonal injury or death. Replace
your seat belts after being in an
accident as soon as possible.
B180A01NF
1VQA2068
1st and 2nd row
Page 111 of 402
395
Features of your vehicle
Additional safety precautionsNever let passengers ride in the
cargo area or on top of a folded-
down back seat.All occupants should
sit upright, fully back in their seats with
their seat belts on and their feet on the
floor.
Passengers should not move out of
or change seats while the vehicle is
moving.A passenger who is not wear-
ing a seat belt during a crash or emer-
gency stop can be thrown against the
inside of the vehicle, against other
occupants, or out of the vehicle.
Each seat belt is designed to
restrain one occupant.If more than
one person uses the same seat belt,
they could be seriously injured or killed
in a collision.
Do not use any accessories on seat
belts.Devices claiming to improve
occupant comfort or reposition the seat
belt can reduce the protection provided
by the seat belt and increase the
chance of serious injury in a crash.
Passengers should not place hard
or sharp objects between them-
selves and the air bags.Carrying
hard or sharp objects on your lap or in
your mouth can result in injuries if an
air bag inflates.Keep occupants away from the air
bag covers.All occupants should sit
upright, fully back in their seats with
their seat belts on and their feet on the
floor. If occupants are too close to the
air bag covers, they could be injured if
the air bags inflate.
Do not attach or place objects on or
near the air bag covers.Any object
attached to or placed on the front or
side impact air bag covers could inter-
fere with the proper operation of the air
bags.
Do not modify the front seats.
Modification of the front seats could
interfere with the operation of the sup-
plemental restraint system sensing
components or side impact air bags.
Do not place items under the front
seats.Placing items under the front
seats could interfere with the operation
of the supplemental restraint system
sensing components and wiring har-
nesses.
Never hold an infant or child on your
lap.The infant or child could be seri-
ously injured or killed in the event of a
crash. All infants and children should
be properly restrained in appropriate
child safety seats or seat belts in the
rear seat.
Adding equipment to or modify-
ing your air bag-equipped vehi-
cle.If you modify your vehicle by changing
your vehicle's frame, bumper system,
front end or side sheet metal or ride
height, this may affect the operation of
your vehicle's air bag system.
WARNING
Sitting improperly or out of posi-
tion can cause occupants to be
shifted too close to a deploying
air bag, strike the interior struc-
ture or be thrown from the vehicle
resulting in serious injury or
death.
Always sit upright with the seat-
back in an upright position, cen-
tered on the seat cushion with
your seat belt on, legs comfort-
ably extended and your feet on
the floor.
Page 236 of 402
Features of your vehicle220 3✽
✽
NOTICEThe RSE will enter standby mode when
the vehicle ignition is turned off and
back on. Press the SRC or
PLAY/PAUSE( ) button to “wake
up” the unit and resume disc play.1. Stop/Eject While the disc is playing, press the
STOP/EJECT ( ) button to stop disc
play. When the disc has stopped, press
the button again to eject the disc.✽ ✽
NOTICEThe player has an Auto-Reload Disc
Protection feature to protect discs from
accidental damage. If an ejected disc is
not removed within 25 seconds after
being ejected, it will be pulled back into
the player. This is to protect the disc
from accidental damage.
2. Speaker Volume ControlYou can adjust the volume one of two
ways. First, if you are adjusting the vol-
ume for audio through the vehicle speak-
ers, you can use the VOLUME button on
the control panel or the remote control.
This button is reserved for sending a sig-
nal to the vehicle speakers only, and will
not adjust the headphone volume. Press
“+” to increase the volume and “-” to
decrease the volume.
Second, the volume on the wireless
headphones can be adjusted by turning
the VOL knob located on the left side of
the headphones.3. Play/Pause You do not need to press the play button
after first loading a DVD or VCD; it will
start automatically by playing the first
track or bringing up the disc menu.
If the disc does not automatically load,
press PLAY/PAUSE( ) to play the DVD.
While playing a DVD, press PLAY
/PAUSE( ) to pause the DVD. Press
the button again to resume play.
4. Display When the player is in DVD mode, press
the DISP button to view the DVD title,
chapter number and elapsed time and
other information about the DVD current-
ly playing.
It will also display brightness. There are
“Day Time” brightness with brightest level
and “Night Time” brightness which has
70% level of “Day Time” brightness.
Adjust the level of brightness by pressing
the REV(dimmer) or FWD(brighter) but-
tons.
The next time the player is turned on, it
will return to the brightness level it was
adjusted to when last used.
The RSE unit has two presets of display
brightness. When the headlamp is turned
on, the display brightness level will be
dimmed as the preset. However, when
the headlamp is turned off, the display
brightness will return to the daytime
brightness.
Press DISP to adjust the image format.
The image format, also known as the
aspect ratio, is a ratio of the height to
width of the image on the screen. For
example, a 4:3 ratio would mean an
image that is 4 units by 3 units.