check engine Hyundai Equus 2010 Owner's Manual
[x] Cancel search | Manufacturer: HYUNDAI, Model Year: 2010, Model line: Equus, Model: Hyundai Equus 2010Pages: 374, PDF Size: 41.29 MB
Page 10 of 374
13
Introduction
Gasoline containing alcohol andmethanol
Gasohol, a mixture of gasoline and
ethanol (also known as grain alcohol),and gasoline or gasohol containing
methanol (also known as wood alcohol)
are being marketed along with or instead
of leaded gasoline. Do not use gasohol containing more than 10% ethanol, and do not use gasoline or
gasohol containing any methanol. Either
of these fuels may cause drivability prob-lems and damage to the fuel system.
Discontinue using gasohol of any kind if
drivability problems occur.
Vehicle damage or drivability problems
may not be covered by the manufactur-
er’s warranty if they result from the useof:
1. Gasohol containing more than 10% ethanol.
2. Gasoline or gasohol containing methanol.
3. Leaded fuel or leaded gasohol.
Use of MTBE
HYUNDAI recommends avoiding fuels
containing MTBE (Methyl Tertiary Butyl
Ether) over 15.0% vol. (Oxygen Content
2.7% weight) in your vehicle.
Fuel containing MTBE over 15.0% vol.
(Oxygen Content 2.7% weight) may
reduce vehicle performance and produce
vapor lock or hard starting.
WARNING
• Do not "top off" after the nozzle automatically shuts off when refueling.
Always check that the fuel cap is installed securely to prevent fuel
spillage in the event of an acci-dent.
CAUTION
NEVER USE LEADED FUEL. The
use of leaded fuel is detrimental to the catalytic converter and willdamage the engine control sys-
tem’s oxygen sensor and affectemission control.
Never add any fuel system cleaningagents to the fuel tank other thanwhat has been specified. (Consult
an authorized HYUNDAI dealer for details.)
CAUTION
Your New Vehicle Limited Warranty
may not cover damage to the fuelsystem and any performance prob-lems that are caused by the use of
fuels containing methanol or fuels containing MTBE (Methyl TertiaryButyl Ether) over 15.0% vol. (Oxygen Content 2.7% weight.)
CAUTION
Never use gasohol which containsmethanol. Discontinue use of any gasohol product which impairs dri-
vability.
Page 46 of 374
Safety features of your vehicle
28
3
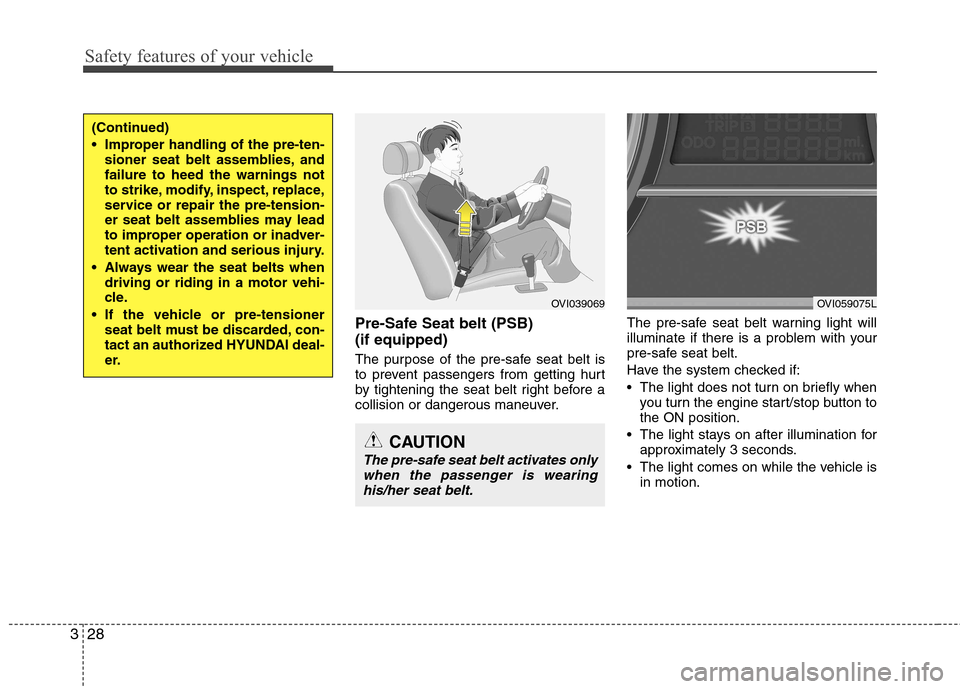
Pre-Safe Seat belt (PSB) (if equipped)
The purpose of the pre-safe seat belt is
to prevent passengers from getting hurt
by tightening the seat belt right before a
collision or dangerous maneuver. The pre-safe seat belt warning light will
illuminate if there is a problem with your
pre-safe seat belt.
Have the system checked if:
The light does not turn on briefly when
you turn the engine start/stop button to the ON position.
The light stays on after illumination for approximately 3 seconds.
The light comes on while the vehicle is in motion.
(Continued)
Improper handling of the pre-ten-sioner seat belt assemblies, and failure to heed the warnings not
to strike, modify, inspect, replace,
service or repair the pre-tension-
er seat belt assemblies may lead
to improper operation or inadver-
tent activation and serious injury.
Always wear the seat belts when driving or riding in a motor vehi-
cle.
If the vehicle or pre-tensioner seat belt must be discarded, con-
tact an authorized HYUNDAI deal-
er.
OVI039069OVI059075L
CAUTION
The pre-safe seat belt activates only
when the passenger is wearing
his/her seat belt.
Page 63 of 374
345
Safety features of your vehicle
Air bag warning light
The purpose of the air bag warning light
in your instrument panel is to alert you of
a potential problem with your air bag -
Supplemental Restraint System (SRS).
When the ignition switch is turned ON,
the warning light should illuminate for
approximately 6 seconds, then go off.
Have the system checked if:
The light does not turn on briefly whenyou turn the engine start/stop button to the ON position.
The light stays on after illuminating for approximately 6 seconds.
The light comes on while the vehicle is in motion.
The light blinks when the engine start/stop button is in ON position. SRS components and functions
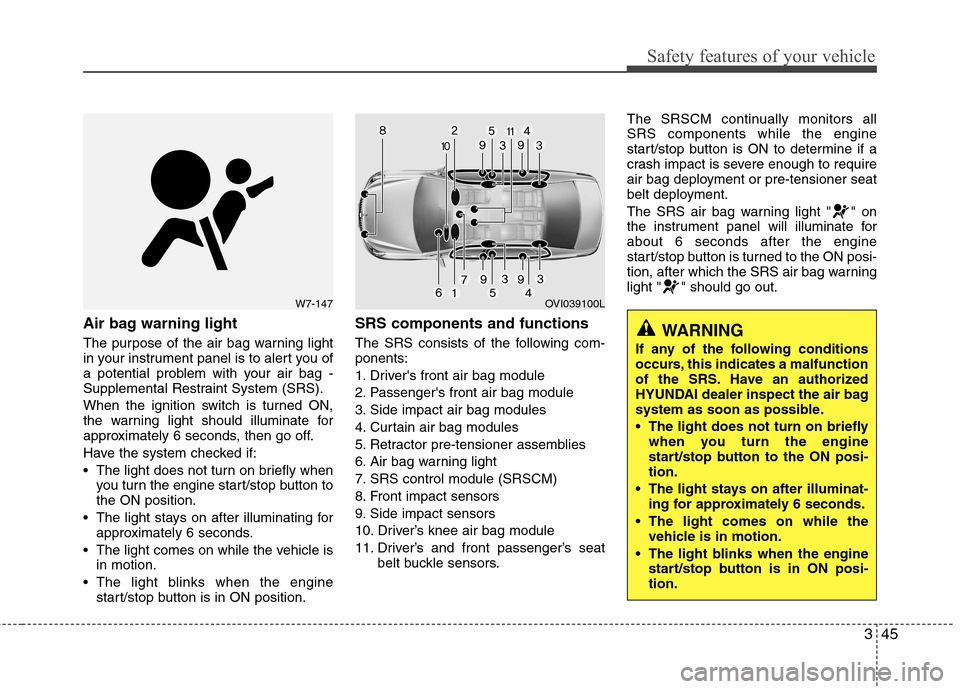
The SRS consists of the following com- ponents:
1. Driver's front air bag module
2. Passenger's front air bag module
3. Side impact air bag modules
4. Curtain air bag modules
5. Retractor pre-tensioner assemblies
6. Air bag warning light
7. SRS control module (SRSCM)
8. Front impact sensors
9. Side impact sensors
10. Driver’s knee air bag module
11. Driver’s and front passenger’s seat
belt buckle sensors. The SRSCM continually monitors all SRS components while the engine
start/stop button is ON to determine if a
crash impact is severe enough to require
air bag deployment or pre-tensioner seat
belt deployment.
The SRS air bag warning light " " on
the instrument panel will illuminate forabout 6 seconds after the engine
start/stop button is turned to the ON posi-
tion, after which the SRS air bag warning
light " " should go out.
W7-147OVI039100L
WARNING
If any of the following conditions
occurs, this indicates a malfunction
of the SRS. Have an authorized
HYUNDAI dealer inspect the air bag
system as soon as possible.
The light does not turn on briefly when you turn the engine
start/stop button to the ON posi-tion.
The light stays on after illuminat- ing for approximately 6 seconds.
The light comes on while the vehicle is in motion.
The light blinks when the engine start/stop button is in ON posi-tion.
Page 81 of 374

43
Features of your vehicle
With a smart key, you can lock or unlock
a door (and trunk) and even start the
engine without inserting the key.
Smart key functions
Carrying the smart key, you can lock and
unlock the vehicle doors (and trunk).
Also, you may start the engine. Refer to
the following for more details.Locking
Pressing the button of the outside door
handles with all doors (and trunk) closed
and any door unlocked, locks all the
doors (and trunk). The hazard warning
lights blink once to indicate that all doors
(and trunk) are locked. The button will
only operate when the smart key is with-in 0.7~1 m (28~40 in.) from the outside
door handle. If you put your hand in the
outside door handle to check that the
doors lock, doors may open.
If you want to make sure that a door has
locked or not, you should check the door
lock button inside the vehicle or check
that the hazard warning lights blink once.Even though you press the outside door
handle buttons, the doors will not lock
and the chime will sound for 3 seconds if
any of following occur:
• The smart key is in the vehicle.
The engine start/stop button is in ACC
or ON position.
Any door except the trunk is open.
Unlocking
Carrying the smart key with you while all
doors locked and if you put your hand in
the outside door handle for approximate-
ly 0.5 second, all doors will unlock. The
hazard warning lights blink twice to indi-
cate that all doors (and trunk) are
unlocked. You can open the door by
pulling the outside door handle. The
smart key is only recognized in the area0.7~1 m (28~40 in.) from the outside
door handle.
When the smart key is recognized in the area of 0.7~1 m (28~40 in.) from the out-
side door handle, other people can alsoopen the door without possession of the
smart key.
SMART KEY
OVI049001OVI049005
UnlockLock
Page 105 of 374
427
Features of your vehicle
2. To set up the curtain, pull up the switchonce more.
3. If you want to open the curtained win- dow, fold the curtain first by pushing
down the switch. Then you can open
the window by pushing the switch onceagain. Resetting the rear door window curtain
If the curtain is not operated correctly, the
curtain must be reset as follows:
1. Turn the engine start/stop button to the
ON position.
2. Close the curtain by pressing the power window switch to the first detent
position and continue pulling up the
switch for at least 10 seconds.
If the curtain doesn't work properly after
above procedure, have the system
checked by an authorized HYUNDAI
dealer.
✽✽ NOTICE
The rear door window curtain may not
operate normally, when the temperature
in the vehicle is lower than -15°C
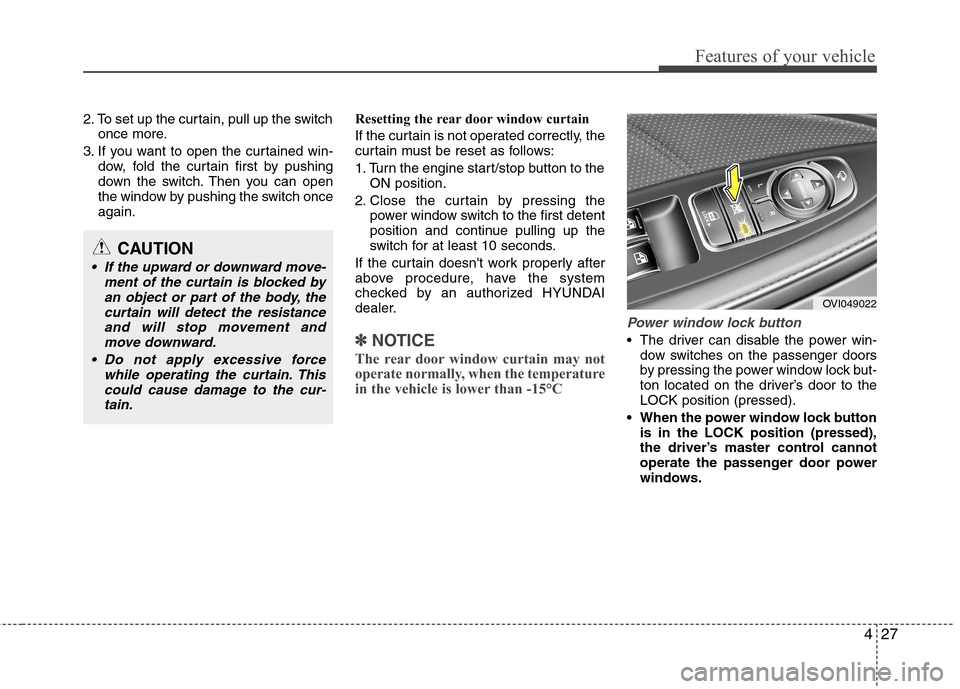
Power window lock button
The driver can disable the power win- dow switches on the passenger doors
by pressing the power window lock but-
ton located on the driver’s door to theLOCK position (pressed).
When the power window lock button is in the LOCK position (pressed),
the driver’s master control cannot
operate the passenger door power
windows.
OVI049022
CAUTION
If the upward or downward move-
ment of the curtain is blocked by
an object or part of the body, thecurtain will detect the resistanceand will stop movement andmove downward.
Do not apply excessive force while operating the curtain. Thiscould cause damage to the cur-tain.
Page 107 of 374
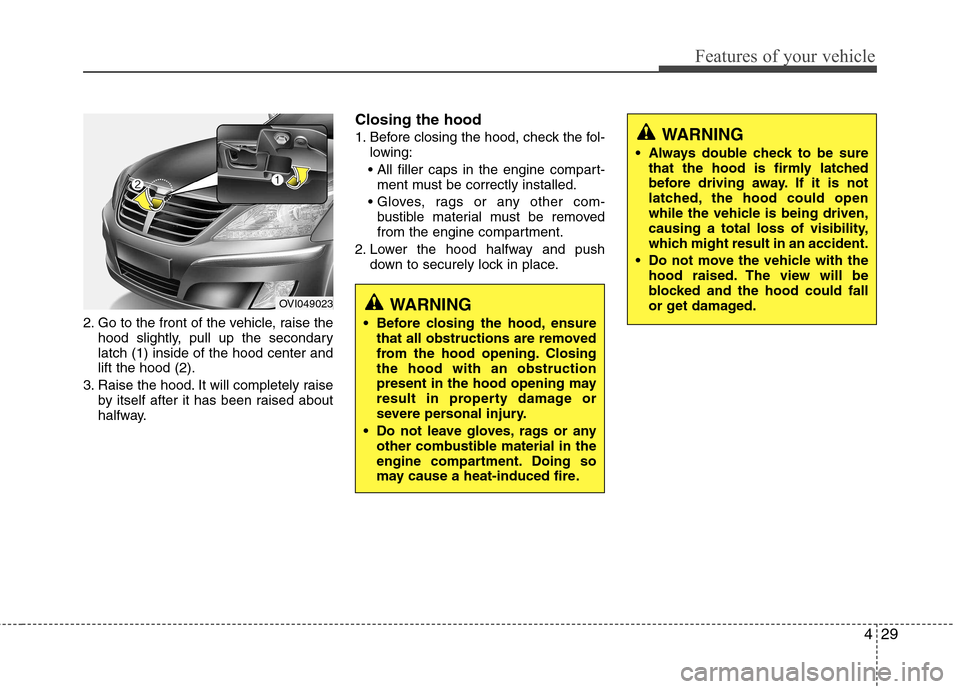
429
Features of your vehicle
2. Go to the front of the vehicle, raise thehood slightly, pull up the secondary latch (1) inside of the hood center andlift the hood (2).
3. Raise the hood. It will completely raise by itself after it has been raised about
halfway. Closing the hood
1. Before closing the hood, check the fol-
lowing:
ment must be correctly installed.
bustible material must be removed
from the engine compartment.
2. Lower the hood halfway and push down to securely lock in place.
WARNING
Before closing the hood, ensure that all obstructions are removed
from the hood opening. Closingthe hood with an obstruction
present in the hood opening may
result in property damage or
severe personal injury.
Do not leave gloves, rags or any other combustible material in the
engine compartment. Doing so
may cause a heat-induced fire.
WARNING
Always double check to be sure that the hood is firmly latched
before driving away. If it is not
latched, the hood could open
while the vehicle is being driven,
causing a total loss of visibility,
which might result in an accident.
Do not move the vehicle with the hood raised. The view will be
blocked and the hood could fall
or get damaged.
OVI049023
Page 108 of 374
Features of your vehicle
30
4
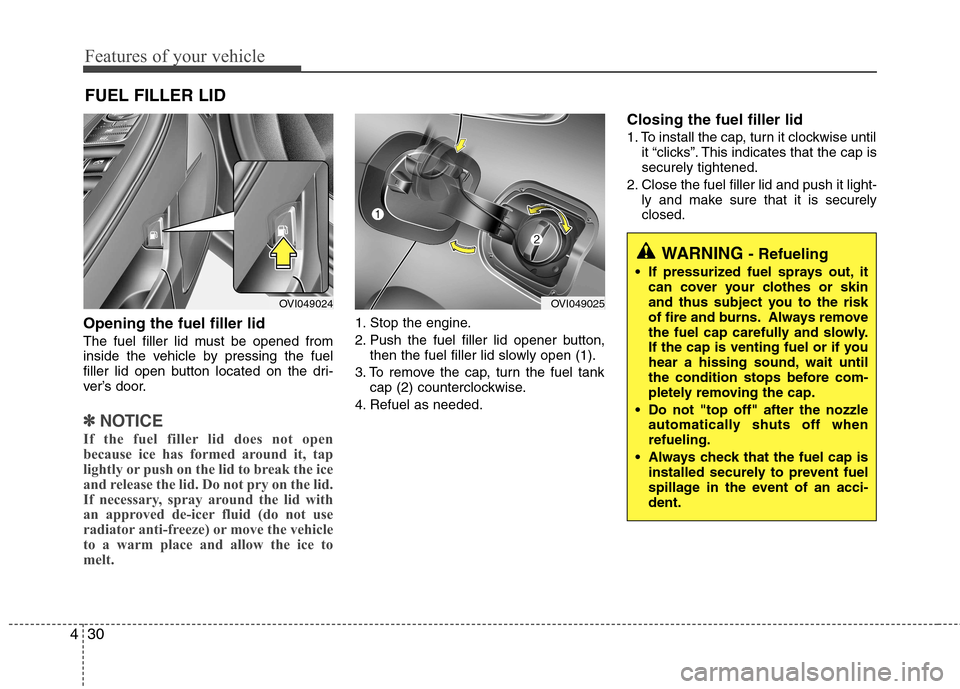
Opening the fuel filler lid
The fuel filler lid must be opened from
inside the vehicle by pressing the fuel
filler lid open button located on the dri-
ver’s door.
✽✽
NOTICE
If the fuel filler lid does not open
because ice has formed around it, tap
lightly or push on the lid to break the ice
and release the lid. Do not pry on the lid.
If necessary, spray around the lid with
an approved de-icer fluid (do not use
radiator anti-freeze) or move the vehicle
to a warm place and allow the ice to
melt.
1. Stop the engine.
2. Push the fuel filler lid opener button, then the fuel filler lid slowly open (1).
3. To remove the cap, turn the fuel tank cap (2) counterclockwise.
4. Refuel as needed. Closing the fuel filler lid
1. To install the cap, turn it clockwise until
it “clicks”. This indicates that the cap is securely tightened.
2. Close the fuel filler lid and push it light- ly and make sure that it is securelyclosed.
FUEL FILLER LID
OVI049024OVI049025
WARNING
- Refueling
If pressurized fuel sprays out, it can cover your clothes or skin
and thus subject you to the risk
of fire and burns. Always remove
the fuel cap carefully and slowly.
If the cap is venting fuel or if you
hear a hissing sound, wait until
the condition stops before com-
pletely removing the cap.
Do not "top off" after the nozzle automatically shuts off whenrefueling.
Always check that the fuel cap is installed securely to prevent fuel
spillage in the event of an acci-dent.
Page 109 of 374
431
Features of your vehicle
(Continued)
Do not get back into a vehicleonce you have begun refueling
since you can generate static
electricity by touching, rubbing
or sliding against any item or fab-
ric (polyester, satin, nylon, etc.)
capable of producing static elec-
tricity. Static electricity discharge
can ignite fuel vapors resulting in
rapid burning. If you must re-
enter the vehicle, you should
once again eliminate potentially
dangerous static electricity dis-
charge by touching a metal part
of the vehicle, away from the fuel
filler neck, nozzle or other gaso-
line source.
When using an approved portable fuel container, be sure toplace the container on the
ground prior to refueling. Static
electricity discharge from the
container can ignite fuel vapors
causing a fire. Once refueling has
begun, contact with the vehicleshould be maintained until the
filling is complete.
(Continued)WARNING - Refueling dan-
gers
Automotive fuels are flammable
materials. When refueling, please
note the following guidelines care-
fully. Failure to follow these guide-
lines may result in severe personal
injury, severe burns or death by fire
or explosion.
Read and follow all warning at the gas station facility.
Before refueling note the location of the Emergency Gasoline Shut-
Off, if available, at the gas station
facility.
Before touching the fuel nozzle, you should eliminate potentially
dangerous static electricity dis-
charge by touching another metal
part of the vehicle, a safe dis-
tance away from the fuel filler
neck, nozzle, or other gas source.
(Continued)(Continued)Use only approved portable plas-
tic fuel containers designed to
carry and store gasoline.
Do not use cellular phones while refueling. Electric current and/or
electronic interference from cel-
lular phones can potentially
ignite fuel vapors causing a fire.
When refueling, always shut the engine off. Sparks produced byelectrical components related to
the engine can ignite fuel vapors
causing a fire. Once refueling is
complete, check to make sure thefiller cap and filler door are
securely closed, before starting
the engine.
DO NOT use matches or a lighter and DO NOT SMOKE or leave a lit
cigarette in your vehicle while at
a gas station especially during
refueling. Automotive fuel is
highly flammable and can, when
ignited, result in fire.
(Continued)
Page 115 of 374
437
Features of your vehicle
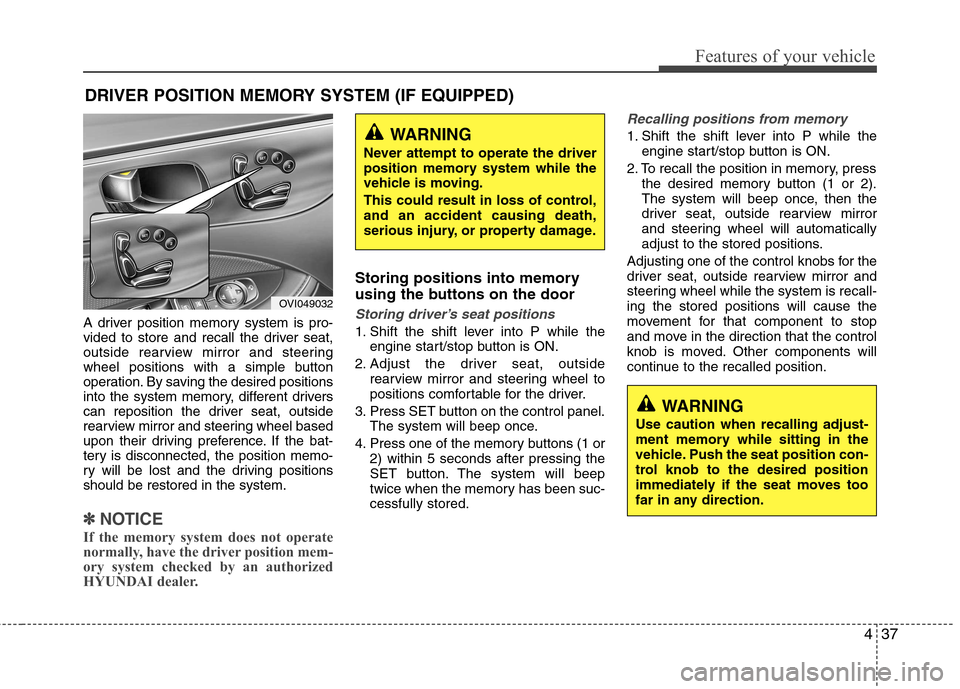
A driver position memory system is pro-
vided to store and recall the driver seat,
outside rearview mirror and steering
wheel positions with a simple button
operation. By saving the desired positions
into the system memory, different drivers
can reposition the driver seat, outside
rearview mirror and steering wheel based
upon their driving preference. If the bat-
tery is disconnected, the position memo-
ry will be lost and the driving positionsshould be restored in the system.
✽✽NOTICE
If the memory system does not operate
normally, have the driver position mem-
ory system checked by an authorized
HYUNDAI dealer.
Storing positions into memory
using the buttons on the door
Storing driver’s seat positions
1. Shift the shift lever into P while the engine start/stop button is ON.
2. Adjust the driver seat, outside rearview mirror and steering wheel to
positions comfortable for the driver.
3. Press SET button on the control panel. The system will beep once.
4. Press one of the memory buttons (1 or 2) within 5 seconds after pressing the
SET button. The system will beep
twice when the memory has been suc-cessfully stored.
Recalling positions from memory
1. Shift the shift lever into P while theengine start/stop button is ON.
2. To recall the position in memory, press the desired memory button (1 or 2).
The system will beep once, then the
driver seat, outside rearview mirror
and steering wheel will automatically
adjust to the stored positions.
Adjusting one of the control knobs for the
driver seat, outside rearview mirror and
steering wheel while the system is recall-ing the stored positions will cause the
movement for that component to stop
and move in the direction that the control
knob is moved. Other components will
continue to the recalled position.
DRIVER POSITION MEMORY SYSTEM (IF EQUIPPED)WARNING
Never attempt to operate the driver
position memory system while the
vehicle is moving.
This could result in loss of control, and an accident causing death,
serious injury, or property damage.
WARNING
Use caution when recalling adjust-
ment memory while sitting in the
vehicle. Push the seat position con-
trol knob to the desired position
immediately if the seat moves too
far in any direction.
OVI049032
Page 117 of 374
439
Features of your vehicle
Left or Right: When the remote control
outside rearview mirror
switch is in the left or
right position, both out-
side rearview mirrors will
move downward.
Neutral : When the remote control out-
side rearview mirror switch is inthe middle position, the outside
rearview mirrors will not oper-
ate.
✽✽ NOTICE
The outside rearview mirrors will auto-
matically revert to their original posi-
tions under the following conditions:
1. Engine start/stop button is turned to the ACC or OFF position.
2. Shift lever is moved to any position except R.
3. Remote control outside rearview mir- ror switch is placed in the middle
position.
Power steering
Power steering uses energy from the
engine to assist you in steering the vehi-
cle. If the engine is off or if the power
steering system becomes inoperative,
the vehicle may still be steered, but it will
require increased steering effort.
Should you notice any change in the
effort required to steer during normal
vehicle operation, have the power steer-
ing checked by an authorized HYUNDAI
dealer.Electronic Hydraulic Power Steering
(EHPS)
EHPS uses an electromotor to assist you
in steering the vehicle. It senses the vehi-cle speed and road condition.
If the engine is off or if the power steer-
ing system becomes inoperative, the
vehicle may still be steered, but it will
require increased steering effort.
Should you notice any change in the
effort required to steer during normal
vehicle operation, have the power steer-
ing checked by an authorized HYUNDAI
dealer.
STEERING WHEEL
CAUTION
Never hold the steering wheel
against a stop (extreme right or left turn) for more than 5 seconds withthe engine running. Holding the
steering wheel for more than 5 sec-onds in either position may cause damage to the power steeringpump.