tow Hyundai Equus 2013 Owner's Manual
[x] Cancel search | Manufacturer: HYUNDAI, Model Year: 2013, Model line: Equus, Model: Hyundai Equus 2013Pages: 479, PDF Size: 10.15 MB
Page 5 of 479
F5
A000A01A-GAT
This Owner's Manual should be considered a part of the car and remain with it when it is sold for the use of the next owner.
OWNER'S I.D.
ORIGINAL: NAME:
ADDRESS: STREET:
TOWN:
COUNTRY:
P.CODE:
DATE OF SALE:
SUBSEQUENT: NAME:
ADDRESS: STREET:
TOWN:
COUNTRY:
P.CODE:
TRANSFER DATE:
Page 12 of 479
15
Introduction
Do not use methanol
Fuels containing methanol (wood
alcohol) should not be used in your
vehicle. This type of fuel can reduce
vehicle performance and damage
components of the fuel system,
engine control system and emission
control system.
Fuel Additives
HYUNDAI recommends that you use
unleaded gasoline which has an
octane rating of RON (Research
Octane Number) 95 / AKI (Anti Knock
Index) 91 or higher (for Europe) or
Octane Rating of RON (Research
Octane Number) 91 / AKI (Anti-Knock
Index) 87 or higher (except Europe).
For customers who do not use good
quality gasoline including fuel addi-
tives regularly, and have problems
starting or the engine does not run
smoothly, one bottle of additives
added to the fuel tank at every
15,000km (for Europe)/5,000km
(except Europe). Additives are avail-
able from your authorized HYUNDAI
dealer along with information on how
to use them.
Operation in foreign countries
If you are going to drive your vehicle
in another country, be sure to:
• Observe all regulations regarding
registration and insurance.
• Determine that acceptable fuel is
available.No special break-in period is need-
ed. By following a few simple precau-
tions for the first 1,000 km (600 miles)
you may add to the performance,
economy and life of your vehicle.
• Do not race the engine.
• While driving, keep your engine
speed (rpm, or revolutions per
minute) between 2,000 rpm and
4,000 rpm.
• Do not maintain a single speed for
long periods of time, either fast or
slow. Varying engine speed is
needed to properly break-in the
engine.
• Avoid hard stops, except in emer-
gencies, to allow the brakes to seat
properly.
• Don't tow a trailer during the first
2,000 km (1,200 miles) of opera-
tion.
VEHICLE BREAK-IN
PROCESS
Page 14 of 479
Your vehicle at a glance
2 2
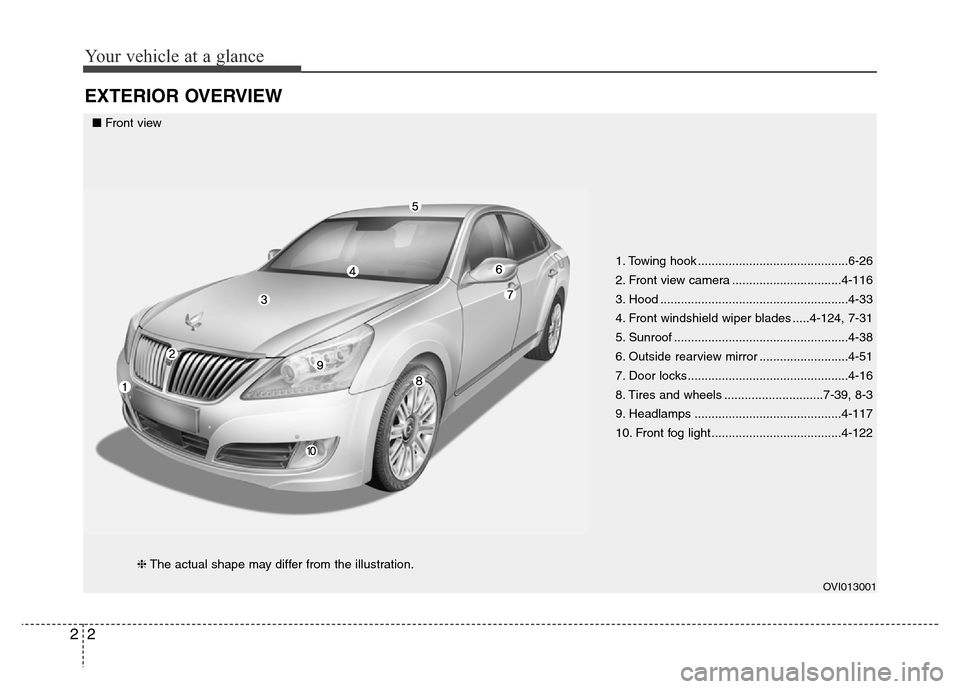
EXTERIOR OVERVIEW
1. Towing hook ............................................6-26
2. Front view camera ................................4-116
3. Hood .......................................................4-33
4. Front windshield wiper blades .....4-124, 7-31
5. Sunroof ...................................................4-38
6. Outside rearview mirror ..........................4-51
7. Door locks...............................................4-16
8. Tires and wheels .............................7-39, 8-3
9. Headlamps ...........................................4-117
10. Front fog light ......................................4-122
OVI013001
■Front view
❈The actual shape may differ from the illustration.
Page 15 of 479
23
Your vehicle at a glance
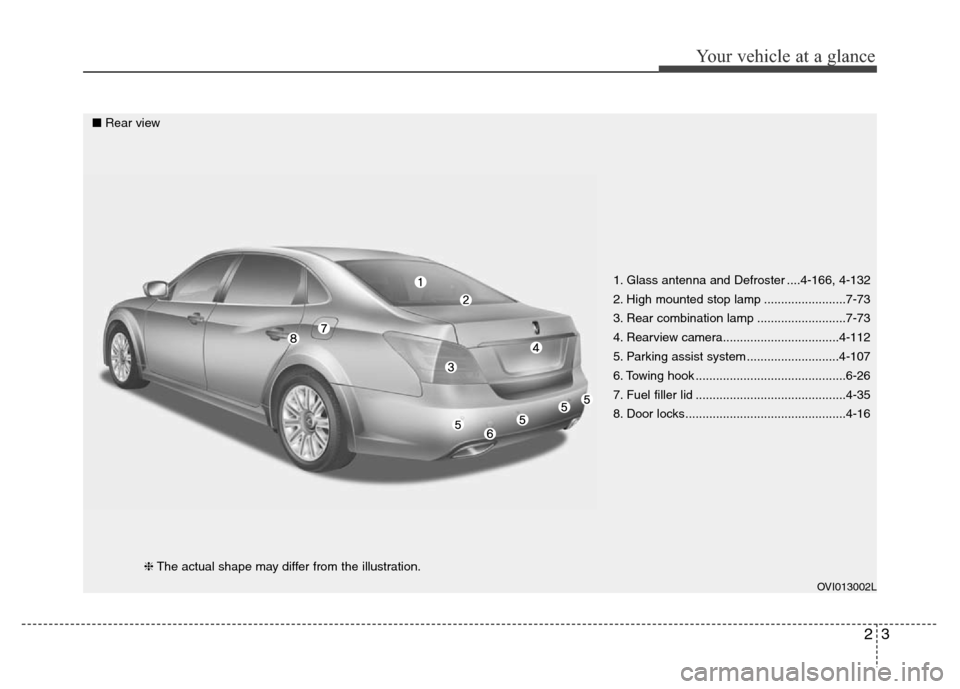
1. Glass antenna and Defroster ....4-166, 4-132
2. High mounted stop lamp ........................7-73
3. Rear combination lamp ..........................7-73
4. Rearview camera..................................4-112
5. Parking assist system ...........................4-107
6. Towing hook ............................................6-26
7. Fuel filler lid ............................................4-35
8. Door locks...............................................4-16
OVI013002L
■Rear view
❈The actual shape may differ from the illustration.
Page 27 of 479
Safety features of your vehicle
8 3
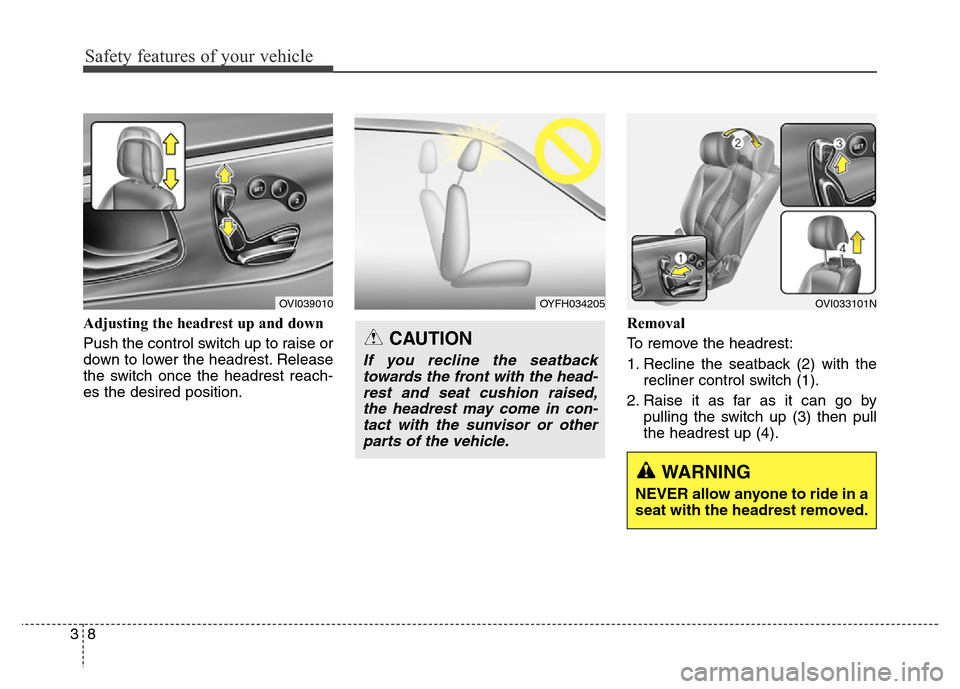
Adjusting the headrest up and down
Push the control switch up to raise or
down to lower the headrest. Release
the switch once the headrest reach-
es the desired position.Removal
To remove the headrest:
1. Recline the seatback (2) with the
recliner control switch (1).
2. Raise it as far as it can go by
pulling the switch up (3) then pull
the headrest up (4).
OVI039010OVI033101N
WARNING
NEVER allow anyone to ride in a
seat with the headrest removed.
OYFH034205
CAUTION
If you recline the seatback
towards the front with the head-
rest and seat cushion raised,
the headrest may come in con-
tact with the sunvisor or other
parts of the vehicle.
Page 37 of 479
Safety features of your vehicle
18 3
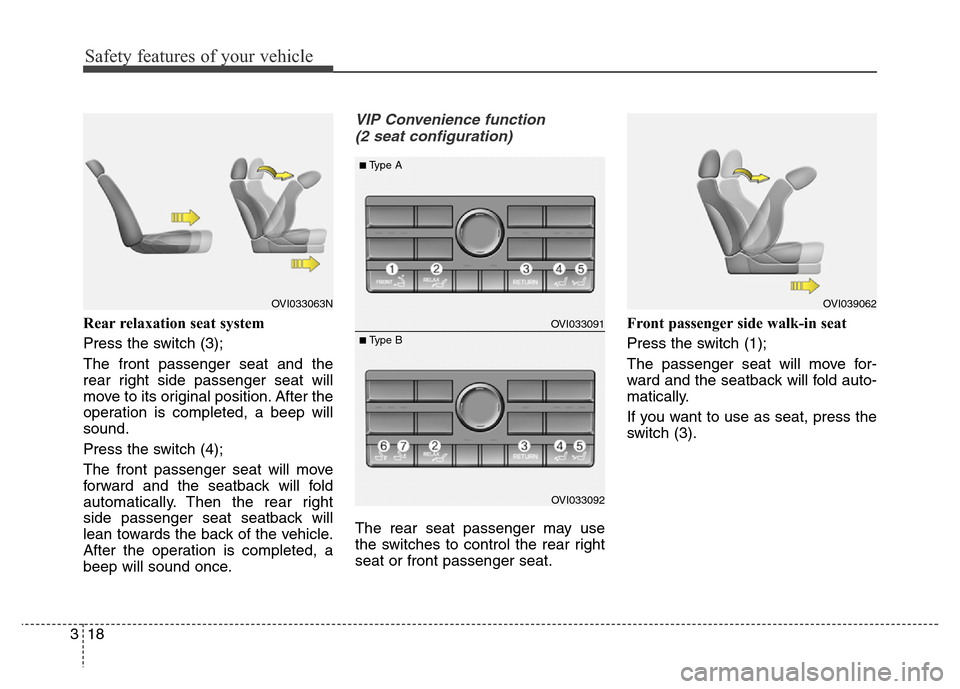
Rear relaxation seat system
Press the switch (3);
The front passenger seat and the
rear right side passenger seat will
move to its original position. After the
operation is completed, a beep will
sound.
Press the switch (4);
The front passenger seat will move
forward and the seatback will fold
automatically. Then the rear right
side passenger seat seatback will
lean towards the back of the vehicle.
After the operation is completed, a
beep will sound once.
VIP Convenience function
(2 seat configuration)
The rear seat passenger may use
the switches to control the rear right
seat or front passenger seat.Front passenger side walk-in seat
Press the switch (1);
The passenger seat will move for-
ward and the seatback will fold auto-
matically.
If you want to use as seat, press the
switch (3).
OVI033091
OVI033092
■Type A
■ Type B
OVI039062OVI033063N
Page 42 of 479
323
Safety features of your vehicle
WARNING
• To reduce the risk of injury in
an accident or sudden stop,
always keep the tower console
storage closed while driving.
• Close this lower and upper lid
while the vehicle is moving.
Failure to observe this instruc-
tion could cause death or seri-
ous injury.
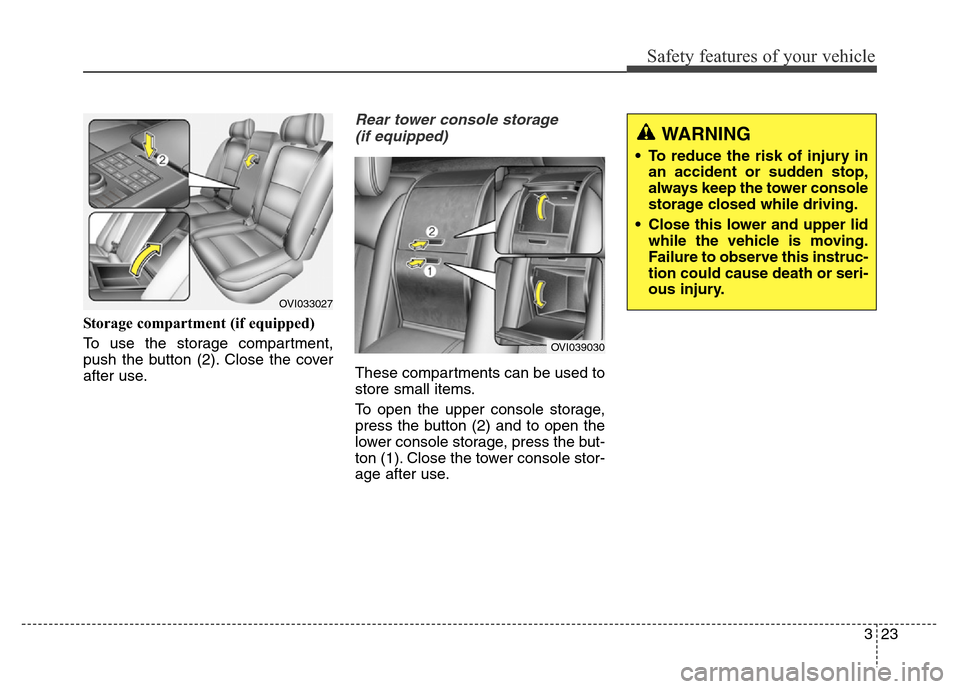
Storage compartment (if equipped)
To use the storage compartment,
push the button (2). Close the cover
after use.
Rear tower console storage
(if equipped)
These compartments can be used to
store small items.
To open the upper console storage,
press the button (2) and to open the
lower console storage, press the but-
ton (1). Close the tower console stor-
age after use.
OVI033027
OVI039030
Page 63 of 479
Safety features of your vehicle
44 3
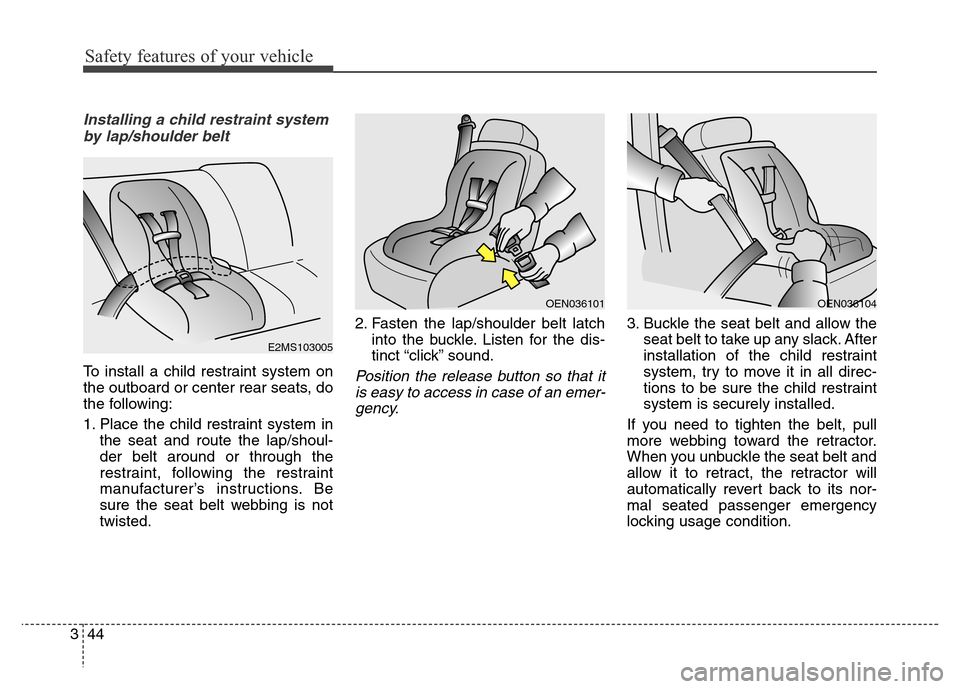
Installing a child restraint system
by lap/shoulder belt
To install a child restraint system on
the outboard or center rear seats, do
the following:
1. Place the child restraint system in
the seat and route the lap/shoul-
der belt around or through the
restraint, following the restraint
manufacturer’s instructions. Be
sure the seat belt webbing is not
twisted.2. Fasten the lap/shoulder belt latch
into the buckle. Listen for the dis-
tinct “click” sound.Position the release button so that it
is easy to access in case of an emer-
gency.
3. Buckle the seat belt and allow the
seat belt to take up any slack. After
installation of the child restraint
system, try to move it in all direc-
tions to be sure the child restraint
system is securely installed.
If you need to tighten the belt, pull
more webbing toward the retractor.
When you unbuckle the seat belt and
allow it to retract, the retractor will
automatically revert back to its nor-
mal seated passenger emergency
locking usage condition.
OEN036101OEN036104
E2MS103005
Page 87 of 479
Safety features of your vehicle
68 3
SRS Care
The SRS is virtually maintenance-
free and so there are no parts you
can safely service by yourself. If the
SRS air bag warning light does not
illuminate when you turn the ignition
ON, or if it continuously remains on,
we recommend that the system be
inspected by an authorized HYUNDAI
dealer.
Improper handling of the SRS sys-
tem may result in serious personal
injury.WARNING
• Modification to SRS compo-
nents or wiring, including the
addition of any kind of badges
to the pad covers or modifica-
tions to the body structure,
can adversely affect SRS per-
formance and lead to possible
injury.
• For cleaning the air bag pad
covers, use only a soft, dry
cloth or one which has been
moistened with plain water.
Solvents or cleaners could
adversely affect the air bag
covers and proper deploy-
ment of the system.
• No objects should be placed
over or near the air bag mod-
ules on the steering wheel,
instrument panel, and the
front passenger's panel above
the glove box, because any
such object could cause harm
if the vehicle is in a crash
severe enough to cause the
air bags to inflate.
(Continued)
(Continued)
• If the air bags inflate, they
must be replaced by an
authorized HYUNDAI dealer.
• Do not tamper with or discon-
nect SRS wiring, or other
components of the SRS sys-
tem. Doing so could result in
injury, due to accidental infla-
tion of the air bags or by ren-
dering the SRS inoperative.
• If components of the air bag
system must be discarded, or
if the vehicle must be
scrapped, certain safety pre-
cautions must be observed.
An authorized HYUNDAI deal-
er knows these precautions
and can give you the neces-
sary information. Failure to
follow these precautions and
procedures could increase
the risk of personal injury.
• If your car was flooded and
has soaked carpeting or water
on the flooring, you shouldn't
try to start the engine; have
the car towed to an authorized
HYUNDAI dealer.
Page 98 of 479
49
Features of your vehicle
Lock release
To release the trunk lock feature,
open the glove box with the mechan-
ical key and set the trunk lid control
button to ON position (pressed). In
this position the trunk will open with
the trunk lid button or smart key.Smart key precautions
✽NOTICE
• If, for some reason, you happen to
lose your smart key, you will not
be able to start the engine. Tow the
vehicle, if necessary, we recom-
mend that you contact an author-
ized HYUNDAI dealer.
• A maximum of 3 smart keys
including card type (if equipped)
can be registered to a single vehi-
cle. If you lose a smart key, we rec-
ommend that you contact an
authorized HYUNDAI dealer.
• The smart key will not work if any
of the following occurs:
- The smart key is close to a radio
transmitter such as a radio sta-
tion or an airport which can
interfere with normal operation
of the smart key.
- The smart key is near a mobile
two-way radio system or a cellu-
lar phone.
- Another vehicle’s smart key is
being operated close to your
vehicle.
(Continued)(Continued)
When the smart key does not work
properly, open and close the door
with the mechanical key. If you
have a problem with the smart
key, we recommend that you con-
tact an authorized HYUNDAI
dealer.
• If the smart key is in close proxim-
ity to your cell phone or smart
phone, the signal from the smart
key could be blocked by normal
operation of your cell phone or
smart phone. This is especially
important when the phone is
active such as making call, receiv-
ing calls, text messaging, and/or
sending/receiving emails. Avoid
placing the smart key and your
cell phone or smart phone in the
same pants or jacket pocket and
maintain adequate distance
between the two devices.