start stop button Hyundai Equus 2014 Owners Manual
[x] Cancel search | Manufacturer: HYUNDAI, Model Year: 2014, Model line: Equus, Model: Hyundai Equus 2014Pages: 479, PDF Size: 10.15 MB
Page 401 of 479
Maintenance
16 7
EXPLANATION OF SCHEDULED MAINTENANCE ITEMS
Engine oil and filter
The engine oil and filter should be
changed at the intervals specified in
the maintenance schedule. If the car
is being driven in severe conditions,
more frequent oil and filter changes
are required.
Drive belts
Inspect all drive belts for evidence of
cuts, cracks, excessive wear or oil
saturation and replace if necessary.
Fuel filter
A clogged filter can limit the speed at
which the vehicle may be driven,
damage the emission system and
cause multiple issues such as hard
starting. If an excessive amount of
foreign matter accumulates in the
fuel tank, the filter may require
replacement more frequently.
After installing a new filter, run the
engine for several minutes, and
check for leaks at the connections.
We recommend that the fuel filter be
replaced by an authorized HYUNDAI
dealer.
Fuel lines, fuel hoses and con-
nections
Check the fuel lines, fuel hoses and
connections for leakage and dam-
age. We recommend that the fuel
lines, fuel hoses and connections be
replaced by an authorized HYUNDAI
dealer.
Vapor hose and fuel filler cap
The vapor hose and fuel filler cap
should be inspected at those intervals
specified in the maintenance sched-
ule. Make sure that a new vapor hose
or fuel filler cap is correctly replaced.
Vacuum crankcase ventilation
hoses (if equipped)
Inspect the surface of hoses for evi-
dence of heat and/or mechanical
damage. Hard and brittle rubber,
cracking, tears, cuts, abrasions, and
excessive swelling indicate deterio-
ration. Particular attention should be
paid to examine those hose surfaces
nearest to high heat sources, such
as the exhaust manifold.
Inspect the hose routing to assure
that the hoses do not come in con-
tact with any heat source, sharp
edges or moving component which
might cause heat damage or
mechanical wear. Inspect all hose
connections, such as clamps and
couplings, to make sure they are
secure, and that no leaks are pres-
ent. Hoses should be replaced
immediately if there is any evidence
of deterioration or damage.
CAUTION
When you are inspecting the
belt, press the engine start/stop
button to the OFF or ACC posi-
tion.
Page 417 of 479
Maintenance
32 7
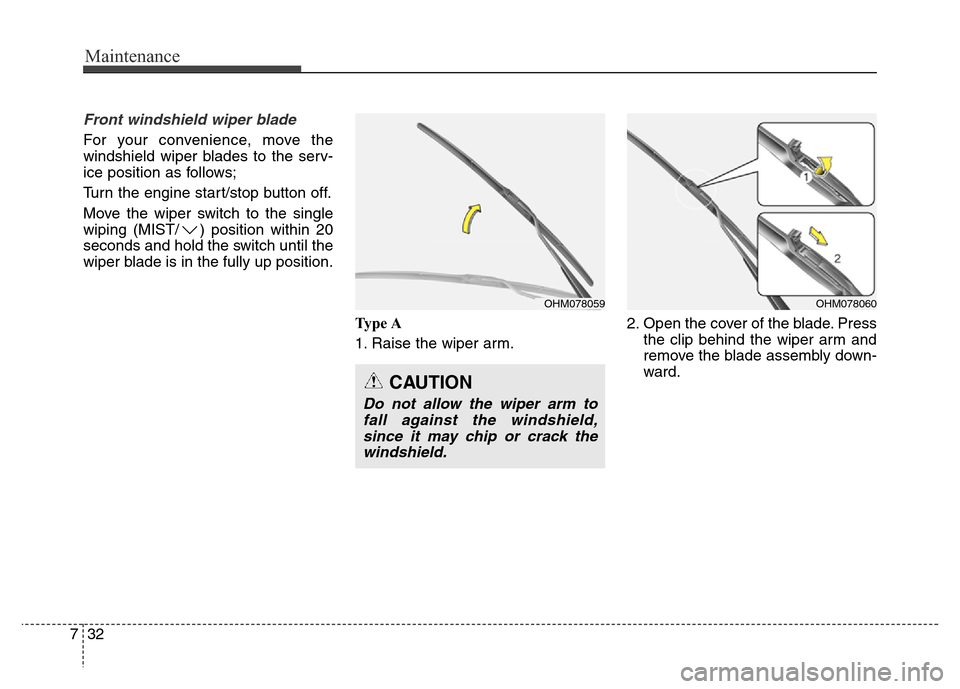
Front windshield wiper blade
For your convenience, move the
windshield wiper blades to the serv-
ice position as follows;
Turn the engine start/stop button off.
Move the wiper switch to the single
wiping (MIST/ ) position within 20
seconds and hold the switch until the
wiper blade is in the fully up position.
Ty p e A
1. Raise the wiper arm.2. Open the cover of the blade. Press
the clip behind the wiper arm and
remove the blade assembly down-
ward.
OHM078059
CAUTION
Do not allow the wiper arm to
fall against the windshield,
since it may chip or crack the
windshield.
OHM078060
Page 435 of 479
Maintenance
50 7
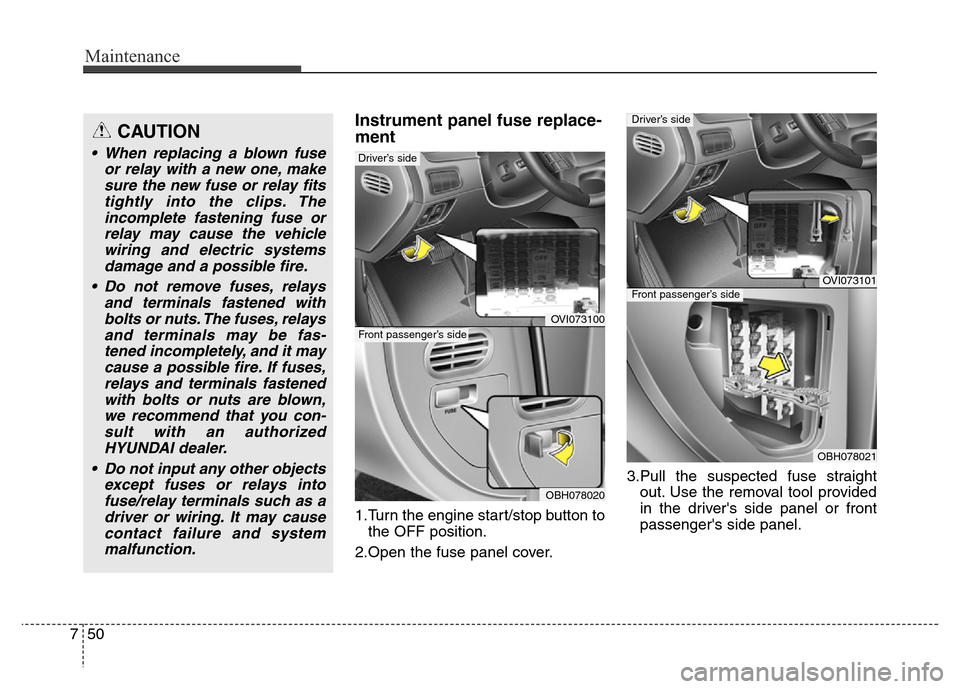
Instrument panel fuse replace-
ment
1.Turn the engine start/stop button to
the OFF position.
2.Open the fuse panel cover.3.Pull the suspected fuse straight
out. Use the removal tool provided
in the driver's side panel or front
passenger's side panel.
OVI073100
OBH078020
Front passenger’s side
Driver’s side
CAUTION
• When replacing a blown fuse
or relay with a new one, make
sure the new fuse or relay fits
tightly into the clips. The
incomplete fastening fuse or
relay may cause the vehicle
wiring and electric systems
damage and a possible fire.
• Do not remove fuses, relays
and terminals fastened with
bolts or nuts. The fuses, relays
and terminals may be fas-
tened incompletely, and it may
cause a possible fire. If fuses,
relays and terminals fastened
with bolts or nuts are blown,
we recommend that you con-
sult with an authorized
HYUNDAI dealer.
• Do not input any other objects
except fuses or relays into
fuse/relay terminals such as a
driver or wiring. It may cause
contact failure and system
malfunction.
OVI073101
OBH078021
Driver’s side
Front passenger’s side
Page 437 of 479
Maintenance
52 7
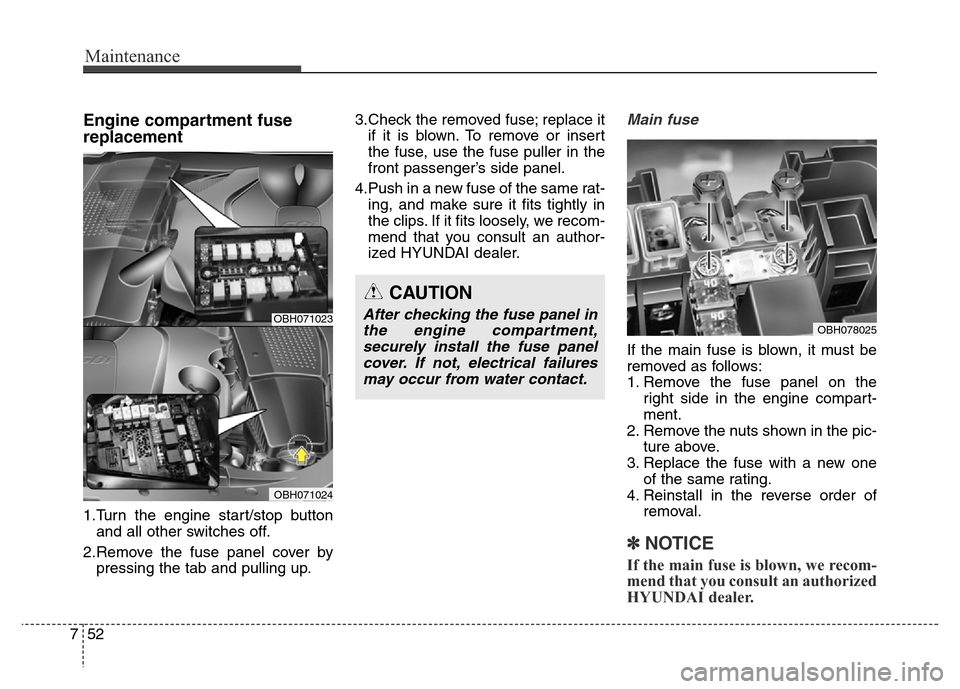
Engine compartment fuse
replacement
1.Turn the engine start/stop button
and all other switches off.
2.Remove the fuse panel cover by
pressing the tab and pulling up.3.Check the removed fuse; replace it
if it is blown. To remove or insert
the fuse, use the fuse puller in the
front passenger’s side panel.
4.Push in a new fuse of the same rat-
ing, and make sure it fits tightly in
the clips. If it fits loosely, we recom-
mend that you consult an author-
ized HYUNDAI dealer.
Main fuse
If the main fuse is blown, it must be
removed as follows:
1. Remove the fuse panel on the
right side in the engine compart-
ment.
2. Remove the nuts shown in the pic-
ture above.
3. Replace the fuse with a new one
of the same rating.
4. Reinstall in the reverse order of
removal.
✽NOTICE
If the main fuse is blown, we recom-
mend that you consult an authorized
HYUNDAI dealer.
CAUTION
After checking the fuse panel in
the engine compartment,
securely install the fuse panel
cover. If not, electrical failures
may occur from water contact.OBH078025OBH071023
OBH071024
Page 439 of 479
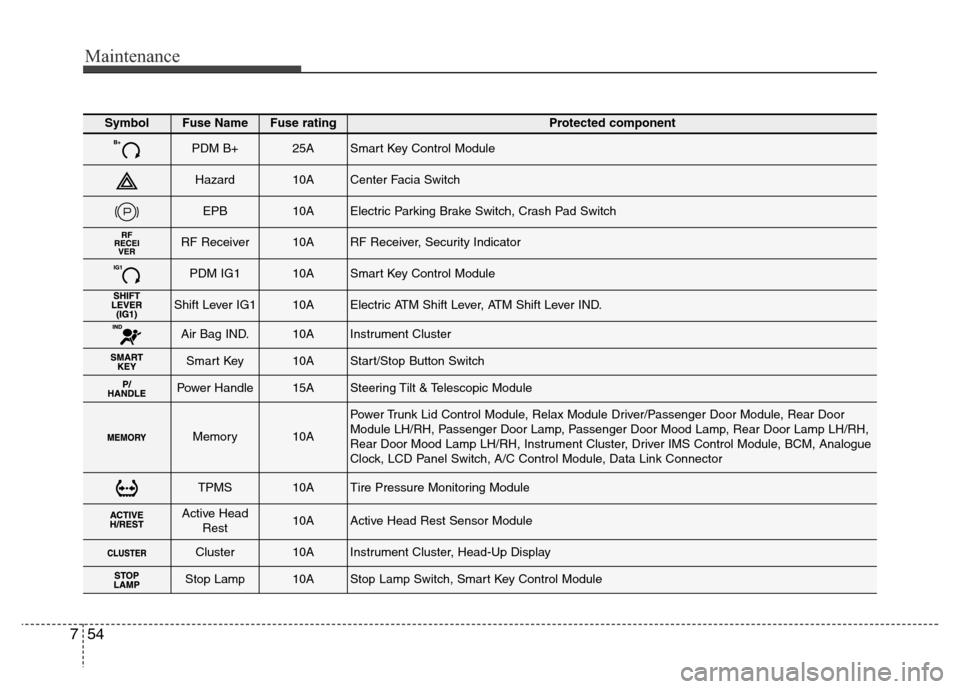
Maintenance
54 7
SymbolFuse NameFuse ratingProtected component
PDM B+25ASmart Key Control Module
Hazard10ACenter Facia Switch
EPB10AElectric Parking Brake Switch, Crash Pad Switch
RF Receiver10ARF Receiver, Security Indicator
PDM IG110ASmart Key Control Module
Shift Lever IG110AElectric ATM Shift Lever, ATM Shift Lever IND.
Air Bag IND.10AInstrument Cluster
Smart Key10AStart/Stop Button Switch
Power Handle15ASteering Tilt & Telescopic Module
Memory10A
Power Trunk Lid Control Module, Relax Module Driver/Passenger Door Module, Rear Door
Module LH/RH, Passenger Door Lamp, Passenger Door Mood Lamp, Rear Door Lamp LH/RH,
Rear Door Mood Lamp LH/RH, Instrument Cluster, Driver IMS Control Module, BCM, Analogue
Clock, LCD Panel Switch, A/C Control Module, Data Link Connector
TPMS10ATire Pressure Monitoring Module
Active Head
Rest10AActive Head Rest Sensor Module
Cluster10AInstrument Cluster, Head-Up Display
Stop Lamp10AStop Lamp Switch, Smart Key Control Module