Hyundai Equus 2014 Owner's Manual
Manufacturer: HYUNDAI, Model Year: 2014, Model line: Equus, Model: Hyundai Equus 2014Pages: 479, PDF Size: 10.15 MB
Page 381 of 479
What to do in an emergency
26 6
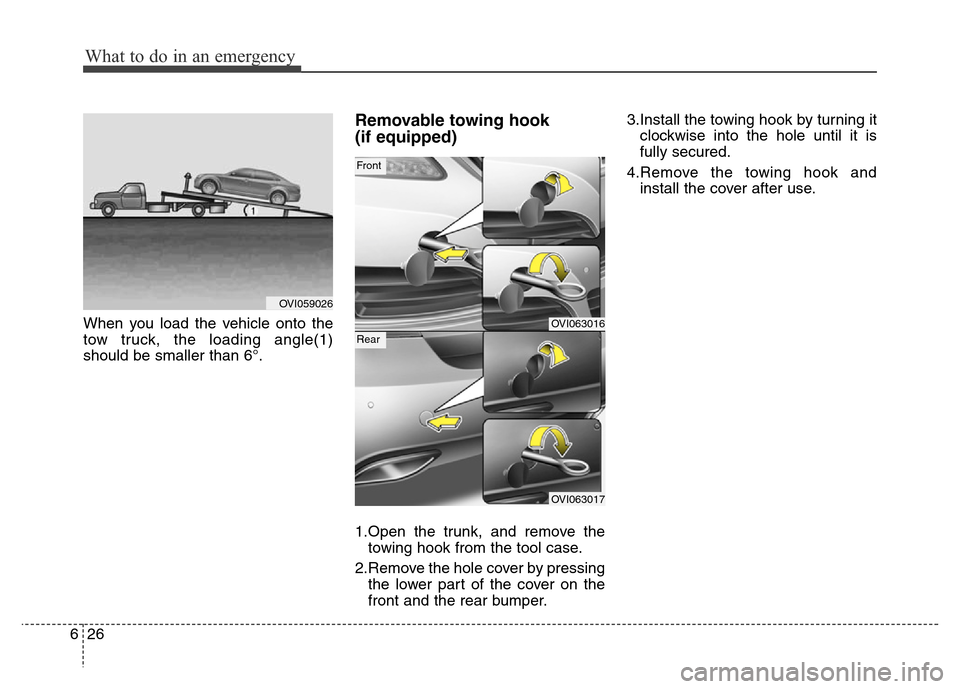
When you load the vehicle onto the
tow truck, the loading angle(1)
should be smaller than 6°.
Removable towing hook
(if equipped)
1.Open the trunk, and remove the
towing hook from the tool case.
2.Remove the hole cover by pressing
the lower part of the cover on the
front and the rear bumper.3.Install the towing hook by turning it
clockwise into the hole until it is
fully secured.
4.Remove the towing hook and
install the cover after use.
OVI063016
OVI063017
OVI059026
Front
Rear
Page 382 of 479
627
What to do in an emergency
Emergency towing
If towing is necessary, we recom-
mend you to have it done by an
authorized HYUNDAI dealer or a
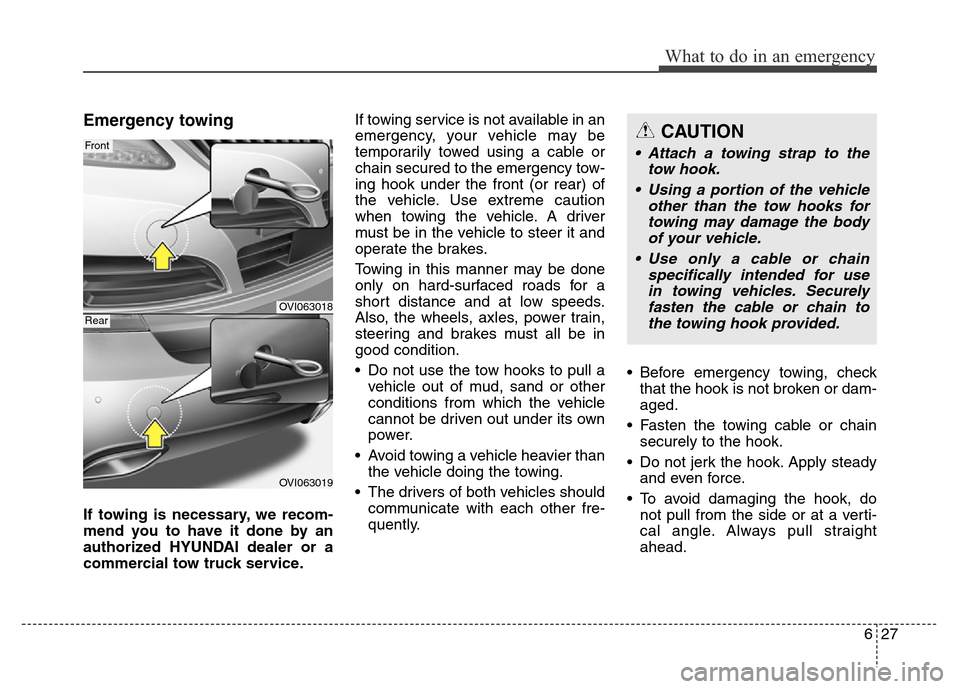
commercial tow truck service.If towing service is not available in an
emergency, your vehicle may be
temporarily towed using a cable or
chain secured to the emergency tow-
ing hook under the front (or rear) of
the vehicle. Use extreme caution
when towing the vehicle. A driver
must be in the vehicle to steer it and
operate the brakes.
Towing in this manner may be done
only on hard-surfaced roads for a
short distance and at low speeds.
Also, the wheels, axles, power train,
steering and brakes must all be in
good condition.
• Do not use the tow hooks to pull a
vehicle out of mud, sand or other
conditions from which the vehicle
cannot be driven out under its own
power.
• Avoid towing a vehicle heavier than
the vehicle doing the towing.
• The drivers of both vehicles should
communicate with each other fre-
quently.• Before emergency towing, check
that the hook is not broken or dam-
aged.
• Fasten the towing cable or chain
securely to the hook.
• Do not jerk the hook. Apply steady
and even force.
• To avoid damaging the hook, do
not pull from the side or at a verti-
cal angle. Always pull straight
ahead.
OVI063018
OVI063019
Front
Rear
CAUTION
• Attach a towing strap to the
tow hook.
• Using a portion of the vehicle
other than the tow hooks for
towing may damage the body
of your vehicle.
• Use only a cable or chain
specifically intended for use
in towing vehicles. Securely
fasten the cable or chain to
the towing hook provided.
Page 383 of 479
What to do in an emergency
28 6
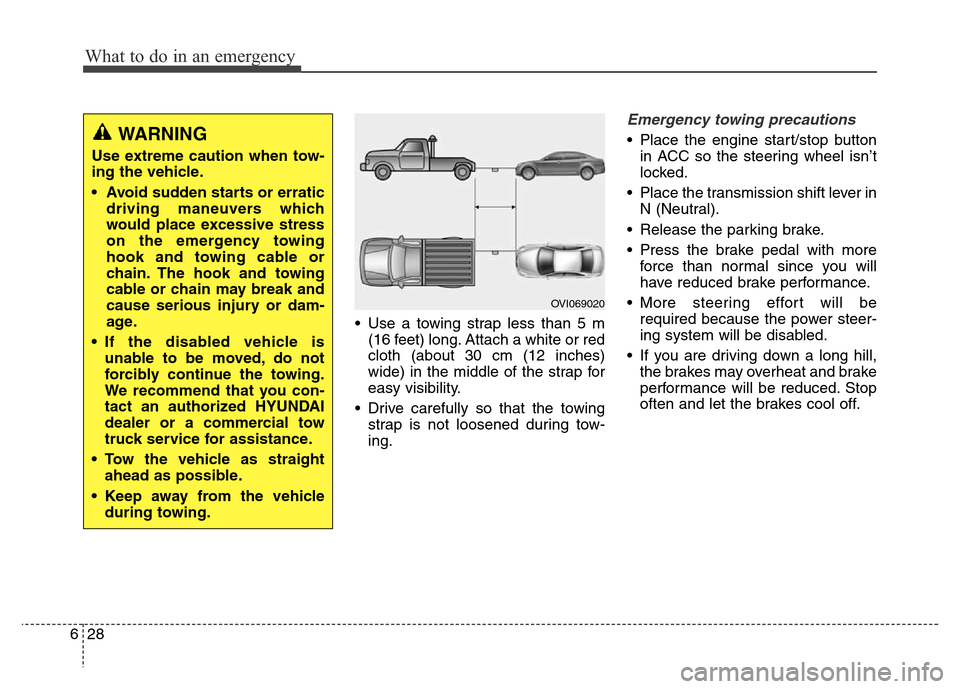
• Use a towing strap less than 5 m
(16 feet) long. Attach a white or red
cloth (about 30 cm (12 inches)
wide) in the middle of the strap for
easy visibility.
• Drive carefully so that the towing
strap is not loosened during tow-
ing.
Emergency towing precautions
• Place the engine start/stop button
in ACC so the steering wheel isn’t
locked.
• Place the transmission shift lever in
N (Neutral).
• Release the parking brake.
• Press the brake pedal with more
force than normal since you will
have reduced brake performance.
• More steering effort will be
required because the power steer-
ing system will be disabled.
• If you are driving down a long hill,
the brakes may overheat and brake
performance will be reduced. Stop
often and let the brakes cool off.WARNING
Use extreme caution when tow-
ing the vehicle.
• Avoid sudden starts or erratic
driving maneuvers which
would place excessive stress
on the emergency towing
hook and towing cable or
chain. The hook and towing
cable or chain may break and
cause serious injury or dam-
age.
• If the disabled vehicle is
unable to be moved, do not
forcibly continue the towing.
We recommend that you con-
tact an authorized HYUNDAI
dealer or a commercial tow
truck service for assistance.
• Tow the vehicle as straight
ahead as possible.
• Keep away from the vehicle
during towing.
OVI069020
Page 384 of 479
629
What to do in an emergency
CAUTION - Automatic
transmission
• If the car is being towed with
all four wheels on the ground,
it can be towed only from the
front. Be sure that the trans-
mission is in neutral. Be sure
the steering is unlocked by
placing the ignition switch in
the ACC position. A driver
must be in the towed vehicle
to operate the steering and
brakes.
• To avoid serious damage to
the automatic transmission,
limit the vehicle speed to 15
km/h (10 mph) and drive less
than 1.5 km (1 mile ) when
towing.
• Before towing, check the auto-
matic transmission fluid leak
under your vehicle. If the auto-
matic transmission fluid is
leaking, a flatbed equipment
or towing dolly must be used.
Page 385 of 479
What to do in an emergency
30 6
EMERGENCY COMMODITY (IF EQUIPPED)
There are some emergency com-
modities in the vehicle to help you
respond to the emergency situation.
Fire extinguisher
If there is small fire and you know
how to use the fire extinguisher, take
the following steps carefully.
1.Pull the pin at the top of the extin-
guisher that keeps the handle from
being accidentally pressed.
2.Aim the nozzle toward the base of
the fire.
3.Stand approximately 2.5 m (8 ft)
away from the fire and squeeze the
handle to discharge the extinguish-
er. If you release the handle, the
discharge will stop.
4.Sweep the nozzle back and forth at
the base of the fire. After the fire
appears to be out, watch it careful-
ly since it may re-ignite.
First aid kit
There are some items such as scis-
sors, bandage and adhesive tape
and etc. in the kit to give first aid to
an injured person.
Triangle reflector
Place the triangle reflector on the
road to warn oncoming vehicles dur-
ing emergencies, such as when the
vehicle is parked by the roadside due
to any problems.
Tire pressure gauge
(If equipped)
Tires normally lose some air in day-
to-day use, and you may have to add
a few pounds of air periodically and it
is not usually a sign of a leaking tire,
but of normal wear. Always check tire
pressure when the tires are cold
because tire pressure increases with
temperature.To check the tire pressure, take the
following steps;
1.Unscrew the inflation valve cap
that is located on the rim of the tire.
2.Press and hold the gauge against
the tire valve. Some air will escape
as you begin and more will escape
if you don't press the gauge in firm-
ly.
3.A firm non-leaking push will acti-
vate the gauge.
4.Read the tire pressure on the
gauge to know whether the tire
pressure is low or high.
5.Adjust the tire pressures to the
specified pressure. Refer to “Tires
and wheels” in section 8.
6.Reinstall the inflation valve cap.
Page 386 of 479
Maintenance
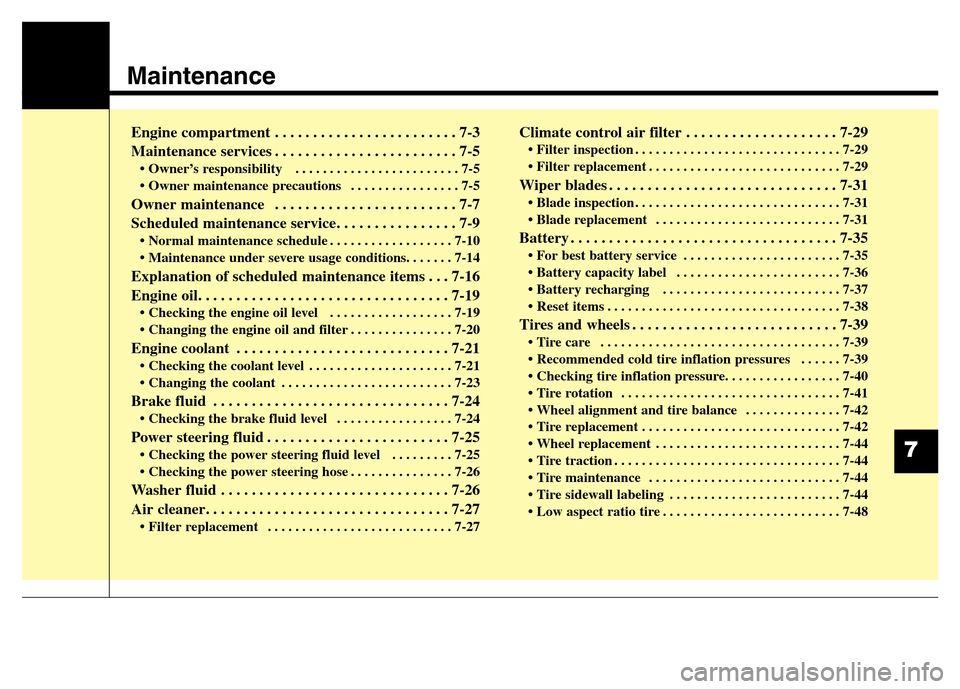
Engine compartment . . . . . . . . . . . . . . . . . . . . . . . . 7-3
Maintenance services . . . . . . . . . . . . . . . . . . . . . . . . 7-5
• Owner’s responsibility . . . . . . . . . . . . . . . . . . . . . . . . 7-5
• Owner maintenance precautions . . . . . . . . . . . . . . . . 7-5
Owner maintenance . . . . . . . . . . . . . . . . . . . . . . . . 7-7
Scheduled maintenance service. . . . . . . . . . . . . . . . 7-9
• Normal maintenance schedule . . . . . . . . . . . . . . . . . . 7-10
• Maintenance under severe usage conditions. . . . . . . 7-14
Explanation of scheduled maintenance items . . . 7-16
Engine oil. . . . . . . . . . . . . . . . . . . . . . . . . . . . . . . . . 7-19
• Checking the engine oil level . . . . . . . . . . . . . . . . . . 7-19
• Changing the engine oil and filter . . . . . . . . . . . . . . . 7-20
Engine coolant . . . . . . . . . . . . . . . . . . . . . . . . . . . . 7-21
• Checking the coolant level . . . . . . . . . . . . . . . . . . . . . 7-21
• Changing the coolant . . . . . . . . . . . . . . . . . . . . . . . . . 7-23
Brake fluid . . . . . . . . . . . . . . . . . . . . . . . . . . . . . . . 7-24
• Checking the brake fluid level . . . . . . . . . . . . . . . . . 7-24
Power steering fluid . . . . . . . . . . . . . . . . . . . . . . . . 7-25
• Checking the power steering fluid level . . . . . . . . . 7-25
• Checking the power steering hose . . . . . . . . . . . . . . . 7-26
Washer fluid . . . . . . . . . . . . . . . . . . . . . . . . . . . . . . 7-26
Air cleaner. . . . . . . . . . . . . . . . . . . . . . . . . . . . . . . . 7-27
• Filter replacement . . . . . . . . . . . . . . . . . . . . . . . . . . . 7-27
Climate control air filter . . . . . . . . . . . . . . . . . . . . 7-29
• Filter inspection . . . . . . . . . . . . . . . . . . . . . . . . . . . . . . 7-29
• Filter replacement . . . . . . . . . . . . . . . . . . . . . . . . . . . . 7-29
Wiper blades . . . . . . . . . . . . . . . . . . . . . . . . . . . . . . 7-31
• Blade inspection . . . . . . . . . . . . . . . . . . . . . . . . . . . . . . 7-31
• Blade replacement . . . . . . . . . . . . . . . . . . . . . . . . . . . 7-31
Battery . . . . . . . . . . . . . . . . . . . . . . . . . . . . . . . . . . . 7-35
• For best battery service . . . . . . . . . . . . . . . . . . . . . . . 7-35
• Battery capacity label . . . . . . . . . . . . . . . . . . . . . . . . 7-36
• Battery recharging . . . . . . . . . . . . . . . . . . . . . . . . . . 7-37
• Reset items . . . . . . . . . . . . . . . . . . . . . . . . . . . . . . . . . . 7-38
Tires and wheels . . . . . . . . . . . . . . . . . . . . . . . . . . . 7-39
• Tire care . . . . . . . . . . . . . . . . . . . . . . . . . . . . . . . . . . . 7-39
• Recommended cold tire inflation pressures . . . . . . 7-39
• Checking tire inflation pressure. . . . . . . . . . . . . . . . . 7-40
• Tire rotation . . . . . . . . . . . . . . . . . . . . . . . . . . . . . . . . 7-41
• Wheel alignment and tire balance . . . . . . . . . . . . . . 7-42
• Tire replacement . . . . . . . . . . . . . . . . . . . . . . . . . . . . . 7-42
• Wheel replacement . . . . . . . . . . . . . . . . . . . . . . . . . . . 7-44
• Tire traction . . . . . . . . . . . . . . . . . . . . . . . . . . . . . . . . . 7-44
• Tire maintenance . . . . . . . . . . . . . . . . . . . . . . . . . . . . 7-44
• Tire sidewall labeling . . . . . . . . . . . . . . . . . . . . . . . . . 7-44
• Low aspect ratio tire . . . . . . . . . . . . . . . . . . . . . . . . . . 7-48
7
Page 387 of 479
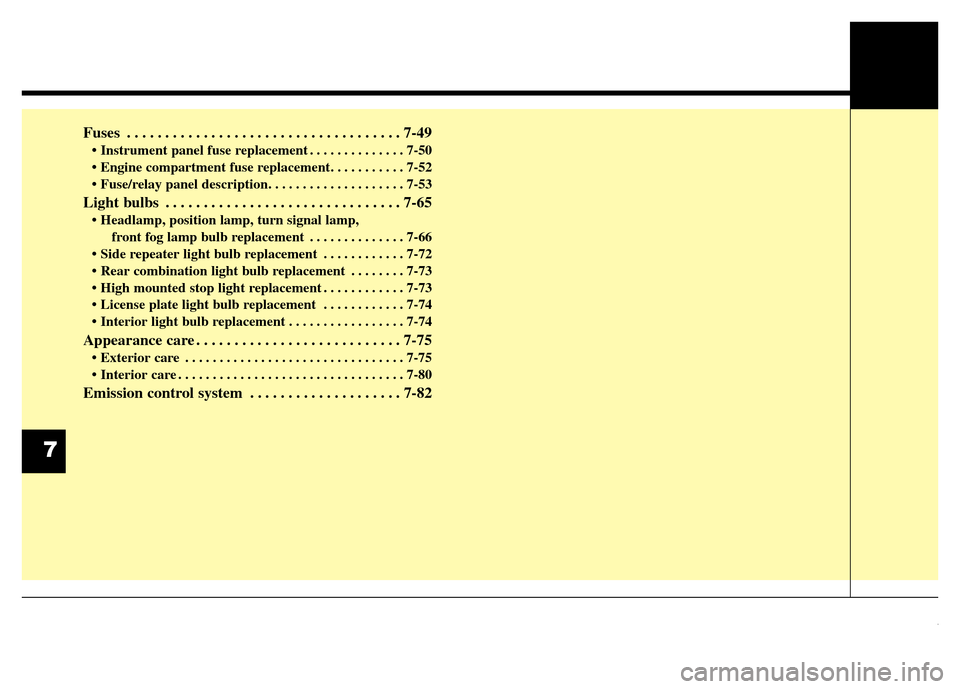
Fuses . . . . . . . . . . . . . . . . . . . . . . . . . . . . . . . . . . . . 7-49
• Instrument panel fuse replacement . . . . . . . . . . . . . . 7-50
• Engine compartment fuse replacement. . . . . . . . . . . 7-52
• Fuse/relay panel description. . . . . . . . . . . . . . . . . . . . 7-53
Light bulbs . . . . . . . . . . . . . . . . . . . . . . . . . . . . . . . 7-65
• Headlamp, position lamp, turn signal lamp,
front fog lamp bulb replacement . . . . . . . . . . . . . . 7-66
• Side repeater light bulb replacement . . . . . . . . . . . . 7-72
• Rear combination light bulb replacement . . . . . . . . 7-73
• High mounted stop light replacement . . . . . . . . . . . . 7-73
• License plate light bulb replacement . . . . . . . . . . . . 7-74
• Interior light bulb replacement . . . . . . . . . . . . . . . . . 7-74
Appearance care . . . . . . . . . . . . . . . . . . . . . . . . . . . 7-75
• Exterior care . . . . . . . . . . . . . . . . . . . . . . . . . . . . . . . . 7-75
• Interior care . . . . . . . . . . . . . . . . . . . . . . . . . . . . . . . . . 7-80
Emission control system . . . . . . . . . . . . . . . . . . . . 7-82
7
Page 388 of 479
73
Maintenance
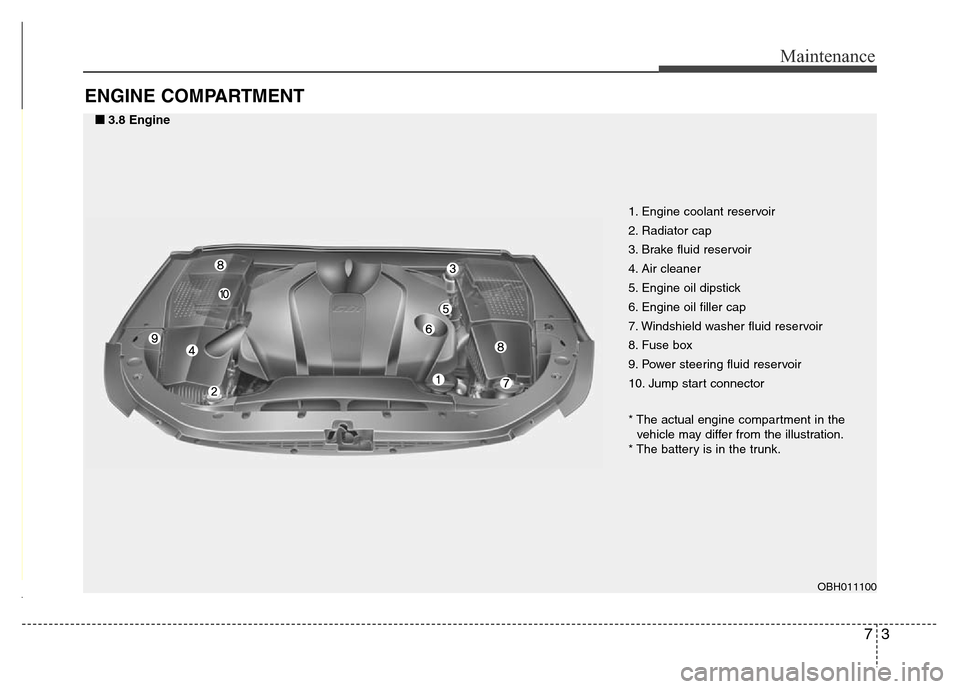
ENGINE COMPARTMENT
1. Engine coolant reservoir
2. Radiator cap
3. Brake fluid reservoir
4. Air cleaner
5. Engine oil dipstick
6. Engine oil filler cap
7. Windshield washer fluid reservoir
8. Fuse box
9. Power steering fluid reservoir
10. Jump start connector
* The actual engine compartment in the
vehicle may differ from the illustration.
* The battery is in the trunk.
OBH011100
■3.8 Engine
Page 389 of 479
Maintenance
4 7
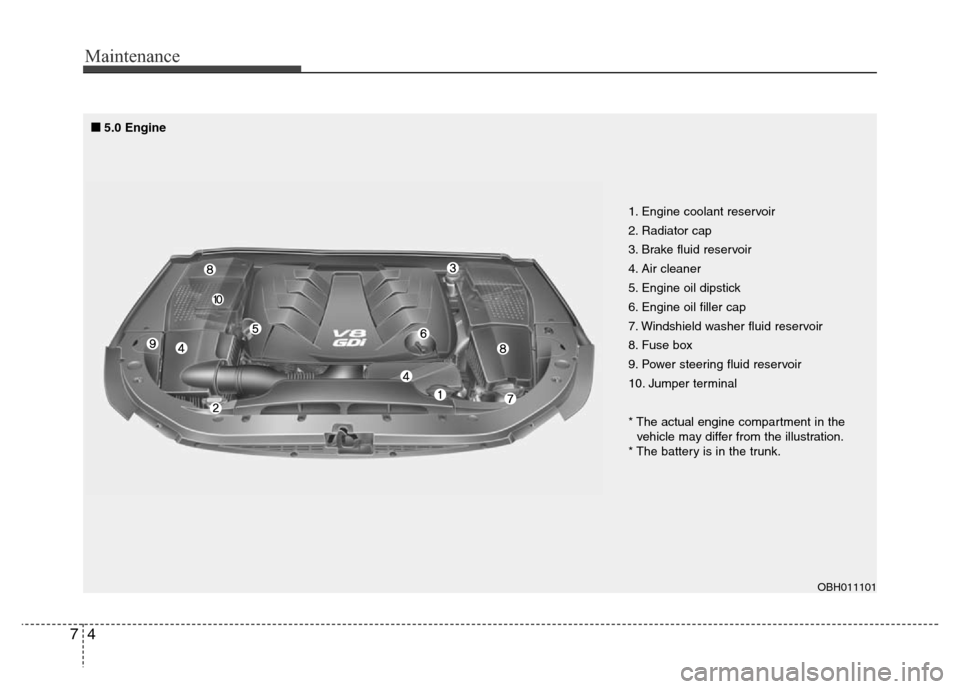
OBH011101
1. Engine coolant reservoir
2. Radiator cap
3. Brake fluid reservoir
4. Air cleaner
5. Engine oil dipstick
6. Engine oil filler cap
7. Windshield washer fluid reservoir
8. Fuse box
9. Power steering fluid reservoir
10. Jumper terminal
* The actual engine compartment in the
vehicle may differ from the illustration.
* The battery is in the trunk.
■5.0 Engine
Page 390 of 479
75
Maintenance
MAINTENANCE SERVICES
You should exercise the utmost care
to prevent damage to your vehicle
and injury to yourself whenever per-
forming any maintenance or inspec-
tion procedures.
Inadequate, incomplete or insuffi-
cient servicing may result in opera-
tional problems with your vehicle that
could lead to vehicle damage, an
accident, or personal injury.Owner’s responsibility
✽NOTICE
Maintenance Service and Record
Retention are the owner's responsi-
bility.
We recommend in general that you
have your vehicle serviced by an
authorized HYUNDAI dealer.
You should retain documents that
show proper maintenance has been
performed on your vehicle in accor-
dance with the scheduled mainte-
nance service charts shown on the
following pages. You need this infor-
mation to establish your compliance
with the servicing and maintenance
requirements of your vehicle war-
ranties.
Detailed warranty information is pro-
vided in your Service Passport.
Repairs and adjustments required as
a result of improper maintenance or
a lack of required maintenance are
not covered when your vehicle is
covered by warranty.
Owner maintenance precau-
tions
Improper or incomplete service may
result in problems. This section gives
instructions only for the maintenance
items that are easy to perform.
✽NOTICE
Improper owner maintenance dur-
ing the warranty period may affect
warranty coverage. For details, read
the separate Service Passport pro-
vided with the vehicle. If you're
unsure about any servicing or main-
tenance procedure, we recommend
that the system be seviced by an
authorized HYUNDAIdealer.