key battery Hyundai Equus 2014 Owner's Manual
[x] Cancel search | Manufacturer: HYUNDAI, Model Year: 2014, Model line: Equus, Model: Hyundai Equus 2014Pages: 479, PDF Size: 10.15 MB
Page 90 of 479
Features of your vehicle
Smart key . . . . . . . . . . . . . . . . . . . . . . . . . . . . . . . . . 4-4
• Smart key function . . . . . . . . . . . . . . . . . . . . . . . . . . . . 4-4
• Buttons on the smart key . . . . . . . . . . . . . . . . . . . . . . . 4-7
• Restrictions in handling keys . . . . . . . . . . . . . . . . . . . . 4-8
• Smart key precautions . . . . . . . . . . . . . . . . . . . . . . . . . 4-9
• Immobilizer system . . . . . . . . . . . . . . . . . . . . . . . . . . . 4-10
• Battery replacement . . . . . . . . . . . . . . . . . . . . . . . . . . 4-11
Theft-alarm system . . . . . . . . . . . . . . . . . . . . . . . . 4-13
Door locks . . . . . . . . . . . . . . . . . . . . . . . . . . . . . . . . 4-16
• From outside . . . . . . . . . . . . . . . . . . . . . . . . . . . . . . . . 4-16
• Power door latch . . . . . . . . . . . . . . . . . . . . . . . . . . . . . 4-17
• From inside . . . . . . . . . . . . . . . . . . . . . . . . . . . . . . . . . 4-17
• Child-protector rear door lock . . . . . . . . . . . . . . . . . 4-19
Trunk . . . . . . . . . . . . . . . . . . . . . . . . . . . . . . . . . . . . 4-20
• Non-powered trunk . . . . . . . . . . . . . . . . . . . . . . . . . . . 4-20
• Power trunk . . . . . . . . . . . . . . . . . . . . . . . . . . . . . . . . . 4-21
• Emergency trunk safety release . . . . . . . . . . . . . . . . . 4-26
Windows . . . . . . . . . . . . . . . . . . . . . . . . . . . . . . . . . 4-28
Hood. . . . . . . . . . . . . . . . . . . . . . . . . . . . . . . . . . . . . 4-33
Fuel filler lid . . . . . . . . . . . . . . . . . . . . . . . . . . . . . . 4-35
• Emergency fuel filler lid release. . . . . . . . . . . . . . . . . 4-37
Sunroof . . . . . . . . . . . . . . . . . . . . . . . . . . . . . . . . . . 4-38
• Sliding the sunroof . . . . . . . . . . . . . . . . . . . . . . . . . . . 4-39
• Tilting the sunroof . . . . . . . . . . . . . . . . . . . . . . . . . . . . 4-39
• Sunshade . . . . . . . . . . . . . . . . . . . . . . . . . . . . . . . . . . . 4-40• Resetting the sunroof . . . . . . . . . . . . . . . . . . . . . . . . . 4-41
Driver position memory system . . . . . . . . . . . . . . 4-42
Steering wheel . . . . . . . . . . . . . . . . . . . . . . . . . . . . . 4-44
• Power steering . . . . . . . . . . . . . . . . . . . . . . . . . . . . . . . 4-44
• Tilt/Telescopic steering . . . . . . . . . . . . . . . . . . . . . . . . 4-45
• Heated steering wheel . . . . . . . . . . . . . . . . . . . . . . . . . 4-45
• Horn . . . . . . . . . . . . . . . . . . . . . . . . . . . . . . . . . . . . . . . 4-46
Mirrors . . . . . . . . . . . . . . . . . . . . . . . . . . . . . . . . . . 4-47
• Inside rearview mirror . . . . . . . . . . . . . . . . . . . . . . . . 4-47
• Outside rearview mirror . . . . . . . . . . . . . . . . . . . . . . . 4-51
Instrument cluster . . . . . . . . . . . . . . . . . . . . . . . . . 4-55
• Instrument cluster control . . . . . . . . . . . . . . . . . . . . . 4-56
• LCD display control . . . . . . . . . . . . . . . . . . . . . . . . . . 4-57
• Gauges . . . . . . . . . . . . . . . . . . . . . . . . . . . . . . . . . . . . . 4-58
LCD display . . . . . . . . . . . . . . . . . . . . . . . . . . . . . . 4-63
• LCD modes. . . . . . . . . . . . . . . . . . . . . . . . . . . . . . . . . . 4-63
• Trip computer mode . . . . . . . . . . . . . . . . . . . . . . . . . . 4-64
• ASCC/LDWS mode . . . . . . . . . . . . . . . . . . . . . . . . . . . 4-64
• A/V mode . . . . . . . . . . . . . . . . . . . . . . . . . . . . . . . . . . . 4-64
• Turn by turn mode . . . . . . . . . . . . . . . . . . . . . . . . . . . 4-65
• Information mode . . . . . . . . . . . . . . . . . . . . . . . . . . . . 4-65
• User settings mode. . . . . . . . . . . . . . . . . . . . . . . . . . . . 4-68
• Warning messages . . . . . . . . . . . . . . . . . . . . . . . . . . . . 4-75
4
Page 100 of 479
411
Features of your vehicle
✽NOTICE
When starting the engine, do not use
the key with other immobilizer keys
around. Otherwise the engine may
not start or may stop soon after it
starts. Keep each key separate in
order to avoid a starting malfunc-
tion.
✽NOTICE
If you need additional keys or lose
your keys, we recommend that you
consult an authorized HYUNDAI
dealer.
Battery replacement
A smart key battery should last for
several years, but if the smart key is
not working properly, try replacing
the battery with a new one. If you are
unsure how to use or replace the
battery, we recommend that you con-
tact an authorized HYUNDAI dealer.
✽NOTICE
The circuit inside the smart key can
have a problem if exposed to mois-
ture or static electricity.
CAUTION
Do not put metal accessories
near the ignition switch.
The engine may not start for the
metal accessories may interrupt
the transponder signal from
normally transmitting.
CAUTION
The transponder in your ignition
key is an important part of the
immobilizer system. It is
designed to give years of trou-
ble-free service, however you
should avoid exposure to mois-
ture, static electricity and rough
handling. Immobilizer system
malfunction could occur.
CAUTION
Do not change, alter or adjust
the immobilizer system because
it could cause the immobilizer
system to malfunction. We rec-
ommend that the system be
serviced by an authorized
HYUNDAI dealer.
Malfunctions caused by improp-
er alterations, adjustments or
modifications to the immobilizer
system are not covered by your
vehicle manufacturer warranty.
Page 101 of 479
Features of your vehicle
12 4
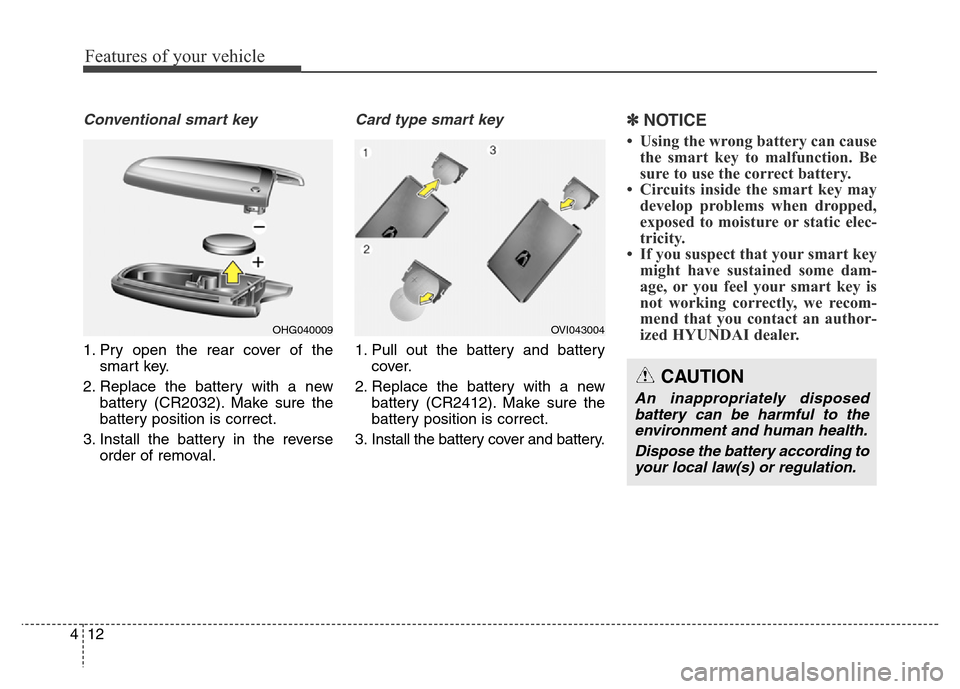
Conventional smart key
1. Pry open the rear cover of the
smart key.
2. Replace the battery with a new
battery (CR2032). Make sure the
battery position is correct.
3. Install the battery in the reverse
order of removal.
Card type smart key
1. Pull out the battery and battery
cover.
2. Replace the battery with a new
battery (CR2412). Make sure the
battery position is correct.
3. Install the battery cover and battery.
✽NOTICE
• Using the wrong battery can cause
the smart key to malfunction. Be
sure to use the correct battery.
• Circuits inside the smart key may
develop problems when dropped,
exposed to moisture or static elec-
tricity.
• If you suspect that your smart key
might have sustained some dam-
age, or you feel your smart key is
not working correctly, we recom-
mend that you contact an author-
ized HYUNDAI dealer.
OHG040009
CAUTION
An inappropriately disposed
battery can be harmful to the
environment and human health.
Dispose the battery according to
your local law(s) or regulation.
OVI043004
Page 114 of 479
425
Features of your vehicle
If the automatic stop and reversal
feature operates continuously more
than twice during one opening or
closing operation, the power trunk
may stop at that position. At this time,
close the trunk manually and operate
the trunk automatically again.How to reset the power trunk
If the battery has been discharged or
disconnected, or if the related fuse
has been replaced or disconnected,
for the power trunk to operate nor-
mally, reset the power trunk as fol-
low:
1. Put the shift lever in P (Park).
2. Close the trunk manually.
If the power trunk doesn't work prop-
erly after above procedure, we rec-
ommend that the system be checked
by an authorized HYUNDAI dealer.
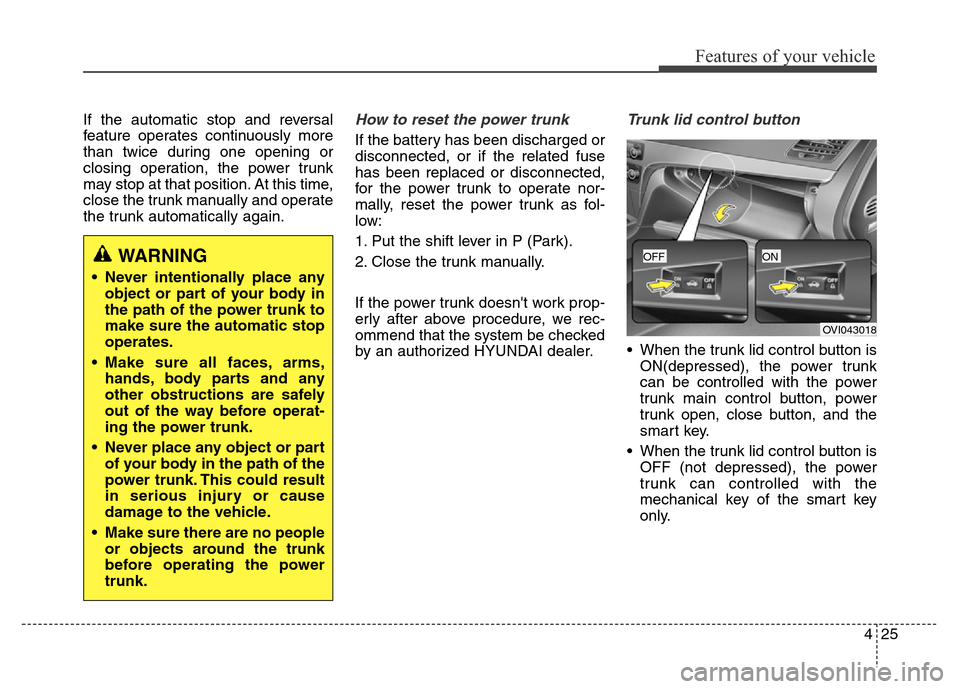
Trunk lid control button
• When the trunk lid control button is
ON(depressed), the power trunk
can be controlled with the power
trunk main control button, power
trunk open, close button, and the
smart key.
• When the trunk lid control button is
OFF (not depressed), the power
trunk can controlled with the
mechanical key of the smart key
only.
WARNING
• Never intentionally place any
object or part of your body in
the path of the power trunk to
make sure the automatic stop
operates.
• Make sure all faces, arms,
hands, body parts and any
other obstructions are safely
out of the way before operat-
ing the power trunk.
• Never place any object or part
of your body in the path of the
power trunk. This could result
in serious injury or cause
damage to the vehicle.
• Make sure there are no people
or objects around the trunk
before operating the power
trunk.
OVI043018
OFFON
Page 166 of 479
477
Features of your vehicle
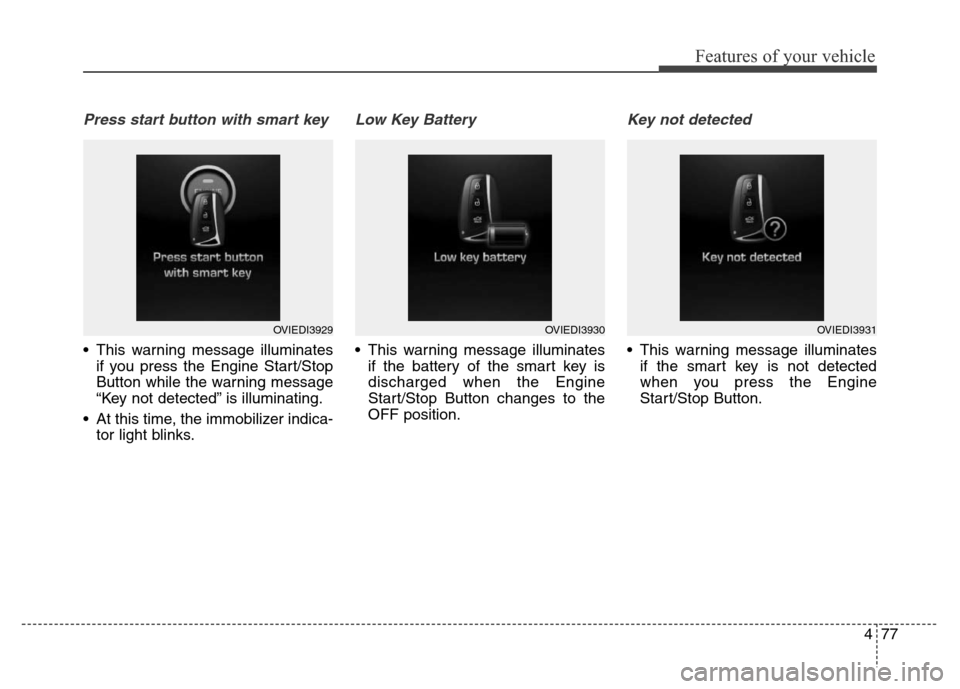
Press start button with smart key
• This warning message illuminates
if you press the Engine Start/Stop
Button while the warning message
“Key not detected” is illuminating.
• At this time, the immobilizer indica-
tor light blinks.
Low Key Battery
• This warning message illuminates
if the battery of the smart key is
discharged when the Engine
Start/Stop Button changes to the
OFF position.
Key not detected
• This warning message illuminates
if the smart key is not detected
when you press the Engine
Start/Stop Button.
OVIEDI3929OVIEDI3930OVIEDI3931
Page 189 of 479
Features of your vehicle
100 4
This indicator light illuminates for 2
seconds and goes off:
• When the vehicle can not detect
the smart key which is in the vehi-
cle while the Engine Start/Stop
Button is ON.
In this case, we recommend that
you have the vehicle inspected by
an authorized HYUNDAI dealer.
This indicator light blinks:
• When the battery of the smart key
is weak.
- At this time, you can not start the
engine. However, you can start
the engine if you press the Engine
Start/Stop Button with the smart
key. (For more details, refer to
“Starting the Engine” in section 5).
• When there is a malfunction with
the immobilizer system.
In this case, we recommend that
you have the vehicle inspected by
an authorized HYUNDAI dealer.Turn Signal Indicator
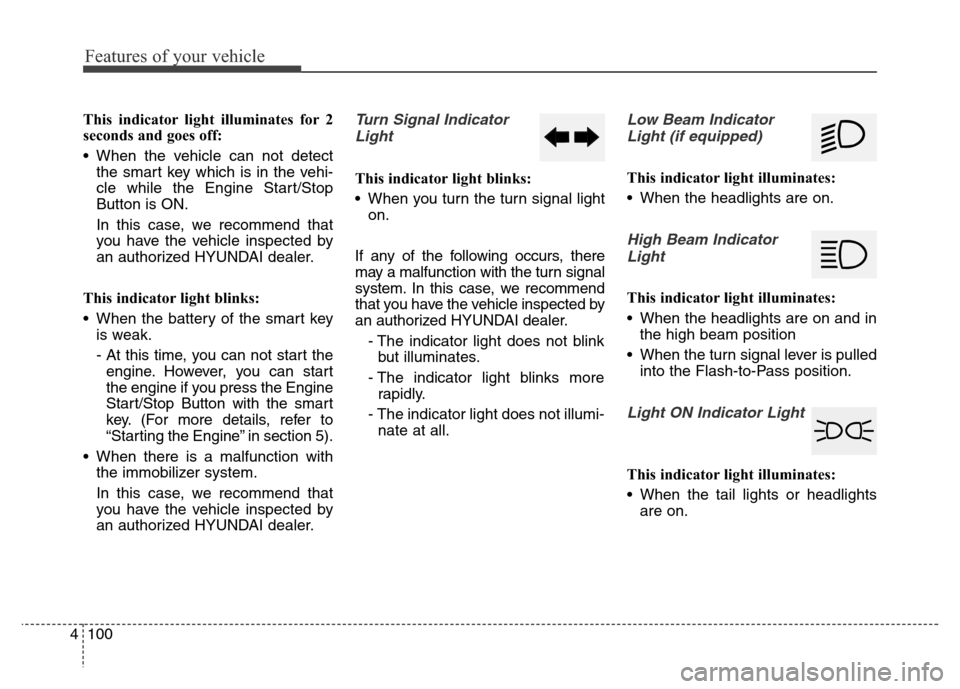
Light
This indicator light blinks:
• When you turn the turn signal light
on.
If any of the following occurs, there
may a malfunction with the turn signal
system. In this case, we recommend
that you have the vehicle inspected by
an authorized HYUNDAI dealer.
- The indicator light does not blink
but illuminates.
- The indicator light blinks more
rapidly.
- The indicator light does not illumi-
nate at all.
Low Beam Indicator
Light (if equipped)
This indicator light illuminates:
• When the headlights are on.
High Beam Indicator
Light
This indicator light illuminates:
• When the headlights are on and in
the high beam position
• When the turn signal lever is pulled
into the Flash-to-Pass position.
Light ON Indicator Light
This indicator light illuminates:
• When the tail lights or headlights
are on.
Page 206 of 479
4117
Features of your vehicle
Battery saver function
• The purpose of this feature is to
prevent the battery from being dis-
charged. The system automatically
turns off the position lamps when
the driver turns off the engine and
opens the driver-side door.
• With this feature, the position
lamps will be turned off automati-
cally if the driver parks on the side
of road at night.
If necessary, to keep the lamps on
when the engine is turned off per-
form the following:
1) Open the driver-side door.
2) Turn the position lamps OFF
and ON again.
Headlamp escort function
The headlamps (and/or position lamp)
will remain on for approximately 5 min-
utes after the engine start/stop button
is turned to the ACC or OFF position.
However, if the driver’s door is opened
and closed, the headlamps are turned
off after 15 seconds.
The headlamps can be turned off by
pressing the lock button on the smart
key twice or turning off the light
switch from the headlight or Auto
light position.
❈Traffic Change (For Europe)
The low beam light distribution is
asymmetric. If you go abroad to a
country with opposite traffic direc-
tion, this asymmetric part will dazzle
oncoming car driver. To prevent daz-
zle, ECE regulation demand several
technical solutions (ex. automatic
change system, adhesive sheet,
down aiming). This headlamps are
designed not to dazzle opposite driv-
ers. So, you need not change your
headlamps in a country with oppo-
site traffic direction.
LIGHTING
CAUTION
If the driver gets out of the vehi-
cle through other doors (except
driver's door), the battery saver
function does not operate.
Therefore, it causes the battery
to be discharged. In this case,
make sure to turn off the lamp
before getting out of the vehicle.
Page 216 of 479
4127
Features of your vehicle
INTERIOR LIGHT
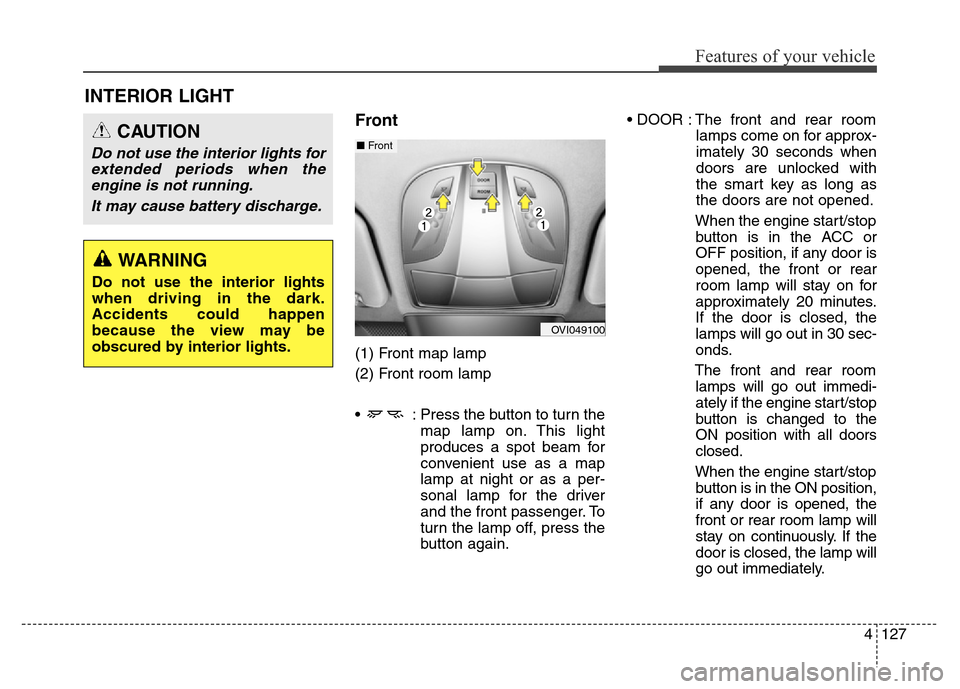
Front
(1) Front map lamp
(2) Front room lamp
• : Press the button to turn the
map lamp on. This light
produces a spot beam for
convenient use as a map
lamp at night or as a per-
sonal lamp for the driver
and the front passenger. To
turn the lamp off, press the
button again.• DOOR : The front and rear room
lamps come on for approx-
imately 30 seconds when
doors are unlocked with
the smart key as long as
the doors are not opened.
When the engine start/stop
button is in the ACC or
OFF position, if any door is
opened, the front or rear
room lamp will stay on for
approximately 20 minutes.
If the door is closed, the
lamps will go out in 30 sec-
onds.
The front and rear room
lamps will go out immedi-
ately if the engine start/stop
button is changed to the
ON position with all doors
closed.
When the engine start/stop
button is in the ON position,
if any door is opened, the
front or rear room lamp will
stay on continuously. If the
door is closed, the lamp will
go out immediately.
CAUTION
Do not use the interior lights for
extended periods when the
engine is not running.
It may cause battery discharge.
OVI049100
■Front
WARNING
Do not use the interior lights
when driving in the dark.
Accidents could happen
because the view may be
obscured by interior lights.
Page 267 of 479
Driving your vehicle
10 5
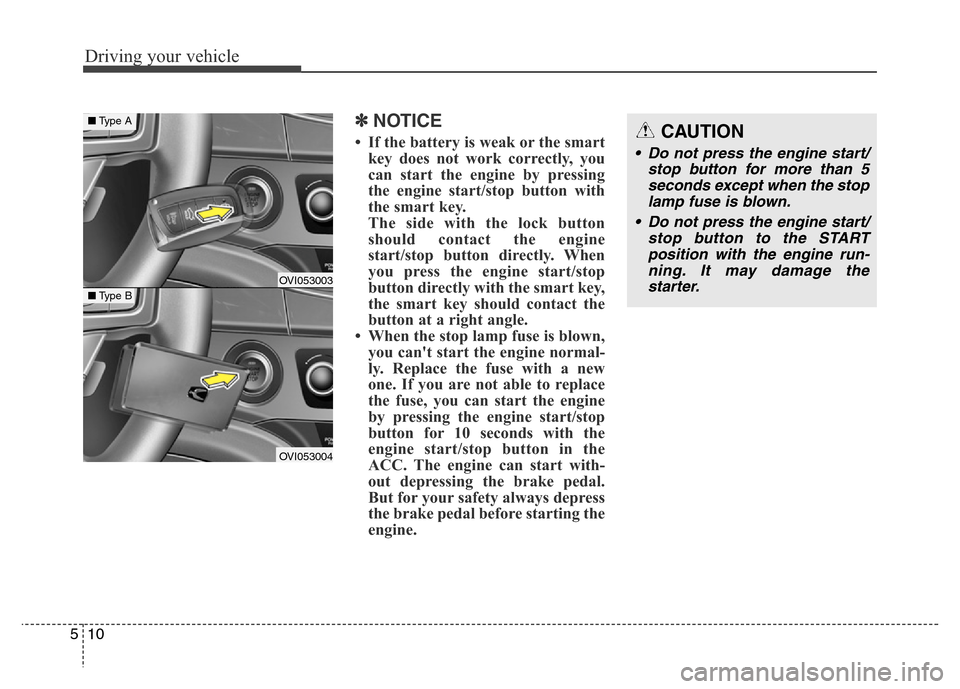
✽NOTICE
• If the battery is weak or the smart
key does not work correctly, you
can start the engine by pressing
the engine start/stop button with
the smart key.
The side with the lock button
should contact the engine
start/stop button directly. When
you press the engine start/stop
button directly with the smart key,
the smart key should contact the
button at a right angle.
• When the stop lamp fuse is blown,
you can't start the engine normal-
ly. Replace the fuse with a new
one. If you are not able to replace
the fuse, you can start the engine
by pressing the engine start/stop
button for 10 seconds with the
engine start/stop button in the
ACC. The engine can start with-
out depressing the brake pedal.
But for your safety always depress
the brake pedal before starting the
engine.CAUTION
• Do not press the engine start/
stop button for more than 5
seconds except when the stop
lamp fuse is blown.
• Do not press the engine start/
stop button to the START
position with the engine run-
ning. It may damage the
starter.
OVI053003
OVI053004
■Type B
■Type A