sensor Hyundai Equus 2016 User Guide
[x] Cancel search | Manufacturer: HYUNDAI, Model Year: 2016, Model line: Equus, Model: Hyundai Equus 2016Pages: 477, PDF Size: 16.25 MB
Page 90 of 477
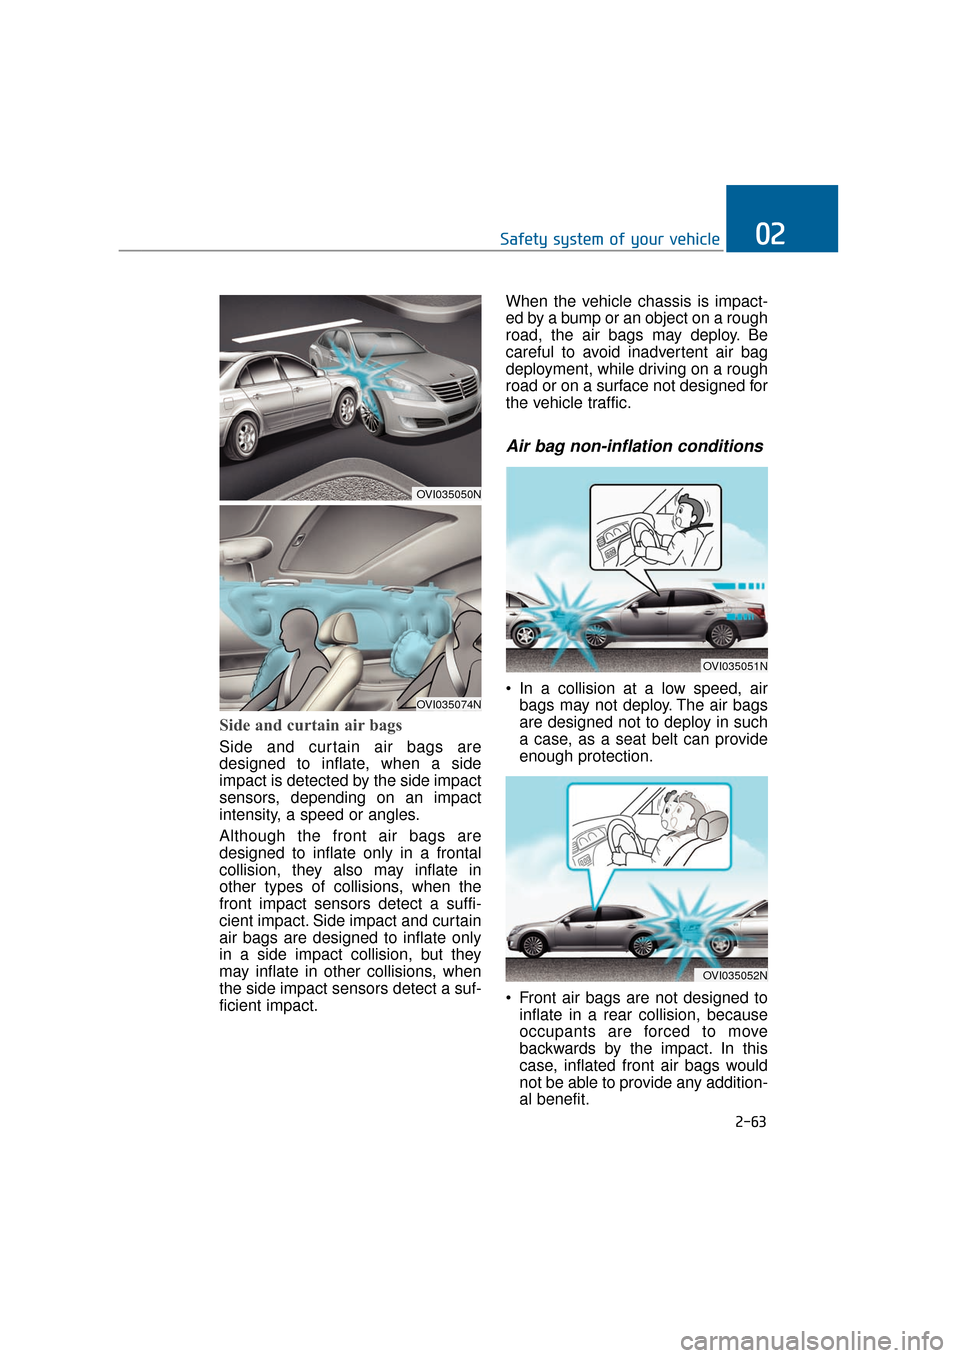
Side and curtain air bags
Side and curtain air bags are
designed to inflate, when a side
impact is detected by the side impact
sensors, depending on an impact
intensity, a speed or angles.
Although the front air bags are
designed to inflate only in a frontal
collision, they also may inflate in
other types of collisions, when the
front impact sensors detect a suffi-
cient impact. Side impact and curtain
air bags are designed to inflate only
in a side impact collision, but they
may inflate in other collisions, when
the side impact sensors detect a suf-
ficient impact.When the vehicle chassis is impact-
ed by a bump or an object on a rough
road, the air bags may deploy. Be
careful to avoid inadvertent air bag
deployment, while driving on a rough
road or on a surface not designed for
the vehicle traffic.
Air bag non-inflation conditions
In a collision at a low speed, air
bags may not deploy. The air bags
are designed not to deploy in such
a case, as a seat belt can provide
enough protection.
Front air bags are not designed to inflate in a rear collision, because
occupants are forced to move
backwards by the impact. In this
case, inflated front air bags would
not be able to provide any addition-
al benefit.
2-63
Safety system of your vehicle02
OVI035051N
OVI035052N
OVI035050N
OVI035074N
Page 91 of 477
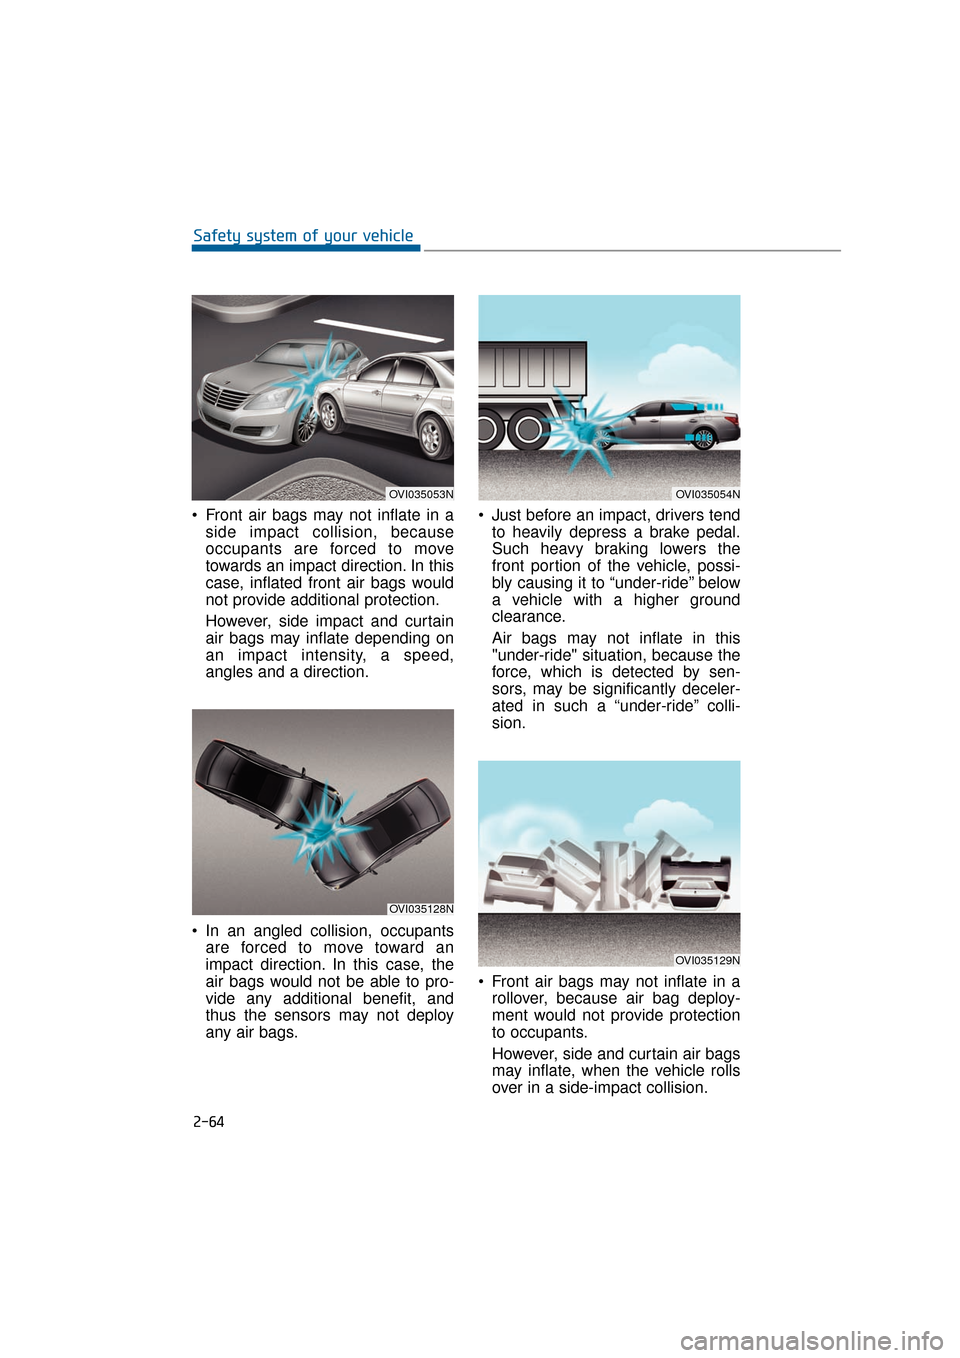
Front air bags may not inflate in aside impact collision, because
occupants are forced to move
towards an impact direction. In this
case, inflated front air bags would
not provide additional protection.
However, side impact and curtain
air bags may inflate depending on
an impact intensity, a speed,
angles and a direction.
In an angled collision, occupants are forced to move toward an
impact direction. In this case, the
air bags would not be able to pro-
vide any additional benefit, and
thus the sensors may not deploy
any air bags. Just before an impact, drivers tend
to heavily depress a brake pedal.
Such heavy braking lowers the
front portion of the vehicle, possi-
bly causing it to “under-ride” below
a vehicle with a higher ground
clearance.
Air bags may not inflate in this
"under-ride" situation, because the
force, which is detected by sen-
sors, may be significantly deceler-
ated in such a “under-ride” colli-
sion.
Front air bags may not inflate in a rollover, because air bag deploy-
ment would not provide protection
to occupants.
However, side and curtain air bags
may inflate, when the vehicle rolls
over in a side-impact collision.
2-64
Safety system of your vehicle
OVI035053N
OVI035128N
OVI035129N
OVI035054N
Page 125 of 477
To Reset the Power Windows
When the power windows do not nor-
mally operate, the automatic power
window system must be reset as fol-
lows:
1. Press the Engine Start/Stop but-ton twice to the ON position.
2. Continue pulling up the power win- dow switch even after fully closing
the windows for one second or
more.
If the problem persists, have the sys-
tem checked by an authorized
EQUUS dealer.
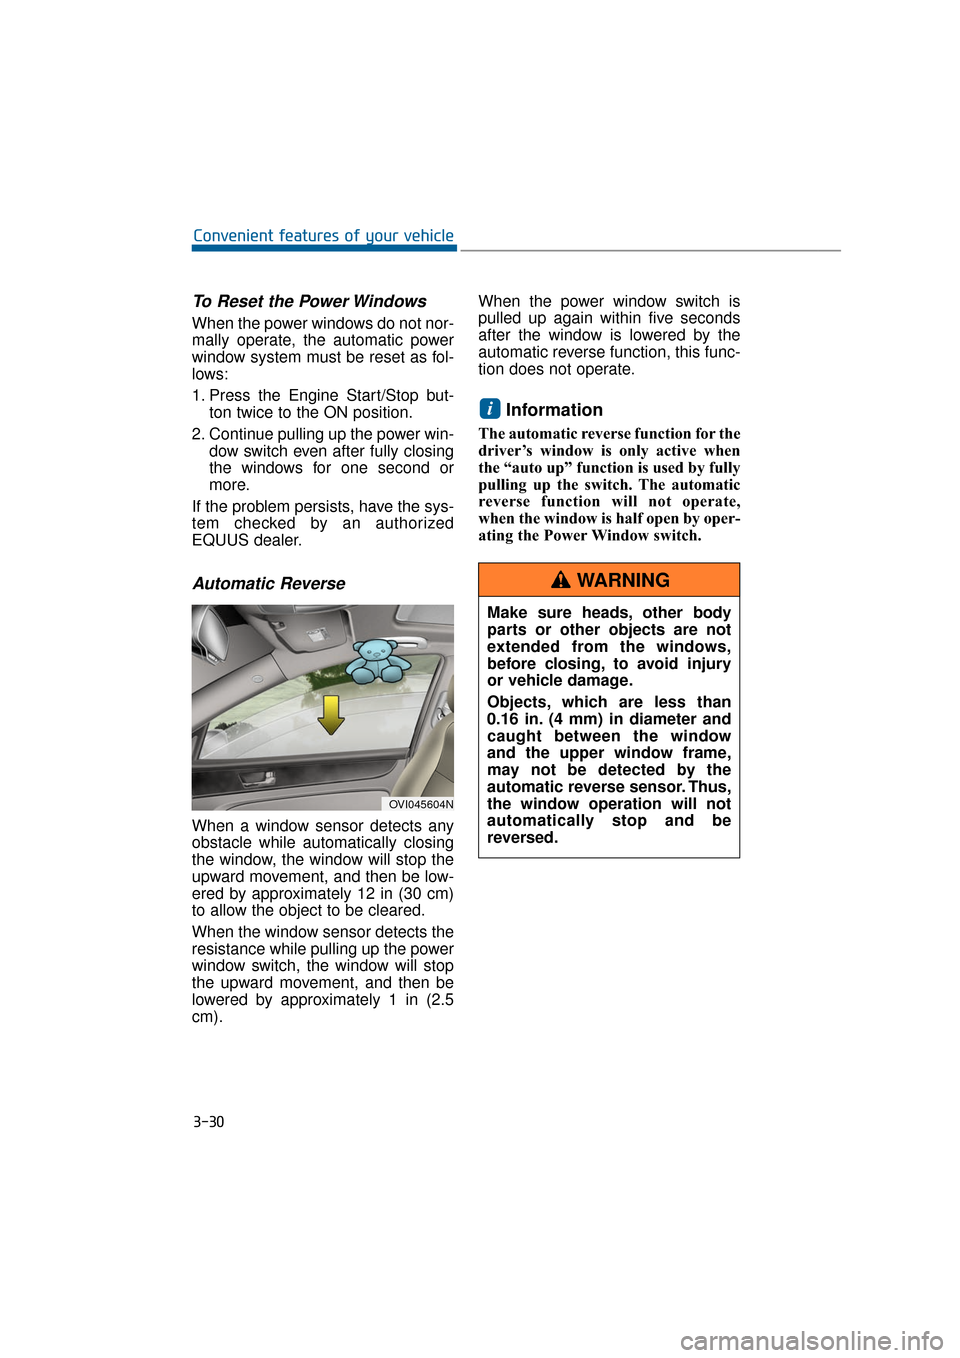
Automatic Reverse
When a window sensor detects any
obstacle while automatically closing
the window, the window will stop the
upward movement, and then be low-
ered by approximately 12 in (30 cm)
to allow the object to be cleared.
When the window sensor detects the
resistance while pulling up the power
window switch, the window will stop
the upward movement, and then be
lowered by approximately 1 in (2.5
cm). When the power window switch is
pulled up again within five seconds
after the window is lowered by the
automatic reverse function, this func-
tion does not operate.
Information
The automatic reverse function for the
driver’s window is only active when
the “auto up” function is used by fully
pulling up the switch. The automatic
reverse function will not operate,
when the window is half open by oper-
ating the Power Window switch.
i
3-30
Convenient features of your vehicle
OVI045604N
Make sure heads, other body
parts or other objects are not
extended from the windows,
before closing, to avoid injury
or vehicle damage.
Objects, which are less than
0.16 in. (4 mm) in diameter and
caught between the window
and the upper window frame,
may not be detected by the
automatic reverse sensor. Thus,
the window operation will not
automatically stop and be
reversed.
WARNING
Page 132 of 477
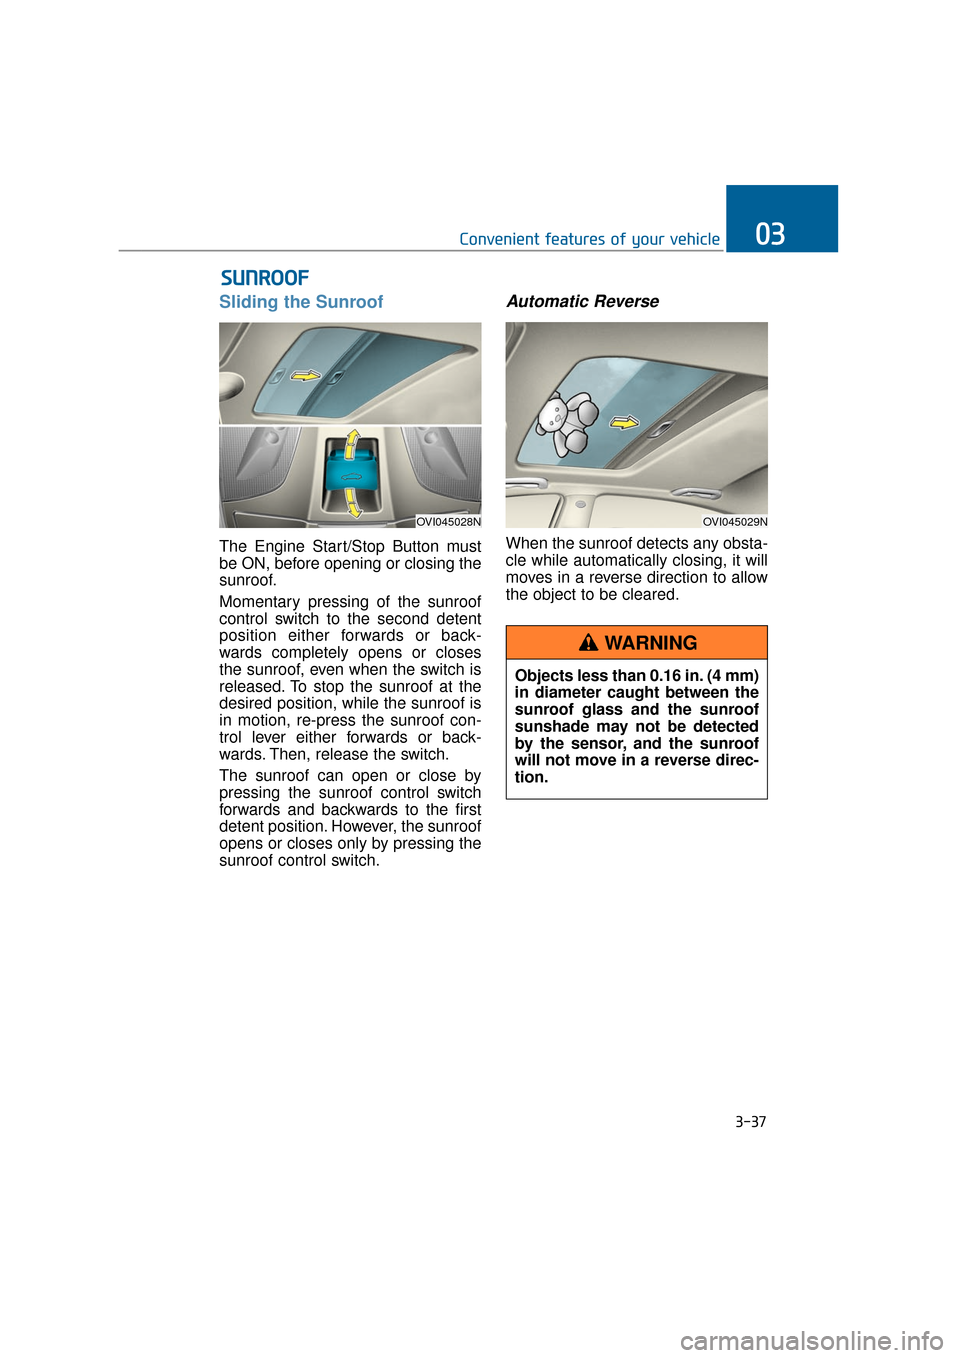
Sliding the Sunroof
The Engine Start/Stop Button must
be ON, before opening or closing the
sunroof.
Momentary pressing of the sunroof
control switch to the second detent
position either forwards or back-
wards completely opens or closes
the sunroof, even when the switch is
released. To stop the sunroof at the
desired position, while the sunroof is
in motion, re-press the sunroof con-
trol lever either forwards or back-
wards. Then, release the switch.
The sunroof can open or close by
pressing the sunroof control switch
forwards and backwards to the first
detent position. However, the sunroof
opens or closes only by pressing the
sunroof control switch.
Automatic Reverse
When the sunroof detects any obsta-
cle while automatically closing, it will
moves in a reverse direction to allow
the object to be cleared.
S SU
U N
NR
RO
O O
OF
F
3-37
Convenient features of your vehicle03
OVI045028NOVI045029N
Objects less than 0.16 in. (4 mm)
in diameter caught between the
sunroof glass and the sunroof
sunshade may not be detected
by the sensor, and the sunroof
will not move in a reverse direc-
tion.
WARNING
Page 139 of 477
Interior rearview mirrors
Before you start driving, adjust the
rearview mirror to focus on the cen-
ter of the rearview through the rear
window.
Electric chromic mirror (ECM)with HomeLink®system and
compass (Type A)
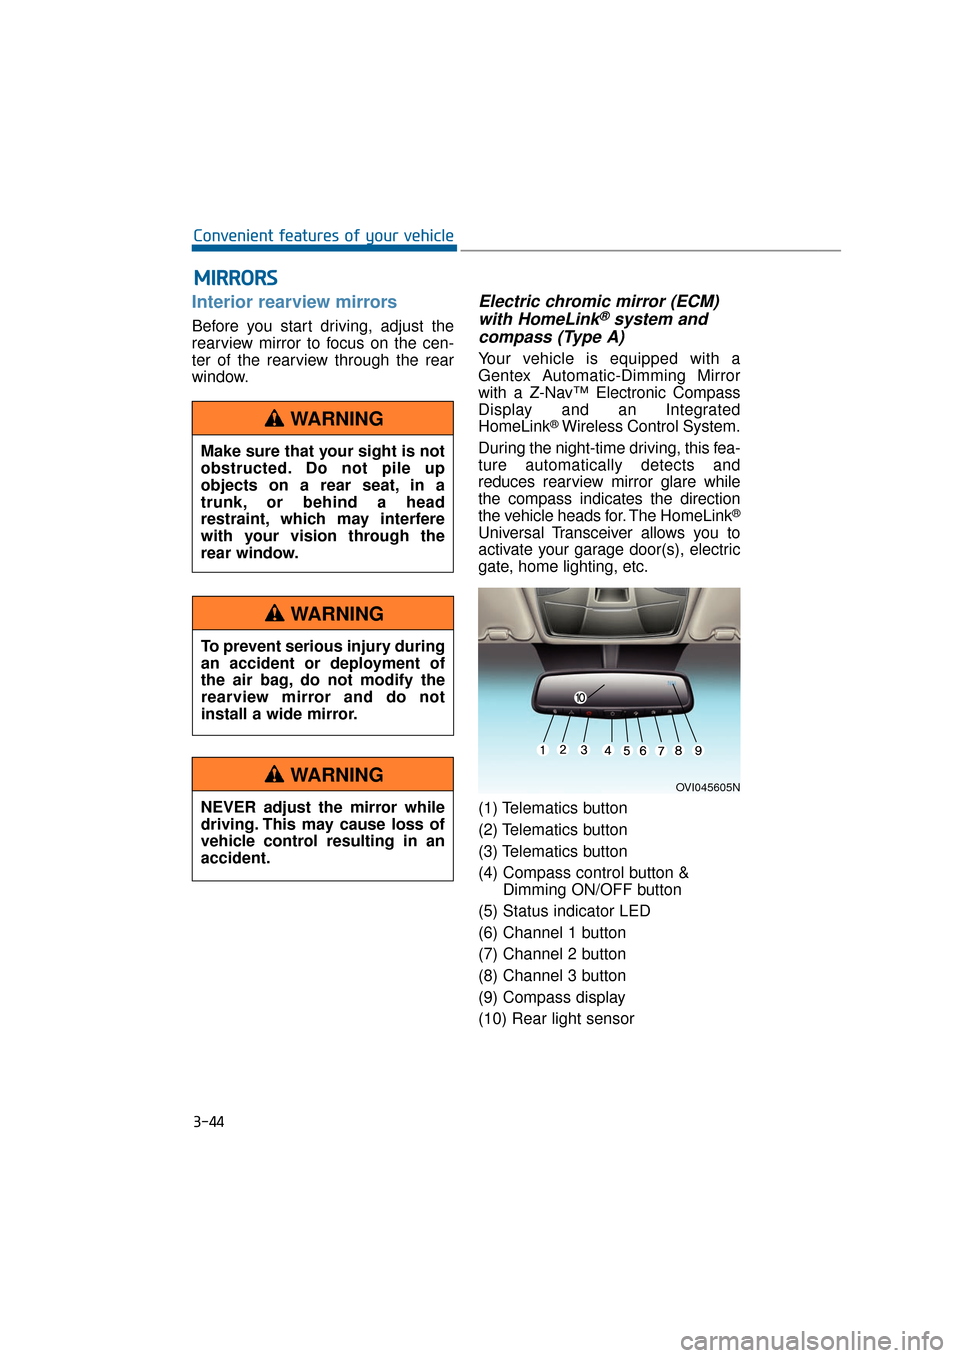
Your vehicle is equipped with a
Gentex Automatic-Dimming Mirror
with a Z-Nav™ Electronic Compass
Display and an Integrated
HomeLink
®Wireless Control System.
During the night-time driving, this fea-
ture automatically detects and
reduces rearview mirror glare while
the compass indicates the direction
the vehicle heads for. The HomeLink
®
Universal Transceiver allows you to
activate your garage door(s), electric
gate, home lighting, etc.
(1) Telematics button
(2) Telematics button
(3) Telematics button
(4) Compass control button & Dimming ON/OFF button
(5) Status indicator LED
(6) Channel 1 button
(7) Channel 2 button
(8) Channel 3 button
(9) Compass display
(10) Rear light sensor
M M I
IR
R R
RO
O R
RS
S
3-44
Convenient features of your vehicle
OVI045605N
Make sure that your sight is not
obstructed. Do not pile up
objects on a rear seat, in a
trunk, or behind a head
restraint, which may interfere
with your vision through the
rear window.
WARNING
To prevent serious injury during
an accident or deployment of
the air bag, do not modify the
rearview mirror and do not
install a wide mirror.
WARNING
NEVER adjust the mirror while
driving. This may cause loss of
vehicle control resulting in an
accident.
WARNING
Page 140 of 477
Automatic-Dimming Night Vision
Safety™ (NVS®) Mirror
The NVS®Mirror in your vehicle is
the most advanced mirror to reduce
annoying glare in the rearview mirror
in any driving situation. For more
information regarding NVS
®mirrors
and other applications, please visit
the Gentex website:
www.gentex.com
Information
The NVS®Mirror automatically
reduces glare while driving based
upon light levels detected in front of
the vehicle and from the rear of the
vehicle. These light sensors are visible
through openings in the front and rear
of the mirror case. Any object that
obstructs either light sensor will
degrade the automatic dimming con-
trol function.
Automatic-dimming function
Your mirror automatically dims the
glare upon detecting it from the vehi-
cles traveling behind you. The auto-
matic-dimming function can be con-
trolled by the Dimming ON/OFF
Button:
1. Pressing and holding the button for 3 seconds turns OFF the
automatic-dimming function,
which is indicated by the turned-
OFF green light of the Status
Indicator LED.
2. Re-pressing and holding the button for 3 seconds turns ON the
automatic-dimming function which
is indicated by the turned-ON
green light of the Status Indicator
LED.
The mirror defaults to the ON posi-
tion whenever the vehicle is started.
Z-Nav™ Compass Display
The NVS™ Mirror in your vehicle is
also equipped with a Z-Nav™
Compass that shows the vehicle
Compass heading on the Display
Window in the 8 cardinals headings
(N, NE, E, SE, etc.).
Compass function
The Compass can be turned
ON/OFF and remember the last
heading information when the igni-
tion is cycled. To turn ON/OFF the
display function:
1. Press and release the button within 1 second to turn OFF the
display function.
2. Press and release the button again within 1 second to turn ON
the display back.
Additional options can be set by
pressing and holding buttons in
sequences.
There is a difference between the
magnetic north and the actual north.
The compass in the mirror can offset
this difference by knowing the
Magnetic Zone in which it is operat-
ing. This is set either by the dealer or
by the user. The operating Zone
Numbers for North America are
shown in the figure on the next page.
i
3-45
Convenient features of your vehicle03
Page 146 of 477
This device complies with Part 15
of the FCC Rules.
Operation is subject to the following
two conditions:
1. This device may not cause harmfulinterference, and
2. This device must accept any inter- ference received, including inter-
ference that may cause undesired
operation.
NVS
®is a registered trademark and
Z-Nav™ is a trademark of the Gentex
Corporation, Zeeland, Michigan.
HomeLink
®is a registered trademark
owned by Johnson Controls,
Incorporated, Milwaukee, Wisconsin.
Electric chromic mirror (ECM) with HomeLink®system and
compass (Type B)
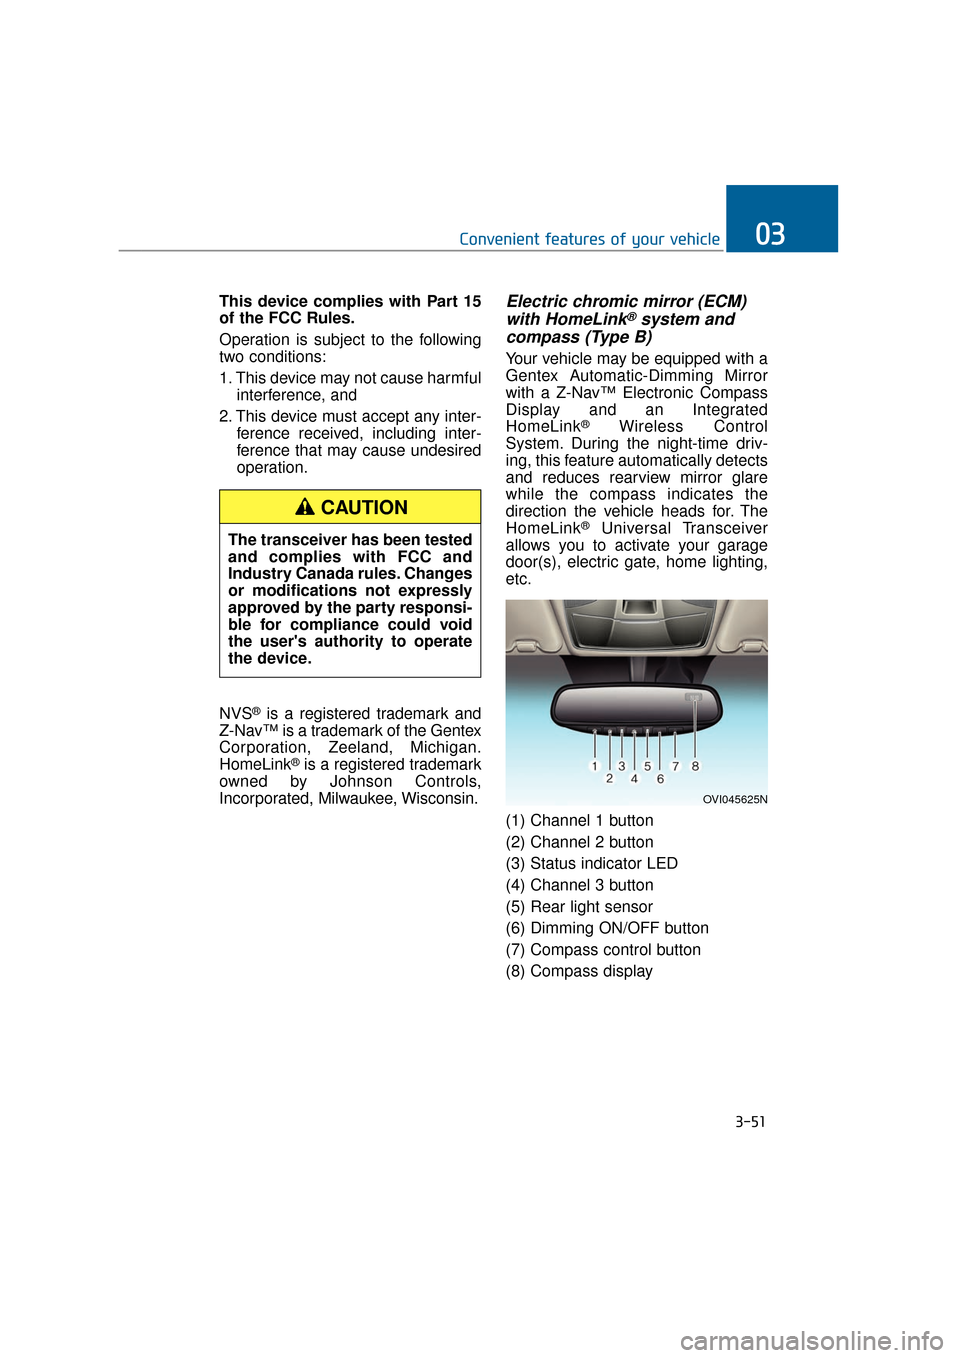
Your vehicle may be equipped with a
Gentex Automatic-Dimming Mirror
with a Z-Nav™ Electronic Compass
Display and an Integrated
HomeLink
®Wireless Control
System. During the night-time driv-
ing, this feature automatically detects
and reduces rearview mirror glare
while the compass indicates the
direction the vehicle heads for. The
HomeLink
®Universal Transceiver
allows you to activate your garage
door(s), electric gate, home lighting,
etc.
(1) Channel 1 button
(2) Channel 2 button
(3) Status indicator LED
(4) Channel 3 button
(5) Rear light sensor
(6) Dimming ON/OFF button
(7) Compass control button
(8) Compass display
3-51
Convenient features of your vehicle03
OVI045625N
The transceiver has been tested
and complies with FCC and
Industry Canada rules. Changes
or modifications not expressly
approved by the party responsi-
ble for compliance could void
the user's authority to operate
the device.
CAUTION
Page 147 of 477
Automatic-Dimming Night Vision
Safety™ (NVS®) Mirror
The NVS®Mirror in your vehicle is
the most advanced mirror to reduce
annoying glare in the rearview mirror
in any driving situation. For more
information regarding NVS
®mirrors
and other applications, please visit
the Gentex website:
www.gentex.com
The NVS
®Mirror automatically
dims glare in driving conditions
based upon light levels detected
in front of the vehicle and from the
rear of the vehicle. These light
sensors are visible through open-
ings in the front and rear of the
mirror case. Any object that
obstructs either light sensor will
degrade the automatic dimming
control function.
Automatic-dimming function
Your mirror automatically dims the
glare upon detecting it from the vehi-
cles traveling behind you. The auto-
matic-dimming function can be con-
trolled by the Dimming ON/OFF
Button:
1. Pressing and hold the button for 3 seconds turns OFF the automat-
ic-dimming function, which is indi-
cated by the turned-OFF green
light of the Status Indicator LED.
2. Pressing and hold the button for 3 seconds again turns ON the
automatic-dimming function which
is indicated by the turned-ON
green light of the Status Indicator
LED.
Information
The mirror resets to be ON whenever
the vehicle is started.
Z-Nav™ Compass Display
The NVS™ Mirror in your vehicle is
also equipped with a Z-Nav™
Compass that shows the vehicle
Compass heading on the Display
Window in the 8 cardinals headings
(N, NE, E, SE, etc.).
Compass function
The Compass can be turned
ON/OFF and remember the last
heading information when the igni-
tion is cycled. To turn ON/OFF the
display function:
1. Press and release the buttonwithin 1 second to turn OFF the
display function.
2. Press and release the button again within 1 second to turn ON
the display back.
Additional options can be set by
pressing and holding buttons in
sequences, as detailed below.
There is a difference between the
magnetic north and the actual north.
The compass in the mirror can offset
this difference by knowing the
Magnetic Zone in which it is operat-
ing. This is set either by the dealer or
by the user. The operating Zone
Numbers for North America are
shown in the figure on the next page.
i
NOTICE
3-52
Convenient features of your vehicle
Page 156 of 477
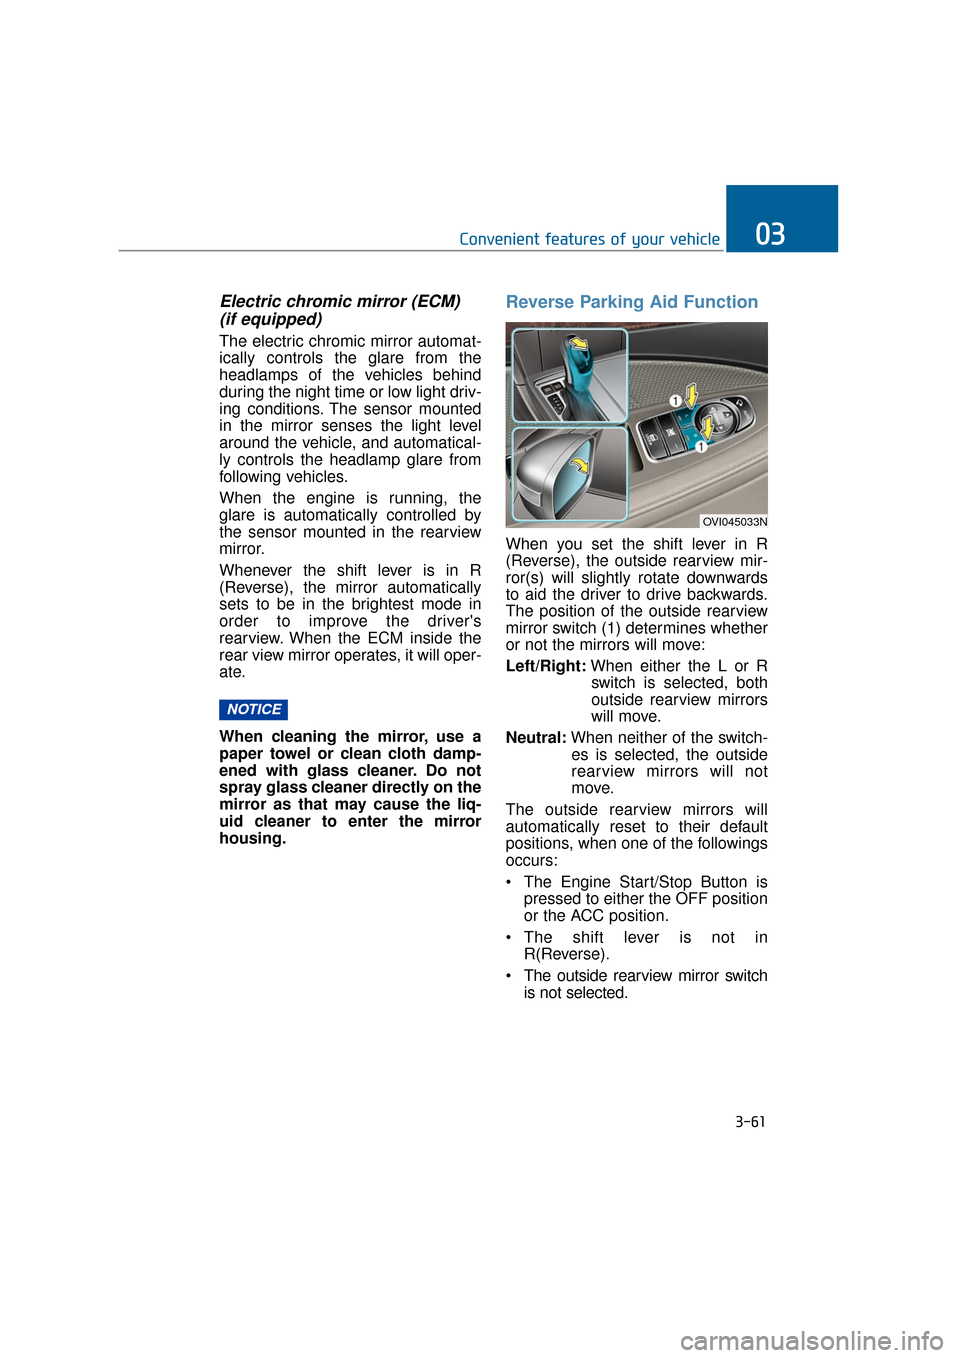
Electric chromic mirror (ECM) (if equipped)
The electric chromic mirror automat-
ically controls the glare from the
headlamps of the vehicles behind
during the night time or low light driv-
ing conditions. The sensor mounted
in the mirror senses the light level
around the vehicle, and automatical-
ly controls the headlamp glare from
following vehicles.
When the engine is running, the
glare is automatically controlled by
the sensor mounted in the rearview
mirror.
Whenever the shift lever is in R
(Reverse), the mirror automatically
sets to be in the brightest mode in
order to improve the driver's
rearview. When the ECM inside the
rear view mirror operates, it will oper-
ate.
When cleaning the mirror, use a
paper towel or clean cloth damp-
ened with glass cleaner. Do not
spray glass cleaner directly on the
mirror as that may cause the liq-
uid cleaner to enter the mirror
housing.
Reverse Parking Aid Function
When you set the shift lever in R
(Reverse), the outside rearview mir-
ror(s) will slightly rotate downwards
to aid the driver to drive backwards.
The position of the outside rearview
mirror switch (1) determines whether
or not the mirrors will move:
Left/Right: When either the L or R
switch is selected, both
outside rearview mirrors
will move.
Neutral: When neither of the switch-
es is selected, the outside
rearview mirrors will not
move.
The outside rearview mirrors will
automatically reset to their default
positions, when one of the followings
occurs:
The Engine Start/Stop Button is pressed to either the OFF position
or the ACC position.
The shift lever is not in R(Reverse).
The outside rearview mirror switch is not selected.
NOTICE
3-61
Convenient features of your vehicle03
OVI045033N
Page 193 of 477
![Hyundai Equus 2016 User Guide AUTO HOLD Indicator Light (if equipped)
This indicator light illuminates:
[White] When you activate the
auto hold system by pressing the
AUTO HOLD button.
[Green] When you completely stop the vehicl Hyundai Equus 2016 User Guide AUTO HOLD Indicator Light (if equipped)
This indicator light illuminates:
[White] When you activate the
auto hold system by pressing the
AUTO HOLD button.
[Green] When you completely stop the vehicl](/img/35/14636/w960_14636-192.png)
AUTO HOLD Indicator Light (if equipped)
This indicator light illuminates:
[White] When you activate the
auto hold system by pressing the
AUTO HOLD button.
[Green] When you completely stop the vehicle by depressing the
brake pedal with the auto hold
system ON.
[Yellow] When there is a malfunc- tion with the auto hold system.
In this case, have your vehicle
inspected by an authorized
EQUUS dealer.
❈ For further information, refer to
“Auto Hold” in the chapter 5.
Lane Departure Warning System
(LDWS) Indicator Light(if equipped)
This indicator light illuminates:
[Green] When you activate the
Lane Departure Warning System
by pressing the LDWS button.
[White] When system operating conditions are not satisfied, or
when the sensor does not detect
the lane line.
[Yellow] When there is a malfunc- tion with the Lane Departure
Warning System.
In this case, have your vehicle
inspected by an authorized
EQUUS dealer.
❈ For further information, refer to
“Lane Departure Warning System
(LDWS)” in the chapter 5.
3-98
Convenient features of your vehicle