fuse box Hyundai Genesis 2014 Owner's Manual
[x] Cancel search | Manufacturer: HYUNDAI, Model Year: 2014, Model line: Genesis, Model: Hyundai Genesis 2014Pages: 546, PDF Size: 13.59 MB
Page 18 of 546
1-7
Your vehicle at a glance
1
ENGINE COMPARTMENT
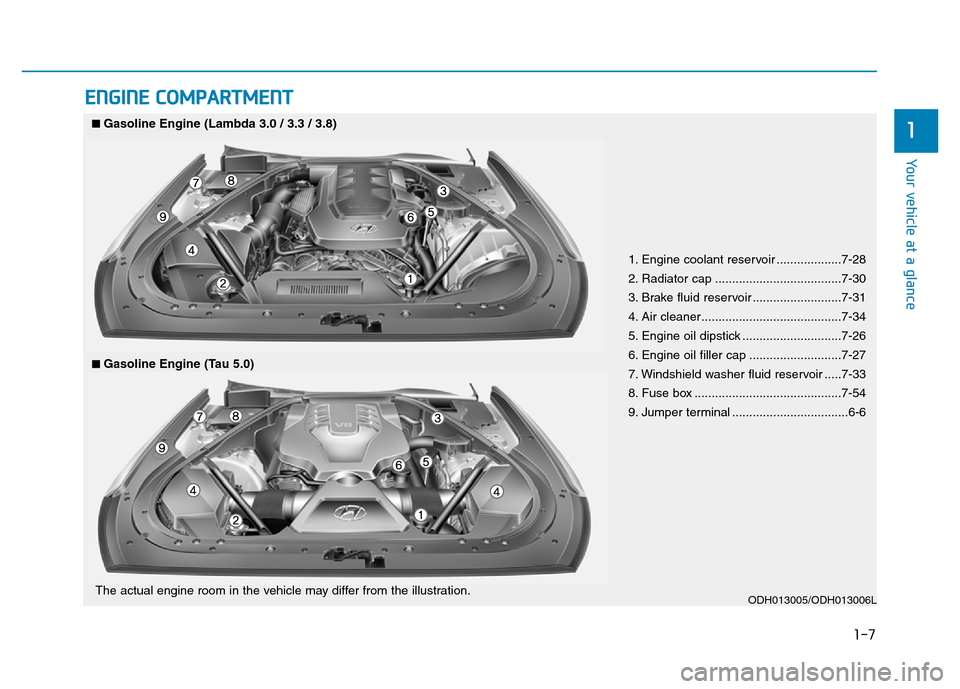
1. Engine coolant reservoir ...................7-28
2. Radiator cap .....................................7-30
3. Brake fluid reservoir ..........................7-31
4. Air cleaner.........................................7-34
5. Engine oil dipstick .............................7-26
6. Engine oil filler cap ...........................7-27
7. Windshield washer fluid reservoir .....7-33
8. Fuse box ...........................................7-54
9. Jumper terminal ..................................6-6
ODH013005/ODH013006L
■Gasoline Engine (Lambda 3.0 / 3.3 / 3.8)
■Gasoline Engine (Tau 5.0)
The actual engine room in the vehicle may differ from the illustration.
Page 165 of 546
3-74
Convenient features of your vehicle
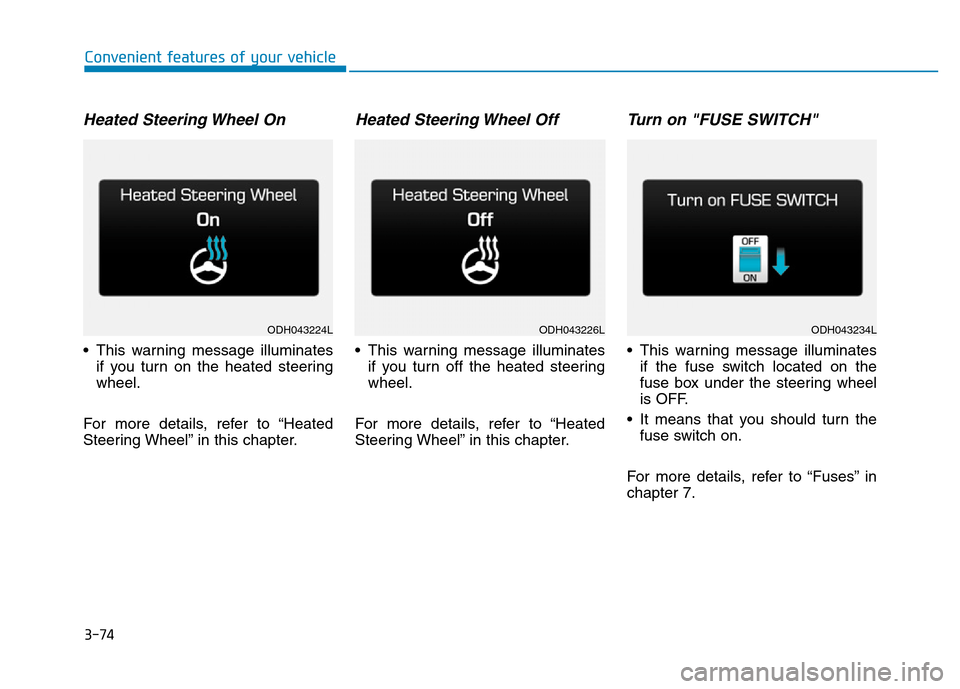
Heated Steering Wheel On
• This warning message illuminates
if you turn on the heated steering
wheel.
For more details, refer to “Heated
Steering Wheel” in this chapter.
Heated Steering Wheel Off
• This warning message illuminates
if you turn off the heated steering
wheel.
For more details, refer to “Heated
Steering Wheel” in this chapter.
Turn on "FUSE SWITCH"
• This warning message illuminates
if the fuse switch located on the
fuse box under the steering wheel
is OFF.
• It means that you should turn the
fuse switch on.
For more details, refer to “Fuses” in
chapter 7.
ODH043224LODH043226LODH043234L
Page 410 of 546
6-7
What to do in an emergency
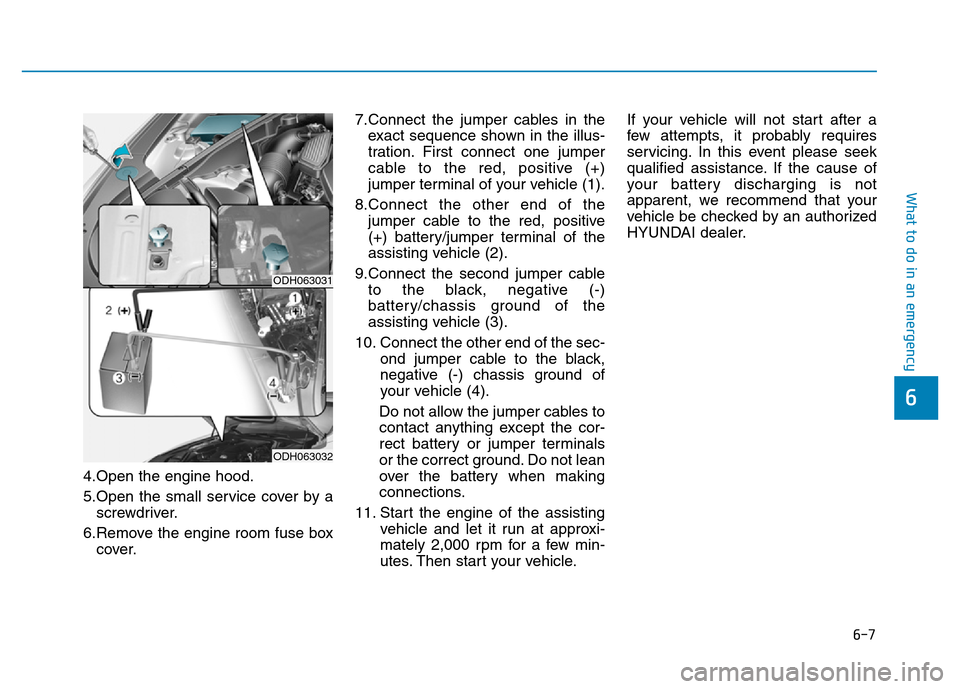
4.Open the engine hood.
5.Open the small service cover by a
screwdriver.
6.Remove the engine room fuse box
cover.7.Connect the jumper cables in the
exact sequence shown in the illus-
tration. First connect one jumper
cable to the red, positive (+)
jumper terminal of your vehicle (1).
8.Connect the other end of the
jumper cable to the red, positive
(+) battery/jumper terminal of the
assisting vehicle (2).
9.Connect the second jumper cable
to the black, negative (-)
battery/chassis ground of the
assisting vehicle (3).
10. Connect the other end of the sec-
ond jumper cable to the black,
negative (-) chassis ground of
your vehicle (4).
Do not allow the jumper cables to
contact anything except the cor-
rect battery or jumper terminals
or the correct ground. Do not lean
over the battery when making
connections.
11. Start the engine of the assisting
vehicle and let it run at approxi-
mately 2,000 rpm for a few min-
utes. Then start your vehicle.If your vehicle will not start after a
few attempts, it probably requires
servicing. In this event please seek
qualified assistance. If the cause of
your battery discharging is not
apparent, we recommend that your
vehicle be checked by an authorized
HYUNDAI dealer.
6
ODH063031
ODH063032
Page 439 of 546
7-3
7
Maintenance
ENGINE COMPARTMENT
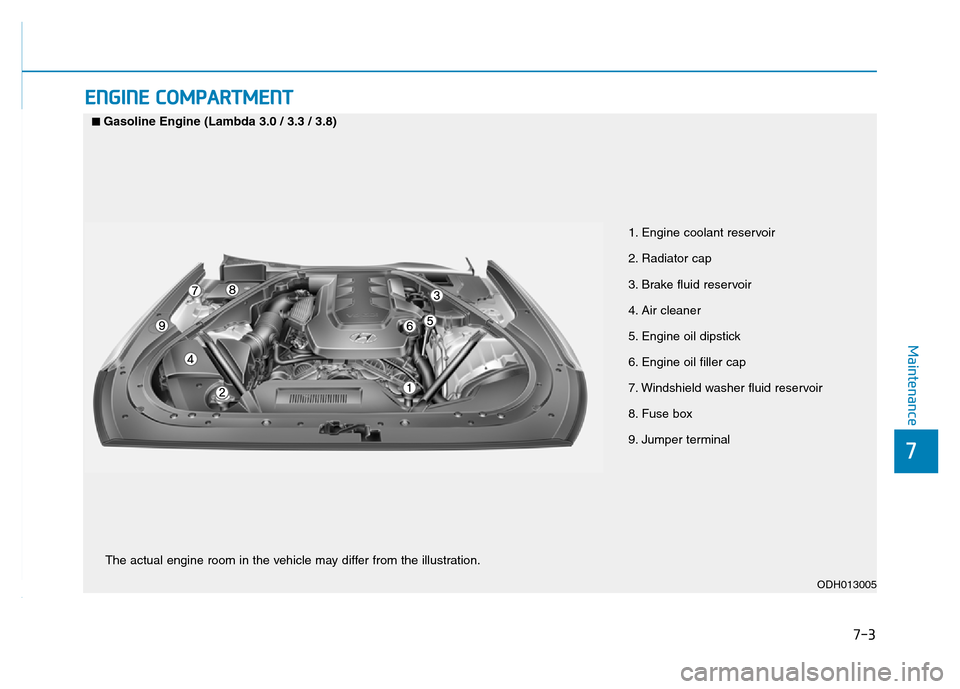
1. Engine coolant reservoir
2. Radiator cap
3. Brake fluid reservoir
4. Air cleaner
5. Engine oil dipstick
6. Engine oil filler cap
7. Windshield washer fluid reservoir
8. Fuse box
9. Jumper terminal
ODH013005
■Gasoline Engine (Lambda 3.0 / 3.3 / 3.8)
The actual engine room in the vehicle may differ from the illustration.
Page 440 of 546
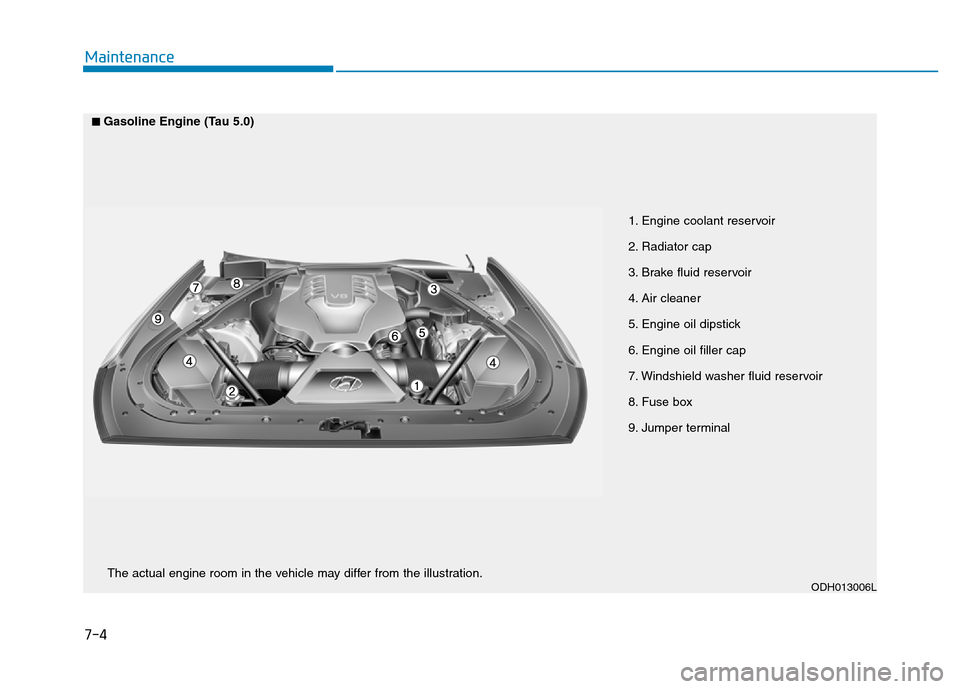
7-4
Maintenance
1. Engine coolant reservoir
2. Radiator cap
3. Brake fluid reservoir
4. Air cleaner
5. Engine oil dipstick
6. Engine oil filler cap
7. Windshield washer fluid reservoir
8. Fuse box
9. Jumper terminal
ODH013006L
■Gasoline Engine (Tau 5.0)
The actual engine room in the vehicle may differ from the illustration.
Page 474 of 546
7-38
Maintenance
BATTERY
For best battery service
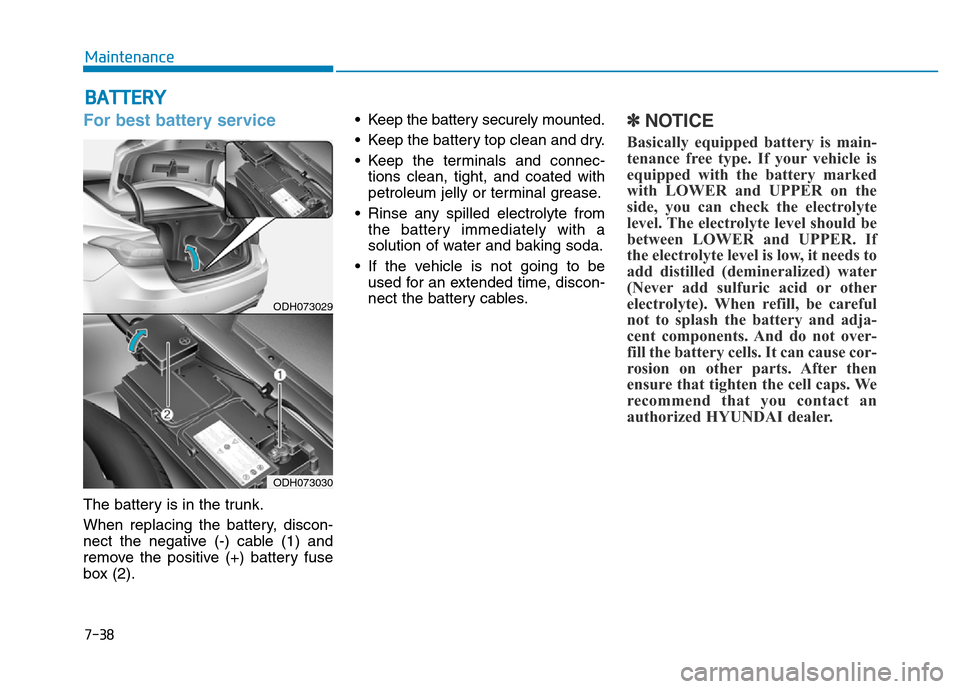
The battery is in the trunk.
When replacing the battery, discon-
nect the negative (-) cable (1) and
remove the positive (+) battery fuse
box (2).• Keep the battery securely mounted.
• Keep the battery top clean and dry.
• Keep the terminals and connec-
tions clean, tight, and coated with
petroleum jelly or terminal grease.
• Rinse any spilled electrolyte from
the battery immediately with a
solution of water and baking soda.
• If the vehicle is not going to be
used for an extended time, discon-
nect the battery cables.
✽NOTICE
Basically equipped battery is main-
tenance free type. If your vehicle is
equipped with the battery marked
with LOWER and UPPER on the
side, you can check the electrolyte
level. The electrolyte level should be
between LOWER and UPPER. If
the electrolyte level is low, it needs to
add distilled (demineralized) water
(Never add sulfuric acid or other
electrolyte). When refill, be careful
not to splash the battery and adja-
cent components. And do not over-
fill the battery cells. It can cause cor-
rosion on other parts. After then
ensure that tighten the cell caps. We
recommend that you contact an
authorized HYUNDAI dealer.
ODH073029
ODH073030
Page 493 of 546
7-57
7
Maintenance
Engine compartment panel fuse
replacement
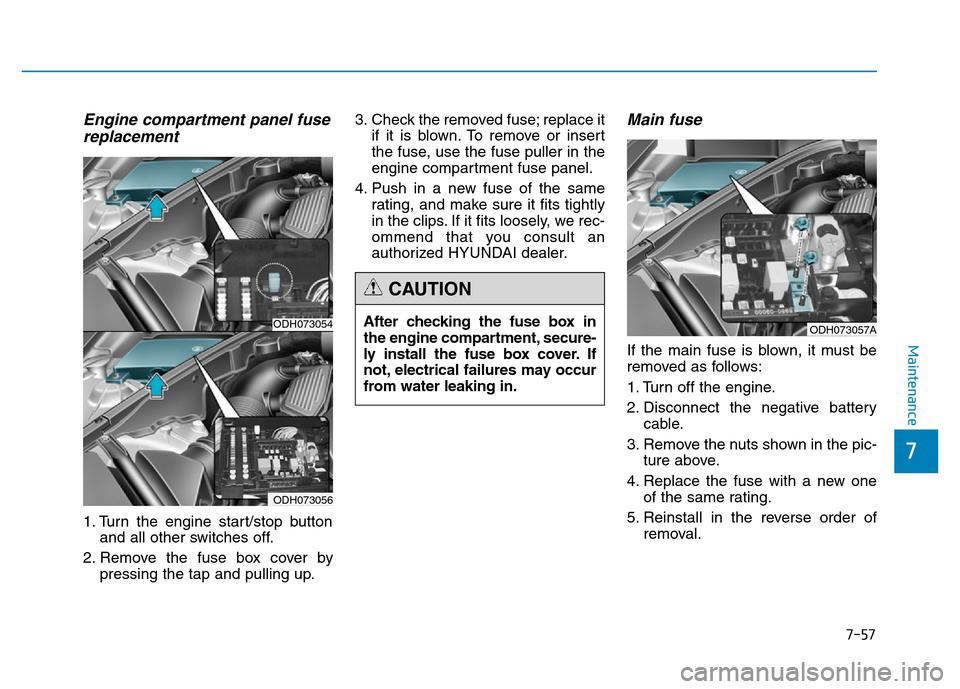
1. Turn the engine start/stop button
and all other switches off.
2. Remove the fuse box cover by
pressing the tap and pulling up.3. Check the removed fuse; replace it
if it is blown. To remove or insert
the fuse, use the fuse puller in the
engine compartment fuse panel.
4. Push in a new fuse of the same
rating, and make sure it fits tightly
in the clips. If it fits loosely, we rec-
ommend that you consult an
authorized HYUNDAI dealer.
Main fuse
If the main fuse is blown, it must be
removed as follows:
1. Turn off the engine.
2. Disconnect the negative battery
cable.
3. Remove the nuts shown in the pic-
ture above.
4. Replace the fuse with a new one
of the same rating.
5. Reinstall in the reverse order of
removal.
ODH073054
ODH073056
ODH073057AAfter checking the fuse box in
the engine compartment, secure-
ly install the fuse box cover. If
not, electrical failures may occur
from water leaking in.
CAUTION
Page 495 of 546
7-59
7
Maintenance
Fuse/Relay panel description
Driver’s side fuse panel
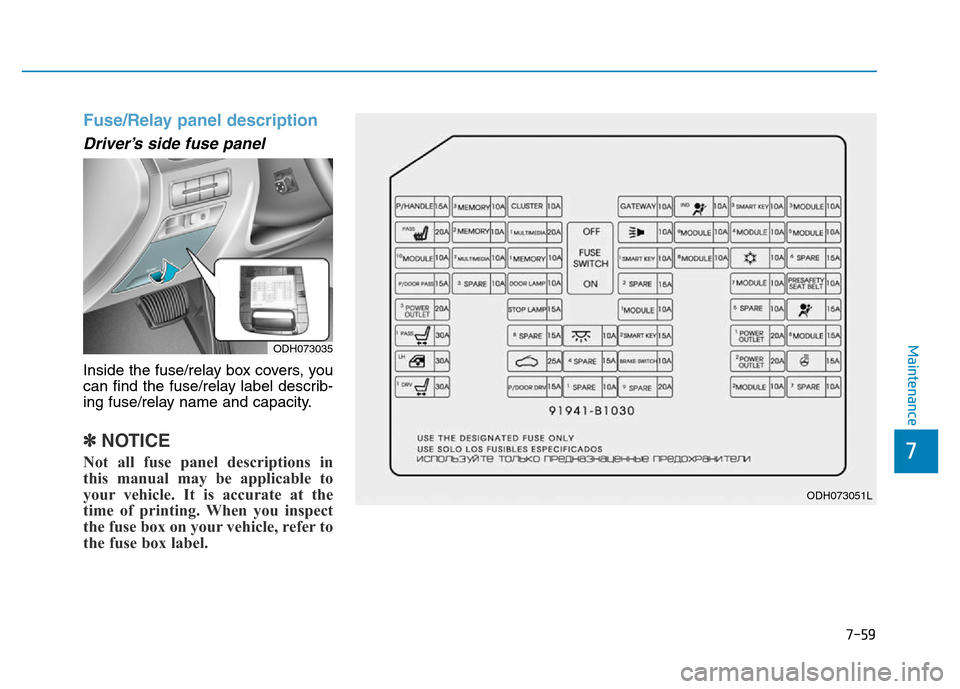
Inside the fuse/relay box covers, you
can find the fuse/relay label describ-
ing fuse/relay name and capacity.
✽NOTICE
Not all fuse panel descriptions in
this manual may be applicable to
your vehicle. It is accurate at the
time of printing. When you inspect
the fuse box on your vehicle, refer to
the fuse box label.
ODH073035
ODH073051L
Page 497 of 546
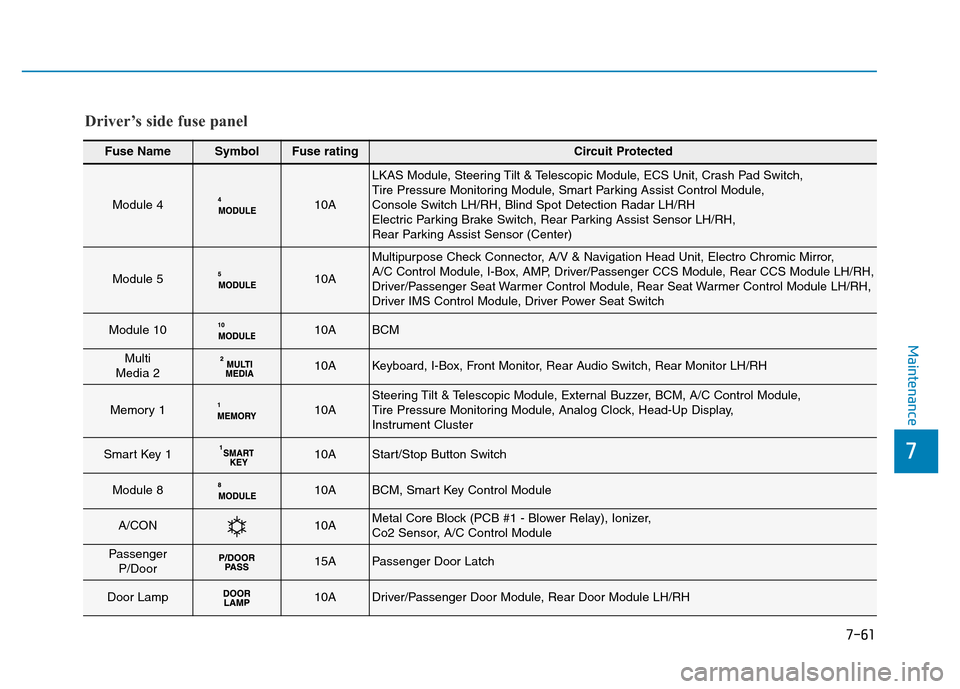
7-61
7
Maintenance
Fuse NameSymbolFuse ratingCircuit Protected
Module 410A
LKAS Module, Steering Tilt & Telescopic Module, ECS Unit, Crash Pad Switch,
Tire Pressure Monitoring Module, Smart Parking Assist Control Module,
Console Switch LH/RH, Blind Spot Detection Radar LH/RH
Electric Parking Brake Switch, Rear Parking Assist Sensor LH/RH,
Rear Parking Assist Sensor (Center)
Module 510A
Multipurpose Check Connector, A/V & Navigation Head Unit, Electro Chromic Mirror,
A/C Control Module, I-Box, AMP, Driver/Passenger CCS Module, Rear CCS Module LH/RH,
Driver/Passenger Seat Warmer Control Module, Rear Seat Warmer Control Module LH/RH,
Driver IMS Control Module, Driver Power Seat Switch
Module 1010ABCM
Multi
Media 210AKeyboard, I-Box, Front Monitor, Rear Audio Switch, Rear Monitor LH/RH
Memory 110ASteering Tilt & Telescopic Module, External Buzzer, BCM, A/C Control Module,
Tire Pressure Monitoring Module, Analog Clock, Head-Up Display,
Instrument Cluster
Smart Key 110AStart/Stop Button Switch
Module 810ABCM, Smart Key Control Module
A/CON10AMetal Core Block (PCB #1 - Blower Relay), Ionizer,
Co2 Sensor, A/C Control Module
Passenger
P/Door15APassenger Door Latch
Door Lamp10ADriver/Passenger Door Module, Rear Door Module LH/RH
Driver’s side fuse panel
Page 498 of 546
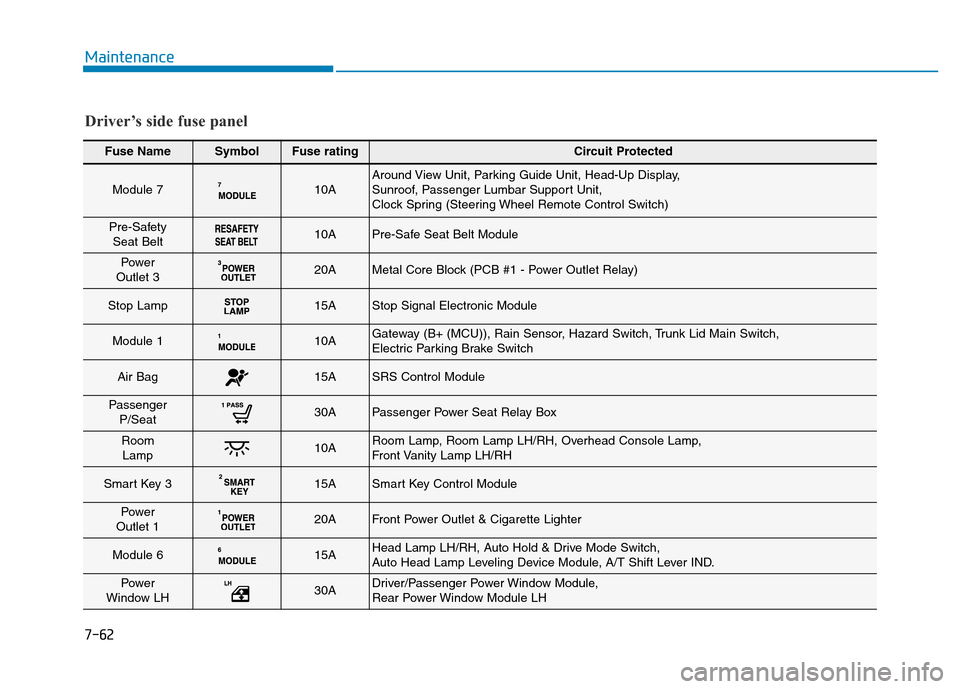
7-62
Maintenance
Fuse NameSymbolFuse ratingCircuit Protected
Module 710AAround View Unit, Parking Guide Unit, Head-Up Display,
Sunroof, Passenger Lumbar Support Unit,
Clock Spring (Steering Wheel Remote Control Switch)
Pre-Safety
Seat Belt10APre-Safe Seat Belt Module
Power
Outlet 320AMetal Core Block (PCB #1 - Power Outlet Relay)
Stop Lamp15AStop Signal Electronic Module
Module 110AGateway (B+ (MCU)), Rain Sensor, Hazard Switch, Trunk Lid Main Switch,
Electric Parking Brake Switch
Air Bag15ASRS Control Module
Passenger
P/Seat30APassenger Power Seat Relay Box
Room
Lamp10ARoom Lamp, Room Lamp LH/RH, Overhead Console Lamp,
Front Vanity Lamp LH/RH
Smart Key 315ASmart Key Control Module
Power
Outlet 120AFront Power Outlet & Cigarette Lighter
Module 615AHead Lamp LH/RH, Auto Hold & Drive Mode Switch,
Auto Head Lamp Leveling Device Module, A/T Shift Lever IND.
Power
Window LH30ADriver/Passenger Power Window Module,
Rear Power Window Module LH
Driver’s side fuse panel