brake Hyundai Genesis 2016 Owner's Manual - RHD (UK, Australia)
[x] Cancel search | Manufacturer: HYUNDAI, Model Year: 2016, Model line: Genesis, Model: Hyundai Genesis 2016Pages: 502, PDF Size: 13.19 MB
Page 9 of 502
F9
Introduction
No special run-in period is needed.
By following a few simple precautions
for the first 600 miles (1,000 km) you
may add to the performance, econo-
my and life of your vehicle.
• Do not race the engine.
• Whilst driving, keep your engine
speed (rpm, or revolutions per
minute) between 2,000 rpm and
4,000 rpm.
• Do not maintain a single speed for
long periods of time, either fast or
slow. Varying engine speed is need-
ed to properly run-in the engine.
• Avoid hard stops, except in emer-
gencies, to allow the brakes to seat
properly.
VEHICLE RUN-IN PROCESS
Page 15 of 502
1-4
Your vehicle at a glance
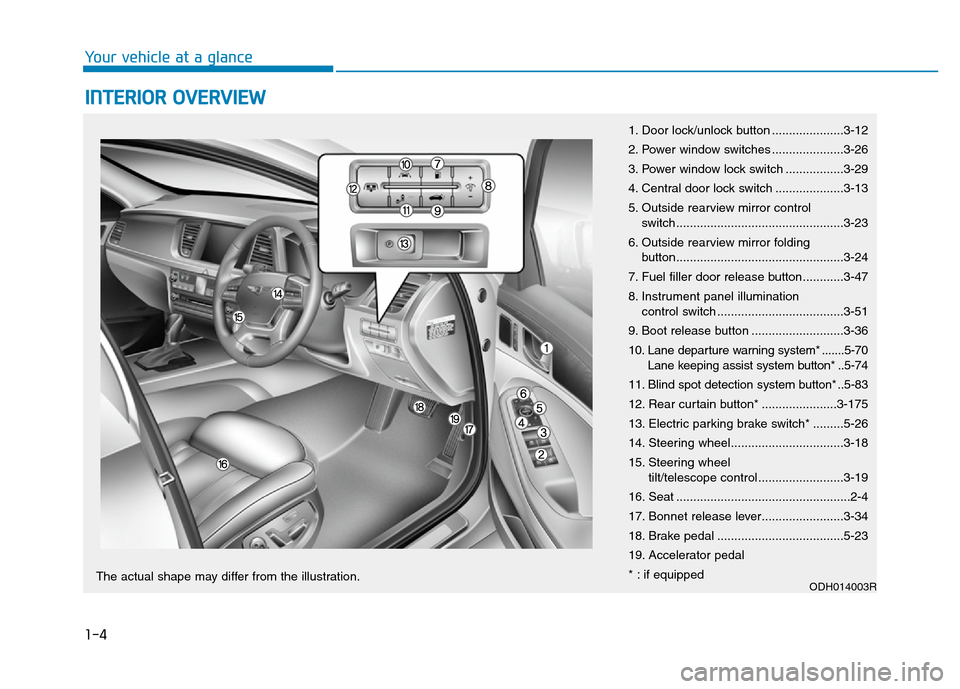
INTERIOR OVERVIEW
1. Door lock/unlock button .....................3-12
2. Power window switches .....................3-26
3. Power window lock switch .................3-29
4. Central door lock switch ....................3-13
5. Outside rearview mirror control
switch.................................................3-23
6. Outside rearview mirror folding
button.................................................3-24
7. Fuel filler door release button............3-47
8. Instrument panel illumination
control switch .....................................3-51
9. Boot release button ...........................3-36
10. Lane departure warning system* .......5-70
Lane keeping assist system button* ..5-74
11. Blind spot detection system button* ..5-83
12. Rear curtain button* ......................3-175
13. Electric parking brake switch* .........5-26
14. Steering wheel.................................3-18
15. Steering wheel
tilt/telescope control .........................3-19
16. Seat ...................................................2-4
17. Bonnet release lever........................3-34
18. Brake pedal .....................................5-23
19. Accelerator pedal
* : if equipped
ODH014003RThe actual shape may differ from the illustration.
Page 18 of 502
1-7
Your vehicle at a glance
1
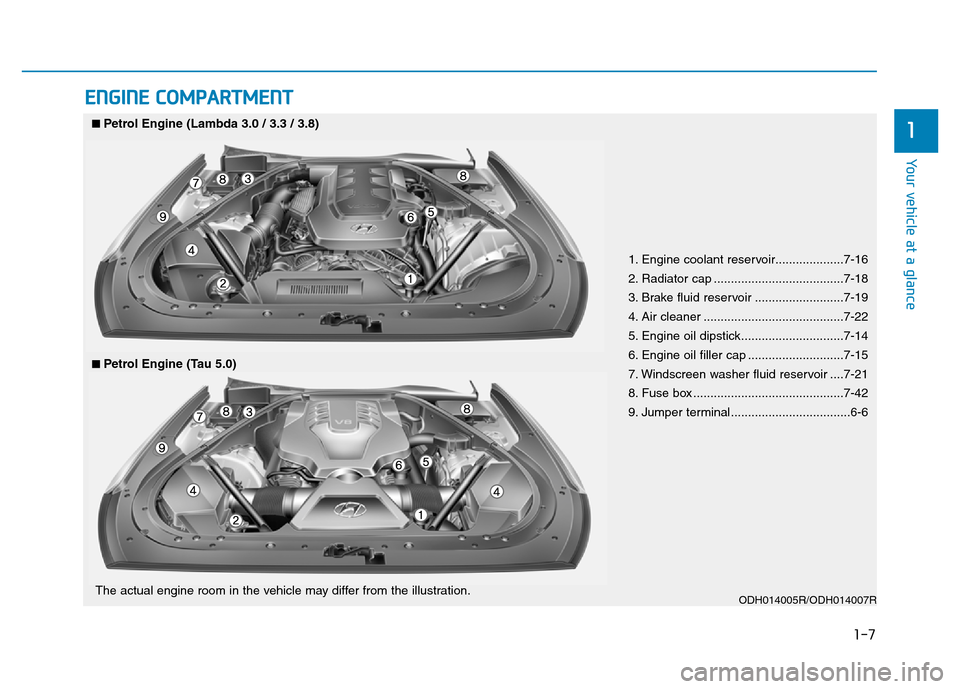
ENGINE COMPARTMENT
1. Engine coolant reservoir....................7-16
2. Radiator cap ......................................7-18
3. Brake fluid reservoir ..........................7-19
4. Air cleaner .........................................7-22
5. Engine oil dipstick..............................7-14
6. Engine oil filler cap ............................7-15
7. Windscreen washer fluid reservoir ....7-21
8. Fuse box ............................................7-42
9. Jumper terminal...................................6-6
ODH014005R/ODH014007R
■Petrol Engine (Lambda 3.0 / 3.3 / 3.8)
■Petrol Engine (Tau 5.0)
The actual engine room in the vehicle may differ from the illustration.
Page 33 of 502
2-15
Safety system of your vehicle
2
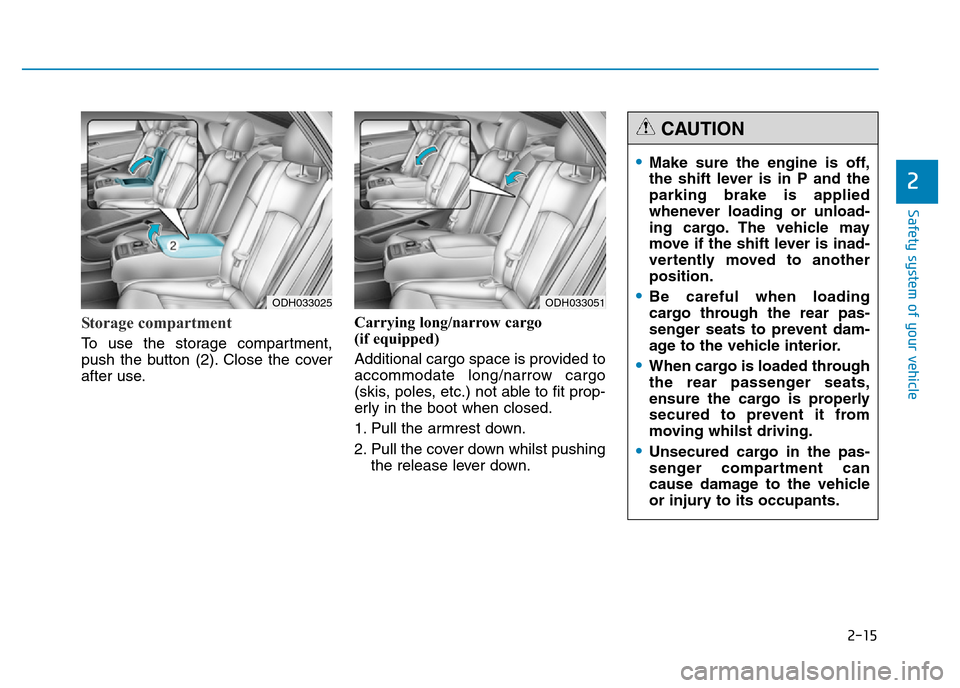
Storage compartment
To use the storage compartment,
push the button (2). Close the cover
after use.Carrying long/narrow cargo
(if equipped)
Additional cargo space is provided to
accommodate long/narrow cargo
(skis, poles, etc.) not able to fit prop-
erly in the boot when closed.
1. Pull the armrest down.
2. Pull the cover down whilst pushing
the release lever down.
ODH033051ODH033025
•Make sure the engine is off,
the shift lever is in P and the
parking brake is applied
whenever loading or unload-
ing cargo. The vehicle may
move if the shift lever is inad-
vertently moved to another
position.
•Be careful when loading
cargo through the rear pas-
senger seats to prevent dam-
age to the vehicle interior.
•When cargo is loaded through
the rear passenger seats,
ensure the cargo is properly
secured to prevent it from
moving whilst driving.
•Unsecured cargo in the pas-
senger compartment can
cause damage to the vehicle
or injury to its occupants.
CAUTION
Page 34 of 502
2-16
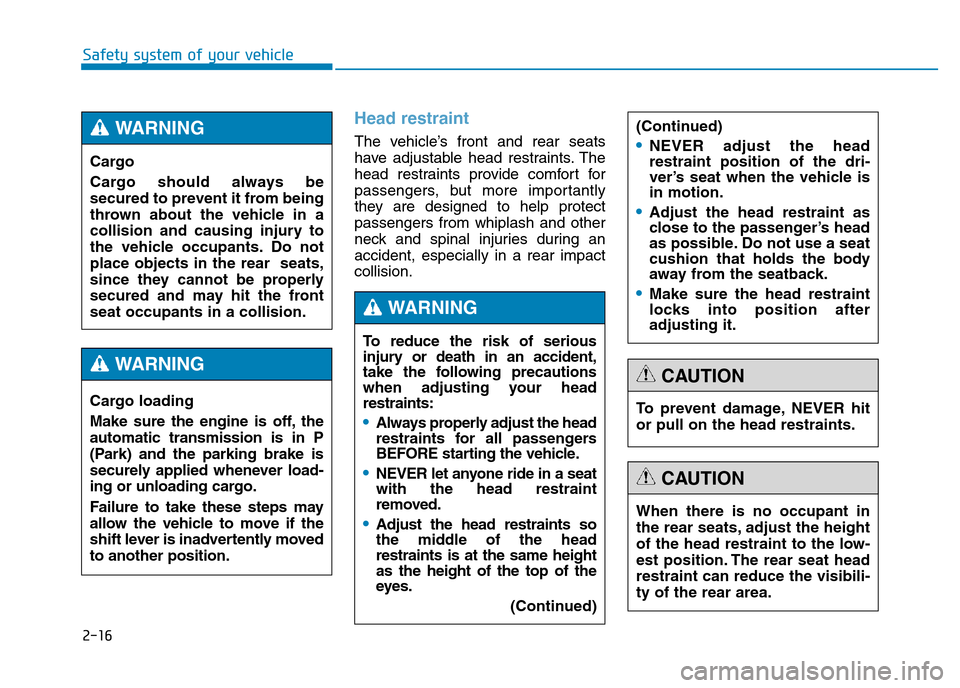
Head restraint
The vehicle’s front and rear seats
have adjustable head restraints. The
head restraints provide comfort for
passengers, but more importantly
they are designed to help protect
passengers from whiplash and other
neck and spinal injuries during an
accident, especially in a rear impact
collision.
Safety system of your vehicle
To reduce the risk of serious
injury or death in an accident,
take the following precautions
when adjusting your head
restraints:
•Always properly adjust the head
restraints for all passengers
BEFORE starting the vehicle.
•NEVER let anyone ride in a seat
with the head restraint
removed.
•Adjust the head restraints so
the middle of the head
restraints is at the same height
as the height of the top of the
eyes.
(Continued)
WARNING
(Continued)
•NEVER adjust the head
restraint position of the dri-
ver’s seat when the vehicle is
in motion.
•Adjust the head restraint as
close to the passenger’s head
as possible. Do not use a seat
cushion that holds the body
away from the seatback.
•Make sure the head restraint
locks into position after
adjusting it.
To prevent damage, NEVER hit
or pull on the head restraints.
CAUTION
When there is no occupant in
the rear seats, adjust the height
of the head restraint to the low-
est position. The rear seat head
restraint can reduce the visibili-
ty of the rear area.
CAUTION
Cargo
Cargo should always be
secured to prevent it from being
thrown about the vehicle in a
collision and causing injury to
the vehicle occupants. Do not
place objects in the rear seats,
since they cannot be properly
secured and may hit the front
seat occupants in a collision.
WARNING
Cargo loading
Make sure the engine is off, the
automatic transmission is in P
(Park) and the parking brake is
securely applied whenever load-
ing or unloading cargo.
Failure to take these steps may
allow the vehicle to move if the
shift lever is inadvertently moved
to another position.
WARNING
Page 85 of 502
2-67
Safety system of your vehicle
2
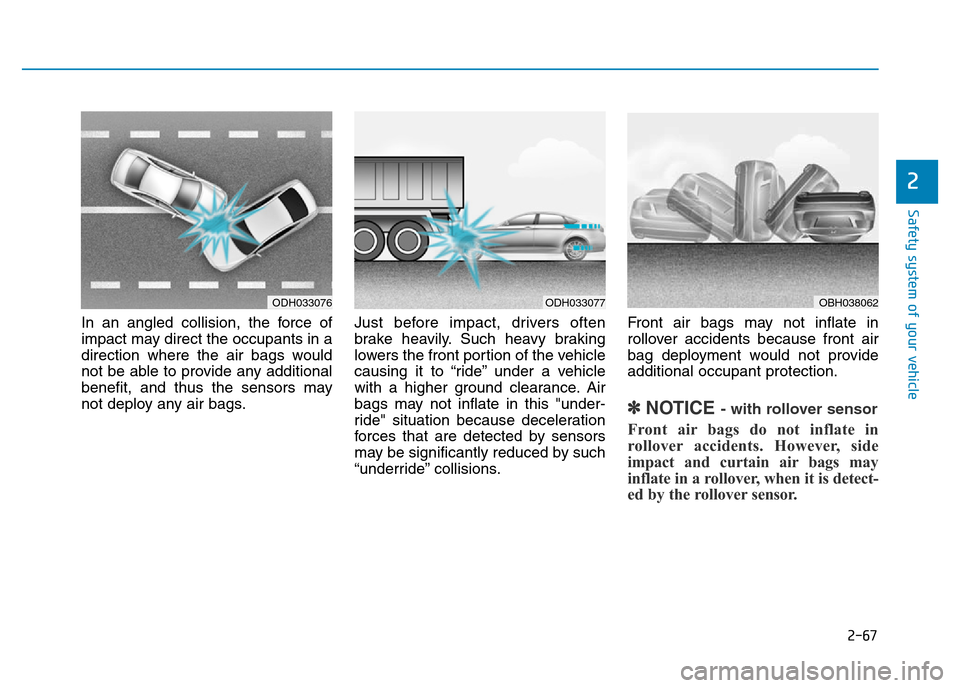
In an angled collision, the force of
impact may direct the occupants in a
direction where the air bags would
not be able to provide any additional
benefit, and thus the sensors may
not deploy any air bags.Just before impact, drivers often
brake heavily. Such heavy braking
lowers the front portion of the vehicle
causing it to “ride” under a vehicle
with a higher ground clearance. Air
bags may not inflate in this "under-
ride" situation because deceleration
forces that are detected by sensors
may be significantly reduced by such
“underride” collisions.Front air bags may not inflate in
rollover accidents because front air
bag deployment would not provide
additional occupant protection.
✽NOTICE - with rollover sensor
Front air bags do not inflate in
rollover accidents. However, side
impact and curtain air bags may
inflate in a rollover, when it is detect-
ed by the rollover sensor.
ODH033076ODH033077OBH038062
Page 104 of 502
3-13
Convenient features of your vehicle
With the central door lock
switch
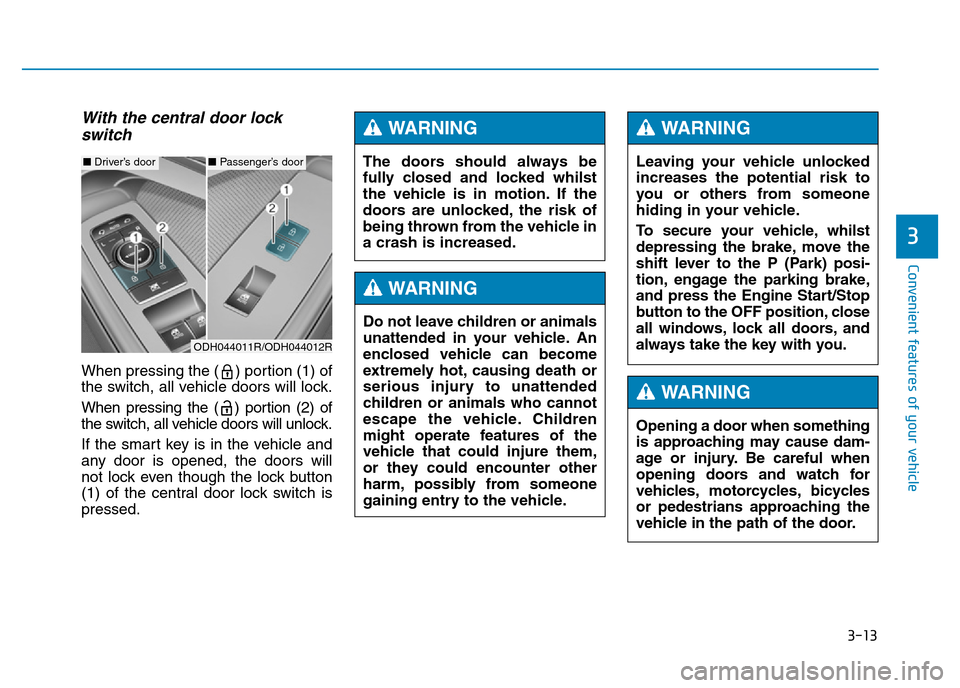
When pressing the ( ) portion (1) of
the switch, all vehicle doors will lock.
When pressing the ( ) portion (2) of
the switch, all vehicle doors will unlock.
If the smart key is in the vehicle and
any door is opened, the doors will
not lock even though the lock button
(1) of the central door lock switch is
pressed.
3
The doors should always be
fully closed and locked whilst
the vehicle is in motion. If the
doors are unlocked, the risk of
being thrown from the vehicle in
a crash is increased.
WARNING
Do not leave children or animals
unattended in your vehicle. An
enclosed vehicle can become
extremely hot, causing death or
serious injury to unattended
children or animals who cannot
escape the vehicle. Children
might operate features of the
vehicle that could injure them,
or they could encounter other
harm, possibly from someone
gaining entry to the vehicle.
WARNING
Leaving your vehicle unlocked
increases the potential risk to
you or others from someone
hiding in your vehicle.
To secure your vehicle, whilst
depressing the brake, move the
shift lever to the P (Park) posi-
tion, engage the parking brake,
and press the Engine Start/Stop
button to the OFF position, close
all windows, lock all doors, and
always take the key with you.
WARNING
Opening a door when something
is approaching may cause dam-
age or injury. Be careful when
opening doors and watch for
vehicles, motorcycles, bicycles
or pedestrians approaching the
vehicle in the path of the door.
WARNING
■Driver’s door■Passenger’s door
ODH044011R/ODH044012R
Page 125 of 502
3-34
Convenient features of your vehicle
Opening the bonnet
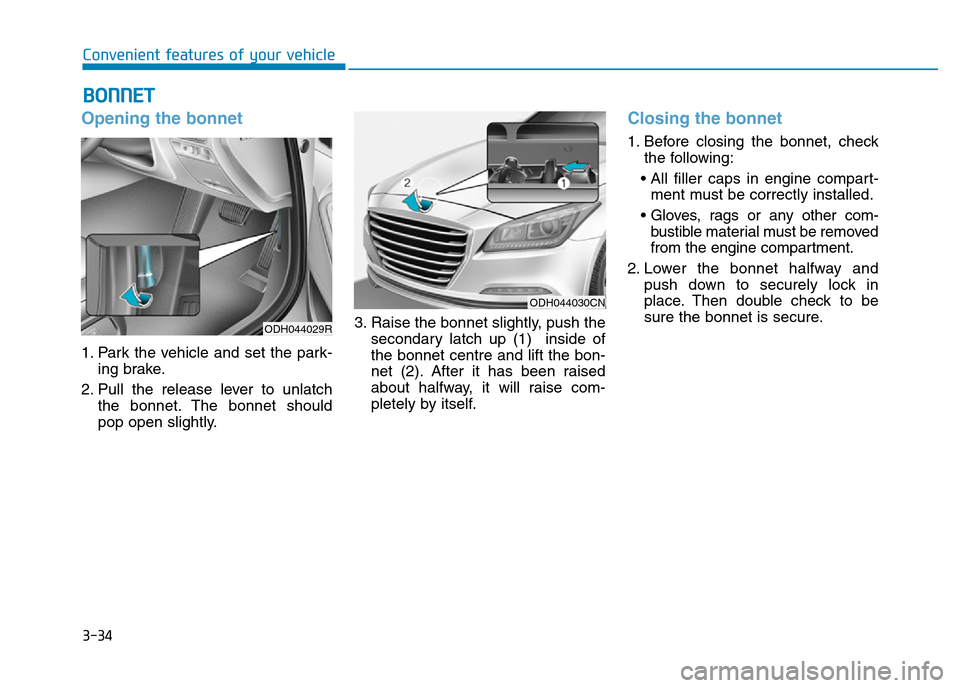
1. Park the vehicle and set the park-
ing brake.
2. Pull the release lever to unlatch
the bonnet. The bonnet should
pop open slightly.3. Raise the bonnet slightly, push the
secondary latch up (1) inside of
the bonnet centre and lift the bon-
net (2). After it has been raised
about halfway, it will raise com-
pletely by itself.
Closing the bonnet
1. Before closing the bonnet, check
the following:
• All filler caps in engine compart-
ment must be correctly installed.
• Gloves, rags or any other com-
bustible material must be removed
from the engine compartment.
2. Lower the bonnet halfway and
push down to securely lock in
place. Then double check to be
sure the bonnet is secure.
BONNET
ODH044029R
ODH044030CN
Page 139 of 502
3-48
Convenient features of your vehicle
(Continued)
•Do not use mobile phones
whilst refuelling. Electric cur-
rent and/or electronic interfer-
ence from mobile phones can
potentially ignite fuel vapours
and cause a fire.
•Do not get back into a vehicle
once you have begun refu-
elling. You can generate a
build-up of static electricity by
touching, rubbing or sliding
against any item or fabric capa-
ble of producing static electric-
ity. Static electricity discharge
can ignite fuel vapours causing
a fire. If you must re-enter the
vehicle, you should once again
eliminate potentially danger-
ous static electricity discharge
by touching a metal part of the
vehicle, away from the fuel filler
neck, nozzle or other petrol
source, with your bare hand.
(Continued)
(Continued)
•When using an approved
portable fuel container, be
sure to place the container on
the ground prior to refuelling.
Static electricity discharge
from the container can ignite
fuel vapours causing a fire.
Once refuelling has begun,
contact between your bare
hand and the vehicle should
be maintained until the filling
is complete.
•Use only approved portable
plastic fuel containers designed
to carry and store petrol.
(Continued)
(Continued)
•When refuelling, always move
the shift lever to the P (Park)
position, set the parking
brake, and place the Engine
Start/Stop button to the OFF
position. Sparks produced by
electrical components related
to the engine can ignite fuel
vapours causing a fire.
•Do not use matches or a
lighter and do not smoke or
leave a lit cigarette in your
vehicle whilst at a petrol sta-
tion, especially during refu-
elling.
•Do not over-fill or top-off your
vehicle tank, which can cause
petrol spillage.
(Continued)
Page 161 of 502
3-70
Convenient features of your vehicle
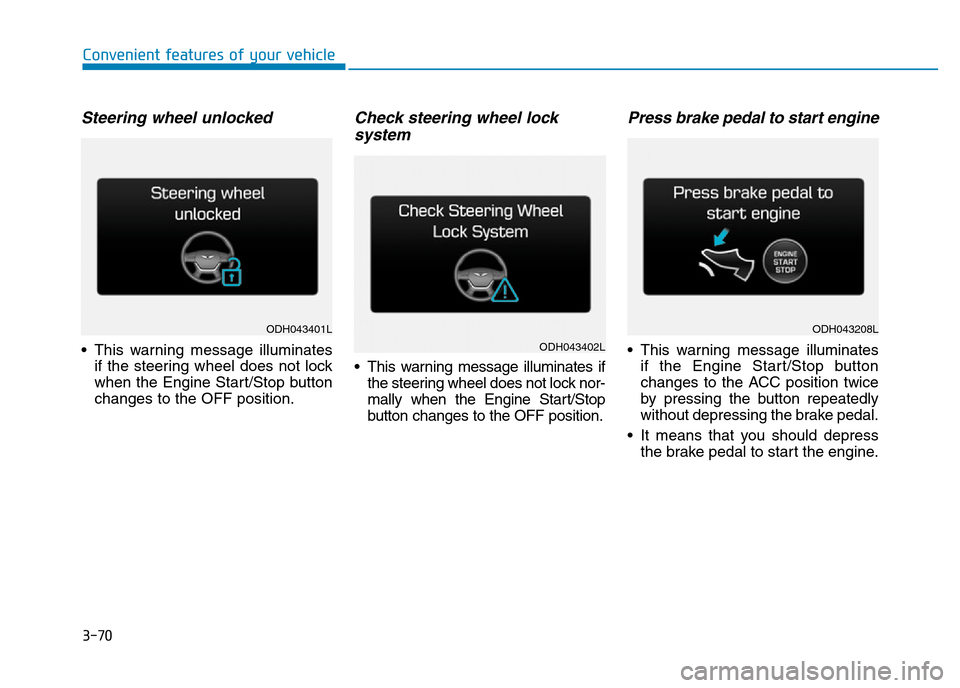
Steering wheel unlocked
• This warning message illuminates
if the steering wheel does not lock
when the Engine Start/Stop button
changes to the OFF position.
Check steering wheel lock
system
• This warning message illuminates if
the steering wheel does not lock nor-
mally when the Engine Start/Stop
button changes to the OFF position.
Press brake pedal to start engine
• This warning message illuminates
if the Engine Start/Stop button
changes to the ACC position twice
by pressing the button repeatedly
without depressing the brake pedal.
• It means that you should depress
the brake pedal to start the engine.
ODH043401L
ODH043402L
ODH043208L