window Hyundai Genesis 2016 Owner's Manual - RHD (UK, Australia)
[x] Cancel search | Manufacturer: HYUNDAI, Model Year: 2016, Model line: Genesis, Model: Hyundai Genesis 2016Pages: 502, PDF Size: 13.19 MB
Page 13 of 502
1-2
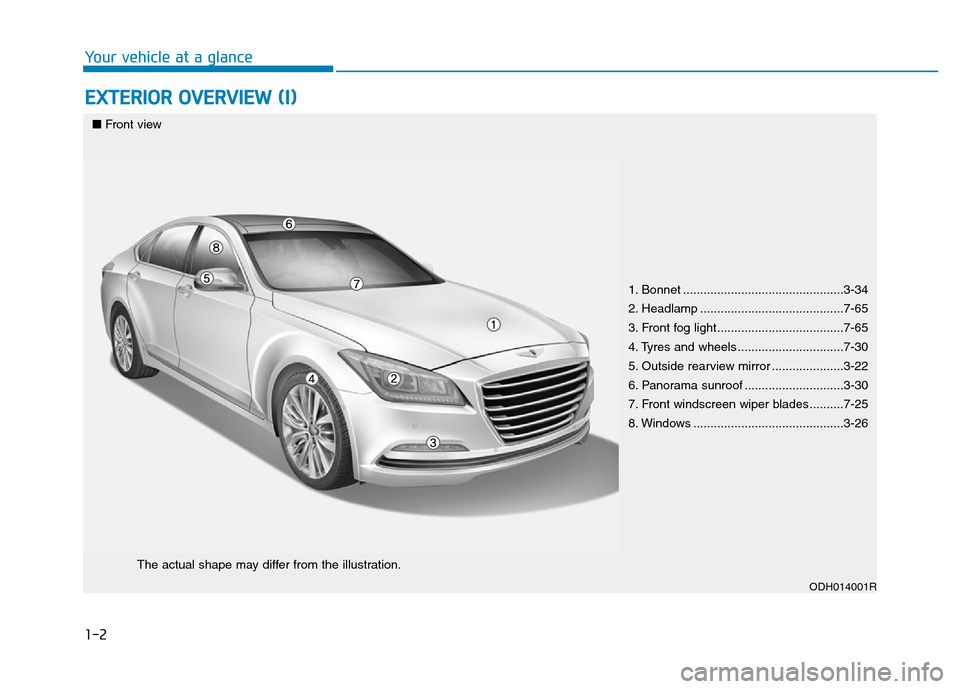
EXTERIOR OVERVIEW (I)
Your vehicle at a glance
1. Bonnet ...............................................3-34
2. Headlamp ..........................................7-65
3. Front fog light.....................................7-65
4. Tyres and wheels ...............................7-30
5. Outside rearview mirror .....................3-22
6. Panorama sunroof .............................3-30
7. Front windscreen wiper blades ..........7-25
8. Windows ............................................3-26
ODH014001R
■Front view
The actual shape may differ from the illustration.
Page 15 of 502
1-4
Your vehicle at a glance
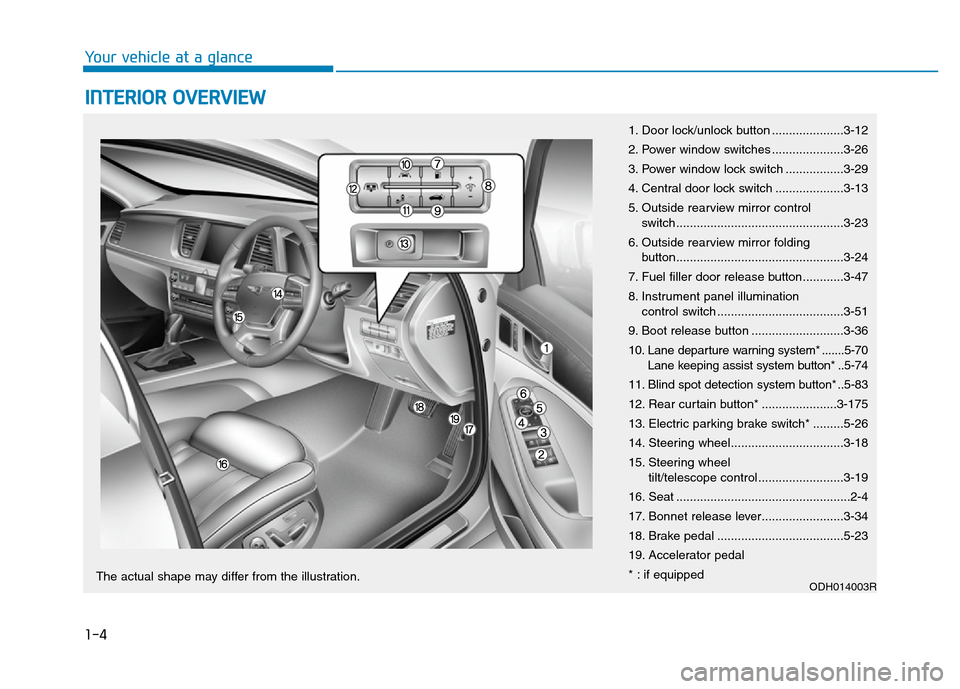
INTERIOR OVERVIEW
1. Door lock/unlock button .....................3-12
2. Power window switches .....................3-26
3. Power window lock switch .................3-29
4. Central door lock switch ....................3-13
5. Outside rearview mirror control
switch.................................................3-23
6. Outside rearview mirror folding
button.................................................3-24
7. Fuel filler door release button............3-47
8. Instrument panel illumination
control switch .....................................3-51
9. Boot release button ...........................3-36
10. Lane departure warning system* .......5-70
Lane keeping assist system button* ..5-74
11. Blind spot detection system button* ..5-83
12. Rear curtain button* ......................3-175
13. Electric parking brake switch* .........5-26
14. Steering wheel.................................3-18
15. Steering wheel
tilt/telescope control .........................3-19
16. Seat ...................................................2-4
17. Bonnet release lever........................3-34
18. Brake pedal .....................................5-23
19. Accelerator pedal
* : if equipped
ODH014003RThe actual shape may differ from the illustration.
Page 72 of 502
2-54
Safety system of your vehicle
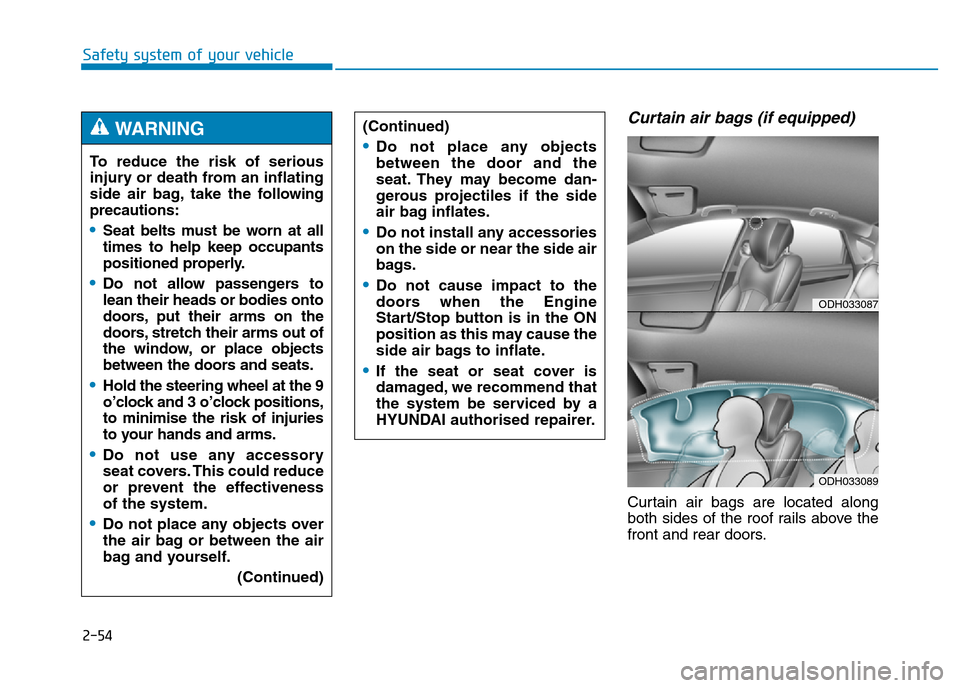
Curtain air bags (if equipped)
Curtain air bags are located along
both sides of the roof rails above the
front and rear doors. To reduce the risk of serious
injury or death from an inflating
side air bag, take the following
precautions:
•Seat belts must be worn at all
times to help keep occupants
positioned properly.
•Do not allow passengers to
lean their heads or bodies onto
doors, put their arms on the
doors, stretch their arms out of
the window, or place objects
between the doors and seats.
•Hold the steering wheel at the 9
o’clock and 3 o’clock positions,
to minimise the risk of injuries
to your hands and arms.
•Do not use any accessory
seat covers. This could reduce
or prevent the effectiveness
of the system.
•Do not place any objects over
the air bag or between the air
bag and yourself.
(Continued)
WARNING (Continued)
•Do not place any objects
between the door and the
seat. They may become dan-
gerous projectiles if the side
air bag inflates.
•Do not install any accessories
on the side or near the side air
bags.
•Do not cause impact to the
doors when the Engine
Start/Stop button is in the ON
position as this may cause the
side air bags to inflate.
•If the seat or seat cover is
damaged, we recommend that
the system be serviced by a
HYUNDAI authorised repairer.
ODH033087
ODH033089
Page 73 of 502
2-55
Safety system of your vehicle
2
Safety system of your vehicle
They are designed to help protect the
heads of the front seat occupants
and the rear outboard seat occupants
in certain side impact collisions.
The curtain air bags are designed to
deploy only during certain side
impact collisions, depending on the
crash severity, angle, speed and
impact.
For vehicles equipped with a rollover
sensor the side and/or curtain air
bags on both sides of the vehicle
may deploy if a rollover or possible
rollover is detected.
The curtain air bags are not designed
to deploy in all side impact or rollover
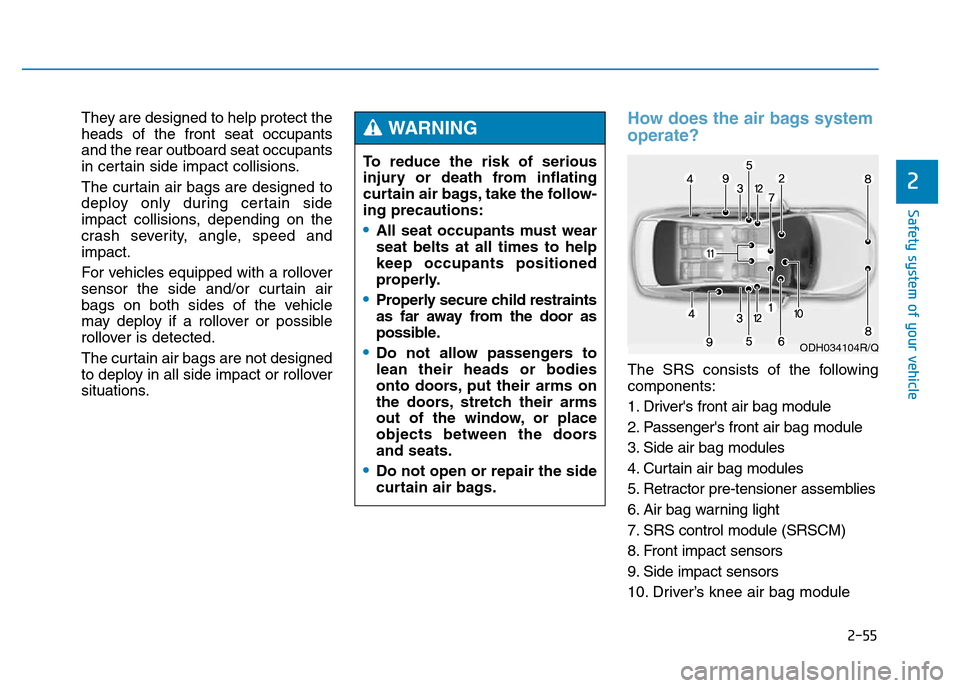
situations.How does the air bags system
operate?
The SRS consists of the following
components:
1. Driver's front air bag module
2. Passenger's front air bag module
3. Side air bag modules
4. Curtain air bag modules
5. Retractor pre-tensioner assemblies
6. Air bag warning light
7. SRS control module (SRSCM)
8. Front impact sensors
9. Side impact sensors
10. Driver’s knee air bag module To reduce the risk of serious
injury or death from inflating
curtain air bags, take the follow-
ing precautions:
•All seat occupants must wear
seat belts at all times to help
keep occupants positioned
properly.
•Properly secure child restraints
as far away from the door as
possible.
•Do not allow passengers to
lean their heads or bodies
onto doors, put their arms on
the doors, stretch their arms
out of the window, or place
objects between the doors
and seats.
•Do not open or repair the side
curtain air bags.
WARNING
ODH034104R/Q
Page 77 of 502
2-59
Safety system of your vehicle
2
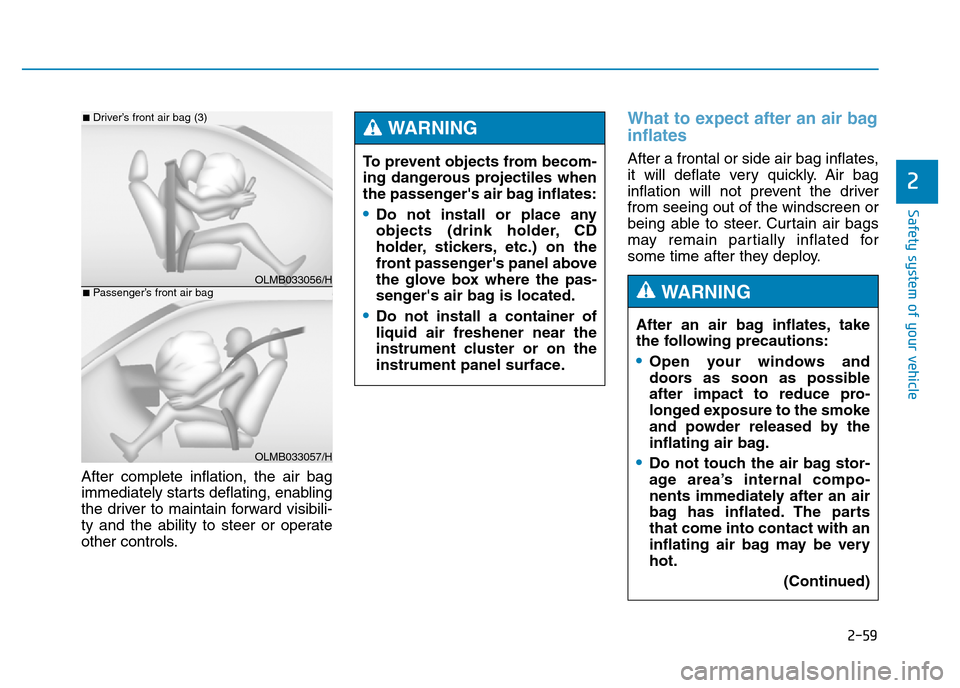
After complete inflation, the air bag
immediately starts deflating, enabling
the driver to maintain forward visibili-
ty and the ability to steer or operate
other controls.
What to expect after an air bag
inflates
After a frontal or side air bag inflates,
it will deflate very quickly. Air bag
inflation will not prevent the driver
from seeing out of the windscreen or
being able to steer. Curtain air bags
may remain partially inflated for
some time after they deploy.
OLMB033056/H
■Driver’s front air bag (3)
OLMB033057/H
■Passenger’s front air bag
To prevent objects from becom-
ing dangerous projectiles when
the passenger's air bag inflates:
•Do not install or place any
objects (drink holder, CD
holder, stickers, etc.) on the
front passenger's panel above
the glove box where the pas-
senger's air bag is located.
•Do not install a container of
liquid air freshener near the
instrument cluster or on the
instrument panel surface.
WARNING
After an air bag inflates, take
the following precautions:
•Open your windows and
doors as soon as possible
after impact to reduce pro-
longed exposure to the smoke
and powder released by the
inflating air bag.
•Do not touch the air bag stor-
age area’s internal compo-
nents immediately after an air
bag has inflated. The parts
that come into contact with an
inflating air bag may be very
hot.
(Continued)
WARNING
Page 92 of 502
Convenient features of your vehicle
Accessing your vehicle .........................................3-4
Smart key ............................................................................3-4
Smart key precautions .....................................................3-7
Immobiliser System ........................................................3-10
Door locks .............................................................3-11
Operating door locks from outside the vehicle .....3-11
Power Door Latch ...........................................................3-12
Operating door locks from inside the vehicle ........3-12
Auto door lock/unlock features ................................3-14
Child-protector rear door locks ..................................3-14
Theft-alarm system.............................................3-15
Driver position memory system .........................3-16
Storing memory positions .............................................3-16
Easy access function .....................................................3-17
Steering wheel......................................................3-18
Electric power steering (EPS) ......................................3-18
Tilt steering/Telescope steering .................................3-19
Heated steering wheel ...................................................3-20
Horn ....................................................................................3-20
Mirrors ...................................................................3-21
Inside rearview mirror....................................................3-21
Outside rearview mirror ..............................................3-22
Reverse parking aid function.......................................3-25
Windows ................................................................3-26
Power windows ................................................................3-26
Panorama sunroof ...............................................3-30
Sunshade ...........................................................................3-30
Sliding the sunroof ........................................................3-31
Tilting the sunroof ........................................................3-31
Closing the sunroof ........................................................3-32
Resetting the sunroof ....................................................3-33
Bonnet ...................................................................3-34
Opening the bonnet ......................................................3-34
Closing the bonnet ..........................................................3-34
Boot........................................................................3-36
Non-Powered Boot.........................................................3-36
Power Boot .......................................................................3-37
Emergency boot safety release ..................................3-41
Smart boot ............................................................3-43
Fuel filler door .....................................................3-47
Opening the fuel filler door .........................................3-47
Closing the fuel filler door ...........................................3-47
Emergency fuel filler lid release .................................3-49
Instrument cluster................................................3-50
Instrument Cluster Control............................................3-51
LCD Display Control ........................................................3-52
Gauges ...............................................................................3-52
3
Page 93 of 502
LCD display ...........................................................3-57
LCD Modes ........................................................................3-57
Trip Computer Mode.......................................................3-58
Turn By Turn (TBT) Mode ............................................3-59
ASCC/LDWS/LKAS Mode ..............................................3-59
A/V Mode..........................................................................3-59
Information Mode ...........................................................3-60
User Settings Mode ........................................................3-62
Warning Messages..........................................................3-69
Trip computer .......................................................3-80
Overview............................................................................3-80
Trip Modes ........................................................................3-80
Trip A/B .............................................................................3-80
Fuel Economy...................................................................3-81
Warning and indicator lights ..............................3-84
Warning lights ..................................................................3-84
Indicator Lights ................................................................3-93
Head Up Display (HUD) .......................................3-98
Description ........................................................................3-98
Head Up Display ON/OFF .............................................3-99
Head Up Display Information .......................................3-99
Head Up Display Setting .............................................3-100
Light .....................................................................3-101
Exterior lights ................................................................3-101
Smart High Beam ..........................................................3-103
Traffic change ...............................................................3-109
Welcome system ...........................................................3-109
Interior lights..................................................................3-111
Wipers and washers ..........................................3-116
Windscreen wipers ......................................................3-116
Windscreen washers ...................................................3-118
Driver assist system ..........................................3-119
Rearview camera...........................................................3-119
Parking assist system ..................................................3-120
Smart Parking Assist System (SPAS) .......................3-123
Parking guide system (For Europe) .........................3-142
Around View Monitoring (AVM) System .................3-143
Defroster .............................................................3-145
Rear window defroster ...............................................3-145
Automatic climate control system ...................3-147
Automatic heating and air conditioning ..................3-148
Manual heating and air conditioning .......................3-149
System operation ..........................................................3-157
Climate control air filter ............................................3-160
3
Page 95 of 502
3-4
Convenient features of your vehicle
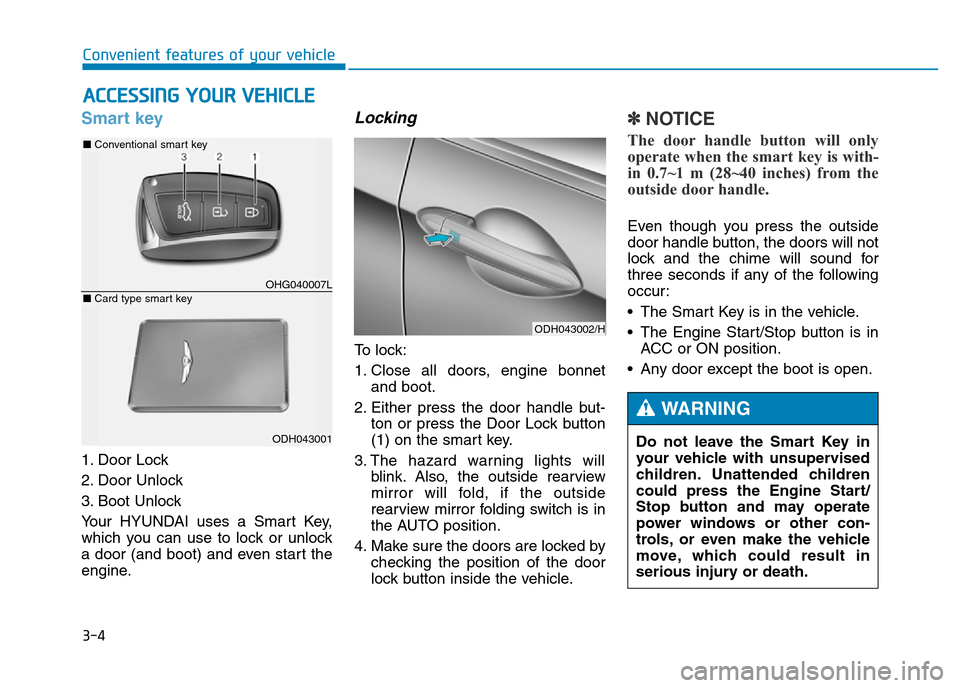
Smart key
1. Door Lock
2. Door Unlock
3. Boot Unlock
Your HYUNDAI uses a Smart Key,
which you can use to lock or unlock
a door (and boot) and even start the
engine.
Locking
To lock:
1. Close all doors, engine bonnet
and boot.
2. Either press the door handle but-
ton or press the Door Lock button
(1) on the smart key.
3. The hazard warning lights will
blink. Also, the outside rearview
mirror will fold, if the outside
rearview mirror folding switch is in
the AUTO position.
4. Make sure the doors are locked by
checking the position of the door
lock button inside the vehicle.
✽NOTICE
The door handle button will only
operate when the smart key is with-
in 0.7~1 m (28~40 inches) from the
outside door handle.
Even though you press the outside
door handle button, the doors will not
lock and the chime will sound for
three seconds if any of the following
occur:
• The Smart Key is in the vehicle.
• The Engine Start/Stop button is in
ACC or ON position.
• Any door except the boot is open.
ACCESSING YOUR VEHICLE
ODH043002/H
Do not leave the Smart Key in
your vehicle with unsupervised
children. Unattended children
could press the Engine Start/
Stop button and may operate
power windows or other con-
trols, or even make the vehicle
move, which could result in
serious injury or death.
WARNING
OHG040007L
■Conventional smart key
ODH043001
■Card type smart key
Page 103 of 502
3-12
Power Door Latch (if equipped)
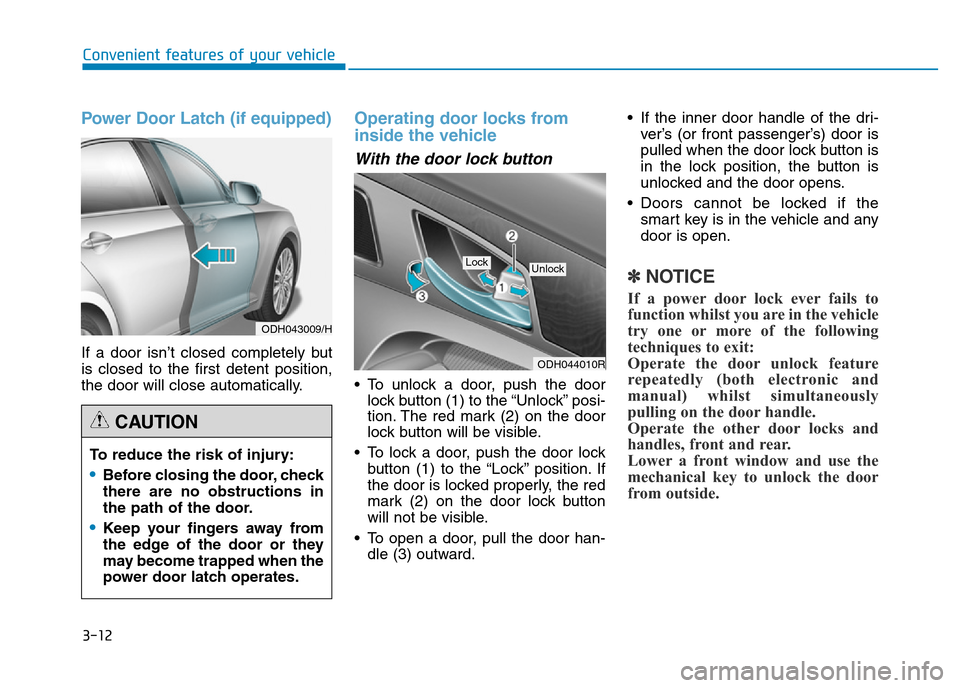
If a door isn’t closed completely but
is closed to the first detent position,
the door will close automatically.
Operating door locks from
inside the vehicle
With the door lock button
• To unlock a door, push the door
lock button (1) to the “Unlock” posi-
tion. The red mark (2) on the door
lock button will be visible.
• To lock a door, push the door lock
button (1) to the “Lock” position. If
the door is locked properly, the red
mark (2) on the door lock button
will not be visible.
• To open a door, pull the door han-
dle (3) outward.• If the inner door handle of the dri-
ver’s (or front passenger’s) door is
pulled when the door lock button is
in the lock position, the button is
unlocked and the door opens.
• Doors cannot be locked if the
smart key is in the vehicle and any
door is open.
✽NOTICE
If a power door lock ever fails to
function whilst you are in the vehicle
try one or more of the following
techniques to exit:
Operate the door unlock feature
repeatedly (both electronic and
manual) whilst simultaneously
pulling on the door handle.
Operate the other door locks and
handles, front and rear.
Lower a front window and use the
mechanical key to unlock the door
from outside.
Convenient features of your vehicle
To reduce the risk of injury:
•Before closing the door, check
there are no obstructions in
the path of the door.
•Keep your fingers away from
the edge of the door or they
may become trapped when the
power door latch operates.
CAUTION
ODH043009/H
ODH044010R
UnlockLock
Page 104 of 502
3-13
Convenient features of your vehicle
With the central door lock
switch
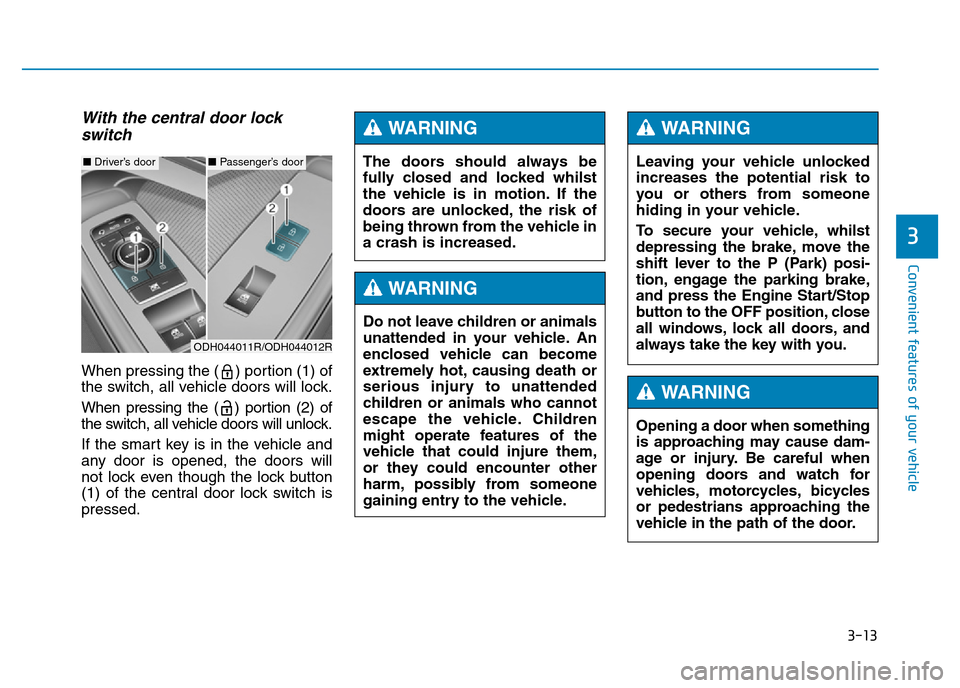
When pressing the ( ) portion (1) of
the switch, all vehicle doors will lock.
When pressing the ( ) portion (2) of
the switch, all vehicle doors will unlock.
If the smart key is in the vehicle and
any door is opened, the doors will
not lock even though the lock button
(1) of the central door lock switch is
pressed.
3
The doors should always be
fully closed and locked whilst
the vehicle is in motion. If the
doors are unlocked, the risk of
being thrown from the vehicle in
a crash is increased.
WARNING
Do not leave children or animals
unattended in your vehicle. An
enclosed vehicle can become
extremely hot, causing death or
serious injury to unattended
children or animals who cannot
escape the vehicle. Children
might operate features of the
vehicle that could injure them,
or they could encounter other
harm, possibly from someone
gaining entry to the vehicle.
WARNING
Leaving your vehicle unlocked
increases the potential risk to
you or others from someone
hiding in your vehicle.
To secure your vehicle, whilst
depressing the brake, move the
shift lever to the P (Park) posi-
tion, engage the parking brake,
and press the Engine Start/Stop
button to the OFF position, close
all windows, lock all doors, and
always take the key with you.
WARNING
Opening a door when something
is approaching may cause dam-
age or injury. Be careful when
opening doors and watch for
vehicles, motorcycles, bicycles
or pedestrians approaching the
vehicle in the path of the door.
WARNING
■Driver’s door■Passenger’s door
ODH044011R/ODH044012R