display Hyundai Genesis Coupe 2015 Owner's Guide
[x] Cancel search | Manufacturer: HYUNDAI, Model Year: 2015, Model line: Genesis Coupe, Model: Hyundai Genesis Coupe 2015Pages: 438, PDF Size: 40.35 MB
Page 191 of 438
4107
Features of your vehicle
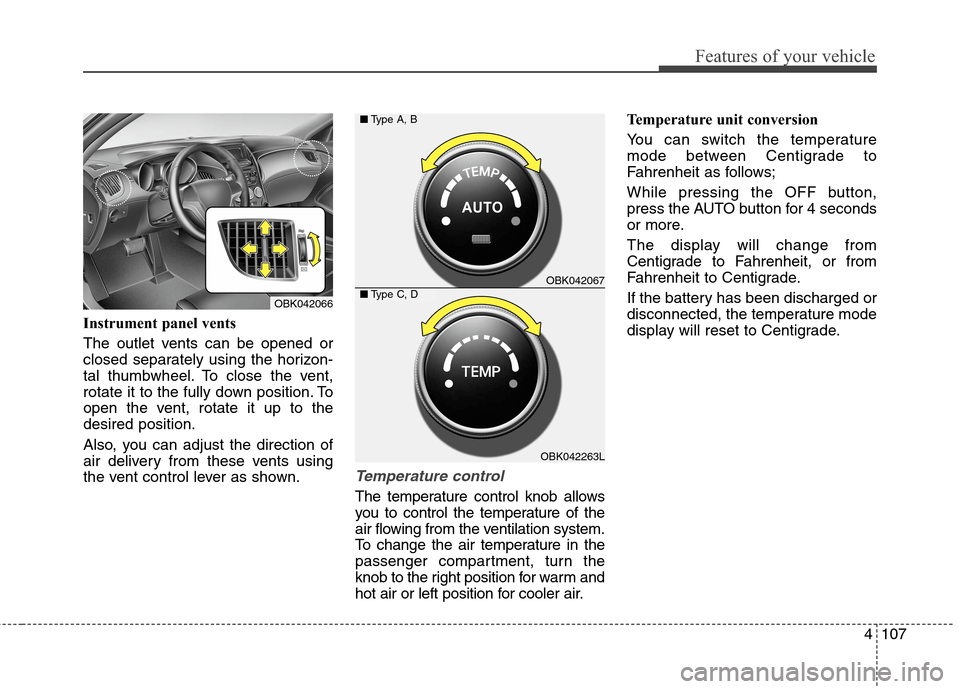
Instrument panel vents
The outlet vents can be opened or
closed separately using the horizon-
tal thumbwheel. To close the vent,
rotate it to the fully down position. To
open the vent, rotate it up to the
desired position.
Also, you can adjust the direction of
air delivery from these vents using
the vent control lever as shown.
Temperature control
The temperature control knob allows
you to control the temperature of the
air flowing from the ventilation system.
To change the air temperature in the
passenger compartment, turn the
knob to the right position for warm and
hot air or left position for cooler air.Temperature unit conversion
You can switch the temperature
mode between Centigrade to
Fahrenheit as follows;
While pressing the OFF button,
press the AUTO button for 4 seconds
or more.
The display will change from
Centigrade to Fahrenheit, or from
Fahrenheit to Centigrade.
If the battery has been discharged or
disconnected, the temperature mode
display will reset to Centigrade.
OBK042067
OBK042263L ■Type A, B
■Type C, DOBK042066
Page 194 of 438
Features of your vehicle
110 4
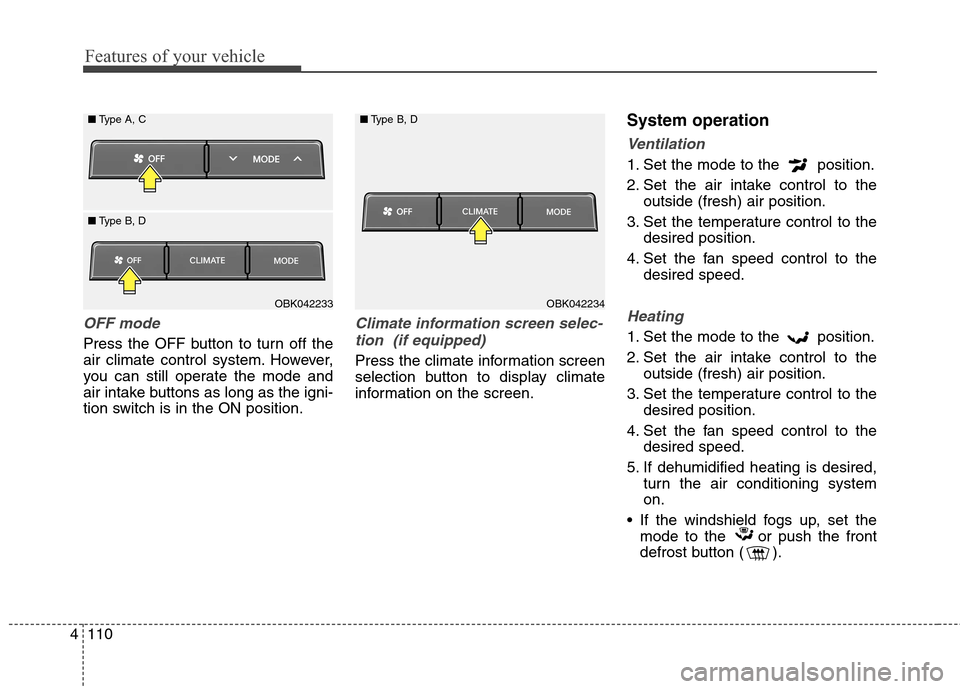
OFF mode
Press the OFF button to turn off the
air climate control system. However,
you can still operate the mode and
air intake buttons as long as the igni-
tion switch is in the ON position.
Climate information screen selec-
tion (if equipped)
Press the climate information screen
selection button to display climate
information on the screen.
System operation
Ventilation
1. Set the mode to the position.
2. Set the air intake control to the
outside (fresh) air position.
3. Set the temperature control to the
desired position.
4. Set the fan speed control to the
desired speed.
Heating
1. Set the mode to the position.
2. Set the air intake control to the
outside (fresh) air position.
3. Set the temperature control to the
desired position.
4. Set the fan speed control to the
desired speed.
5. If dehumidified heating is desired,
turn the air conditioning system
on.
If the windshield fogs up, set the
mode to the or push the front
defrost button ( ).
OBK042234 ■Type B, DOBK042233 ■Type A, C
■Type B, D
Page 202 of 438
Features of your vehicle
118 4
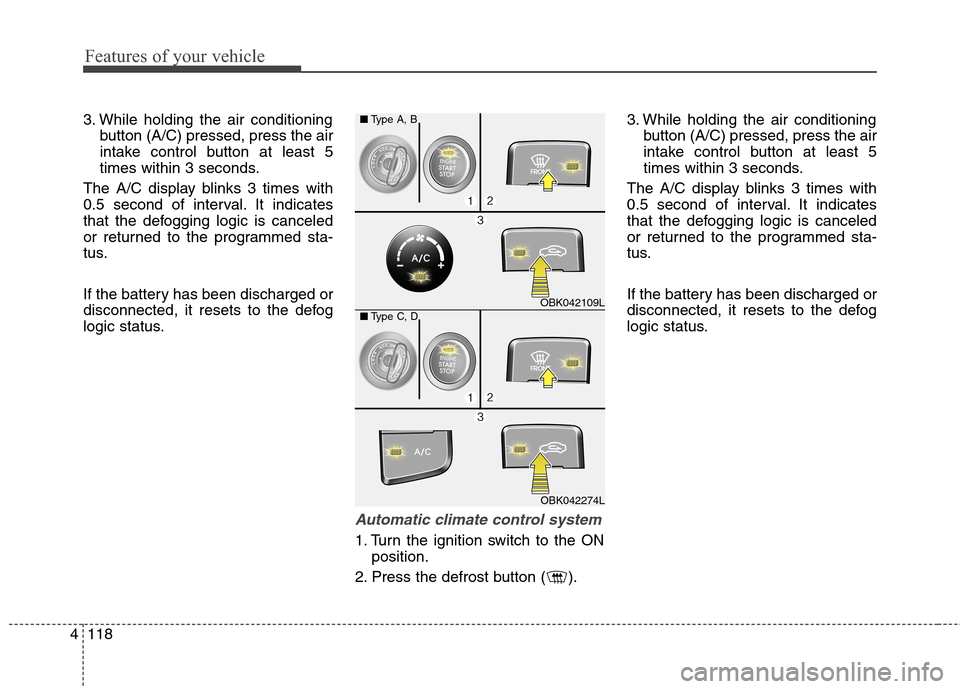
3. While holding the air conditioning
button (A/C) pressed, press the air
intake control button at least 5
times within 3 seconds.
The A/C display blinks 3 times with
0.5 second of interval. It indicates
that the defogging logic is canceled
or returned to the programmed sta-
tus.
If the battery has been discharged or
disconnected, it resets to the defog
logic status.
Automatic climate control system
1. Turn the ignition switch to the ON
position.
2. Press the defrost button ( ).3. While holding the air conditioning
button (A/C) pressed, press the air
intake control button at least 5
times within 3 seconds.
The A/C display blinks 3 times with
0.5 second of interval. It indicates
that the defogging logic is canceled
or returned to the programmed sta-
tus.
If the battery has been discharged or
disconnected, it resets to the defog
logic status.
OBK042109L
OBK042274L ■Type A, B
■Type C, D
Page 209 of 438
![Hyundai Genesis Coupe 2015 Owners Guide 4125
Features of your vehicle
Setup the clock
With audio off
1. Press the [SETUP] or [Clock] but-
ton(1) until the clock of the display
blinks.
2. Set the clock by turning the
knob(2) and press it.
Wi Hyundai Genesis Coupe 2015 Owners Guide 4125
Features of your vehicle
Setup the clock
With audio off
1. Press the [SETUP] or [Clock] but-
ton(1) until the clock of the display
blinks.
2. Set the clock by turning the
knob(2) and press it.
Wi](/img/35/14686/w960_14686-208.png)
4125
Features of your vehicle
Setup the clock
With audio off
1. Press the [SETUP] or [Clock] but-
ton(1) until the clock of the display
blinks.
2. Set the clock by turning the
knob(2) and press it.
With audio on
1. Press the [SETUP] or [Clock] but-
ton (1).
2. Select the clock menu by turning
the knob (2).
3. Set the clock by turning the
knob(2) and press it.
Outside thermometer
The current outside temperature is
displayed in 1°F (1°C) increments.
The temperature range is between -
30°F~140°F (-30°C ~ 60°C).
The outside temperature on the dis-
play may not change immediately
like a general thermometer to pre-
vent the driver from being inattentive.
Floor mat anchor(s)
When using a floor mat on the front
floor carpet, make sure it attaches to
the floor mat anchor(s) in your vehi-
cle. This keeps the floor mat from
sliding forward.
OBK049112NOXM049228
■Type A■Type B
Page 222 of 438
Features of your vehicle
138 4
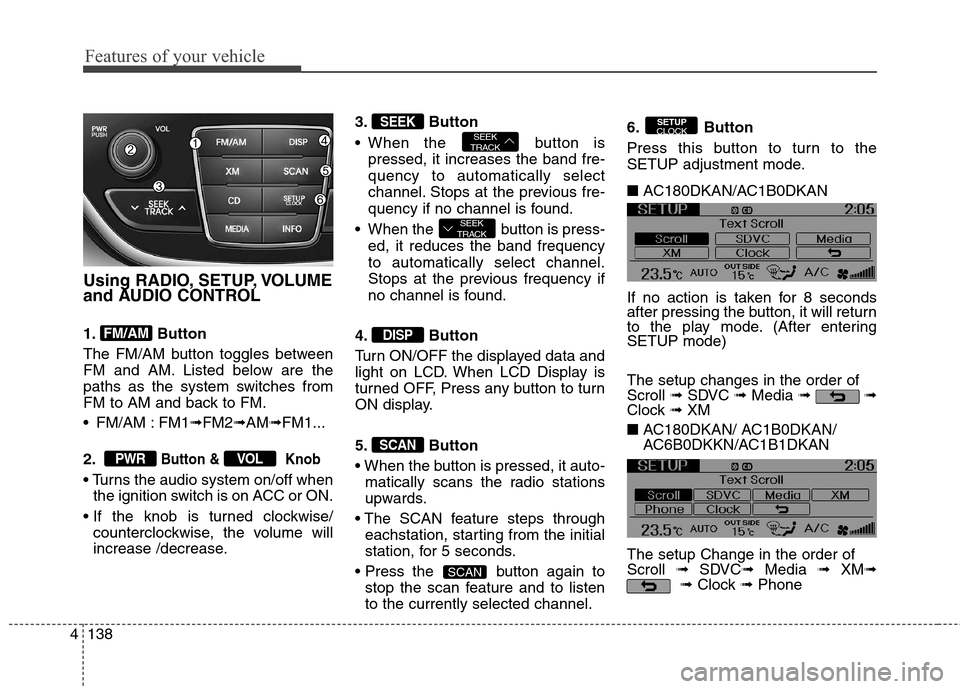
Using RADIO, SETUP, VOLUME
and AUDIO CONTROL
1. Button
The FM/AM button toggles between
FM and AM. Listed below are the
paths as the system switches from
FM to AM and back to FM.
FM/AM : FM1➟FM2➟AM➟FM1...
2.
Button & Knob
the ignition switch is on ACC or ON.
counterclockwise, the volume will
increase /decrease.3. Button
When the button is
pressed, it increases the band fre-
quency to automatically select
channel. Stops at the previous fre-
quency if no channel is found.
When the button is press-
ed, it reduces the band frequency
to automatically select channel.
Stops at the previous frequency if
no channel is found.
4. Button
Turn ON/OFF the displayed data and
light on LCD. When LCD Display is
turned OFF, Press any button to turn
ON display.
5. Button
matically scans the radio stations
upwards.
eachstation, starting from the initial
station, for 5 seconds.
button again to
stop the scan feature and to listen
to the currently selected channel.6. Button
Press this button to turn to the
SETUP adjustment mode.
■ AC180DKAN/AC1B0DKAN
If no action is taken for 8 seconds
after pressing the button, it will return
to the play mode. (After entering
SETUP mode)
The setup changes in the order of
Scroll ➟SDVC ➟Media ➟ ➟
Clock ➟ XM
■ AC180DKAN/ AC1B0DKAN/
AC6B0DKKN/AC1B1DKAN
The setup Change in the order of
Scroll ➟SDVC➟Media ➟ XM➟
➟Clock ➟Phone
SETUP
CLOCK
SCAN
SCAN
DISP
SEEK
TRACK
SEEK
TRACKSEEK
VOLPWR
FM/AM
Page 223 of 438
4139
Features of your vehicle
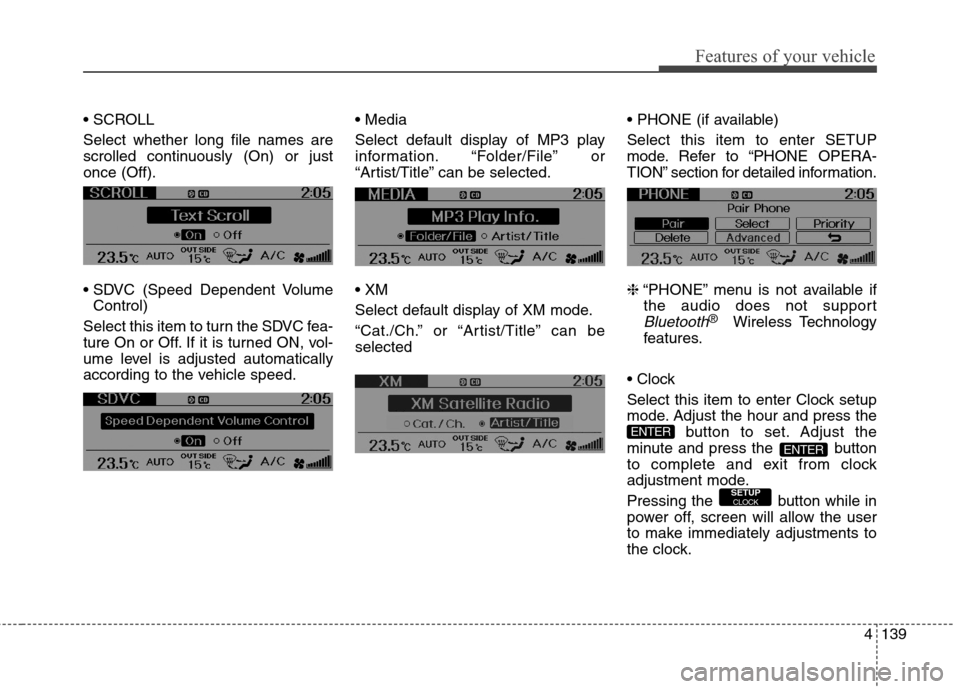
Select whether long file names are
scrolled continuously (On) or just
once (Off).
Control)
Select this item to turn the SDVC fea-
ture On or Off. If it is turned ON, vol-
ume level is adjusted automatically
according to the vehicle speed.
Select default display of MP3 play
information. “Folder/File” or
“Artist/Title” can be selected.
Select default display of XM mode.
“Cat./Ch.” or “Artist/Title” can be
selected
Select this item to enter SETUP
mode. Refer to “PHONE OPERA-
TION” section for detailed information.
❈“PHONE” menu is not available if
the audio does not support
Bluetooth®Wireless Technology
features.
Select this item to enter Clock setup
mode. Adjust the hour and press the
button to set. Adjust the
minute and press the button
to complete and exit from clock
adjustment mode.
Pressing the button while in
power off, screen will allow the user
to make immediately adjustments to
the clock.
SETUPCLOCK
ENTER
ENTER
Page 225 of 438
4141
Features of your vehicle
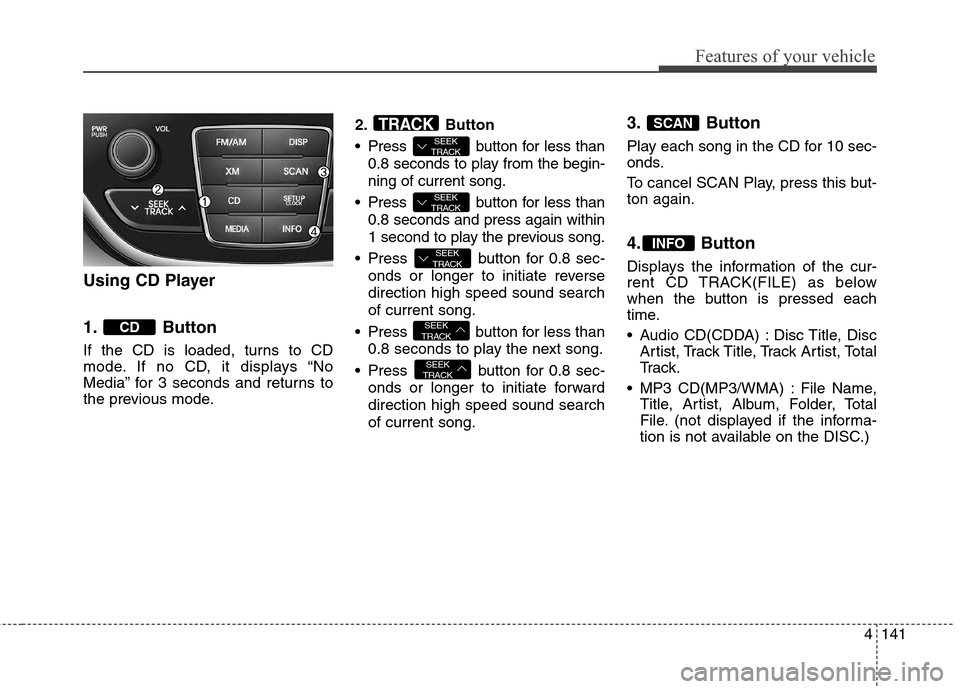
Using CD Player
1. Button
If the CD is loaded, turns to CD
mode. If no CD, it displays “No
Media” for 3 seconds and returns to
the previous mode.2. Button
Press button for less than
0.8 seconds to play from the begin-
ning of current song.
Press button for less than
0.8 seconds and press again within
1 second to play the previous song.
Press button for 0.8 sec-
onds or longer to initiate reverse
direction high speed sound search
of current song.
Press button for less than
0.8 seconds to play the next song.
Press button for 0.8 sec-
onds or longer to initiate forward
direction high speed sound search
of current song.
3. Button
Play each song in the CD for 10 sec-
onds.
To cancel SCAN Play, press this but-
ton again.
4. Button
Displays the information of the cur-
rent CD TRACK(FILE) as below
when the button is pressed each
time.
Audio CD(CDDA) : Disc Title, Disc
Artist, Track Title, Track Artist, Total
Tr a c k .
MP3 CD(MP3/WMA) : File Name,
Title, Artist, Album, Folder, Total
File. (not displayed if the informa-
tion is not available on the DISC.)
INFO
SCAN
SEEK
TRACK
SEEK
TRACK
SEEK
TRACK
SEEK
TRACK
SEEK
TRACKTRACK
CD
Page 227 of 438
4143
Features of your vehicle
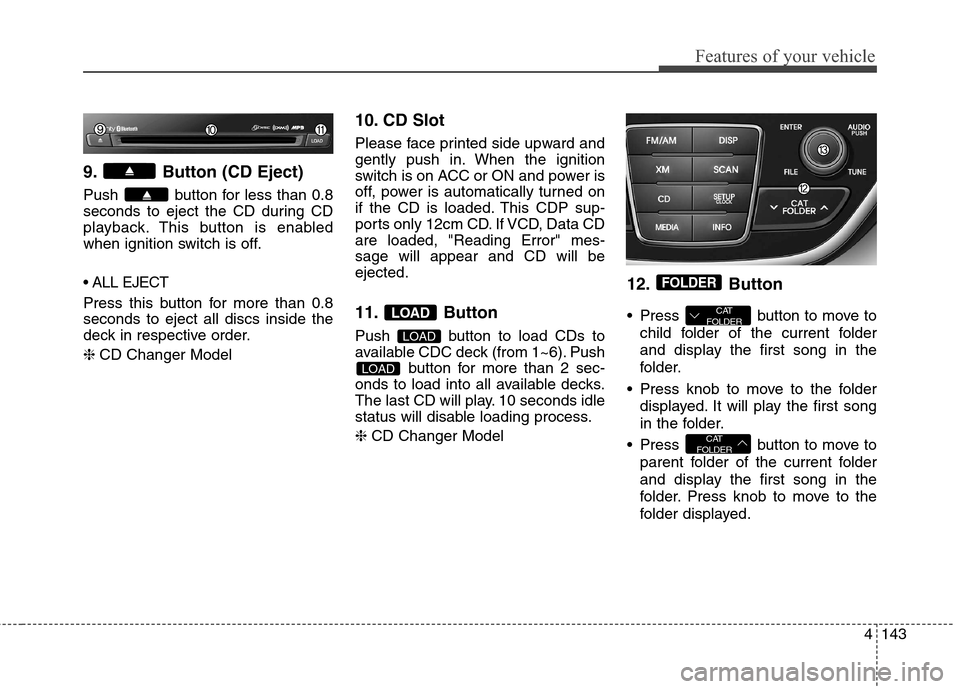
9. Button (CD Eject)
Push button for less than 0.8
seconds to eject the CD during CD
playback. This button is enabled
when ignition switch is off.
Press this button for more than 0.8
seconds to eject all discs inside the
deck in respective order.
❈CD Changer Model
10. CD Slot
Please face printed side upward and
gently push in. When the ignition
switch is on ACC or ON and power is
off, power is automatically turned on
if the CD is loaded. This CDP sup-
ports only 12cm CD. If VCD, Data CD
are loaded, "Reading Error" mes-
sage will appear and CD will be
ejected.
11. Button
Push button to load CDs to
available CDC deck (from 1~6). Push
button for more than 2 sec-
onds to load into all available decks.
The last CD will play. 10 seconds idle
status will disable loading process.
❈CD Changer Model
12. Button
Press button to move to
child folder of the current folder
and display the first song in the
folder.
Press knob to move to the folder
displayed. It will play the first song
in the folder.
Press button to move to
parent folder of the current folder
and display the first song in the
folder. Press knob to move to the
folder displayed.
CAT
FOLDER
CAT
FOLDER
FOLDER
LOAD
LOAD
LOAD
Page 228 of 438
Features of your vehicle
144 4
13.& Knob
Turn this knob clockwise to browse
songs after current song, or coun-
terclockwise to browse songs
before current song. To play the
displayed song, press the knob.
Pressing this knob without turning
enters to AUDIO CONTROL mode.NOTE:
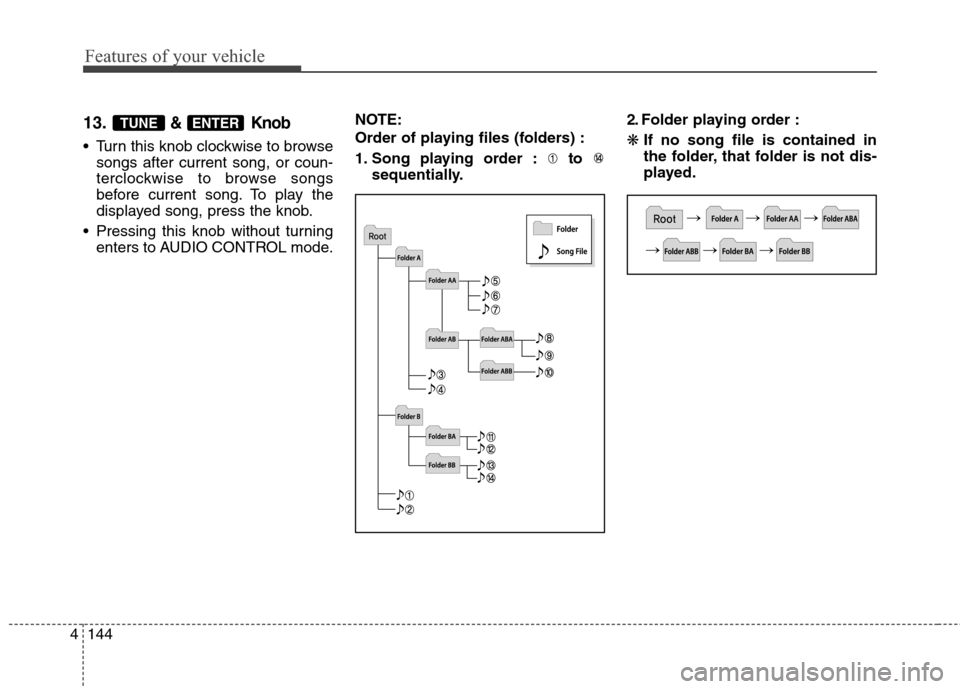
Order of playing files (folders) :
1. Song playing order : to
sequentially.2. Folder playing order :
❋If no song file is contained in
the folder, that folder is not dis-
played.
ENTERTUNE
Page 231 of 438
4147
Features of your vehicle
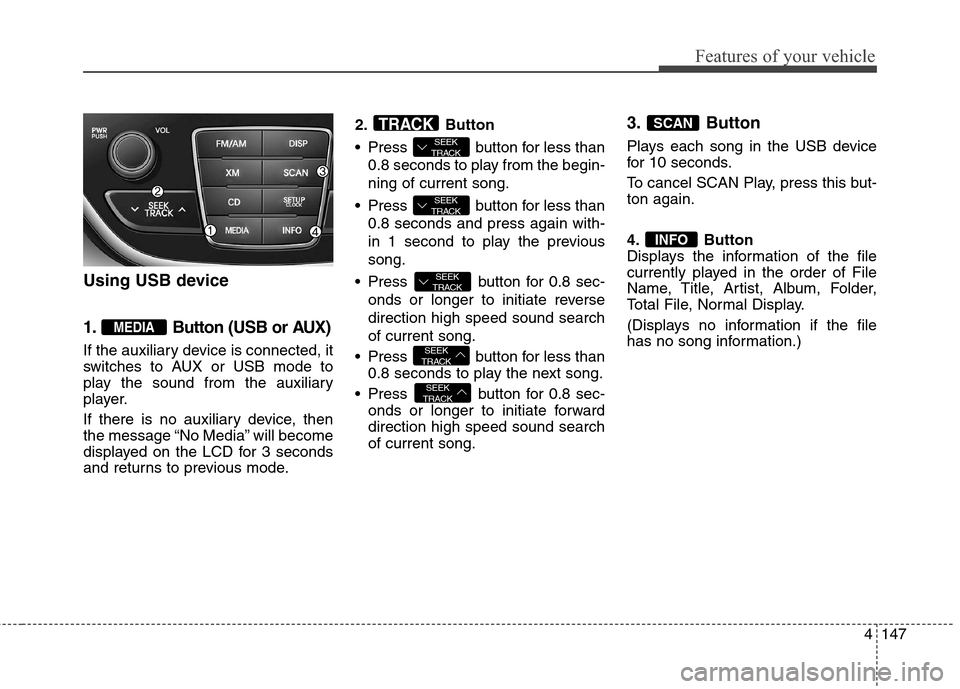
Using USB device
1. Button (USB or AUX)
If the auxiliary device is connected, it
switches to AUX or USB mode to
play the sound from the auxiliary
player.
If there is no auxiliary device, then
the message “No Media” will become
displayed on the LCD for 3 seconds
and returns to previous mode.2. Button
Press button for less than
0.8 seconds to play from the begin-
ning of current song.
Press button for less than
0.8 seconds and press again with-
in 1 second to play the previous
song.
Press button for 0.8 sec-
onds or longer to initiate reverse
direction high speed sound search
of current song.
Press button for less than
0.8 seconds to play the next song.
Press button for 0.8 sec-
onds or longer to initiate forward
direction high speed sound search
of current song.
3. Button
Plays each song in the USB device
for 10 seconds.
To cancel SCAN Play, press this but-
ton again.
4. Button
Displays the information of the file
currently played in the order of File
Name, Title, Artist, Album, Folder,
Total File, Normal Display.
(Displays no information if the file
has no song information.)
INFO
SCAN
SEEK
TRACK
SEEK
TRACK
SEEK
TRACK
SEEK
TRACK
SEEK
TRACKTRACK
MEDIA