stop start Hyundai Genesis Coupe 2016 s Owner's Guide
[x] Cancel search | Manufacturer: HYUNDAI, Model Year: 2016, Model line: Genesis Coupe, Model: Hyundai Genesis Coupe 2016Pages: 475, PDF Size: 15.71 MB
Page 328 of 475
541
Driving your vehicle
Your vehicle's fuel economy depends
mainly on your style of driving, where
you drive and when you drive.
Each of these factors affects how
many miles (kilometers) you can get
from a gallon (liter) of fuel. To operate
your vehicle as economically as possi-
ble, use the following driving sugges-
tions to help save money in both fuel
and repairs:
Drive smoothly. Accelerate at a mod-erate rate. Don't make "jack-rabbit"
starts or full-throttle shifts and main-
tain a steady cruising speed. Don't
race between stoplights. Try to adjust
your speed to that of the other traffic
so you don't have to change speeds
unnecessarily. Avoid heavy traffic
whenever possible. Always maintain
a safe distance from other vehicles
so you can avoid unnecessary brak-
ing. This also reduces brake wear.
Drive at a moderate speed. The faster you drive the more fuel your
vehicle uses. Driving at a moderate
speed, in the highest gear appropri-
ate for the conditions, especially on
the highway, is one of the most effec-
tive ways to reduce fuel consump-
tion. Don't "ride" the brake or clutch
pedal. This can increase fuel con-
sumption and also increase wear
on these components. In addition,
driving with your foot resting on the
brake pedal may cause the brakes
to overheat, which reduces their
effectiveness and may lead to
more serious consequences.
Take care of your tires. Keep them inflated to the recommended pres-
sure. Incorrect inflation, either too
much or too little, results in unnec-
essary tire wear. Check the tire
pressures at least once a month.
Be sure that the wheels are aligned correctly. Improper align-
ment can result from hitting curbs
or driving too fast over irregular
surfaces. Poor alignment causes
faster tire wear and may also result
in other problems as well as
greater fuel consumption. Keep your car in good condition.
For better fuel economy and
reduced maintenance costs, main-
tain your car in accordance with
the maintenance schedule in sec-
tion 7. If you drive your car in
severe conditions, more frequent
maintenance is required (see sec-
tion 7 for details).
Keep your car clean. For maximum service, your vehicle should be
kept clean and free of corrosive
materials. It is especially important
that mud, dirt, ice, etc. not be
allowed to accumulate on the
underside of the car. This extra
weight can result in increased fuel
consumption and also contribute to
corrosion.
Travel lightly. Don't carry unneces- sary weight in your car. Weight
reduces fuel economy.
Don't let the engine idle longer than necessary. If you are waiting
(and not in traffic), turn off your
engine and restart only when
you're ready to go.
ECONOMICAL OPERATION
Page 348 of 475
63
What to do in an emergency
2.When the car is stopped, turn onyour emergency hazard flashers,
set the parking brake and put the
transmission in P (automatic trans-
mission) or reverse (manual trans-
mission).
3.Have all passengers get out of the car. Be sure they all get out on the
side of the car that is away from
traffic.
4.When changing a flat tire, follow the instruction provided later in this
section.
If engine stalls while driving
1. Reduce your speed gradually, keeping a straight line. Move cau-
tiously off the road to a safe place.
2. Turn on your emergency flashers.
3. Try to start the engine again. If your vehicle will not start, contact
an authorized HYUNDAI dealer or
seek other qualified assistance.
If engine doesn't turn over or
turns over slowly
1. If your vehicle has an automatictransmission, be sure the gear
selector lever is in N(Neutral) or
P(Park) and the emergency brake
is set.
2. Check the battery connections to be sure they are clean and tight.
3. Turn on the interior light. If the light dims or goes out when you oper-
ate the starter, the battery is dis-
charged.
4. Check the starter connections to be sure they are securely tight-
ened.
5. Do not push or pull the vehicle to start it. See instructions for "Jump
starting".
If the engine turns over nor-
mally but does not start
1. Check fuel level.
2. With the ignition switch in theLOCK position, check all connec-
tors at the ignition coils and spark
plugs. Reconnect any that may be
disconnected or loose.
3. If the engine still does not start, call an authorized HYUNDAI deal-
er or seek other qualified assis-
tance.
IF THE ENGINE WILL NOT START
WARNING
If the engine will not start, do
not push or pull the car to start
it. This could result in a collision
or cause other damage.
Page 352 of 475
67
What to do in an emergency
TIRE PRESSURE MONITORING SYSTEM (TPMS)
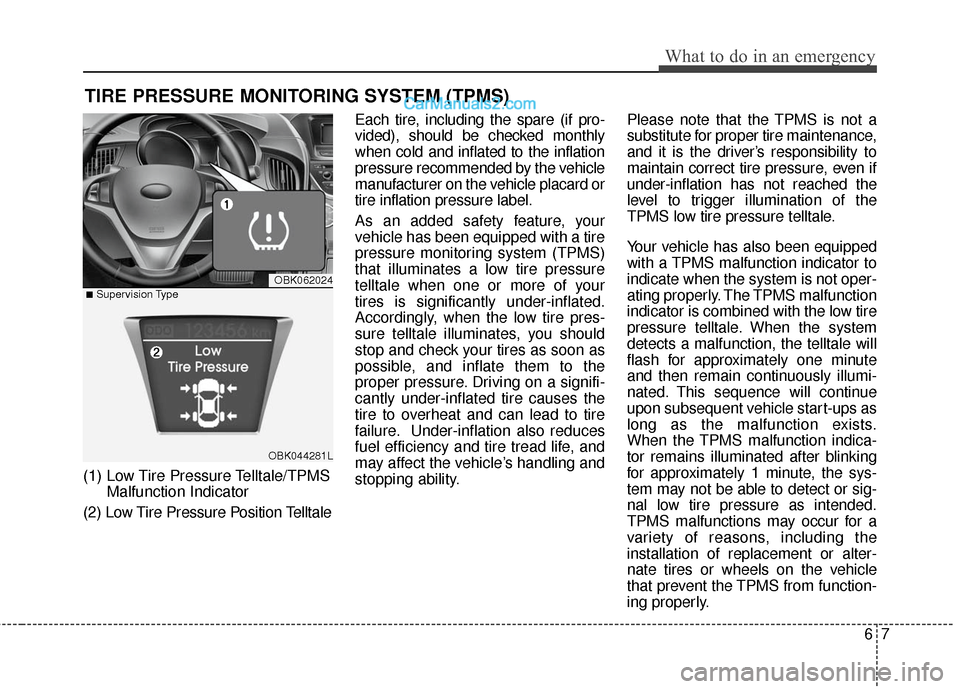
(1) Low Tire Pressure Telltale/TPMSMalfunction Indicator
(2) Low Tire Pressure Position Telltale Each tire, including the spare (if pro-
vided), should be checked monthly
when cold and inflated to the inflation
pressure recommended by the vehicle
manufacturer on the vehicle placard or
tire inflation pressure label.
As an added safety feature, your
vehicle has been equipped with a tire
pressure monitoring system (TPMS)
that illuminates a low tire pressure
telltale when one or more of your
tires is significantly under-inflated.
Accordingly, when the low tire pres-
sure telltale illuminates, you should
stop and check your tires as soon as
possible, and inflate them to the
proper pressure. Driving on a signifi-
cantly under-inflated tire causes the
tire to overheat and can lead to tire
failure. Under-inflation also reduces
fuel efficiency and tire tread life, and
may affect the vehicle’s handling and
stopping ability.
Please note that the TPMS is not a
substitute for proper tire maintenance,
and it is the driver’s responsibility to
maintain correct tire pressure, even if
under-inflation has not reached the
level to trigger illumination of the
TPMS low tire pressure telltale.
Your vehicle has also been equipped
with a TPMS malfunction indicator to
indicate when the system is not oper-
ating properly. The TPMS malfunction
indicator is combined with the low tire
pressure telltale. When the system
detects a malfunction, the telltale will
flash for approximately one minute
and then remain continuously illumi-
nated. This sequence will continue
upon subsequent vehicle start-ups as
long as the malfunction exists.
When the TPMS malfunction indica-
tor remains illuminated after blinking
for approximately 1 minute, the sys-
tem may not be able to detect or sig-
nal low tire pressure as intended.
TPMS malfunctions may occur for a
variety of reasons, including the
installation of replacement or alter-
nate tires or wheels on the vehicle
that prevent the TPMS from function-
ing properly.
OBK062024
OBK044281L
■Supervision Type
Page 430 of 475

761
Maintenance
Description Fuse ratingProtected component
MODULE2 7.5AIPS Control Module, Instrument Cluster (IND, MICOM), BCM, ATM Shift Lever IND.,
Multifunction Switch (Remote Control), Multi Gauge, Cruise Clutch Pedal Position Switch,
A/C Control Module, Auto Head Lamp Leveling Device Unit, Stop Lamp Switch,
Driver/Passenger Seat Warmer Module, Electro Chromic Mirror, MTS Module,
Tire Pressure Monitoring Module, Head Lamp Leveling Device Actuator LH/RH,
Front Parking Assist Sensor LH/RH
Rear Parking Assist Sensor Side LH/RH
Rear Parking Assist Sensor Center LH/RH
MODULE5 7.5A Sport Mode Switch (A/T), Key Solenoid
STOP LP 15A Stop Signal Relay
MODULE7 7.5A Blower Relay, Sunroof Control Module, A/C Control Module, Cluster Ionizer (Auto A/C)
MODULE4 7.5ABCM, PDM, IPS Control Module, Vacuum Switch
E/R Junction Box LH (Vacuum Pump Relay)
WIPER FRT 25AMultiFunction Switch (Wiper), Front Wiper Motor
E/R Junction Box LH (Wiper FRT Relay)
START 10AE/R Junction Box LH (Start Relay), Ignition Lock Switch, PDM
Transmission Range Switch, ECM (G6DJ), B/Alarm Relay
BLOWER 7.5A A/C Control Module
HTD MIRR 7.5A A/C Control Module, Driver/Passenger Power Outside Mirror
TRUNK 10A Trunk Lid & Fuel Filler Door Switch, ICM Relay Box (Trunk Lid Relay)
PDM2 10A PDM, Smart Key Control Module, Start Stop Button Switch, FOB Holder
SAFETY POWER
WINDOW RH 25A Passenger Safety Power Window Module
FOG LP RR 10A (Not Used)
S/HEATER 15A Driver/Passenger Seat Warmer Module
AMP 25A AMP (JBL)
SAFETY POWER
WINDOW LH 25A Driver Safety Power Window Module
Page 432 of 475
763
Maintenance
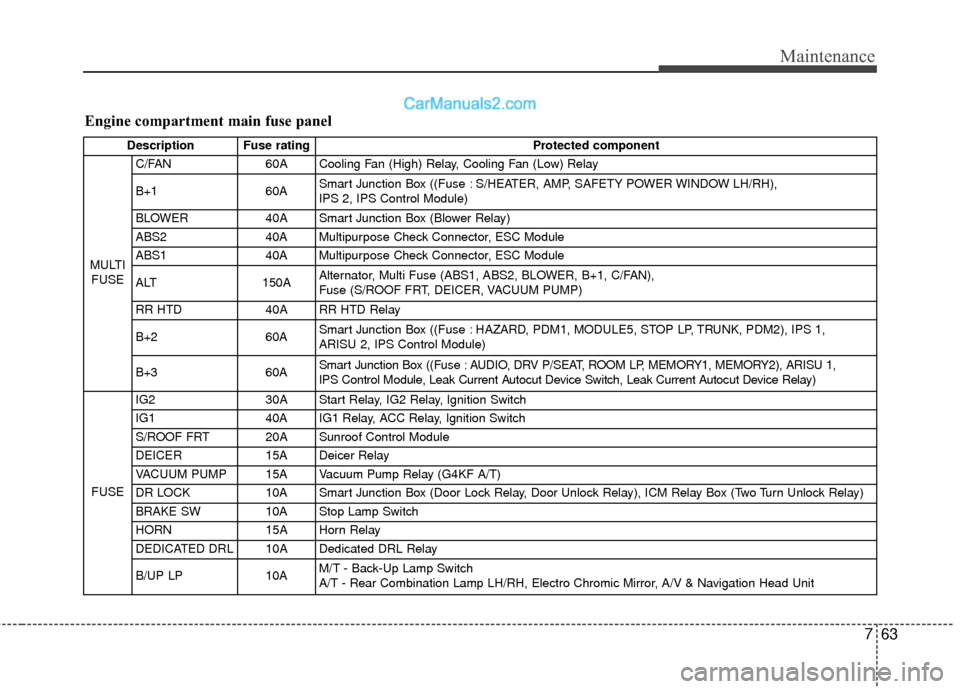
Engine compartment main fuse panel
Description Fuse ratingProtected component
MULTI FUSE C/FAN
60A Cooling Fan (High) Relay, Cooling Fan (Low) Relay
B+1 60ASmart Junction Box ((Fuse : S/HEATER, AMP, SAFETY POWER WINDOW LH/RH),
IPS 2, IPS Control Module)
BLOWER 40A Smart Junction Box (Blower Relay)
ABS2 40A Multipurpose Check Connector, ESC Module
ABS1 40A Multipurpose Check Connector, ESC Module
ALT 150AAlternator, Multi Fuse (ABS1, ABS2, BLOWER, B+1, C/FAN),
Fuse (S/ROOF FRT, DEICER, VACUUM PUMP)
RR HTD 40A RR HTD Relay
B+260ASmart Junction Box ((Fuse : HAZARD, PDM1, MODULE5, STOP LP, TRUNK, PDM2), IPS 1,
ARISU 2, IPS Control Module)
B+360ASmart Junction Box ((Fuse : AUDIO, DRV P/SEAT, ROOM LP, MEMORY1, MEMORY2), ARISU 1,
IPS Control Module, Leak Current Autocut Device Switch, Leak Current Autocut Device Relay)
FUSE IG2
30A Start Relay, IG2 Relay, Ignition Switch
IG140AIG1 Relay, ACC Relay, Ignition Switch
S/ROOF FRT 20A Sunroof Control Module
DEICER 15A Deicer Relay
VACUUM PUMP 15A Vacuum Pump Relay (G4KF A/T)
DR LOCK 10A Smart Junction Box (Door Lock Relay, Door Unlock Relay), ICM Relay Box (Two Turn Unlock Relay)
BRAKE SW 10A Stop Lamp Switch
HORN 15A Horn Relay
DEDICATED DRL 10A Dedicated DRL Relay
B/UP LP 10AM/T - Back-Up Lamp Switch
A/T - Rear Combination Lamp LH/RH, Electro Chromic Mirror, A/V & Navigation Head Unit
Page 468 of 475
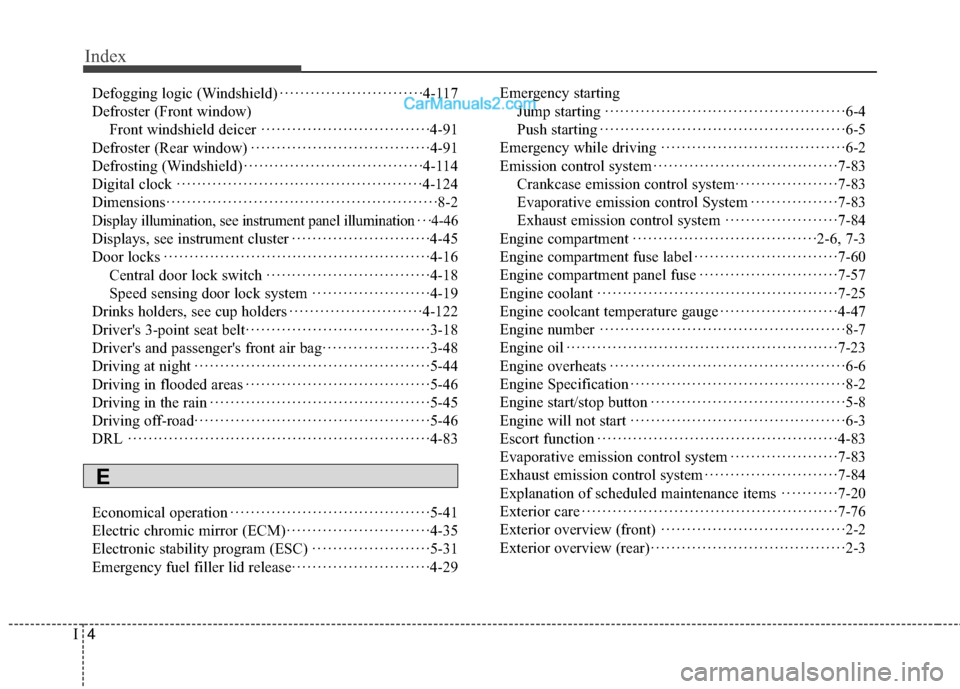
Index
4I
Defogging logic (Windshield)··················\
··········4-117
Defroster (Front window) Front windshield deicer ··················\
···············4-91
Defroster (Rear window) ··················\
················ ·4-91
Defrosting (Windshield) ··················\
·················4-114
Digital clock ··················\
··················\
··········· ·4-124
Dimensions ··················\
··················\
·················8-2
Display illumination, see instrument panel illumination · · ·4-46
Displays, see instrument cluster ··················\
·········4-45
Door locks ··················\
··················\
··············· ·4-16
Central door lock switch ··················\
··············4-18
Speed sensing door lock system ··················\
·····4-19
Drinks holders, see cup holders ··················\
········4-122
Driver's 3-point seat belt ··················\
················· ·3-18
Driver's and passenger's front air bag ··················\
···3-48
Driving at night ··················\
··················\
········· ·5-44
Driving in flooded areas ··················\
················· ·5-46
Driving in the rain ··················\
··················\
······ ·5-45
Driving off-road ··················\
··················\
········· ·5-46
DRL ··················\
··················\
··················\
···· ·4-83
Economical operation ··················\
··················\
·· ·5-41
Electric chromic mirror (ECM) ··················\
··········4-35
Electronic stability program (ESC) ··················\
·····5-31
Emergency fuel filler lid release ··················\
·········4-29 Emergency starting
Jump starting ··················\
··················\
·········· ·6-4
Push starting ··················\
··················\
··········· ·6-5
Emergency while driving ··················\
················· ·6-2
Emission control system ··················\
················· ·7-83
Crankcase emission control system ··················\
··7-83
Evaporative emission control System ·················7-83
Exhaust emission control system ··················\
····7-84
Engine compartment ··················\
················· ·2-6, 7-3
Engine compartment fuse label ··················\
··········7-60
Engine compartment panel fuse ··················\
·········7-57
Engine coolant ··················\
··················\
·········· ·7-25
Engine coolcant temperature gauge ··················\
·····4-47
Engine number ··················\
··················\
··········· ·8-7
Engine oil ··················\
··················\
·················7-23
Engine overheats ··················\
··················\
········· ·6-6
Engine Specification ··················\
··················\
····· ·8-2
Engine start/stop button ··················\
··················\
· ·5-8
Engine will not start ··················\
··················\
····· ·6-3
Escort function ··················\
··················\
·········· ·4-83
Evaporative emission control system ··················\
···7-83
Exhaust emission control system ··················\
········7-84
Explanation of scheduled maintenance items ···········7-20
Exterior care ··················\
··················\
··············7-76
Exterior overview (front) ··················\
················· ·2-2
Exterior overview (rear) ··················\
··················\
· ·2-3
E