air conditioning HYUNDAI GENESIS G80 2021 User Guide
[x] Cancel search | Manufacturer: HYUNDAI, Model Year: 2021, Model line: GENESIS G80, Model: HYUNDAI GENESIS G80 2021Pages: 516, PDF Size: 81.01 MB
Page 232 of 516
3-144
Convenient features of your vehicle
Checking the amount of air
conditioner refrigerant and
compressor lubricant
When the amount of refrigerant is
low, the performance of the air con-
ditioning is reduced. Overfilling also
has a negative impact on the air con-
ditioning system.
Therefore, if abnormal operation is
found, have the system inspected by
an authorized retailer of Genesis
Branded products.
✽ ✽
NOTICE
It is important that the correct type
and amount of oil and refrigerant is
used. Otherwise, damage to the
compressor and abnormal system
operation may occur.
The air conditioning system should
be serviced by an authorized retailer
of Genesis Branded products.
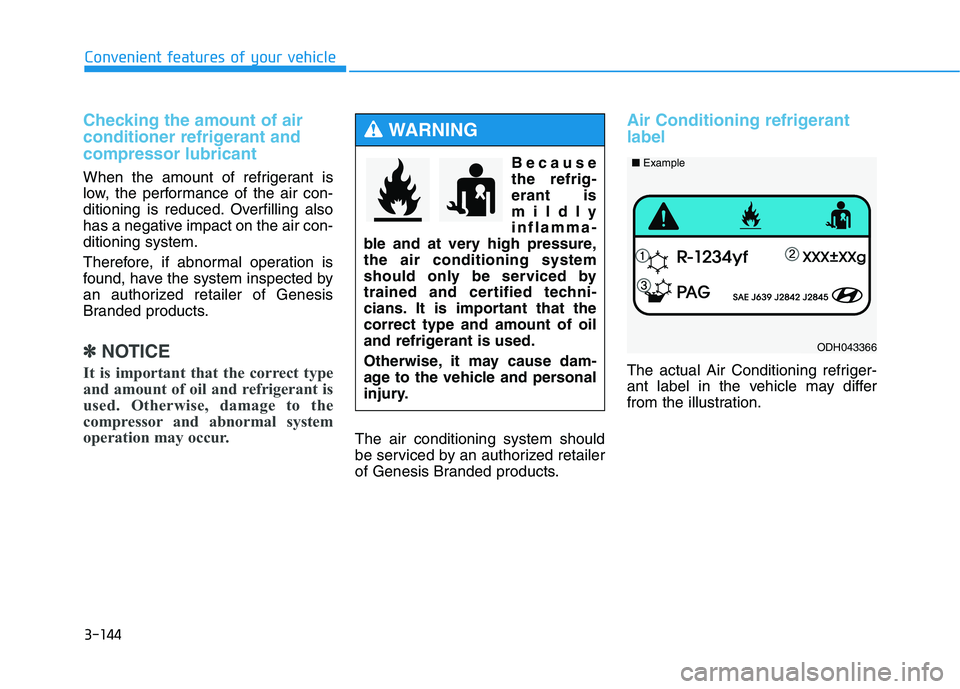
Air Conditioning refrigerant
label
The actual Air Conditioning refriger-
ant label in the vehicle may differ
from the illustration.
ODH043366 ■Example
Because
the refrig-
erant is
mildly
inflamma-
ble and at very high pressure,
the air conditioning system
should only be serviced by
trained and certified techni-
cians. It is important that the
correct type and amount of oil
and refrigerant is used.
Otherwise, it may cause dam-
age to the vehicle and personal
injury.
WARNING
Page 233 of 516
3-145
Convenient features of your vehicle
3
Each symbols and specification on
air conditioning refrigerant label
means as below ;
1. Classification of refrigerant
2. Amount of refrigerant
3. Classification of Compressor lubri-
cant
Refer to chapter 8 for more detail
location of air conditioning refrig-
erant label.
Page 235 of 516
3-147
Convenient features of your vehicle
3
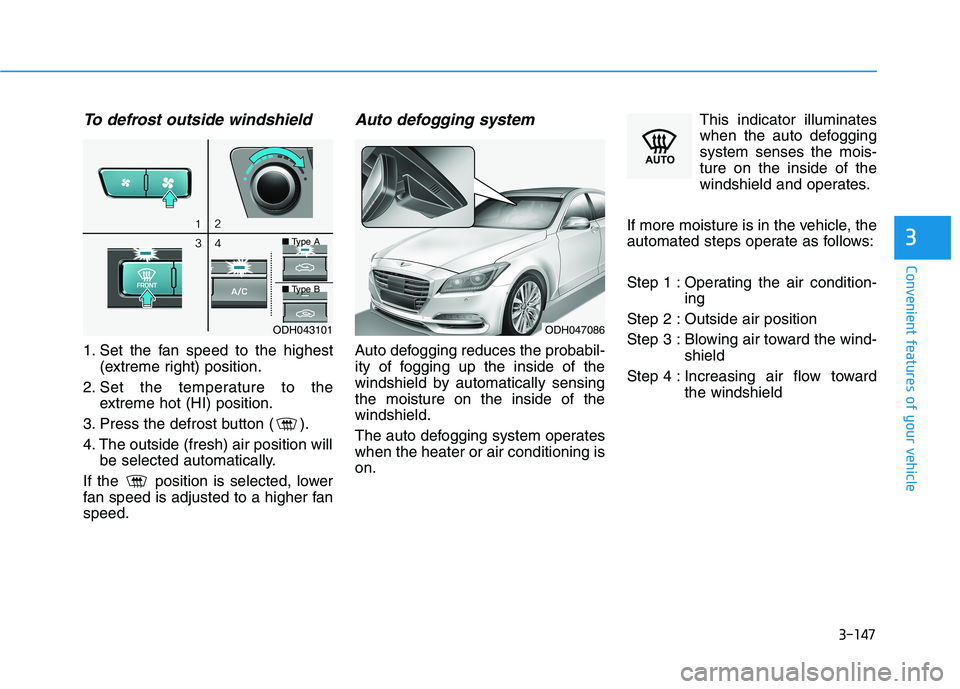
To defrost outside windshield
1. Set the fan speed to the highest
(extreme right) position.
2. Set the temperature to the
extreme hot (HI) position.
3. Press the defrost button ( ).
4. The outside (fresh) air position will
be selected automatically.
If the position is selected, lower
fan speed is adjusted to a higher fan
speed.
Auto defogging system
Auto defogging reduces the probabil-
ity of fogging up the inside of the
windshield by automatically sensing
the moisture on the inside of the
windshield.
The auto defogging system operates
when the heater or air conditioning is
on.This indicator illuminates
when the auto defogging
system senses the mois-
ture on the inside of the
windshield and operates.
If more moisture is in the vehicle, the
automated steps operate as follows:
Step 1 : Operating the air condition-
ing
Step 2 : Outside air position
Step 3 : Blowing air toward the wind-
shield
Step 4 : Increasing air flow toward
the windshield
ODH043101ODH047086
■Type A
■Type B
Page 236 of 516
3-148
Convenient features of your vehicle
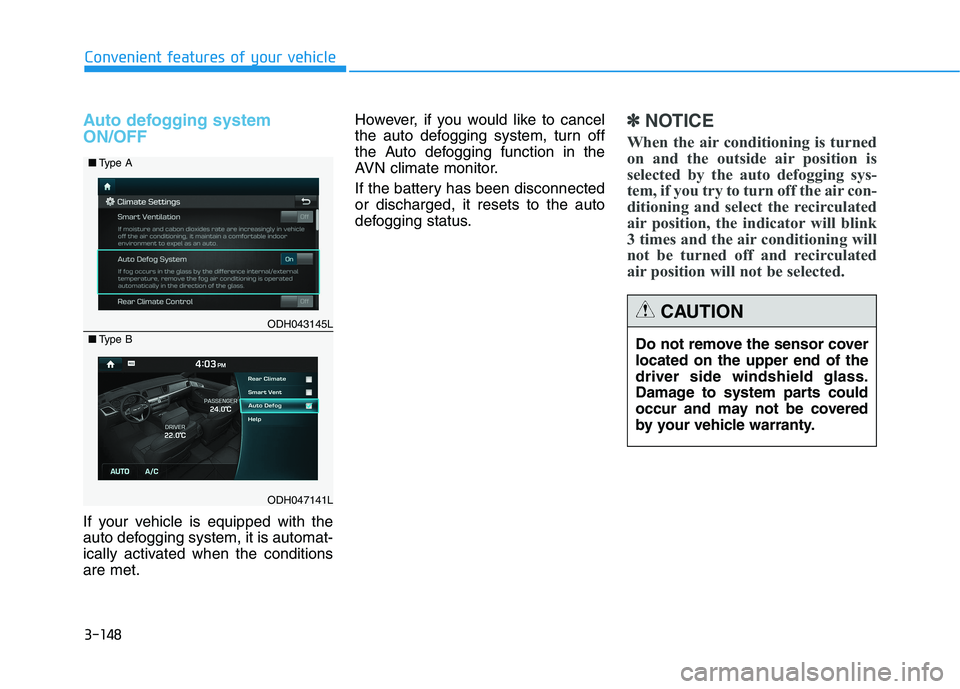
Auto defogging system
ON/OFF
If your vehicle is equipped with the
auto defogging system, it is automat-
ically activated when the conditions
are met.However, if you would like to cancel
the auto defogging system, turn off
the Auto defogging function in the
AVN climate monitor.
If the battery has been disconnected
or discharged, it resets to the auto
defogging status.
✽ ✽
NOTICE
When the air conditioning is turned
on and the outside air position is
selected by the auto defogging sys-
tem, if you try to turn off the air con-
ditioning and select the recirculated
air position, the indicator will blink
3 times and the air conditioning will
not be turned off and recirculated
air position will not be selected.
ODH043145L
ODH047141L ■Type A
■Type B
Do not remove the sensor cover
located on the upper end of the
driver side windshield glass.
Damage to system parts could
occur and may not be covered
by your vehicle warranty.
CAUTION
Page 237 of 516
3-149
Convenient features of your vehicle
3
C CL
LI
IM
MA
AT
TE
E
C
CO
ON
NT
TR
RO
OL
L
A
AD
DD
DI
IT
TI
IO
ON
NA
AL
L
F
FE
EA
AT
TU
UR
RE
ES
S
(
(I
IF
F
E
EQ
QU
UI
IP
PP
PE
ED
D)
)
Cluster ionizer
When the Engine Start/Stop button
is in the ON position, the clean air
function turns on automatically.
Also, the clean air function turns off
automatically, when the Engine
Start/Stop button is in the OFF posi-
tion.
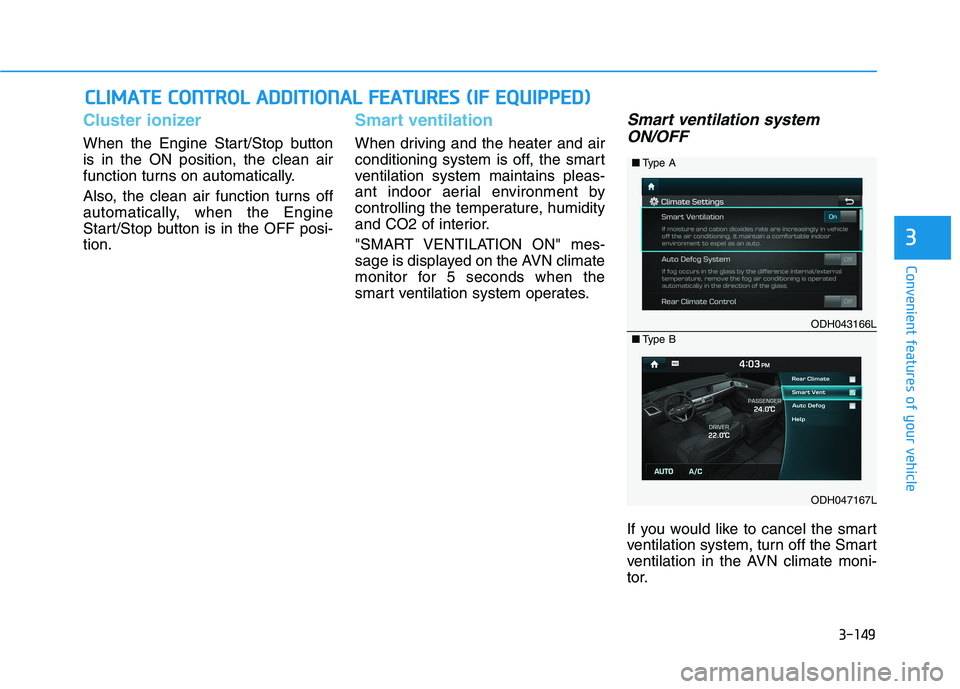
Smart ventilation
When driving and the heater and air
conditioning system is off, the smart
ventilation system maintains pleas-
ant indoor aerial environment by
controlling the temperature, humidity
and CO2 of interior.
"SMART VENTILATION ON" mes-
sage is displayed on the AVN climate
monitor for 5 seconds when the
smart ventilation system operates.
Smart ventilation system
ON/OFF
If you would like to cancel the smart
ventilation system, turn off the Smart
ventilation in the AVN climate moni-
tor.
ODH043166L
ODH047167L ■Type A
■Type B
Page 381 of 516
6-5
What to do in an emergency
6
✽ ✽
NOTICE
An inappropriately disposed
battery can be harmful to
the environment and human
health. Dispose the battery
according to your local
law(s) or regulations.
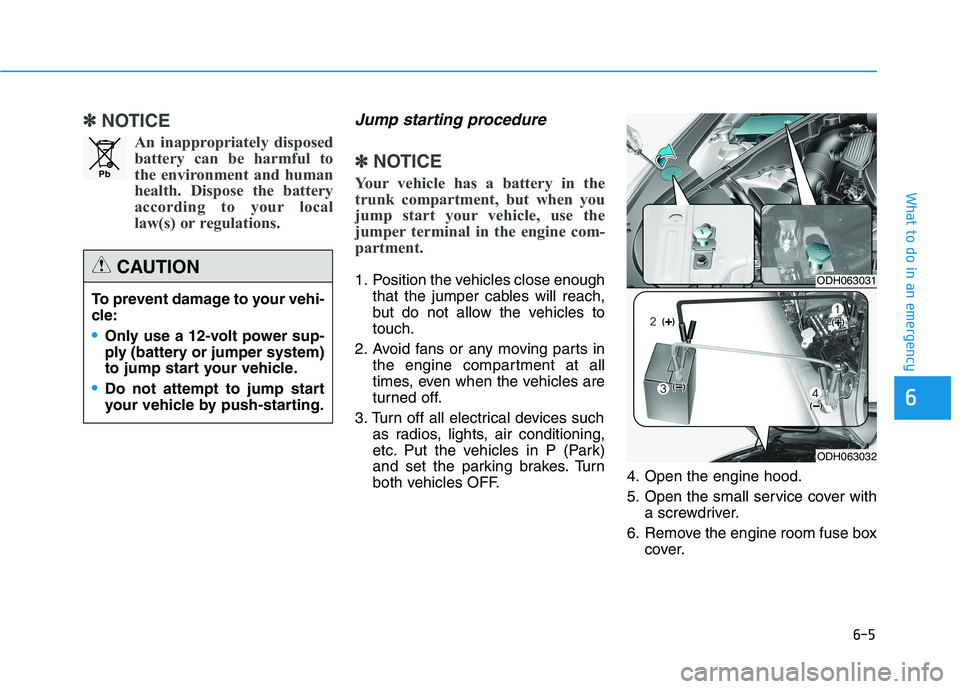
Jump starting procedure
✽ ✽
NOTICE
Your vehicle has a battery in the
trunk compartment, but when you
jump start your vehicle, use the
jumper terminal in the engine com-
partment.
1. Position the vehicles close enough
that the jumper cables will reach,
but do not allow the vehicles to
touch.
2. Avoid fans or any moving parts in
the engine compartment at all
times, even when the vehicles are
turned off.
3. Turn off all electrical devices such
as radios, lights, air conditioning,
etc. Put the vehicles in P (Park)
and set the parking brakes. Turn
both vehicles OFF.4. Open the engine hood.
5. Open the small service cover with
a screwdriver.
6. Remove the engine room fuse box
cover.
To prevent damage to your vehi-
cle:
Only use a 12-volt power sup-
ply (battery or jumper system)
to jump start your vehicle.
Do not attempt to jump start
your vehicle by push-starting.
CAUTION
Pb
ODH063031
ODH063032
Page 383 of 516
6-7
What to do in an emergency
6
If your temperature gauge indicates
overheating, you experience a loss
of power, or hear loud pinging or
knocking, the engine may be over-
heating. If this happens, you should:
1. Pull off the road and stop as soon
as it is safe to do so.
2. Place the shift lever in P (Park)
and set the parking brake. If the air
conditioning is ON, turn it OFF.
3. If engine coolant is running out
under the vehicle or steam is com-
ing out from the hood, stop the
engine. Do not open the hood until
the coolant has stopped running
or the steaming has stopped. If
there is no visible loss of engine
coolant and no steam, leave the
engine running and check to be
sure the engine cooling fan is
operating. If the fan is not running,
turn the engine off.4. Check for coolant leaking from the
radiator, hoses or under the vehi-
cle. (If the air conditioning had
been in use, it is normal for cold
water to be draining from it when
you stop.)
5. If engine coolant is leaking out,
stop the engine immediately and
call the nearest authorized retailer
of Genesis Branded products for
assistance.
I IF
F
T
TH
HE
E
E
EN
NG
GI
IN
NE
E
O
OV
VE
ER
RH
HE
EA
AT
TS
S
While the engine is
running, keep hands,
clothing and tools
away from the mov-
ing parts such as the
cooling fan and drive
belt to prevent seri-
ous injury.
WARNING
Page 409 of 516
7-8
Maintenance
Owner maintenance schedule
When you stop for fuel:
• Check the engine oil level.
Check coolant level in the engine
coolant reservoir.
Check the windshield washer fluid
level.
Check for low or under-inflated
tires.
While operating your vehicle:
Note any changes in the sound of
the exhaust or any smell of
exhaust fumes in the vehicle.
Check for vibrations in the steering
wheel. Notice if there is any
increased steering effort or loose-
ness in the steering wheel, or
change in its straight-ahead posi-
tion.
Notice if your vehicle constantly
turns slightly or "pulls" to one side
when traveling on smooth, level
road.
When stopping, listen and check
for unusual sounds, pulling to one
side, increased brake pedal travel
or "hard-to-push" brake pedal.
If any slipping or changes in the
operation of your transmission
occurs, check the transmission
fluid level.
Check the automatic transmission
P (Park) function. Check the parking brake.
Check for fluid leaks under your
vehicle (water dripping from the air
conditioning system during or after
use is normal).
At least monthly:
Check coolant level in the engine
coolant reservoir.
Check the operation of all exterior
lights, including the stoplights, turn
signals and hazard warning flash-
ers.
Check the inflation pressures of all
tires including the spare for tires
that are worn, show uneven wear,
or are damaged.
Check for loose wheel lug nuts. Be careful when checking your
engine coolant level when the
engine is hot. This may result in
coolant being blown out of the
opening and cause serious
burns and other injuries.
WARNING
Page 410 of 516
7-9
7
Maintenance
At least twice a year:
(i.e., every Spring and Fall):
Check radiator, heater and air con-
ditioning hoses for leaks or dam-
age.
Check windshield washer spray
and wiper operation. Clean wiper
blades with clean cloth dampened
with washer fluid.
Check headlight alignment.
Check muffler, exhaust pipes,
shields and clamps.
Check the seat belts for wear and
function.
At least once a year:
Clean body and door drain holes.
Lubricate door hinges and hood
hinges.
Lubricate door and hood locks and
latches.
Lubricate door rubber weather
strips.
Check the air conditioning system.
Inspect and lubricate automatic
transmission linkage and controls.
Clean the battery and terminals.
Check the brake fluid level.
Page 424 of 516
7-23
7
Maintenance
Brake hoses and lines
Visually check for proper installation,
chafing, cracks, deterioration and
any leakage. Replace any deteriorat-
ed or damaged parts immediately.
Brake fluid
Check brake fluid level in the brake
fluid reservoir. The level should be
between the MIN and the MAX
marks on the side of the reservoir.
Use only hydraulic brake fluid con-
forming to DOT 3 or DOT 4 specifi-
cation.
Parking brake
Inspect the parking brake system
including the parking brake pedal
and cables.
Brake discs, pads, calipers
and rotors
Check the pads for excessive wear,
discs for run out and wear, and
calipers for fluid leakage.
Exhaust pipe and muffler
Visually inspect the exhaust pipes,
muffler and hangers for cracks, dete-
rioration, or damage. Start the
engine and listen carefully for any
exhaust gas leakage. Tighten con-
nections or replace parts as neces-
sary.
Suspension mounting bolts
Check the suspension connections
for looseness or damage. Retighten
to the specified torque.
Steering gear box, linkage &
boots/lower arm ball joint
With the vehicle stopped and the
engine off, check for excessive free-
play in the steering wheel. Check the
linkage for bends or damage. Check
the dust boots and ball joints for
deterioration, cracks, or damage.
Replace any damaged parts.
Drive shafts and boots
Check the drive shafts, boots and
clamps for cracks, deterioration, or
damage. Replace any damaged
parts and, if necessary, repack the
grease.
Air conditioning refrigerant
Check the air conditioning lines and
connections for leakage and dam-
age.