lights Hyundai Getz 2004 Owner's Guide
[x] Cancel search | Manufacturer: HYUNDAI, Model Year: 2004, Model line: Getz, Model: Hyundai Getz 2004Pages: 445, PDF Size: 12.16 MB
Page 155 of 445
2- 20 DRIVING YOUR HYUNDAI
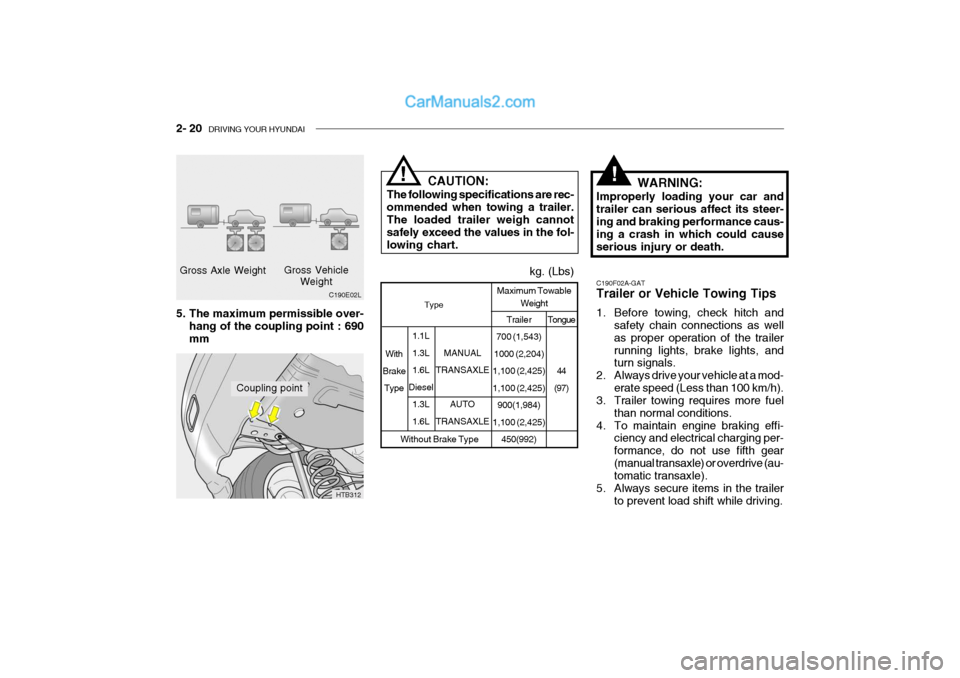
C190F02A-GAT Trailer or Vehicle Towing Tips
1. Before towing, check hitch and
safety chain connections as well as proper operation of the trailerrunning lights, brake lights, and turn signals.
2. Always drive your vehicle at a mod- erate speed (Less than 100 km/h).
3. Trailer towing requires more fuel
than normal conditions.
4. To maintain engine braking effi- ciency and electrical charging per- formance, do not use fifth gear(manual transaxle) or overdrive (au- tomatic transaxle).
5. Always secure items in the trailer to prevent load shift while driving.
Tongue
44
(97)
Without Brake Type Trailer
700 (1,543)
1000 (2,204)
1,100 (2,425) 1,100 (2,425) 900(1,984)
1,100 (2,425) 450(992)
MANUAL
TRANSAXLE
AUTO
TRANSAXLE
1.1L 1.3L1.6L
Diesel 1.3L1.6L
With
Brake Type
kg. (Lbs)
Coupling point
HTB312
C190E02L
Gross Axle Weight
Gross Vehicle
Weight
!!
Maximum Towable
Weight
5. The maximum permissible over-
hang of the coupling point : 690 mm CAUTION:
The following specifications are rec-ommended when towing a trailer.The loaded trailer weigh cannot safely exceed the values in the fol- lowing chart. WARNING:
Improperly loading your car andtrailer can serious affect its steer- ing and braking performance caus- ing a crash in which could causeserious injury or death.
Type
Page 156 of 445
DRIVING YOUR HYUNDAI 2- 21
6. Check the condition and air pres-
sure of all tires on the trailer and your car. Low tire pressure canseriously affect the handling. Also check the spare tire.
7. The vehicle/trailer combination is more affected by crosswind andbuffeting. When being passed by a largevehicle, keep a constant speed and steer straight ahead. If there is too much wind buffeting slow downto get out of the other vehicle's air turbulence.
8. When parking your car and trailer, especially on a hill, be sure to fol-low all the normal precautions. Turn your front wheel into the curb, setthe parking brake firmly, and put the transaxle in 1st or Reverse (manual) or Park (automatic). Inaddition, place wheel chocks at each of the trailer's tires.
9. If the trailer has electric brakes, start your vehicle and trailer mov-ing, and then apply the trailer brake controller by hand to be sure thebrakes are working. This lets you check your electrical connection at the same time. 10. During your trip, check occasion-
ally to be sure that the load issecure, and that the lights andany trailer brakes are still working.
11. Avoid jerky starts, sudden accel-
eration or sudden stops.
12. Avoid sharp turns and rapid lane changes.
13. Avoid holding the brake pedal down
too long or too frequently. This could cause the brakes to over- heat, resulting in reduced brakingefficiency.
14. When going down a hill, shift into a
lower gear and use the engine brak-ing effect. When ascending a long grade, downshift the transaxle to a lowergear and reduce speed to reduce chances of engine overloading and/ or overheating.
15. If you have to stop while going uphill, do not hold the vehicle inplace by pressing on the accelera-tor. This can cause the automatic transaxle to overheat. Use the park- ing brake or footbrake.
NOTE: When towing check transaxle fluid more frequently. CAUTION:
If overheating should occur whentowing, (temperature gauge readsnear red zone), taking the following action may reduce or eliminate the problem.
1. Turn off the air conditioner.
2. Reduce highway speed.
3. Select a lower gear when going uphill.
4. While in stop and go traffic, place the gear selection in park or neutral and idle the engine at a higher speed.
!
Page 159 of 445
WHAT TO DO IN AN EMERGENCY 3- 3
HTB218
Discharged battery
Booster battery
WARNING:
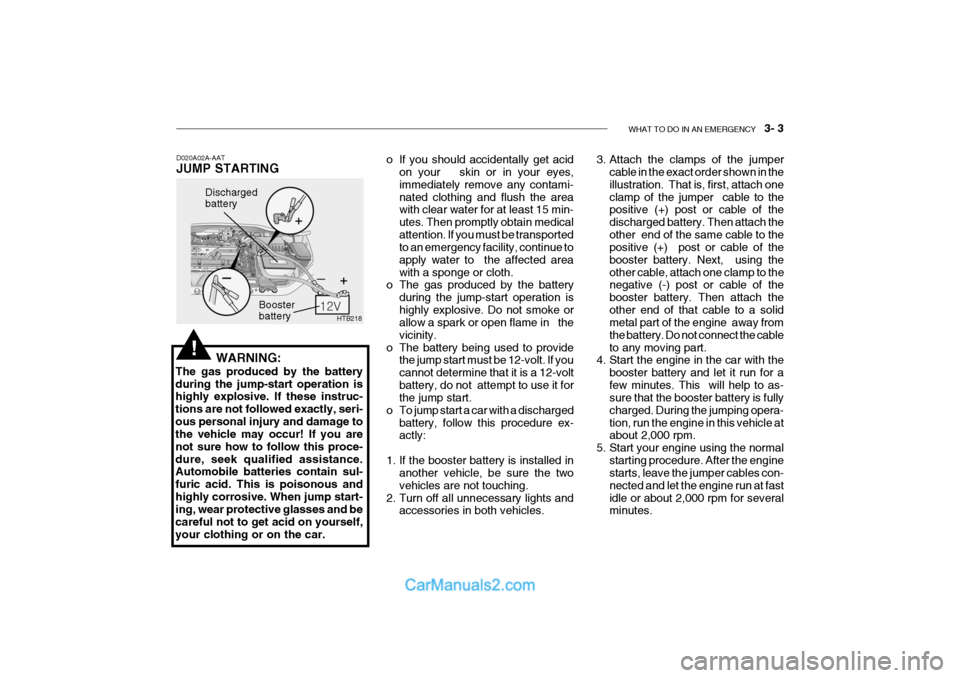
The gas produced by the battery during the jump-start operation is highly explosive. If these instruc- tions are not followed exactly, seri-ous personal injury and damage to the vehicle may occur! If you are not sure how to follow this proce-dure, seek qualified assistance. Automobile batteries contain sul- furic acid. This is poisonous andhighly corrosive. When jump start- ing, wear protective glasses and be careful not to get acid on yourself,your clothing or on the car. 3. Attach the clamps of the jumper
cable in the exact order shown in theillustration. That is, first, attach oneclamp of the jumper cable to the positive (+) post or cable of the discharged battery. Then attach theother end of the same cable to the positive (+) post or cable of the booster battery. Next, using theother cable, attach one clamp to the negative (-) post or cable of the booster battery. Then attach theother end of that cable to a solid metal part of the engine away from the battery. Do not connect the cableto any moving part.
4. Start the engine in the car with the
booster battery and let it run for afew minutes. This will help to as- sure that the booster battery is fully charged. During the jumping opera-tion, run the engine in this vehicle at about 2,000 rpm.
5. Start your engine using the normal starting procedure. After the enginestarts, leave the jumper cables con- nected and let the engine run at fastidle or about 2,000 rpm for several minutes.
D020A02A-AAT JUMP STARTING!
o If you should accidentally get acid
on your skin or in your eyes, immediately remove any contami-nated clothing and flush the area with clear water for at least 15 min- utes. Then promptly obtain medicalattention. If you must be transported to an emergency facility, continue to apply water to the affected areawith a sponge or cloth.
o The gas produced by the battery
during the jump-start operation ishighly explosive. Do not smoke or allow a spark or open flame in the vicinity.
o The battery being used to provide the jump start must be 12-volt. If youcannot determine that it is a 12-voltbattery, do not attempt to use it for the jump start.
o To jump start a car with a discharged battery, follow this procedure ex-actly:
1. If the booster battery is installed in another vehicle, be sure the two vehicles are not touching.
2. Turn off all unnecessary lights and accessories in both vehicles.
Page 160 of 445
3- 4 WHAT TO DO IN AN EMERGENCY
D030A01TB-AAT IF THE ENGINE OVERHEATS If your temperature gauge indicates overheating, you experience a loss of power, or hear loud pinging or knock- ing, the engine is probably too hot. Ifthis happens to you, you should:
1. Pull off the road and stop as soon as
it is safe to do so.
2. Place the gear selector lever in "P"
(automatic), or neutral (manual transaxle) and set the parking brake. If the air conditioning is on, turn it off.
6. Carefully remove the jumper cables
in the reverse order of attachment.
If you do not know why your battery became discharged (because the lights were left on, etc.), have the chargingsystem checked by your Hyundai dealer. 3. If engine coolant is running out un-
der the car or steam is coming out from the hood, stop the engine. Donot open the hood until the engine coolant has stopped running or the steaming has stopped. If there is novisible loss of engine coolant and no steam, leave the engine running and check to be sure the enginecooling fan is operating. If the fan is not running, turn the engine off.
4. Check to see if the water pump drive belt is missing. If it is not missing,check to see that it is tight. If the drive belt seems to be satisfactory,check for coolant leaking from the radiator, hoses or under the car. (If the air conditioning had been in use,it is normal for cold water to be draining from it when you stop). WARNING (Diesel only):
Never work on injection system with engine running or within 30 sec- onds after shutting off engine. High pressure pump, rail, injectors andhigh pressure pipes are subject to high pressure even after the engine stopped. The fuel jet produced byfuel leaks may cause serious in- jury, if it touch the body. People using pacemakers should not movethan 30cm closer to the ECU or wiring harness within the engine room while engine is running, sincethe high currents in the Common Rail system produce considerable magnetic fields.
WARNING:
While the engine is running, keep hair, hands, and clothing away from moving parts such as the fan anddrive belts to prevent injury.
!
!
5. If the water pump drive belt is bro- ken or coolant is leaking out, stop the engine immediately and call the nearest Hyundai dealer for assis-tance.
Page 193 of 445
6- 6 DO-IT-YOURSELF MAINTENANCE
G020A01A-AAT GENERAL CHECKS Engine Compartment The following should be checked regu-larly:
o Engine oil level and condition
o Transaxle fluid level and condition
o Brake fluid level
o Clutch fluid level
o Engine coolant level
o Windshield washer fluid level
o Accessory drive belt condition
o Engine coolant hose condition
o Fluid leaks (on or below compo-
nents)
o Power steering fluid level
o Battery condition G020C01A-AAT Vehicle Interior The following should be checked each time when the vehicle is driven:
o Lights operation
o Windshield wiper operation
o Horn operation
o Defroster, heater system operation
(and air conditioning, if installed)
o Steering operation and condition
o Mirror condition and operation
o Turn signal operation
o Accelerator pedal operation
o Brake operation, including parking brake
o Manual transaxle operation, includ- ing clutch operation
o Automatic transaxle operation, in- cluding "Park" mechanism opera-tion
o Seat control condition and opera- tion
o Seat belt condition and operation
o Sunvisor operation If you notice anything that does not operate correctly or appears to befunctioning incorrectly, inspect it care- fully and seek assistance from your Hyundai dealer if service is needed.
G020B01A-AAT Vehicle Exterior The following should be checked monthly:
o Overall appearance and condition
o Wheel condition and wheel nut
torgue
o Air filter condition
o Exhaust system condition
o Light condition and operation
o Windshield glass condition
o Wiper blade condition
o Paint condition and body corrosion
o Fluid leaks
o Door and hood lock condition
o Tire pressure and condition (including spare tire)
Page 214 of 445

DO-IT-YOURSELF MAINTENANCE 6- 27
CAUTION:
When replacing a fusible link, never use anything but a new fusible link with the same or lower amperage rating. Never use a piece of wire ora higher-rated fusible link. This could result in serious damage and create a fire hazard.!
4. Replace the blown fuse by pressing a new fuse of the same rating into place. The fuse should be a snug fit. If it is not, have the fuse clip repairedor replaced by a Hyundai dealer. If you do not have a spare fuse, you may be able to borrow a fuse of thesame or lower rating from an acces-
G200B02A-AAT Replacing Accessory Fuse The fuse box for the lights and other electrical accessories will be found low on the dashboard on the driver's side.Inside the box you will find a list show- ing the circuits protected by each fuse. If any of your car's lights or otherelectrical accessories stop working, a blown fuse could be the reason. If the fuse has burned out, you will see thatthe metal strip inside the fuse has burned through. If you suspect a blown fuse, follow this procedure:
HTB180
1. Turn off the ignition and all other
switches.
2. Open the fuse box and examine each fuse. Remove each fuse by pulling it toward you (a small "fuse puller" tool is contained in the fusebox to simplify this operation).
3. Be sure to check all other fuses
even if you find one that appears tohave burned out.
HTB223
Page 218 of 445
DO-IT-YOURSELF MAINTENANCE 6- 31
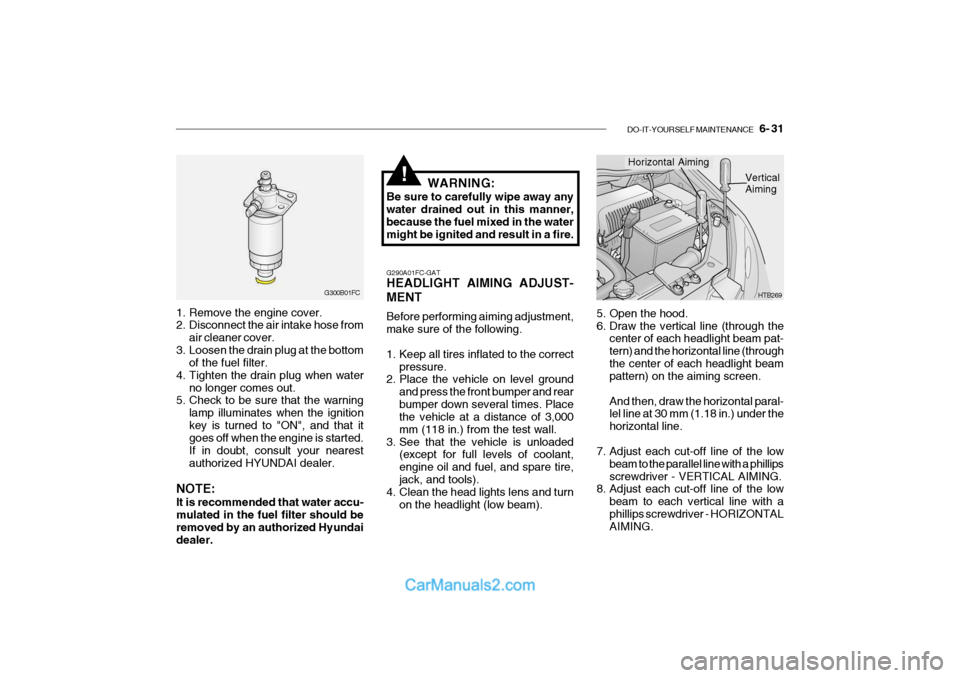
1. Remove the engine cover.
2. Disconnect the air intake hose from
air cleaner cover.
3. Loosen the drain plug at the bottom of the fuel filter.
4. Tighten the drain plug when water no longer comes out.
5. Check to be sure that the warning
lamp illuminates when the ignition key is turned to "ON", and that it goes off when the engine is started. If in doubt, consult your nearestauthorized HYUNDAI dealer.
NOTE: It is recommended that water accu- mulated in the fuel filter should beremoved by an authorized Hyundai dealer. G300B01FC
WARNING:
Be sure to carefully wipe away anywater drained out in this manner, because the fuel mixed in the watermight be ignited and result in a fire.
!
5. Open the hood.
6. Draw the vertical line (through the center of each headlight beam pat-tern) and the horizontal line (throughthe center of each headlight beam pattern) on the aiming screen. And then, draw the horizontal paral- lel line at 30 mm (1.18 in.) under the horizontal line.
7. Adjust each cut-off line of the low beam to the parallel line with a phillipsscrewdriver - VERTICAL AIMING.
8. Adjust each cut-off line of the low
beam to each vertical line with aphillips screwdriver - HORIZONTAL AIMING. HTB269
Horizontal Aiming
Vertical Aiming
G290A01FC-GAT HEADLIGHT AIMING ADJUST- MENT Before performing aiming adjustment, make sure of the following.
1. Keep all tires inflated to the correct pressure.
2. Place the vehicle on level ground
and press the front bumper and rear bumper down several times. Place the vehicle at a distance of 3,000 mm (118 in.) from the test wall.
3. See that the vehicle is unloaded (except for full levels of coolant,engine oil and fuel, and spare tire,jack, and tools).
4. Clean the head lights lens and turn
on the headlight (low beam).
Page 219 of 445
6- 32 DO-IT-YOURSELF MAINTENANCE
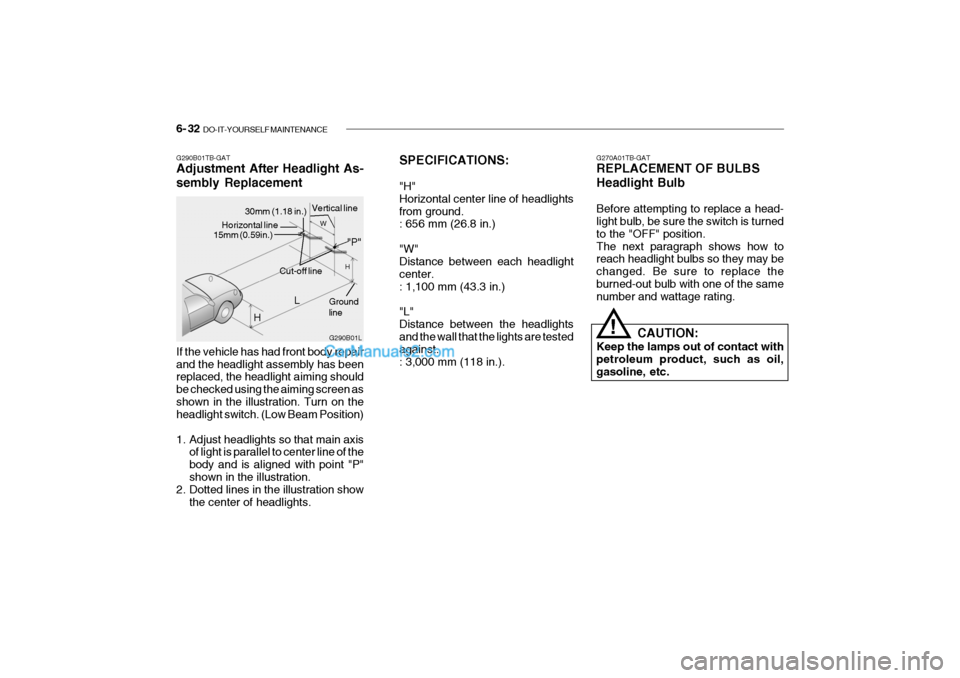
If the vehicle has had front body repair and the headlight assembly has been replaced, the headlight aiming should be checked using the aiming screen asshown in the illustration. Turn on the headlight switch. (Low Beam Position)
1. Adjust headlights so that main axis
of light is parallel to center line of the body and is aligned with point "P"shown in the illustration.
2. Dotted lines in the illustration show
the center of headlights.
G290B01TB-GAT Adjustment After Headlight As- sembly Replacement
SPECIFICATIONS: "H" Horizontal center line of headlightsfrom ground. : 656 mm (26.8 in.) "W" Distance between each headlight center.: 1,100 mm (43.3 in.) "L" Distance between the headlights and the wall that the lights are tested against.: 3,000 mm (118 in.).
G290B01L
LW
H
H Cut-off line
Ground line
"P"
Horizontal line15mm (0.59in.)
30mm (1.18 in.) Vertical line G270A01TB-GAT REPLACEMENT OF BULBS Headlight Bulb Before attempting to replace a head- light bulb, be sure the switch is turned to the "OFF" position.The next paragraph shows how to reach headlight bulbs so they may be changed. Be sure to replace theburned-out bulb with one of the same number and wattage rating.
CAUTION:
Keep the lamps out of contact with petroleum product, such as oil,gasoline, etc.
!
Page 247 of 445
10- 6 INDEX
V Vehicle Identification Number ..................................... 8-2
W Warning Lights .......................................................... 1-44
Windshield Wiper and Washer................................. 1-54
Windshield Wiper Blades ................... ....................... 6-17
Winter Driving ........................................................... 2-15
Page 258 of 445
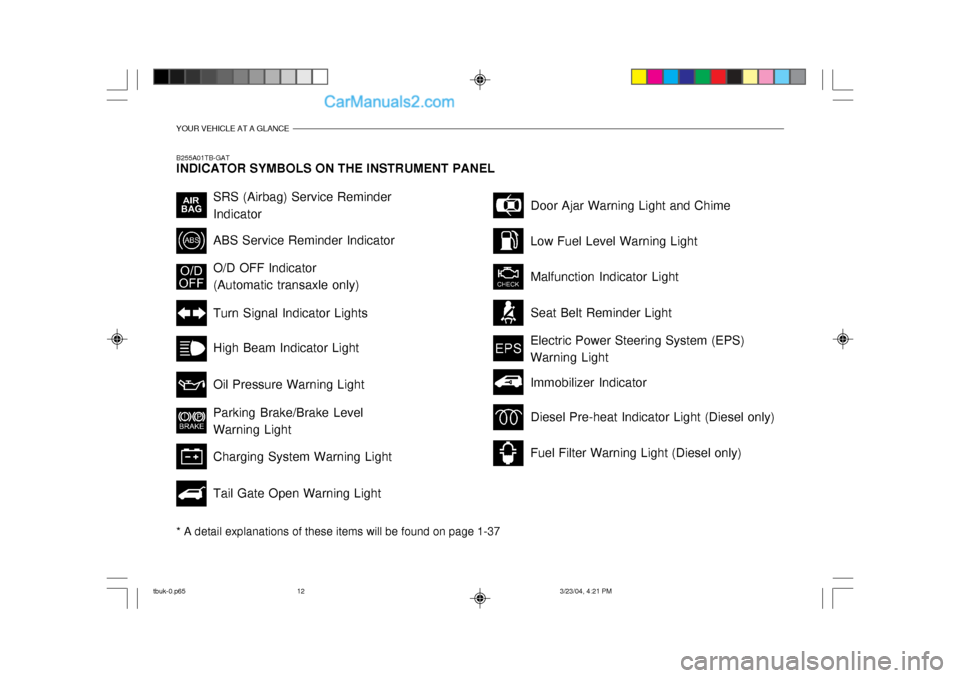
YOUR VEHICLE AT A GLANCE
B255A01TB-GAT INDICATOR SYMBOLS ON THE INSTRUMENT PANEL * A detail explanations of these items will be found on page 1-37
SRS (Airbag) Service Reminder Indicator ABS Service Reminder Indicator Turn Signal Indicator Lights High Beam Indicator Light Oil Pressure Warning Light Parking Brake/Brake Level Warning Light Charging System Warning Light Tail Gate Open Warning LightDoor Ajar Warning Light and Chime
Low Fuel Level Warning Light Malfunction Indicator Light Seat Belt Reminder Light
O/D OFF Indicator (Automatic transaxle only)
Electric Power Steering System (EPS)Warning Light
Diesel Pre-heat Indicator Light (Diesel only)
Fuel Filter Warning Light (Diesel only)
Immobilizer Indicator
tbuk-0.p65
3/23/04, 4:21 PM
12