air filter Hyundai Getz 2004 Owner's Guide
[x] Cancel search | Manufacturer: HYUNDAI, Model Year: 2004, Model line: Getz, Model: Hyundai Getz 2004Pages: 445, PDF Size: 12.16 MB
Page 392 of 445
6. Do-It-Yourself MaintenanceEngine compart ment ............................................... ......................... 6-2
Daily operating checks ............................................. ........................ 6-6
Engine oil ......................................... ................................................. 6-6
Engine and filter Replacement ................................................... ...... 6-9
Engine coolant Checking and R eplacing ....................................... 6-10
Spark plug Replacem ent ................................................ ................6-13
Changing the air cleaner filter ................................................... ......6-14
Manual Transaxle Lubri cant ............................................... ............6-15
Automatic Transaxle flui d .................................................. .............6-16
Brake System Checki ng ................................................. ...............6-18
Air conditioning System ............................................. .....................6-19
Drive belts .............................................. ........................................6-23
Individual Circu it Fuses ........................................... .......................6-24
Power steering fluid level ........................................ .......................6-26
Replacing Light Bulbs .............................................. ......................6-28
Fuse panel description ................................................... ................6-34
6
tbuk-6.p65 3/23/04, 4:26 PM
1
Page 393 of 445
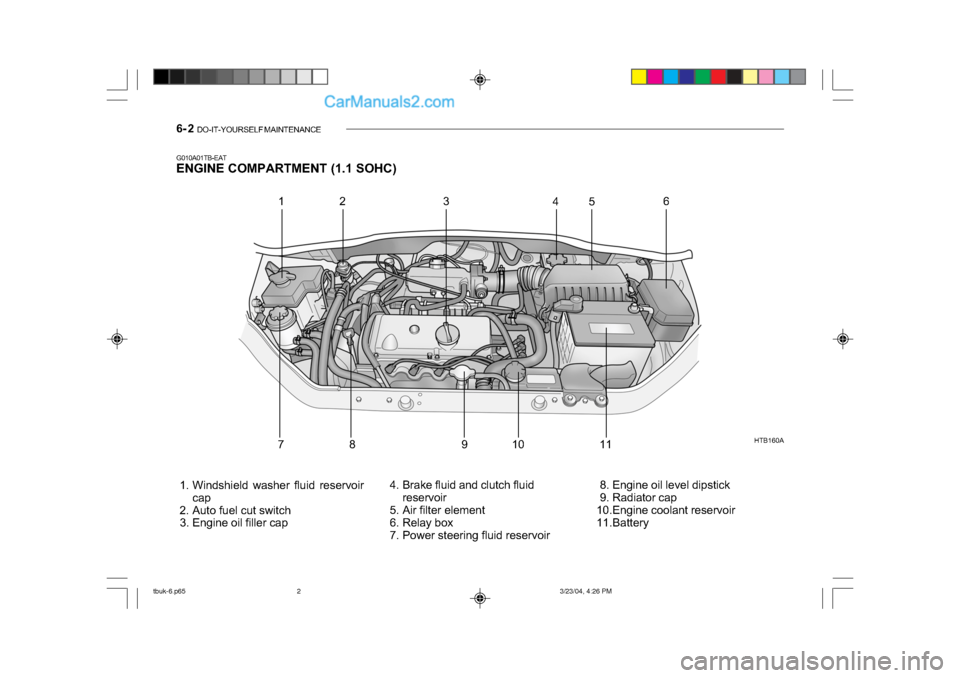
6- 2 DO-IT-YOURSELF MAINTENANCE
HTB160A
1. Windshield washer fluid reservoir cap
2. Auto fuel cut switch
3. Engine oil filler cap 4. Brake fluid and clutch fluid
reservoir
5. Air filter element
6. Relay box
7. Power steering fluid reservoir 8. Engine oil level dipstick
9. Radiator cap
10.Engine coolant reservoir
11.Battery
G010A01TB-EAT
ENGINE COMPARTMENT (1.1 SOHC)
12 3
456
78 9 10 1 1
tbuk-6.p65 3/23/04, 4:26 PM
2
Page 394 of 445
DO-IT-YOURSELF MAINTENANCE 6- 3
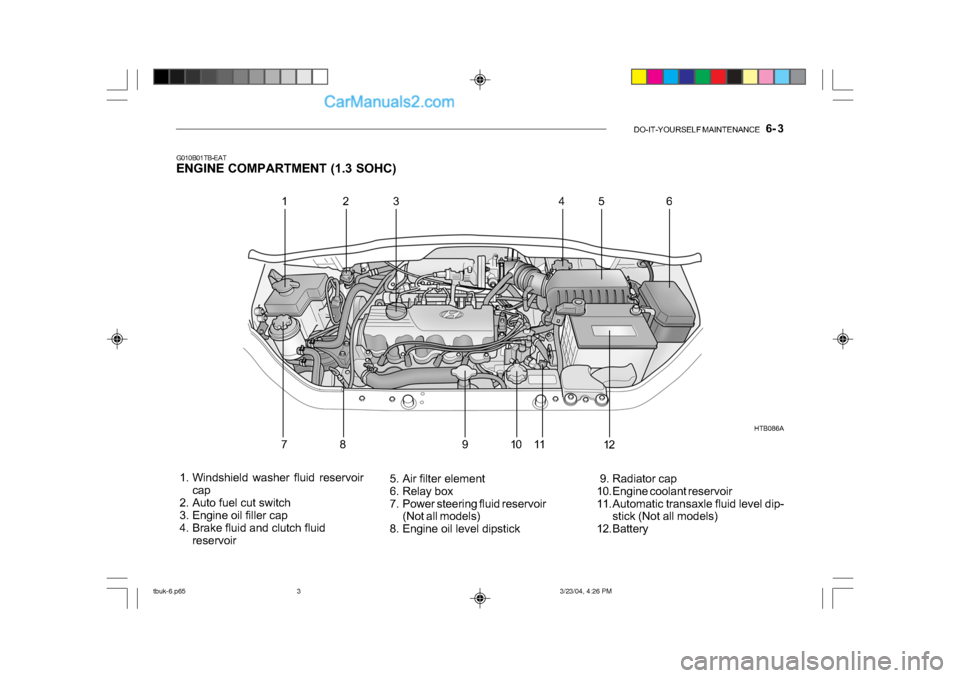
G010B01TB-EAT
ENGINE COMPARTMENT (1.3 SOHC)
1. Windshield washer fluid reservoir
cap
2. Auto fuel cut switch
3. Engine oil filler cap
4. Brake fluid and clutch fluid reservoir 5. Air filter element
6. Relay box
7. Power steering fluid reservoir
(Not all models)
8. Engine oil level dipstick 9. Radiator cap
10. Engine coolant reservoir
11. Automatic transaxle fluid level dip-
stick (Not all models)
12. Battery HTB086A
123
456
78 91 011
12
tbuk-6.p65 3/23/04, 4:26 PM
3
Page 395 of 445
6- 4 DO-IT-YOURSELF MAINTENANCE
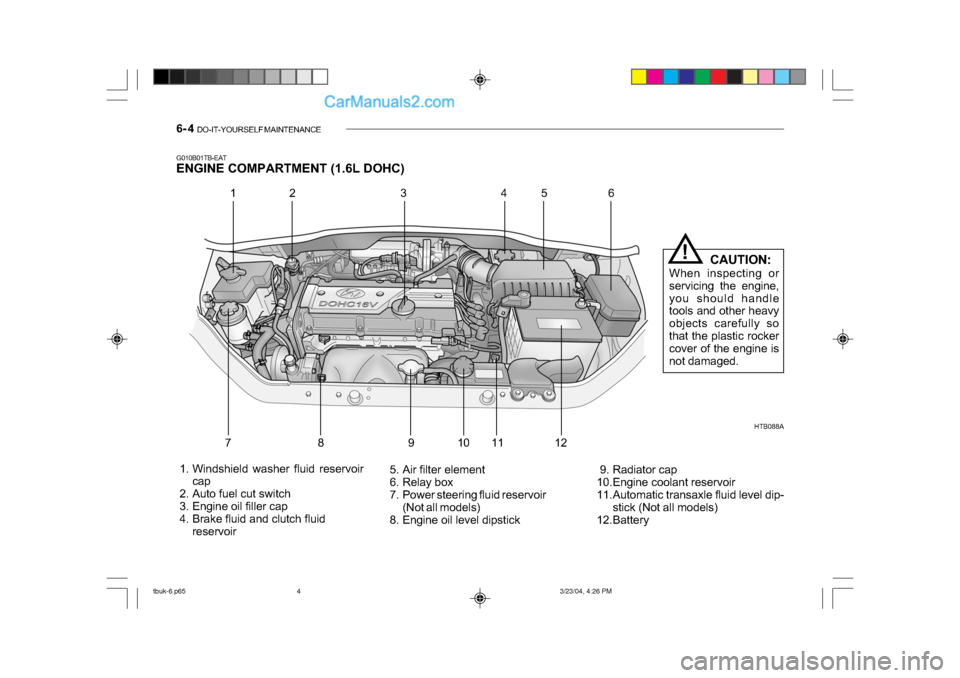
G010B01TB-EAT
ENGINE COMPARTMENT (1.6L DOHC)
HTB088A
1. Windshield washer fluid reservoir cap
2. Auto fuel cut switch
3. Engine oil filler cap
4. Brake fluid and clutch fluid reservoir 5. Air filter element
6. Relay box
7. Power steering fluid reservoir
(Not all models)
8. Engine oil level dipstick 9. Radiator cap
10.Engine coolant reservoir
11.Automatic transaxle fluid level dip-
stick (Not all models)
12.Battery
1 2 34
56
789 10 11 12 CAUTION:
When inspecting or
servicing the engine,
you should handle
tools and other heavy
objects carefully so
that the plastic rocker
cover of the engine is
not damaged.
!
tbuk-6.p65 3/23/04, 4:26 PM
4
Page 396 of 445
DO-IT-YOURSELF MAINTENANCE 6- 5
G010C01TB-EAT
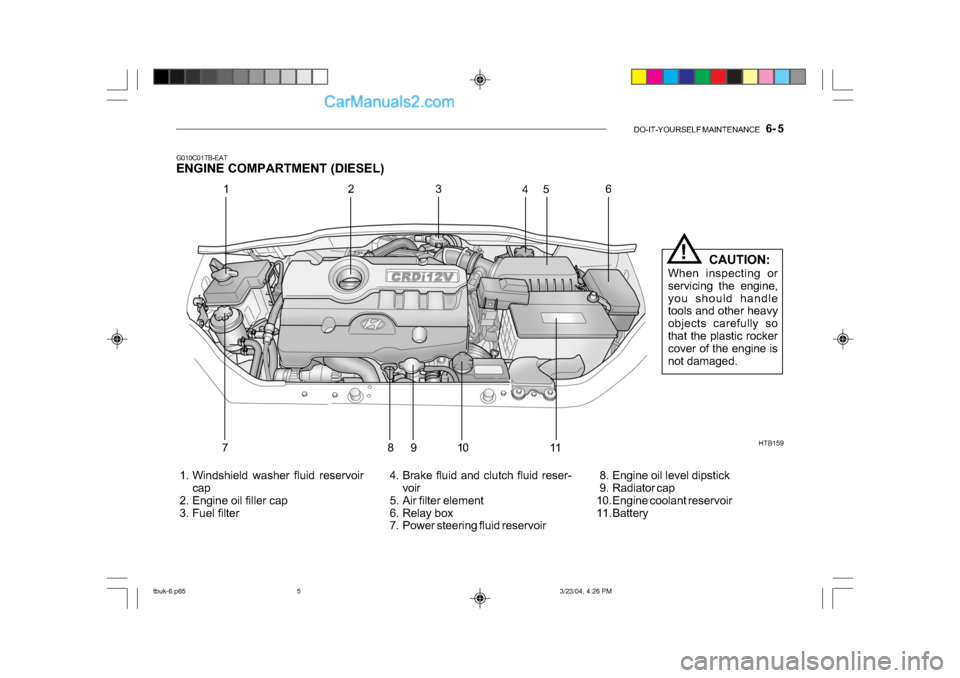
ENGINE COMPARTMENT (DIESEL)
HTB159
1. Windshield washer fluid reservoir cap
2. Engine oil filler cap
3. Fuel filter 4. Brake fluid and clutch fluid reser-
voir
5. Air filter element
6. Relay box
7. Power steering fluid reservoir 8. Engine oil level dipstick
9. Radiator cap
10. Engine coolant reservoir
11. Battery
12
3
45 6
78 910
11 CAUTION:
When inspecting or
servicing the engine,
you should handle
tools and other heavy
objects carefully so
that the plastic rocker
cover of the engine is
not damaged.
!
tbuk-6.p65 3/23/04, 4:26 PM
5
Page 405 of 445
6- 14 DO-IT-YOURSELF MAINTENANCE
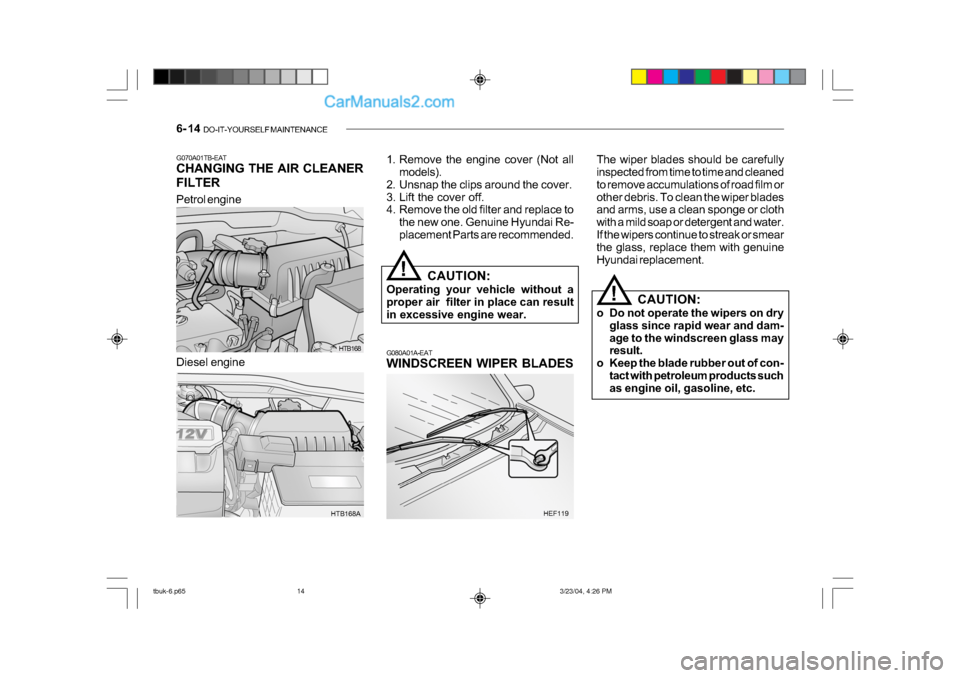
Petrol engine
HTB168
HTB168A
G070A01TB-EAT
CHANGING THE AIR CLEANER
FILTER
1. Remove the engine cover (Not all
models).
2. Unsnap the clips around the cover.
3. Lift the cover off.
4. Remove the old filter and replace to the new one. Genuine Hyundai Re-
placement Parts are recommended.
CAUTION:
Operating your vehicle without a
proper air filter in place can result
in excessive engine wear.
!
G080A01A-EAT
WINDSCREEN WIPER BLADES The wiper blades should be carefully
inspected from time to time and cleaned
to remove accumulations of road film or
other debris. To clean the wiper blades
and arms, use a clean sponge or cloth
with a mild soap or detergent and water.
If the wipers continue to streak or smear
the glass, replace them with genuine
Hyundai replacement.
HEF119
Diesel engine
CAUTION:
o Do not operate the wipers on dry glass since rapid wear and dam-
age to the windscreen glass may
result.
o Keep the blade rubber out of con- tact with petroleum products such
as engine oil, gasoline, etc.
!
tbuk-6.p65 3/23/04, 4:26 PM
14
Page 411 of 445
6- 20 DO-IT-YOURSELF MAINTENANCE
B145A01TB-EAT
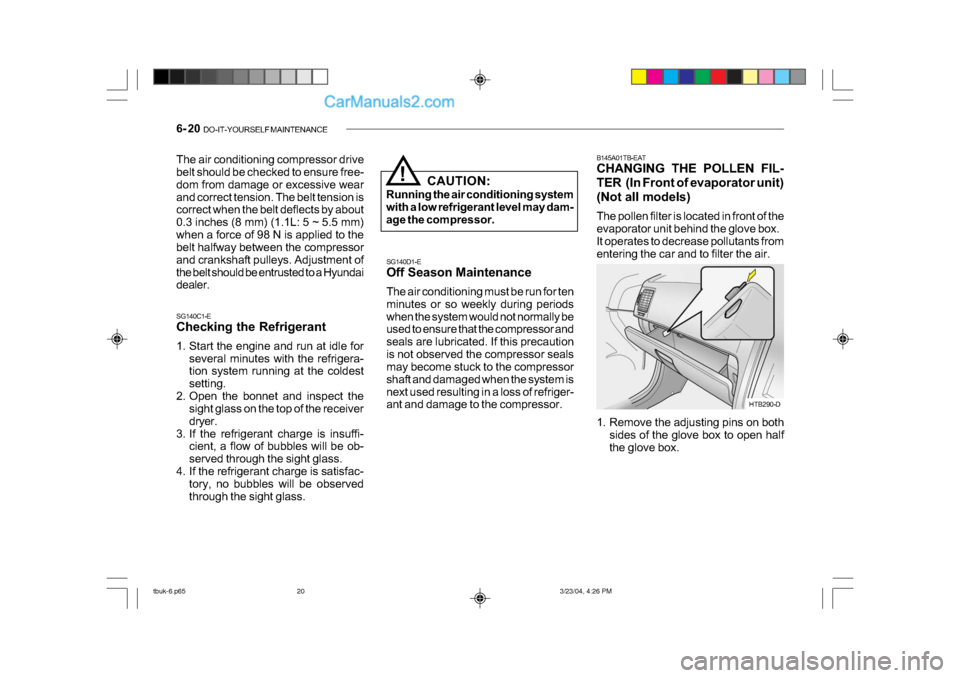
CHANGING THE POLLEN FIL-
TER (In Front of evaporator unit)
(Not all models)
The pollen filter is located in front of the
evaporator unit behind the glove box.
It operates to decrease pollutants from
entering the car and to filter the air.
1. Remove the adjusting pins on both
sides of the glove box to open half
the glove box.
HTB290-D
SG140D1-E
Off Season Maintenance
The air conditioning must be run for ten
minutes or so weekly during periods
when the system would not normally be
used to ensure that the compressor and
seals are lubricated. If this precaution
is not observed the compressor seals
may become stuck to the compressor
shaft and damaged when the system is
next used resulting in a loss of refriger-
ant and damage to the compressor.
SG140C1-E
Checking the Refrigerant
1. Start the engine and run at idle for
several minutes with the refrigera-
tion system running at the coldest
setting.
2. Open the bonnet and inspect the sight glass on the top of the receiver
dryer.
3. If the refrigerant charge is insuffi- cient, a flow of bubbles will be ob-
served through the sight glass.
4. If the refrigerant charge is satisfac- tory, no bubbles will be observed
through the sight glass. CAUTION:
Running the air conditioning system
with a low refrigerant level may dam-
age the compressor.
!
The air conditioning compressor drive
belt should be checked to ensure free-
dom from damage or excessive wear
and correct tension. The belt tension is
correct when the belt deflects by about
0.3 inches (8 mm) (1.1L: 5 ~ 5.5 mm)
when a force of 98 N is applied to the
belt halfway between the compressor
and crankshaft pulleys. Adjustment of
the belt should be entrusted to a Hyundai
dealer.
tbuk-6.p65
3/23/04, 4:26 PM
20
Page 418 of 445
DO-IT-YOURSELF MAINTENANCE 6- 27
!
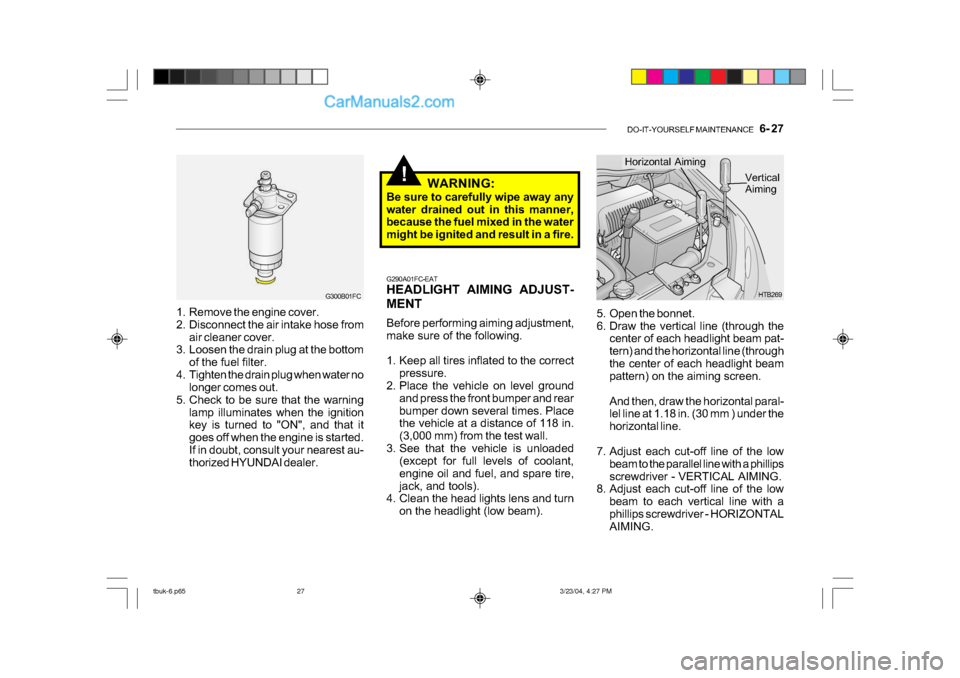
5. Open the bonnet.
6. Draw the vertical line (through the
center of each headlight beam pat-
tern) and the horizontal line (through
the center of each headlight beam
pattern) on the aiming screen.
And then, draw the horizontal paral-
lel line at 1.18 in. (30 mm ) under the
horizontal line.
7. Adjust each cut-off line of the low beam to the parallel line with a phillips
screwdriver - VERTICAL AIMING.
8. Adjust each cut-off line of the low
beam to each vertical line with a
phillips screwdriver - HORIZONTAL
AIMING. HTB269
Horizontal Aiming
Vertical
Aiming
G290A01FC-EAT
HEADLIGHT AIMING ADJUST-
MENT
Before performing aiming adjustment,
make sure of the following.
1. Keep all tires inflated to the correct pressure.
2. Place the vehicle on level ground
and press the front bumper and rear
bumper down several times. Place
the vehicle at a distance of 118 in.
(3,000 mm) from the test wall.
3. See that the vehicle is unloaded (except for full levels of coolant,
engine oil and fuel, and spare tire,
jack, and tools).
4. Clean the head lights lens and turn
on the headlight (low beam). WARNING:
Be sure to carefully wipe away any
water drained out in this manner,
because the fuel mixed in the water
might be ignited and result in a fire.
1. Remove the engine cover.
2. Disconnect the air intake hose from air cleaner cover.
3. Loosen the drain plug at the bottom
of the fuel filter.
4. Tighten the drain plug when water no longer comes out.
5. Check to be sure that the warning lamp illuminates when the ignition
key is turned to "ON", and that it
goes off when the engine is started.
If in doubt, consult your nearest au-
thorized HYUNDAI dealer.
G300B01FC
tbuk-6.p65 3/23/04, 4:27 PM
27
Page 442 of 445
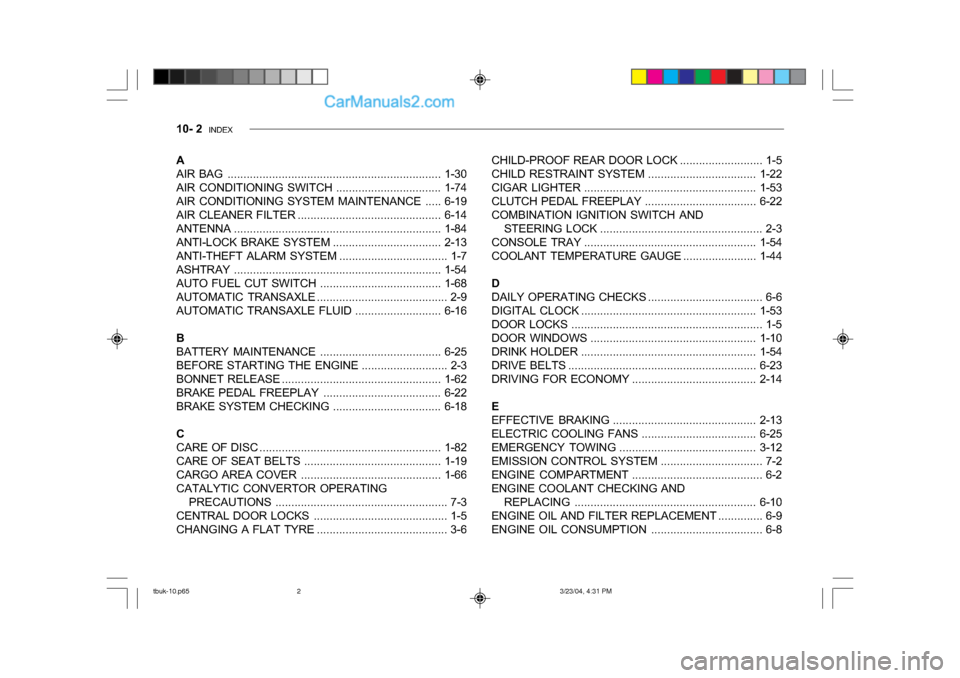
10- 2 INDEX
A
AIR BAG ................................................... ................1-30
AIR CONDITIONING SWI TCH ................................. 1-74
AIR CONDITIONING SYSTEM MAINTENANCE .....6-19
AIR CLEANER FILTER ............................................. 6-14
ANTENNA ................................................... ..............1-84
ANTI-LOCK BRAKE SYSTEM .................................. 2-13
ANTI-THEFT ALARM SYSTEM .................................. 1-7
ASHTRAY ................................................... ..............1-54
AUTO FUEL CUT SWITCH...................................... 1-68
AUTOMATIC TRANSAXLE ......................................... 2-9
AUTOMATIC TRANSAXLE FLUID .......................... .6-16
B
BATTERY MAINTENANCE ......................................6-25
BEFORE STARTING THE ENGINE........................... 2-3
BONNET RELEASE .................................................. 1-62
BRAKE PEDAL FREEPLAY ..................................... 6-22
BRAKE SYSTEM CHECKI NG ..................................6-18
C
CARE OF DI SC ................................................. ........1-82
CARE OF SEAT BELTS ........................................... 1-19
CARGO AREA COVER ............................................ 1-66
CATALYTIC CONVERTOR OPERATING PRECAUTIONS ................................................... ... 7-3
CENTRAL DOOR LOCKS .......................................... 1-5
CHANGING A FLAT TYRE ......................................... 3-6 CHILD-PROOF REAR DOOR LOCK
.......................... 1-5
CHILD RESTRAINT SYST EM ..................................1-22
CIGAR LIGHTER ................................................... ...1-53
CLUTCH PEDAL FREEPLAY ...................................6-22
COMBINATION IGNITION SWITCH AND STEERING LOCK ................................................... 2-3
CONSOLE TRAY ................................................... ...1-54
COOLANT TEMPERATURE GAUGE .......................1-44
D
DAILY OPERATING CHECKS .................................... 6-6
DIGITAL CLOCK ........ ............................................... 1-53
DOOR LOCKS ................................................... ......... 1-5
DOOR WINDOWS ................................................... .1-10
DRINK HOLDER ... ................................................... .1-54
DRIVE BELTS ................................................... ........6-23
DRIVING FOR ECONOMY .......................................2-14
E
EFFECTIVE BRAKING ............................................. 2-13
ELECTRIC COOLING FANS ....................................6-25
EMERGENCY TOWI NG ........................................... 3-12
EMISSION CONTROL SYSTEM ................................ 7-2
ENGINE COM PARTMENT......................................... 6-2
ENGINE COOLANT CHECKING AND REPLACI NG ................................................. ........6-10
ENGINE OIL AND FILTER REPLACEMENT .............. 6-9
ENGINE OIL CO NSUMPTION................................... 6-8
tbuk-10.p65 3/23/04, 4:31 PM
2