stop start Hyundai Getz 2005 Owner's Guide
[x] Cancel search | Manufacturer: HYUNDAI, Model Year: 2005, Model line: Getz, Model: Hyundai Getz 2005Pages: 437, PDF Size: 11.19 MB
Page 374 of 437

5- 10 VEHICLE MAINTENANCE REQUIREMENTS
F070L01A-AAT
o Suspension Mounting Bolts
Check the suspension connections
for looseness or damage. Retighten to the specified torque. F070M01A-AAT
o Steering Gear Box, Linkage &
Boots/Lower arm Ball Joint
With the vehicle stopped and engine
off, check for excessive free-play inthe steering wheel. Check the linkage for bends or damage. Check the dust boots and ball joints for deterioration,cracks, or damage. Replace any dam- aged parts.
F070N01A-AAT
o Power Steering Pump, Belt and
Hoses
Check the power steering pump and
hoses for leakage and damage. Re- place any damaged or leaking parts immediately. Inspect the power steer- ing belt for evidence of cuts, cracks,excessive wear, oiliness and proper tension. Replace or adjust it if neces- sary.
F070J01A-AAT
o Brake Pads, Calipers and
Rotors
Check the pads for excessive wear,
discs for run out and wear, and cali-pers for fluid leakage.
F070K01A-AAT
o Exhaust Pipe and Muffler
Visually inspect the exhaust pipes,
muffler and hangers for cracks, dete-rioration, or damage. Start the engineand listen carefully for any exhaust gas leakage. Tighten connections or replace parts as necessary.
F070F01A-AAT
o Brake Hoses and Lines Visually check for proper installation, chafing, cracks, deterioration and any leakage. Replace any deteriorated or damaged parts immediately. F070G02A-AAT
o Brake Fluid Check brake fluid level in the brake fluid reservoir. The level should be between "MIN" and "MAX" marks onthe side of the reservoir. Use only hydraulic brake fluid conforming to DOT 3 or DOT 4. F070H01A-AAT
o Rear Brake Drums/Linings
Parking Brake
Check the rear brake drums and lin- ings for scoring, burning, leaking fluid, broken parts, and excessive wear. Inspect the parking brake system in-cluding the parking brake lever and cables. For detailed service proce- dures, refer to the Shop Manual.
TBENG_5.P65 3/9/2005, 5:03 PM
10
Page 385 of 437

6- 10 DO-IT-YOURSELF MAINTENANCE
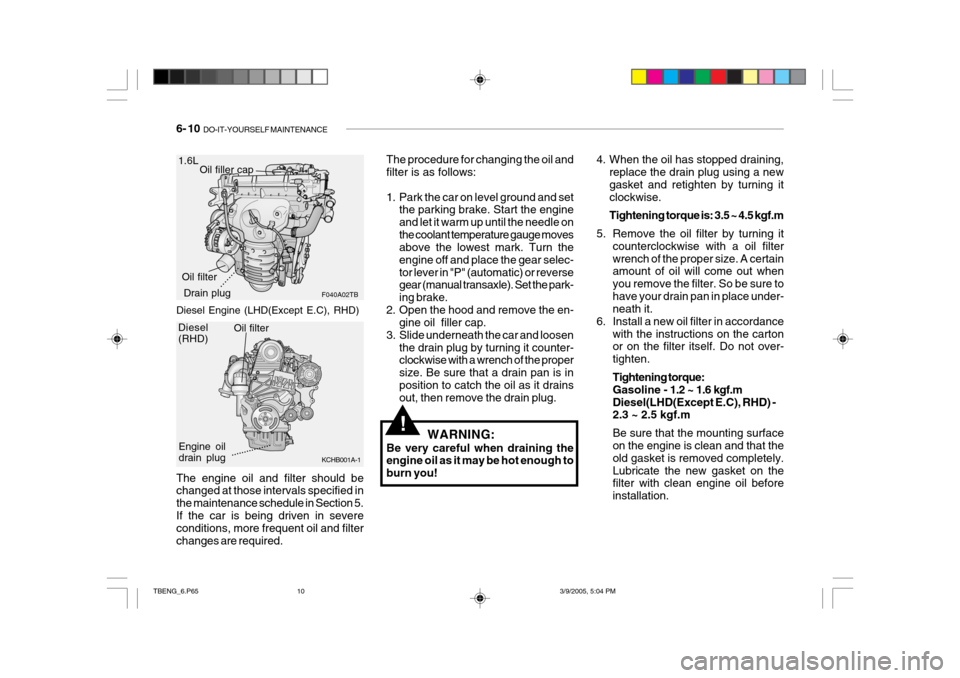
The engine oil and filter should be changed at those intervals specified in the maintenance schedule in Section 5.If the car is being driven in severe conditions, more frequent oil and filter changes are required.1.6L
F040A02TB
Oil filler cap
Drain plug
Oil filter The procedure for changing the oil and filter is as follows:
1. Park the car on level ground and set
the parking brake. Start the engine and let it warm up until the needle onthe coolant temperature gauge moves above the lowest mark. Turn the engine off and place the gear selec-tor lever in "P" (automatic) or reverse gear (manual transaxle). Set the park- ing brake.
2. Open the hood and remove the en- gine oil filler cap.
3. Slide underneath the car and loosen
the drain plug by turning it counter- clockwise with a wrench of the proper size. Be sure that a drain pan is inposition to catch the oil as it drains out, then remove the drain plug.
WARNING:
Be very careful when draining theengine oil as it may be hot enough to burn you!
!
4. When the oil has stopped draining, replace the drain plug using a new gasket and retighten by turning itclockwise. Tightening torque is: 3.5 ~ 4.5 kgf.m
5. Remove the oil filter by turning it counterclockwise with a oil filter wrench of the proper size. A certain amount of oil will come out when you remove the filter. So be sure tohave your drain pan in place under- neath it.
6. Install a new oil filter in accordance
with the instructions on the cartonor on the filter itself. Do not over- tighten. Tightening torque: Gasoline - 1.2 ~ 1.6 kgf.m
Diesel(LHD(Except E.C), RHD) - 2.3 ~ 2.5 kgf.m Be sure that the mounting surface on the engine is clean and that the old gasket is removed completely.Lubricate the new gasket on the filter with clean engine oil before installation.
.........
Diesel (RHD)
KCHB001A-1
Engine oil drain plugOil filter................
Diesel Engine (LHD(Except E.C), RHD)
TBENG_6.P65
3/9/2005, 5:04 PM
10
Page 387 of 437

6- 12 DO-IT-YOURSELF MAINTENANCE
5. Loosen the oil filter drain plug by
turning it counterclockwise with a wrench of the proper size and drainout some oil in the oil filter. Be sure that a drain pan is in position to catch the oil.
6. Loosen the oil filter upper cap with a proper tool from the lower case untilan O-ring is seen. Then, drain the oilcompletely.
7. Pull out the oil filter upper cap with
element from the lower case.Using a clean cloth, remove any dirt or oil accumulated around the lower case.
8. Install a new copper washer of the oil filter drain plug by the side oflower case and retighten by turningit clockwise. Tightening torque : 0.8 ~ 1.0 kgf.m
9. After mounting a new oil filter ele- ment and new O-ring to upper cap, install the upper cap to lower case and retighten by turning it clock- wise. Do not over-tighten. Tightening torque : 2.3 ~ 2.5 kgf.m
10. Remove the engine oil level dip- stick.
G040B01FC
Oil filter drain plug O-ring
Oil filter element
Washer
Upper cap
Lower case
WARNING:
Be very careful when draining the engine oil as it may be hot enoughto burn you!!
4. When the oil has stopped draining, replace the drain plug using a new gasket and retighten by turning it clockwise. Oil pan drain plug tightening torque: 3.5 ~ 4.5 kgf.m
!
12. Start the engine and check to be sure no oil is leaking from the drain plug or oil filter.
13. Shut off the engine and recheck the oil level.
NOTE: It is recommended that the engine oil and filter should be changed by an authorized Hyundai dealer. NOTE: Always dispose of used engine oil in an environmentally acceptable man- ner. It is suggested that it be placedin a sealed container and taken to a service station for maybe reclaimation. Do not pour the oil onthe ground or put it into the house- hold trash.
11. Refill the crankcase with the recom-
mended engine oil. Refer to the specification in chapter 9 for engineoil capacity.
CAUTION:
Slowly pour the recommended oilusing by a funnel. Do not overfill not to damage engine.
TBENG_6.P65 3/9/2005, 5:04 PM
12
Page 405 of 437

6- 30 DO-IT-YOURSELF MAINTENANCE
HTB287
G240A01A-AAT POWER STEERING HOSES It is suggested that you check the power steering hose connections for fluid leakage at regular intervals. Thepower steering hoses should be re- placed if there is severe surface crack- ing, scuffing or worn spots. Deteriora-tion of the hose could cause prema- ture failure. G300A01TB-GAT REMOVAL OF WATER FROM THE FUEL FILTER(DIESEL ENGINE) If the fuel filter warning light illuminates during driving, it indicates that water has accumulated in the fuel filter. If this occurs, remove the water as describedbelow.
G230A03A-GAT POWER STEERING FLUID LEVEL The power steering fluid level should be checked regularly.To check the power steering fluid level, be sure the ignition is "OFF", then check to make certain that the powersteering fluid level is between the "MAX" and "MIN" level markings on the fluid reservoir. NOTE: Grinding noise from the power steering pump may be heard imme-diately after the engine is started in extremely cold conditions (below - 20°C). If the noise stops during warm
HTB163
up, there is no abnormal function in the system. It is due to a power steering fluid characteristic in ex-tremely cold conditions. Recommended Fluid Use PSF-3 type fluid NOTE: Do not start the engine when the power steering oil reservoir is empty.
TBENG_6.P65
3/9/2005, 5:04 PM
30
Page 414 of 437

DO-IT-YOURSELF MAINTENANCE 6- 39
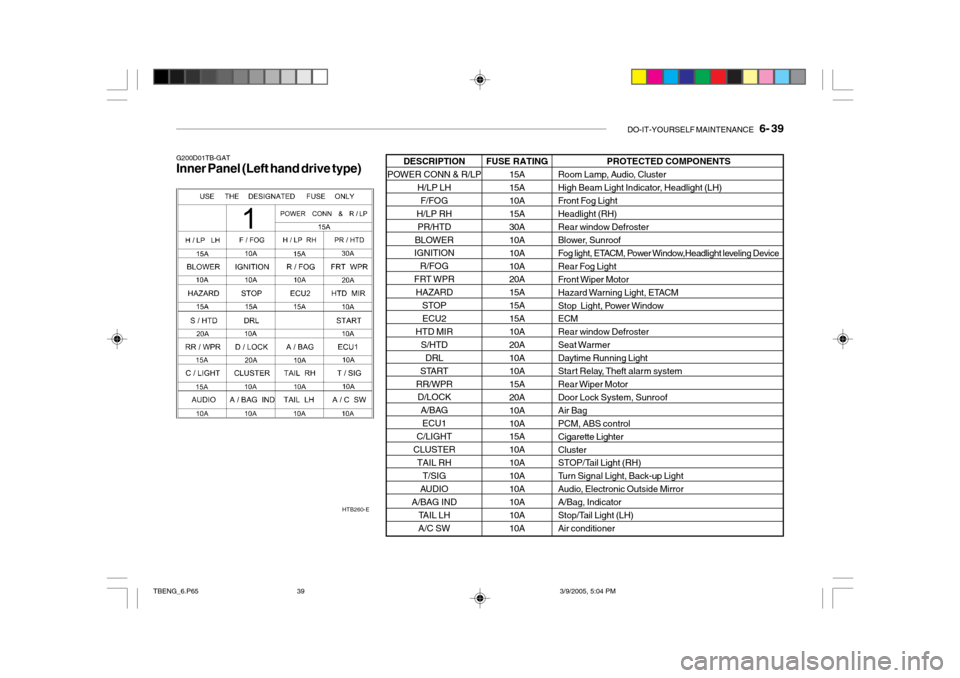
PROTECTED COMPONENTS
Room Lamp, Audio, Cluster
High Beam Light Indicator, Headlight (LH)
Front Fog LightHeadlight (RH)
Rear window Defroster
Blower, Sunroof
Fog light, ETACM, Power Window,Headlight leveling Device
Rear Fog Light
Front Wiper Motor
Hazard Warning Light, ETACM
Stop Light, Power Window ECM
Rear window Defroster
Seat Warmer
Daytime Running Light
Start Relay, Theft alarm system
Rear Wiper Motor
Door Lock System, SunroofAir BagPCM, ABS controlCigarette LighterCluster
STOP/Tail Light (RH)
Turn Signal Light, Back-up Light
Audio, Electronic Outside MirrorA/Bag, Indicator
Stop/Tail Light (LH)Air conditioner
G200D01TB-GAT Inner Panel (Left hand drive type)
HTB260-EFUSE RATING15A 15A 10A 15A30A10A10A10A 20A 15A15A15A10A20A 10A 10A15A20A10A10A 15A 10A10A10A10A10A 10A 10A
DESCRIPTION
POWER CONN & R/LP
H/LP LHF/FOG
H/LP RH
PR/HTD
BLOWER
IGNITION
R/FOG
FRT WPR HAZARD STOP
ECU2
HTD MIR
S/HTDDRL
START
RR/WPR D/LOCK
A/BAGECU1
C/LIGHT
CLUSTER TAIL RH T/SIG
AUDIO
A/BAG IND TAIL LH
A/C SW
TBENG_6.P65 3/9/2005, 5:04 PM
39
Page 415 of 437

6- 40 DO-IT-YOURSELF MAINTENANCE
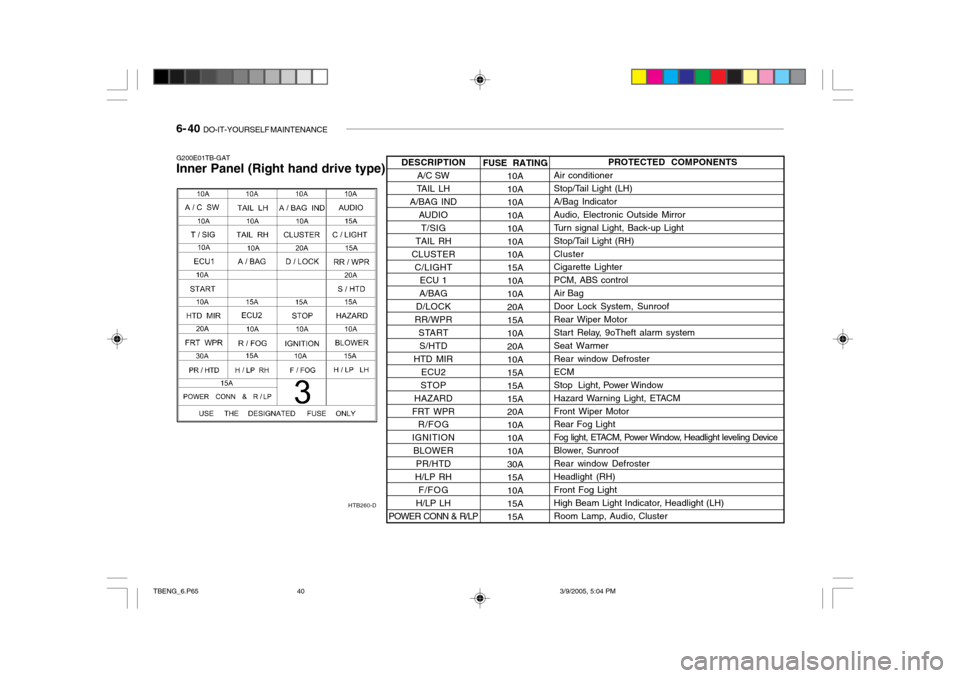
G200E01TB-GAT Inner Panel (Right hand drive type)
HTB260-DFUSE RATING10A 10A10A10A10A10A 10A 15A10A10A20A15A 10A 20A10A15A15A15A 20A 10A10A10A30A15A 10A 15A15APROTECTED COMPONENTS
Air conditioner
Stop/Tail Light (LH) A/Bag IndicatorAudio, Electronic Outside Mirror
Turn signal Light, Back-up Light
Stop/Tail Light (RH)Cluster Cigarette Lighter PCM, ABS controlAir BagDoor Lock System, SunroofRear Wiper Motor
Start Relay, 9oTheft alarm system Seat Warmer Rear window DefrosterECM
Stop Light, Power Window
Hazard Warning Light, ETACMFront Wiper Motor Rear Fog Light
Fog light, ETACM, Power Window, Headlight leveling Device
Blower, SunroofRear window DefrosterHeadlight (RH)Front Fog Light
High Beam Light Indicator, Headlight (LH) Room Lamp, Audio, Cluster
DESCRIPTION
A/C SW
TAIL LH
A/BAG IND
AUDIOT/SIG
TAIL RH
CLUSTER C/LIGHT ECU 1
A/BAG
D/LOCK
RR/WPR
STARTS/HTD
HTD MIR ECU2
STOP
HAZARD
FRT WPR R/FOG
IGNITION BLOWER PR/HTD
H/LP RH
F/FOG
H/LP LH
POWER CONN & R/LP
TBENG_6.P65 3/9/2005, 5:04 PM
40
Page 418 of 437

EMISSION CONTROL SYSTEMS 7- 3
H020A01A-GAT
CATALYTIC CONVERTER (If Installed) ; For a gasoline engine
HTB178
The catalytic converter is part of the exhaust emission control system. Its purpose is to remove certain engine emission products from the engine'sexhaust. It looks something like a muffler and is located underneath the car in the exhaust system.
Catalytic Converter H020B01A-GAT
About the Catalytic Converter
Exhaust gases passing through the
catalytic converter cause it to operate at very high temperatures. As a re- sult, the introduction of large amountsof unburned gasoline may cause it to overheat and create a fire hazard. This can be avoided by observing thefollowing:
o Use unleaded fuel only.
o Maintain your engine in good con-
dition. Extremely high converter temperatures can result from im- proper operation of the electrical,ignition or fuel injection systems.
H020D01S-GAT CATALYTIC CONVERTER ; For a diesel engine All Hyundai vehicles are equipped with oxidation type catalytic converterto reduce the carbon monoxide, hy- drocarbons and particulate contained in the exhaust gas.
o If your engine stalls, pings, knocks,
or is hard to start, take your car toyour Hyundai dealer as soon aspossible and have the difficulty cor- rected.
o Avoid driving with a very low fuel level. If your run out of gasoline, it could cause the engine to misfireand result in excessive loading of the catalytic converter.
o Avoid idling the engine for periods longer than 10 minutes.
o Your Hyundai should not be either pushed or pulled to get it started.This can cause the catalytic con- verter to overload.
o Take care not to stop your Hyundai over any combustible material suchas grass, paper, leaves or rags. Asthese materials could come in con- tact with the catalytic converter and could cause a fire.
o Do not touch the catalytic con-
verter or any other part of the ex-haust system while the engine is running as it is very hot and could result in burns.
o Remember that your Hyundai dealer is your best source of assis-tance.
TBENG_7.P65 3/9/2005, 5:06 PM
3
Page 433 of 437

10- 4 INDEX
H Hazard Warning Syst em ........................................... 1-55
Headlight Aiming Adjustment ....................................6-31
Headlight Leveling Device Syst em ...........................1-58
Heating and cooling control ...................................... 1-74
Heating and Ventilation ............................................. 1-75
Air flow control ....................................................... 1-76
Air intake control .................................................... 1-76
Bi-level heating ....................................................... 1-79
Fan speed control .................................................. 1-77
Temperature control ............................................... 1-78
High-Mounted Rear Stop Light................................. 1-66
Hood Release ........................................................... 1-66
How to use luggage room .. ......................................1-69
Horn .......................................................................... 1-73
IIgnition Sw itch ............................................................. 2-3
Immobilizer S ystem ..................................................... 1-5
Instrument Cluster and Indicator ..............................1-41
IInterior Light Interior light ............................................................ 1-62
Map light ................................................................ 1-61
Intermittent Wiper ..................................................... 1-54
JJump Starting .............................................................. 3-3 K
Key .............................................................................. 1-4
If you lose your keys ............................................. 3-14
Positions ................................................................... 2-4
L Lubrication Chart ......................................................... 9-4
Luggage Net ............................................................. 1-71
Luggage Board .......................................................... 1-71
Luggage Under Tray ................................................. 1-70
MMaintenance Intervals Explanation of scheduled maintenance items
................................................................................. 5-8
Maintenance under severe usage conditions .......... 5-7Scheduled maintenance ........................................... 5-4
Service requ irements............................................... 5-2
Mirrors Day-night inside rearview ....................................... 1-65
Outside rearview mirror heater .............................. 1-65
O Odometer .................................................................. 1-49
Outside rear view...................................................... 1-63
TBENG_10.P65 3/9/2005, 4:56 PM
4