air pressure Hyundai Grand i10 2015 Owner's Manual
[x] Cancel search | Manufacturer: HYUNDAI, Model Year: 2015, Model line: Grand i10, Model: Hyundai Grand i10 2015Pages: 343, PDF Size: 29.47 MB
Page 27 of 343
Safety system of your vehicle
16
3
When the vehicle stops suddenly, or if
the occupant tries to lean forward too
quickly, the seat belt retractor will lock
into position. In certain frontal collisions,
the pre-tensioner will activate and pullthe seat belt into tighter contact against
the occupant's body.
If the system senses excessive seat belt
tension on the driver or passenger's seat
belt when the pre-tensioner activates, theload limiter inside the pre-tensioner willrelease some of the pressure on the
affected seat belt. (if equipped)(Continued)
Improper handling of the pre-ten-
sioner seat belt assemblies, and failure to heed the warnings not
to strike, modify, inspect, replace,
service or repair the pre-tension-
er seat belt assemblies may lead
to improper operation or inadver-
tent activation and serious injury.
If the vehicle or pre-tensioner seat belt must be discarded, we
recommend that you contact an
authorized HYUNDAI dealer.WARNING
Pre-tensioners are designed to operate only one time. After acti-
vation, pre-tensioner seat belts
must be replaced. All seat belts,
of any type, should always be
replaced after they have been
worn during a collision.
The pre-tensioner seat belt assembly mechanisms become
hot during activation. Do not
touch the pre-tensioner seat belt
assemblies for several minutes
after they have been activated.
Do not hit the pre-tensioner seat belt assemblies.
Do not attempt to inspect or replace the pre-tensioner seat
belts yourself. We recommend
that the system be serviced by an
authorized HYUNDAI dealer.
Do not attempt to service or repair the pre-tensioner seat belt
system in any manner.
(Continued)
WARNING
To obtain maximum benefit from a pre-tensioner seat belt:
1. The seatbelt must be worn cor- rectly and adjusted to the proper
position. Please read and follow
all of the important information
and precautions about your vehi-
cle’s occupant safety features –
including seat belts and air bags
– that are provided in this manu-al.
2. Be sure you and your passen- gers always wear seat belts prop-
erly.
Page 45 of 343
Safety system of your vehicle
34
3
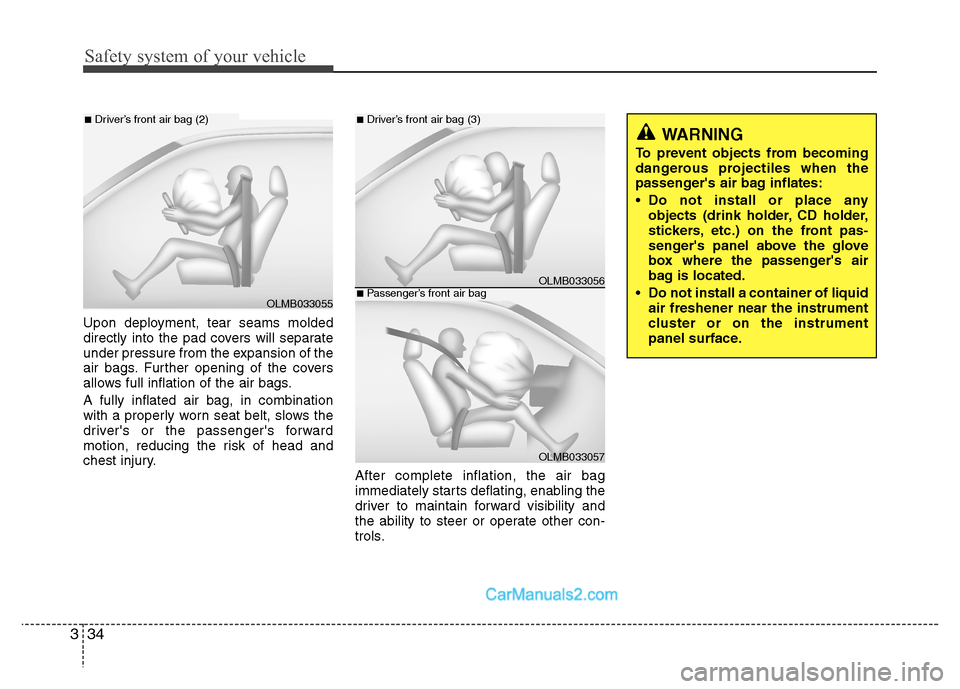
Upon deployment, tear seams molded
directly into the pad covers will separate
under pressure from the expansion of the
air bags. Further opening of the covers
allows full inflation of the air bags. A fully inflated air bag, in combination
with a properly worn seat belt, slows the
driver's or the passenger's forward
motion, reducing the risk of head and
chest injury.
After complete inflation, the air bag
immediately starts deflating, enabling the
driver to maintain forward visibility and
the ability to steer or operate other con-
trols.
OLMB033055
■Driver’s front air bag (2)
OLMB033056
■Driver’s front air bag (3)
OLMB033057
■Passenger’s front air bag
WARNING
To prevent objects from becoming
dangerous projectiles when the
passenger's air bag inflates:
Do not install or place any objects (drink holder, CD holder,
stickers, etc.) on the front pas-
senger's panel above the glove
box where the passenger's air
bag is located.
Do not install a container of liquid air freshener near the instrument
cluster or on the instrument
panel surface.
Page 152 of 343
Features of your vehicle
96
4
(Continued)
Turn on the car ignition before using this device. Do not operatethe audio system for long periodsof time with the ignition turned off
as such operations may lead tobattery discharge.
Do not subject the device to severe shock or impact. Direct
pressure onto the front side ofthe monitor may cause damage tothe LCD or touch screen.
When cleaning the device, make sure to turn off the device and
use a dry and smooth cloth.Never use tough materials, chem-ical cloths, or solvents (alcohol,benzene, thinners, etc.) as such
materials may damage the devicepanel or cause color/quality dete-rioration
(Continued)(Continued) Do not place beverages close to the audio system. Spilling bever-ages may lead to system mal-function.
In case of product malfunction, please contact your place of pur-chase or After Service center.
Placing the audio system within an electromagnetic environment
may result in noise interference.
Prevent caustic solutions such as perfume and cosmetic oil fromcontacting the dashboardbecause they may cause damage
or discoloration.CAUTION
Operating the device while driv- ing could lead to accidents due to
a lack of attention to external sur-roundings. First park the vehiclebefore operating the device.
Adjust the volume to levels that allow the driver to hear soundsfrom outside of the vehicle.Driving in a state where external sounds cannot be heard may lead
to accidents.
Pay attention to the volume set- ting when turning the device on.A sudden output of extreme vol-ume upon turning the device on
could lead to hearing impairment.(Adjust the volume to a suitablelevels before turning off the device.)
(Continued)
Page 241 of 343
613
What to do in an emergency
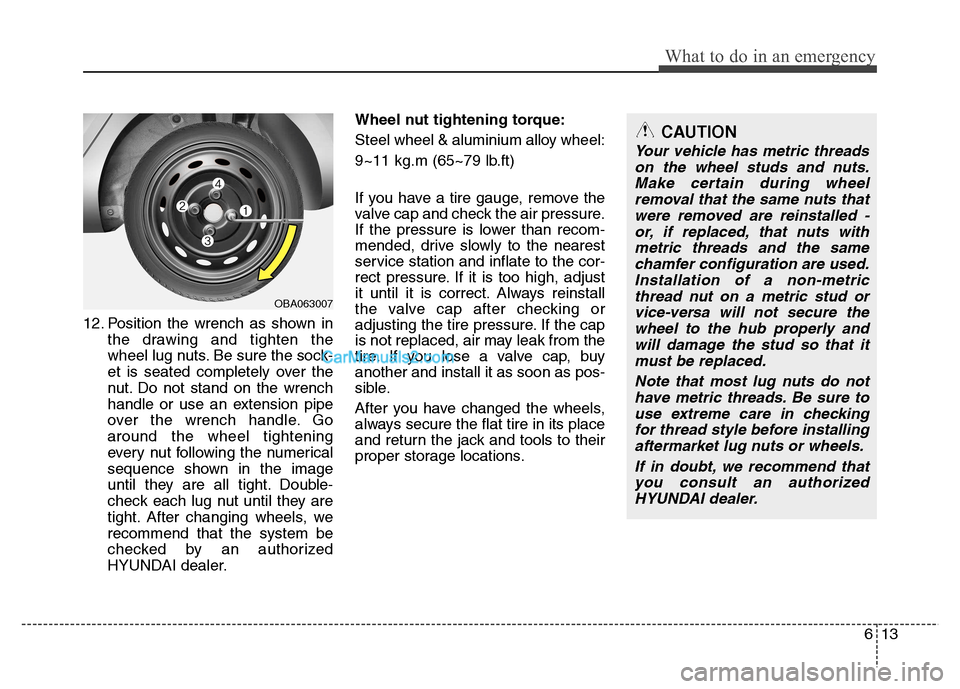
12. Position the wrench as shown inthe drawing and tighten the
wheel lug nuts. Be sure the sock-
et is seated completely over the
nut. Do not stand on the wrench
handle or use an extension pipe
over the wrench handle. Goaround the wheel tightening
every nut following the numerical
sequence shown in the image
until they are all tight. Double-
check each lug nut until they are
tight. After changing wheels, werecommend that the system be
checked by an authorized
HYUNDAI dealer. Wheel nut tightening torque:
Steel wheel & aluminium alloy wheel:
9~11 kg.m (65~79 lb.ft)
If you have a tire gauge, remove the
valve cap and check the air pressure.
If the pressure is lower than recom-
mended, drive slowly to the nearest
service station and inflate to the cor-
rect pressure. If it is too high, adjust
it until it is correct. Always reinstall
the valve cap after checking or
adjusting the tire pressure. If the cap
is not replaced, air may leak from the
tire. If you lose a valve cap, buyanother and install it as soon as pos-
sible.
After you have changed the wheels,
always secure the flat tire in its place
and return the jack and tools to their
proper storage locations.
CAUTION
Your vehicle has metric threads
on the wheel studs and nuts.Make certain during wheel removal that the same nuts thatwere removed are reinstalled -or, if replaced, that nuts withmetric threads and the same chamfer configuration are used.Installation of a non-metricthread nut on a metric stud or vice-versa will not secure thewheel to the hub properly andwill damage the stud so that it must be replaced.
Note that most lug nuts do nothave metric threads. Be sure touse extreme care in checkingfor thread style before installing aftermarket lug nuts or wheels.
If in doubt, we recommend thatyou consult an authorizedHYUNDAI dealer.
OBA063007
Page 253 of 343
Maintenance
6
7
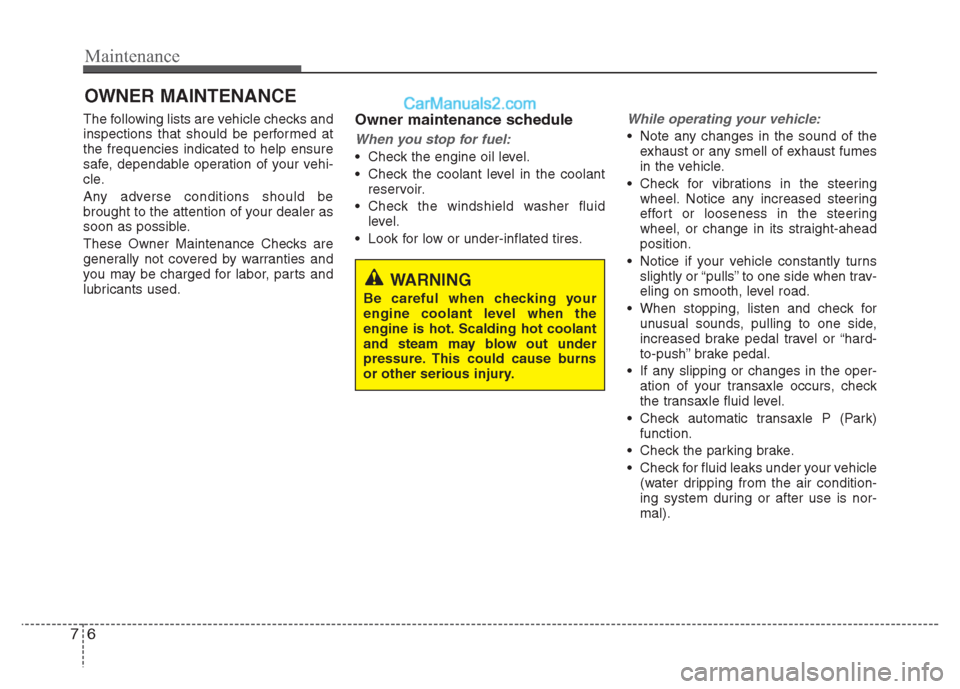
OWNER MAINTENANCE
The following lists are vehicle checks and
inspections that should be performed atthe frequencies indicated to help ensure
safe, dependable operation of your vehi-
cle.
Any adverse conditions should be
brought to the attention of your dealer as
soon as possible.
These Owner Maintenance Checks are
generally not covered by warranties and
you may be charged for labor, parts and
lubricants used. Owner maintenance schedule
When you stop for fuel:
• Check the engine oil level.
Check the coolant level in the coolant
reservoir.
Check the windshield washer fluid level.
Look for low or under-inflated tires.
While operating your vehicle:
Note any changes in the sound of the exhaust or any smell of exhaust fumes
in the vehicle.
Check for vibrations in the steering wheel. Notice any increased steering
effort or looseness in the steering
wheel, or change in its straight-aheadposition.
Notice if your vehicle constantly turns slightly or “pulls” to one side when trav-
eling on smooth, level road.
When stopping, listen and check for unusual sounds, pulling to one side,
increased brake pedal travel or “hard-
to-push” brake pedal.
If any slipping or changes in the oper- ation of your transaxle occurs, check
the transaxle fluid level.
Check automatic transaxle P (Park) function.
Check the parking brake.
Check for fluid leaks under your vehicle (water dripping from the air condition-
ing system during or after use is nor-mal).
WARNING
Be careful when checking your
engine coolant level when the
engine is hot. Scalding hot coolant
and steam may blow out under
pressure. This could cause burns
or other serious injury.
Page 254 of 343
77
Maintenance
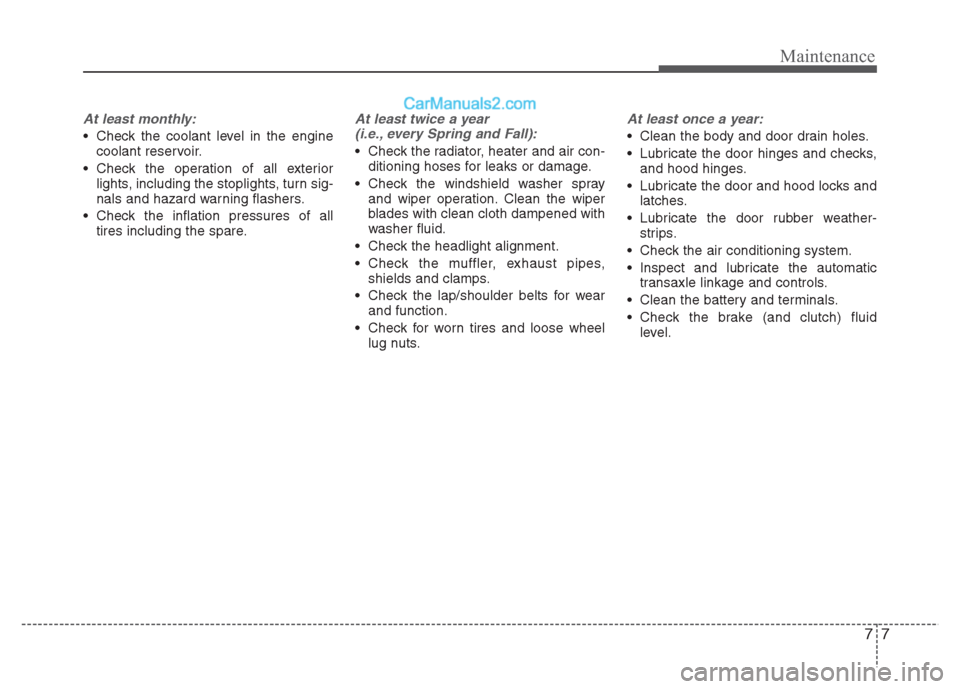
At least monthly:
Check the coolant level in the enginecoolant reservoir.
Check the operation of all exterior lights, including the stoplights, turn sig-
nals and hazard warning flashers.
Check the inflation pressures of all tires including the spare.
At least twice a year
(i.e., every Spring and Fall):
Check the radiator, heater and air con- ditioning hoses for leaks or damage.
Check the windshield washer spray and wiper operation. Clean the wiper
blades with clean cloth dampened with
washer fluid.
Check the headlight alignment.
Check the muffler, exhaust pipes, shields and clamps.
Check the lap/shoulder belts for wear and function.
Check for worn tires and loose wheel lug nuts.
At least once a year:
Clean the body and door drain holes.
Lubricate the door hinges and checks,and hood hinges.
Lubricate the door and hood locks and latches.
Lubricate the door rubber weather- strips.
Check the air conditioning system.
Inspect and lubricate the automatic transaxle linkage and controls.
Clean the battery and terminals.
Check the brake (and clutch) fluid level.
Page 259 of 343
Maintenance
12
7
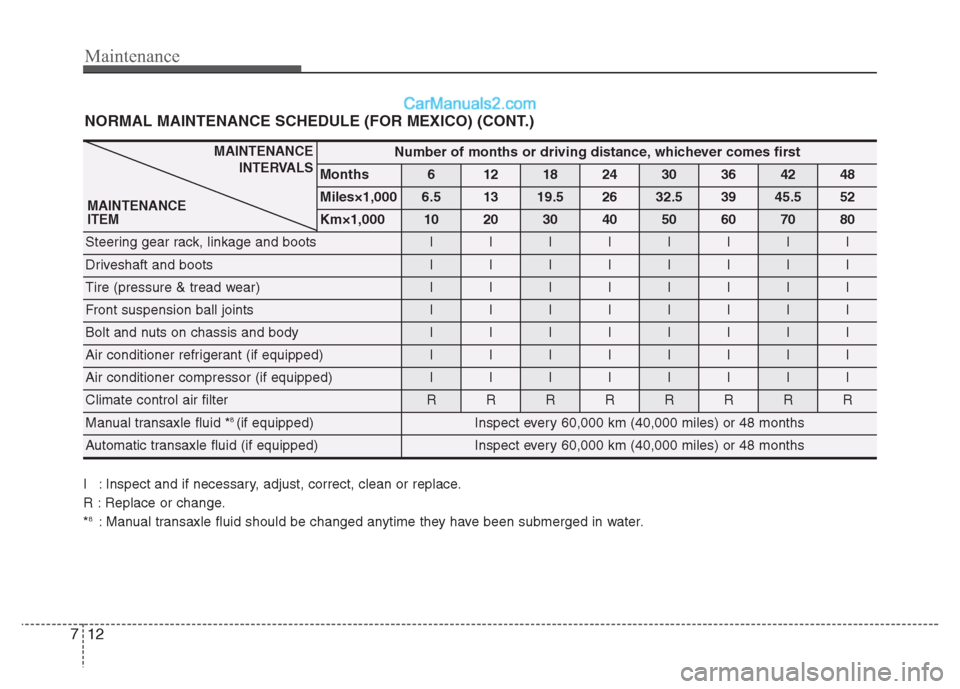
NORMAL MAINTENANCE SCHEDULE (FOR MEXICO) (CONT.)
Number of months or driving distance, whichever comes first
Months612182430364248
Miles×1,0006.51319.52632.53945.552
Km×1,0001020304050607080
Steering gear rack, linkage and bootsIIIIIIII
Driveshaft and bootsIIIIIIII
Tire (pressure & tread wear) IIIIIIII
Front suspension ball jointsIIIIIIII
Bolt and nuts on chassis and bodyIIIIIIII
Air conditioner refrigerant (if equipped)IIIIIIII
Air conditioner compressor (if equipped)IIIIIIII
Climate control air filter RRRRRRRR
Manual transaxle fluid * 8
(if equipped)Inspect every 60,000 km (40,000 miles) or 48 months
Automatic transaxle fluid (if equipped) Inspect every 60,000 km (40,000 miles) or 48 months
I : Inspect and if necessary, adjust, correct, clean or replace.
R : Replace or change.*8
: Manual transaxle fluid should be changed anytime they have been submerged in water.
MAINTENANCE
INTERVALS
MAINTENANCE ITEM
Page 263 of 343
Maintenance
16
7
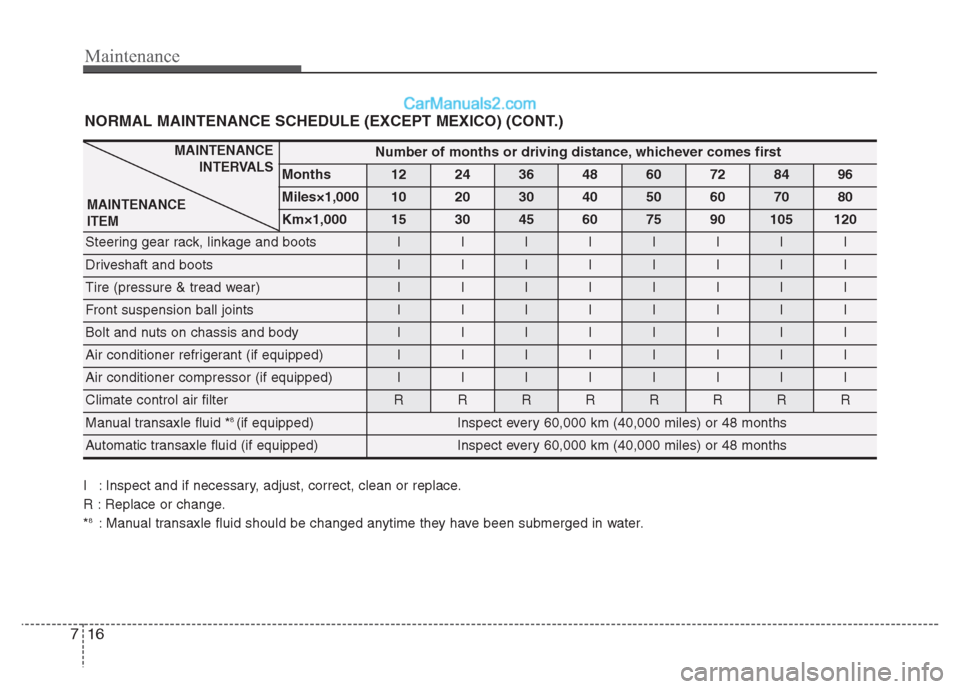
NORMAL MAINTENANCE SCHEDULE (EXCEPT MEXICO) (CONT.)
Number of months or driving distance, whichever comes first
Months1224364860728496
Miles×1,0001020304050607080
Km×1,000153045607590105120
Steering gear rack, linkage and bootsIIIIIIII
Driveshaft and bootsIIIIIIII
Tire (pressure & tread wear) IIIIIIII
Front suspension ball jointsIIIIIIII
Bolt and nuts on chassis and bodyIIIIIIII
Air conditioner refrigerant (if equipped)IIIIIIII
Air conditioner compressor (if equipped)IIIIIIII
Climate control air filter RRRRRRRR
Manual transaxle fluid * 8
(if equipped)Inspect every 60,000 km (40,000 miles) or 48 months
Automatic transaxle fluid (if equipped) Inspect every 60,000 km (40,000 miles) or 48 months
MAINTENANCE
INTERVALS
MAINTENANCE ITEM
I : Inspect and if necessary, adjust, correct, clean or replace.
R : Replace or change.* 8
: Manual transaxle fluid should be changed anytime they have been submerged in water.
Page 289 of 343
Maintenance
42
7
WARNING - Tire inflation
Overinflation or underinflation
can reduce tire life, adversely
affect vehicle handling, and
lead to sudden tire failure. This
could result in loss of vehicle
control and potential injury.
CAUTION - Tire pressure
Always observe the following:
Check tire pressure when the tires are cold. (After vehiclehas been parked for at leastthree hours or hasn't been driven more than 1.6 km (onemile) since startup.)
Check the pressure of your spare tire each time you checkthe pressure of other tires.
Never overload your vehicle. Be careful not to overload avehicle luggage rack if yourvehicle is equipped with one.
Worn, old tires can cause acci- dents. If your tread is badlyworn, or if your tires have been damaged, replace them.
CAUTION
Underinflation also results in excessive wear, poor handlingand reduced fuel economy.Wheel deformation also ispossible. Keep your tire pres-sures at the proper levels. If a tire frequently needs refilling,we recommend that the sys-tem be checked by an author- ized HYUNDAI dealer.
Overinflation produces a harsh ride, excessive wear atthe center of the tire tread, anda greater possibility of dam- age from road hazards.
CAUTION
Warm tires normally exceed recommended cold tire pres-sures by 28 to 41 kPa (4 to 6 psi). Do not release air fromwarm tires to adjust the pres-sure or the tires will be under- inflated.
Be sure to reinstall the tire inflation valve caps. Withoutthe valve cap, dirt or moisturecould get into the valve core and cause air leakage. If avalve cap is missing, install anew one as soon as possible.
Page 290 of 343
743
Maintenance
Checking tire inflation pressure
Check your tires once a month or
more.
Also, check the tire pressure of the
spare tire.
How to check
Use a good quality gage to check tire
pressure. You can not tell if your tires
are properly inflated simply by look-
ing at them. Radial tires may look
properly inflated even when they're
underinflated.
Check the tire's inflation pressure
when the tires are cold. - "Cold"
means your vehicle has been sitting
for at least three hours or driven nomore than 1.6 km (1 mile).Remove the valve cap from the tire
valve stem. Press the tire gage firm-
ly onto the valve to get a pressure
measurement. If the cold tire inflationpressure matches the recommendedpressure on the tire and loading
information label, no further adjust-
ment is necessary. If the pressure is
low, add air until you reach the rec-ommended amount.
If you overfill the tire, release air by pushing on the metal stem in the
center of the tire valve. Recheck the
tire pressure with the tire gage. Be
sure to put the valve caps back on
the valve stems. They help prevent
leaks by keeping out dirt and mois-
ture.
WARNING
Inspect your tires frequently for proper inflation as well as
wear and damage. Always use
a tire pressure gauge.
Tires with too much or too little pressure wear unevenly caus-
ing poor handling, loss of vehi-
cle control, and sudden tirefailure leading to accidents,
injuries, and even death. Therecommended cold tire pres-
sure for your vehicle can be
found in this manual and onthe tire label located on the dri-
ver's side center pillar.
Worn tires can cause acci- dents. Replace tires that are
worn, show uneven wear, or
are damaged.
Remember to check the pres- sure of your spare tire.
HYUNDAI recommends that
you check the spare every
time you check the pressure
of the other tires on your vehi-
cle.