instrument cluster Hyundai Grand Santa Fe 2016 Owner's Manual
[x] Cancel search | Manufacturer: HYUNDAI, Model Year: 2016, Model line: Grand Santa Fe, Model: Hyundai Grand Santa Fe 2016Pages: 717, PDF Size: 18.59 MB
Page 80 of 717
361
Safety features of your vehicle
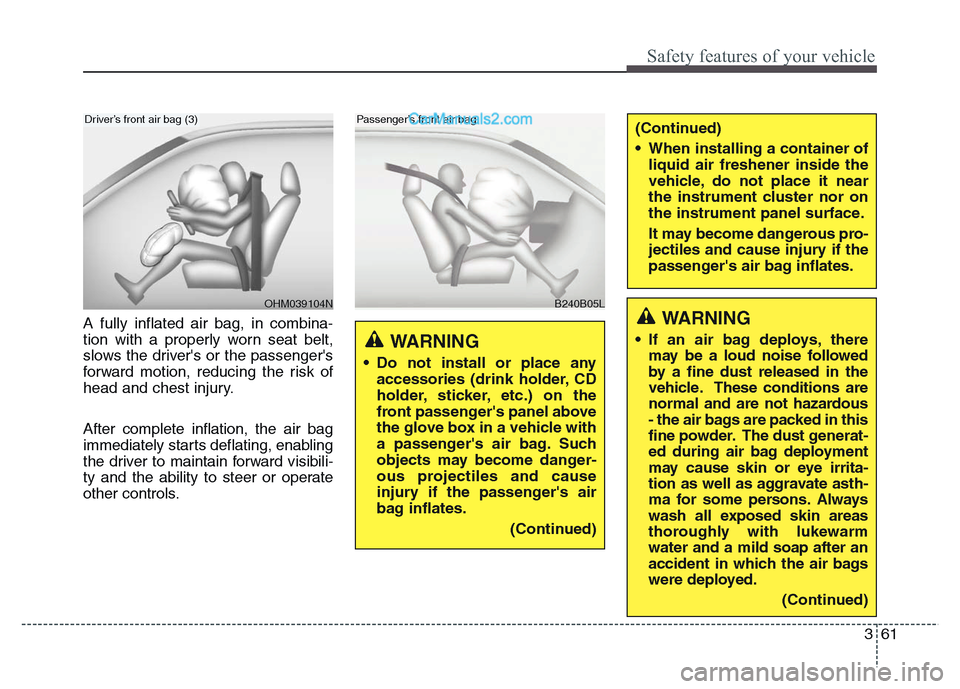
A fully inflated air bag, in combina-
tion with a properly worn seat belt,
slows the driver's or the passenger's
forward motion, reducing the risk of
head and chest injury.
After complete inflation, the air bag
immediately starts deflating, enabling
the driver to maintain forward visibili-
ty and the ability to steer or operate
other controls.
OHM039104N
Driver’s front air bag (3)
B240B05L
Passenger’s front air bag
WARNING
• Do not install or place any
accessories (drink holder, CD
holder, sticker, etc.) on the
front passenger's panel above
the glove box in a vehicle with
a passenger's air bag. Such
objects may become danger-
ous projectiles and cause
injury if the passenger's air
bag inflates.
(Continued)
(Continued)
• When installing a container of
liquid air freshener inside the
vehicle, do not place it near
the instrument cluster nor on
the instrument panel surface.
It may become dangerous pro-
jectiles and cause injury if the
passenger's air bag inflates.
WARNING
• If an air bag deploys, there
may be a loud noise followed
by a fine dust released in the
vehicle. These conditions are
normal and are not hazardous
- the air bags are packed in this
fine powder. The dust generat-
ed during air bag deployment
may cause skin or eye irrita-
tion as well as aggravate asth-
ma for some persons. Always
wash all exposed skin areas
thoroughly with lukewarm
water and a mild soap after an
accident in which the air bags
were deployed.
(Continued)
Page 99 of 717
Instrument cluster . . . . . . . . . . . . . . . . . . . . . . . . . 4-63
• Instrument cluster control . . . . . . . . . . . . . . . . . . . . . 4-65
• LCD display control . . . . . . . . . . . . . . . . . . . . . . . . . . 4-65
• Gauges . . . . . . . . . . . . . . . . . . . . . . . . . . . . . . . . . . . . . 4-66
• Transaxle shift indicator . . . . . . . . . . . . . . . . . . . . . . . 4-71
LCD display . . . . . . . . . . . . . . . . . . . . . . . . . . . . . . 4-72
• LCD modes. . . . . . . . . . . . . . . . . . . . . . . . . . . . . . . . . . 4-72
• Service mode . . . . . . . . . . . . . . . . . . . . . . . . . . . . . . . . 4-73
• User settings mode. . . . . . . . . . . . . . . . . . . . . . . . . . . . 4-74
• A/V mode . . . . . . . . . . . . . . . . . . . . . . . . . . . . . . . . . . . 4-77
• Turn by turn mode . . . . . . . . . . . . . . . . . . . . . . . . . . . 4-77
• Warning messages . . . . . . . . . . . . . . . . . . . . . . . . . . . . 4-78
Trip computer . . . . . . . . . . . . . . . . . . . . . . . . . . . . . 4-84
• Overview. . . . . . . . . . . . . . . . . . . . . . . . . . . . . . . . . . . . 4-84
• Trip A/B . . . . . . . . . . . . . . . . . . . . . . . . . . . . . . . . . . . . 4-85
• Fuel economy . . . . . . . . . . . . . . . . . . . . . . . . . . . . . . . . 4-86
Warning and indicator lights . . . . . . . . . . . . . . . . 4-89
• Warning lights . . . . . . . . . . . . . . . . . . . . . . . . . . . . . . . 4-89
• Indicator lights. . . . . . . . . . . . . . . . . . . . . . . . . . . . . . . 4-99
Rear parking assist system . . . . . . . . . . . . . . . . . 4-104
• Operation . . . . . . . . . . . . . . . . . . . . . . . . . . . . . . . . . . 4-104
• Non-operational conditions . . . . . . . . . . . . . . . . . . . 4-105
• Rear parking assist system precautions . . . . . . . . . 4-106
• Self-diagnosis . . . . . . . . . . . . . . . . . . . . . . . . . . . . . . . 4-107
Parking assist system . . . . . . . . . . . . . . . . . . . . . . 4-108
• Operation . . . . . . . . . . . . . . . . . . . . . . . . . . . . . . . . . . 4-109
• Non-operational conditions . . . . . . . . . . . . . . . . . . . 4-111
• Self-diagnosis . . . . . . . . . . . . . . . . . . . . . . . . . . . . . . . 4-112
Smart parking assist system (SPAS) . . . . . . . . . 4-113
• Operating condition . . . . . . . . . . . . . . . . . . . . . . . . . 4-114
• Non-operating condition . . . . . . . . . . . . . . . . . . . . . . 4-114
• How the system works . . . . . . . . . . . . . . . . . . . . . . . 4-117
• Additional instructions (messages) . . . . . . . . . . . . . 4-123
• System malfunction . . . . . . . . . . . . . . . . . . . . . . . . . . 4-124
Rearview camera . . . . . . . . . . . . . . . . . . . . . . . . . 4-125
Hazard warning flasher . . . . . . . . . . . . . . . . . . . . 4-126
Lighting . . . . . . . . . . . . . . . . . . . . . . . . . . . . . . . . . 4-127
• Battery saver function. . . . . . . . . . . . . . . . . . . . . . . . 4-127
• Headlight (Headlamp) escort function . . . . . . . . . . 4-127
• Lighting control . . . . . . . . . . . . . . . . . . . . . . . . . . . . . 4-127
• Traffic change . . . . . . . . . . . . . . . . . . . . . . . . . . . . . . 4-129
• High - beam operation . . . . . . . . . . . . . . . . . . . . . . . 4-131
• Turn signals and lane change signals . . . . . . . . . . . 4-132
• Front fog light . . . . . . . . . . . . . . . . . . . . . . . . . . . . . . 4-132
• Rear fog light . . . . . . . . . . . . . . . . . . . . . . . . . . . . . . . 4-133
• Daytime running light . . . . . . . . . . . . . . . . . . . . . . . . 4-134
• Headlight leveling device . . . . . . . . . . . . . . . . . . . . . 4-134
• Adaptive front lighting system (AFLS) . . . . . . . . . . 4-135
4
Page 146 of 717
449
Features of your vehicle
Electronic power steering
Power steering uses the motor to
assist you in steering the vehicle. If
the engine is off or if the power steer-
ing system becomes inoperative, the
vehicle may still be steered, but it will
require increased steering effort.
The motor driven power steering is
controlled by the power steering con-
trol unit which senses the steering
wheel torque and vehicle speed to
command the motor.
The steering wheel becomes heavier
as the vehicle’s speed increases and
becomes lighter as the vehicle’s
speed decreases for better control of
the steering wheel.
Should you notice any change in the
effort required to steer during normal
vehicle operation, we recommend
that the system be checked by
authorized HYUNDAI dealer.
✽NOTICE
The following symptoms may occur
during normal vehicle operation:
• The EPS warning light does not
illuminate.
• The steering effort is high immedi-
ately after turning the ignition
switch on. This happens as the sys-
tem performs the EPS system
diagnostics. When the diagnostics
is completed, the steering wheel
will return to its normal condition.
• A click noise may be heard from
the EPS relay after the ignition
switch is turned to the ON or
LOCK/OFF position.
• Motor noise may be heard when
the vehicle is at a stop or at a low
driving speed.
• The steering effort increases if the
steering wheel is rotated continu-
ously when the vehicle is not in
motion. However, after a few min-
utes, it will return to its normal
conditions.
(Continued)(Continued)
• If the Electronic Power Steering
System does not operate normally,
the warning light will illuminate on
the instrument cluster. The steer-
ing wheel may become difficult to
control or operate abnormally. We
recommend that you contact an
authorized HYUNDAI dealer.
• When you operate the steering
wheel in low temperature, abnor-
mal noise could occur. If tempera-
ture rises, the noise will disappear.
This is a normal condition.
STEERING WHEEL
Page 160 of 717
463
Features of your vehicle
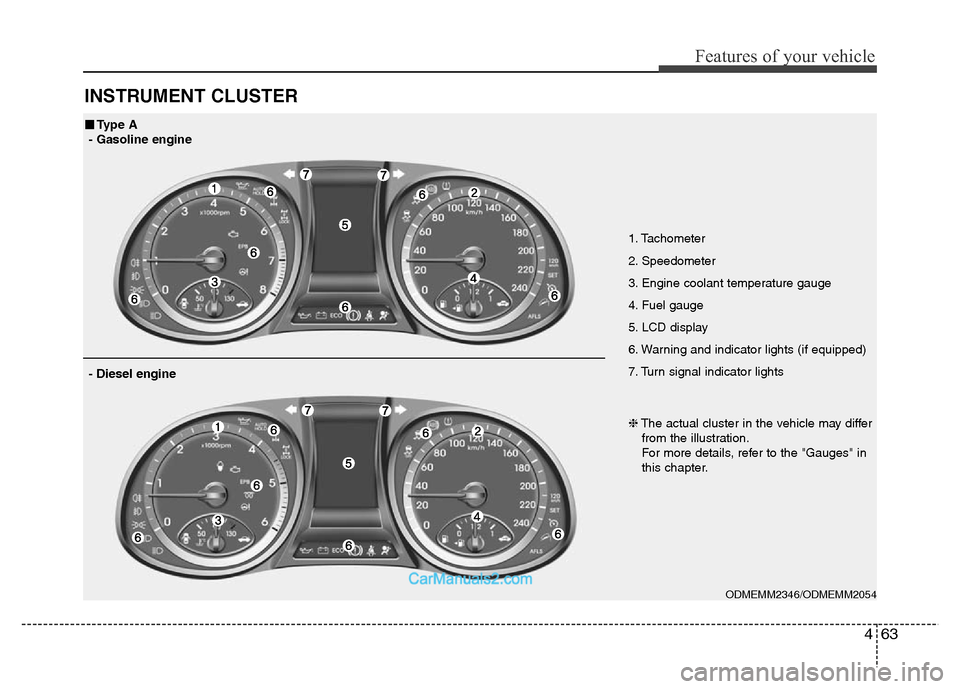
INSTRUMENT CLUSTER
1. Tachometer
2. Speedometer
3. Engine coolant temperature gauge
4. Fuel gauge
5. LCD display
6. Warning and indicator lights (if equipped)
7. Turn signal indicator lights
ODMEMM2346/ODMEMM2054
■Type A
- Gasoline engine
❈The actual cluster in the vehicle may differ
from the illustration.
For more details, refer to the "Gauges" in
this chapter.
- Diesel engine
Page 162 of 717
465
Features of your vehicle
Instrument Cluster Control
Adjusting Instrument Cluster
Illumination (if equipped)
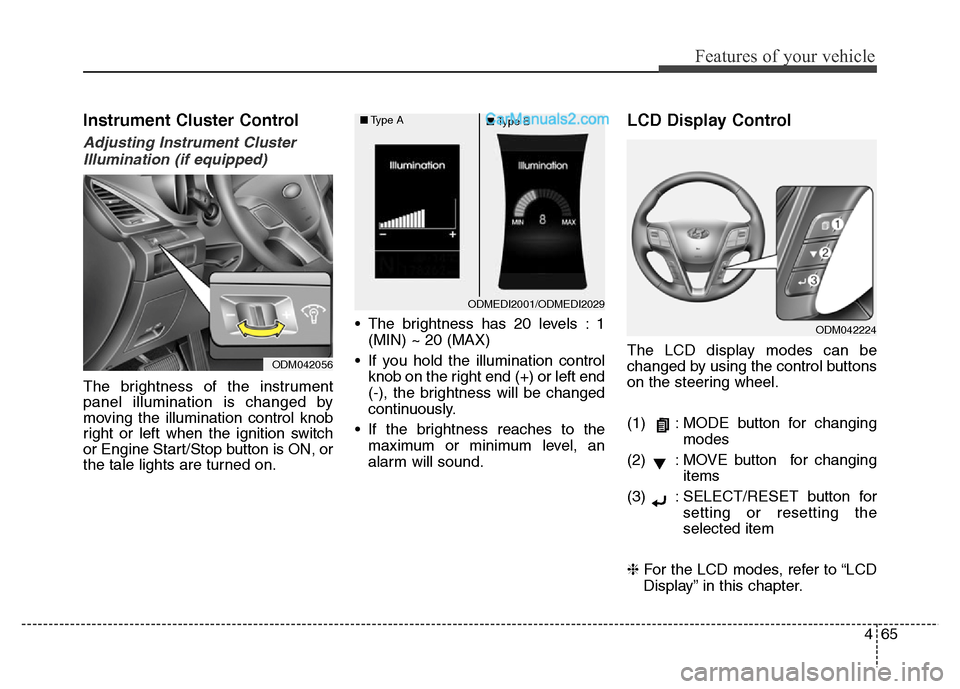
The brightness of the instrument
panel illumination is changed by
moving the illumination control knob
right or left when the ignition switch
or Engine Start/Stop button is ON, or
the tale lights are turned on.• The brightness has 20 levels : 1
(MIN) ~ 20 (MAX)
• If you hold the illumination control
knob on the right end (+) or left end
(-), the brightness will be changed
continuously.
• If the brightness reaches to the
maximum or minimum level, an
alarm will sound.
LCD Display Control
The LCD display modes can be
changed by using the control buttons
on the steering wheel.
(1) : MODE button for changing
modes
(2) : MOVE button for changing
items
(3) : SELECT/RESET button for
setting or resetting the
selected item
❈For the LCD modes, refer to “LCD
Display” in this chapter.
ODMEDI2001/ODMEDI2029 ■Type A
■Type B
ODM042056
ODM042224
Page 173 of 717
Features of your vehicle
76 4
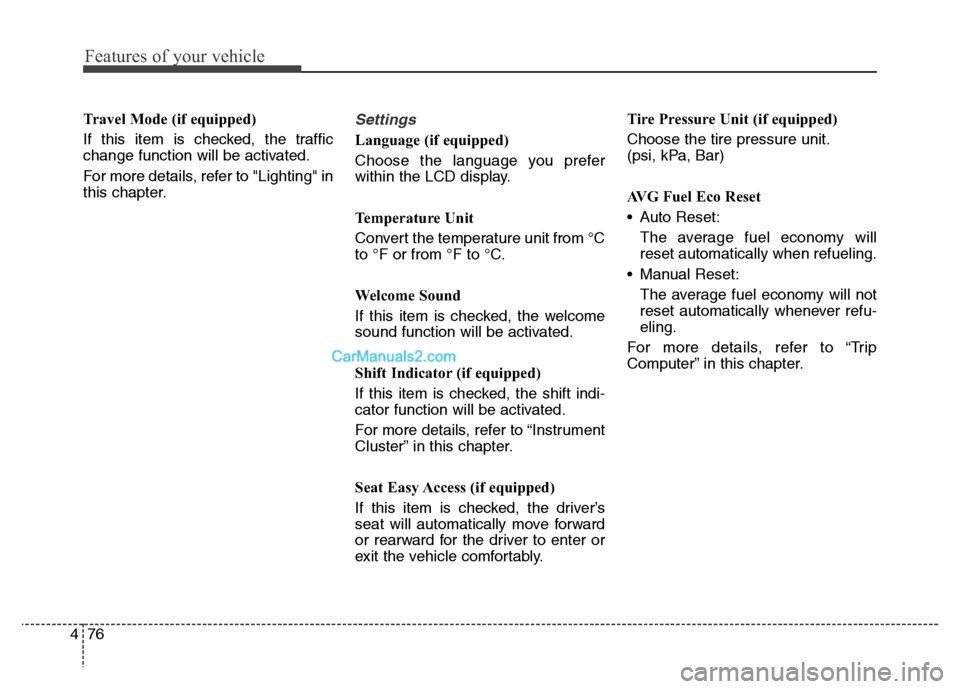
Travel Mode (if equipped)
If this item is checked, the traffic
change function will be activated.
For more details, refer to "Lighting" in
this chapter.Settings
Language (if equipped)
Choose the language you prefer
within the LCD display.
Temperature Unit
Convert the temperature unit from °C
to °F or from °F to °C.
Welcome Sound
If this item is checked, the welcome
sound function will be activated.
Shift Indicator (if equipped)
If this item is checked, the shift indi-
cator function will be activated.
For more details, refer to “Instrument
Cluster” in this chapter.
Seat Easy Access (if equipped)
If this item is checked, the driver’s
seat will automatically move forward
or rearward for the driver to enter or
exit the vehicle comfortably.Tire Pressure Unit (if equipped)
Choose the tire pressure unit.
(psi, kPa, Bar)
AVG Fuel Eco Reset
• Auto Reset:
The average fuel economy will
reset automatically when refueling.
• Manual Reset:
The average fuel economy will not
reset automatically whenever refu-
eling.
For more details, refer to “Trip
Computer” in this chapter.
Page 464 of 717
515
Driving your vehicle
Starting and stopping the engine for
turbocharger intercooler
1.Do not race or accelerate the
engine immediately after starting.
If the engine is cold, idle for sever-
al seconds before sufficient lubri-
cation is ensured in the tur-
bocharger unit.
2.After high speed or extended driv-
ing, requiring a heavy engine load,
idle the engine about 1 minute
before turning it off.
This idle time will allow the tur-
bocharger to cool prior to shutting
the engine off.• Even if the smart key is in the vehi-
cle, if it is far away from you, the
engine may not start.
• When the engine start/stop button
is in the ACC position or above, if
any door is opened, the system
checks for the smart key. If the
smart key is not in the vehicle, the
“ ” indicator and a message
“Key not in vehicle” will appear on
the instrument cluster and LCD
display. And if all doors are closed,
the chime will sound for 5 seconds.
The indicator or warning will turn
off while the vehicle is moving.
Always have the smart key with
you.
WARNING
The engine will start, only when
the smart key is in the vehicle.
Never allow children or any per-
son who is unfamiliar with the
vehicle touch the engine
start/stop button or related
parts.
CAUTION
Do not turn the engine off imme-
diately after it has been subject-
ed to a heavy load. Doing so
may cause severe damage to
the engine or turbocharger unit.
CAUTION
If the engine stalls while the
vehicle is in motion, do not
attempt to move the shift lever
to the P (Park) position. If the
traffic and road conditions per-
mit, you may put the shift lever
in the N (Neutral) position while
the vehicle is still moving and
press the engine start/stop but-
ton in an attempt to restart the
engine.
Page 467 of 717
Driving your vehicle
18 5
For smooth operation, depress the
brake pedal when shifting from N
(Neutral) to a forward or reverse
gear.Transaxle ranges
The indicator lights in the instrument
cluster displays the shift lever posi-
tion when the ignition switch is in the
ON position.
P (Park)
Always come to a complete stop
before shifting into P (Park). This
position locks the transaxle and pre-
vents the front wheels from rotating.
WARNING- Automatic
transaxle
• Always check the surrounding
areas near your vehicle for
people, especially children,
before shifting a vehicle into
D (Drive) or R (Reverse).
• Before leaving the driver’s
seat, always make sure the
shift lever is in the P (Park)
position; then set the parking
brake fully and shut the
engine off. Unexpected and
sudden vehicle movement
can occur if these precautions
are not followed in the order
identified.
CAUTION
• To avoid damage to your
transaxle, do not accelerate
the engine in R (Reverse) or
any forward gear position with
the brakes on.
• When stopped on an upgrade,
do not hold the vehicle sta-
tionary with engine power.
Use the service brake or the
parking brake.
• Do not shift from N (Neutral)
or P (Park) into D (Drive), or R
(Reverse) when the engine is
above idle speed.
WARNING
• Shifting into P (Park) while the
vehicle is in motion will cause
the drive wheels to lock which
will cause you to lose control
of the vehicle.
• Do not use the P (Park) posi-
tion in place of the parking
brake. Always make sure the
shift lever is latched in the P
(Park) position and set the
parking brake fully.
• Never leave a child unattend-
ed in a vehicle.
Page 502 of 717
553
Driving your vehicle
The VSM does not operate when:
• Driving on bank road such as gra-
dient or incline
• Driving rearward
• ESC OFF indicator light ( )
remains on the instrument
cluster
• EPS (Electronic Power Steering)
indicator light remains on the
instrument cluster
VSM operation off
If you press the ESC OFF button to
turn off the ESC, the VSM will also
cancel and the ESC OFF indicator
light ( ) illuminates.
To turn on the VSM, press the button
again. The ESC OFF indicator light
goes out.
Malfunction indicator
The VSM can be deactivated even if
you don’t cancel the VSM operation
by pressing the ESC OFF button. It
indicates that a malfunction has
been detected somewhere in the
EPS (Electronic Power Steering)
system or VSM system. If the ESC
indicator light ( ) or EPS warning
light remains on, we recommend that
you contact an authorized HYUNDAI
dealer.
✽NOTICE
• The VSM is designed to function
above approximately 15 km/h (9
mph) on curves.
• The VSM is designed to function
above approximately 30 km/h (18
mph) when a vehicle is braking on
a split-mu road. The split-mu road
is made of surfaces which have dif-
ferent friction forces.
WARNING
• The Vehicle Stability
Management system is not a
substitute for safe driving
practices but a supplemen-
tary function only. It is the
responsibility of the driver to
always check the speed and
the distance to the vehicle
ahead. Always hold the steer-
ing wheel firmly while driving.
• Your vehicle is designed to
activate according to the dri-
ver’s intention, even with the
VSM installed. Always follow
all the normal precautions for
driving at safe speeds for the
conditions – including driving
in inclement weather and on a
slippery road.
• Driving with varying tire or
wheel sizes may cause the
VSM system to malfunction.
When replacing tires, make
sure they are the same size as
your original tires.
Page 508 of 717
559
Driving your vehicle
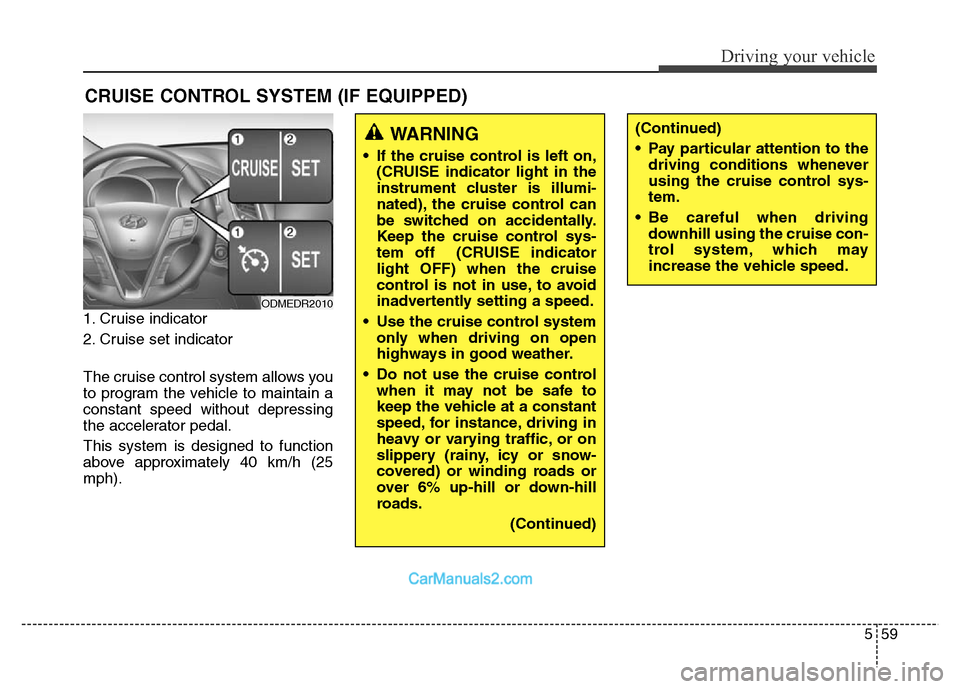
1. Cruise indicator
2. Cruise set indicator
The cruise control system allows you
to program the vehicle to maintain a
constant speed without depressing
the accelerator pedal.
This system is designed to function
above approximately 40 km/h (25
mph).
CRUISE CONTROL SYSTEM (IF EQUIPPED)
WARNING
• If the cruise control is left on,
(CRUISE indicator light in the
instrument cluster is illumi-
nated), the cruise control can
be switched on accidentally.
Keep the cruise control sys-
tem off (CRUISE indicator
light OFF) when the cruise
control is not in use, to avoid
inadvertently setting a speed.
• Use the cruise control system
only when driving on open
highways in good weather.
• Do not use the cruise control
when it may not be safe to
keep the vehicle at a constant
speed, for instance, driving in
heavy or varying traffic, or on
slippery (rainy, icy or snow-
covered) or winding roads or
over 6% up-hill or down-hill
roads.
(Continued)
(Continued)
• Pay particular attention to the
driving conditions whenever
using the cruise control sys-
tem.
• Be careful when driving
downhill using the cruise con-
trol system, which may
increase the vehicle speed.
ODMEDR2010