power steering Hyundai Grandeur 2002 Owner's Manual
[x] Cancel search | Manufacturer: HYUNDAI, Model Year: 2002, Model line: Grandeur, Model: Hyundai Grandeur 2002Pages: 230, PDF Size: 3.82 MB
Page 27 of 230
1- 14 FEATURES OF YOUR HYUNDAI
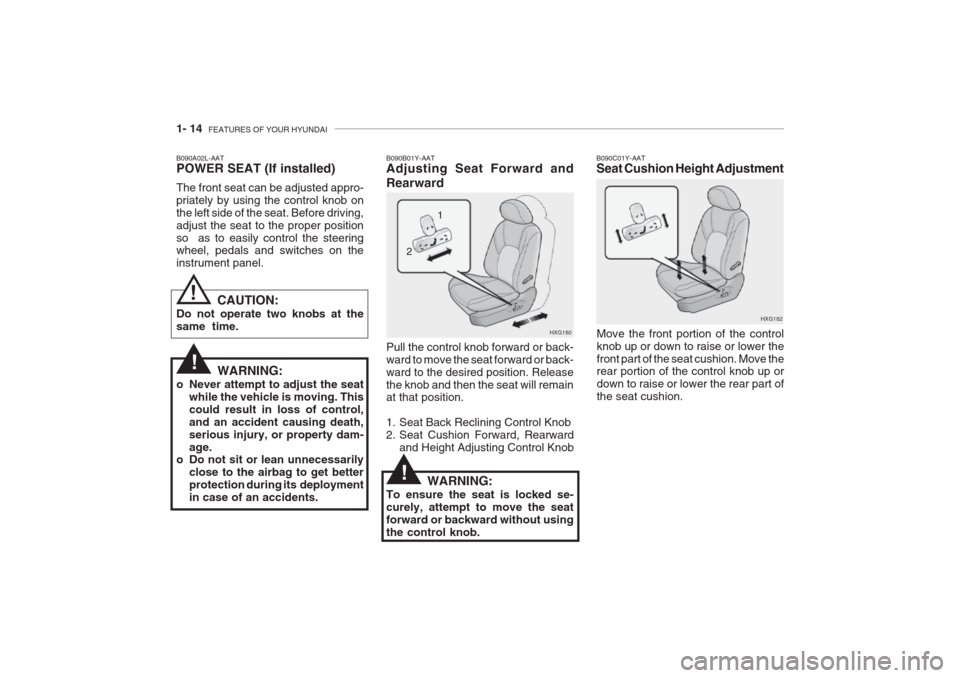
B090A02L-AAT POWER SEAT (If installed) The front seat can be adjusted appro- priately by using the control knob onthe left side of the seat. Before driving,adjust the seat to the proper positionso as to easily control the steering wheel, pedals and switches on the instrument panel.
HXG180
1
2
B090B01Y-AAT Adjusting Seat Forward and Rearward Pull the control knob forward or back- ward to move the seat forward or back-ward to the desired position. Releasethe knob and then the seat will remain at that position.
1. Seat Back Reclining Control Knob
2. Seat Cushion Forward, Rearward
and Height Adjusting Control Knob
WARNING:
o Never attempt to adjust the seat while the vehicle is moving. Thiscould result in loss of control,and an accident causing death,serious injury, or property dam-age.
o Do not sit or lean unnecessarily
close to the airbag to get betterprotection during its deploymentin case of an accidents.
CAUTION:
Do not operate two knobs at the same time.
WARNING:
To ensure the seat is locked se- curely, attempt to move the seatforward or backward without usingthe control knob.
B090C01Y-AAT Seat Cushion Height Adjustment
Move the front portion of the control knob up or down to raise or lower thefront part of the seat cushion. Move the rear portion of the control knob up or down to raise or lower the rear part ofthe seat cushion. HXG182
!
!
!
Page 173 of 230
VEHICLE MAINTENANCE REQUIREMENTS 5- 5
NO.
1 234 5 67 8 9
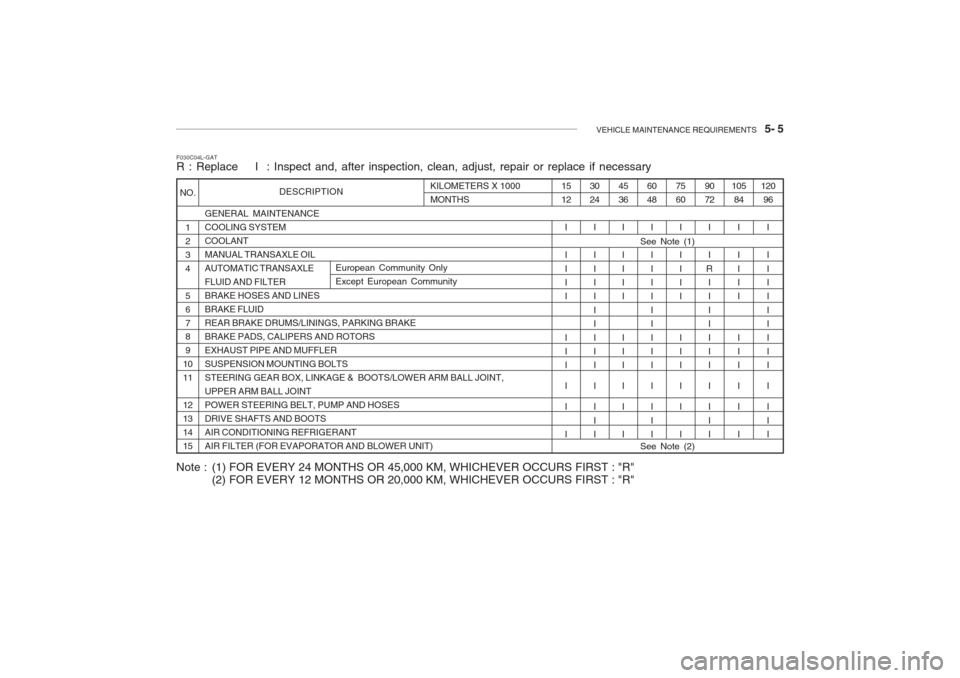
1011 12 131415 GENERAL MAINTENANCECOOLING SYSTEMCOOLANTMANUAL TRANSAXLE OILAUTOMATIC TRANSAXLEFLUID AND FILTERBRAKE HOSES AND LINESBRAKE FLUIDREAR BRAKE DRUMS/LININGS, PARKING BRAKEBRAKE PADS, CALIPERS AND ROTORSEXHAUST PIPE AND MUFFLERSUSPENSION MOUNTING BOLTSSTEERING GEAR BOX, LINKAGE & BOOTS/LOWER ARM BALL JOINT,UPPER ARM BALL JOINTPOWER STEERING BELT, PUMP AND HOSESDRIVE SHAFTS AND BOOTSAIR CONDITIONING REFRIGERANTAIR FILTER (FOR EVAPORATOR AND BLOWER UNIT)
F030C04L-GAT R : Replace I : Inspect and, after inspection, clean, adjust, repair or replace if necessary120
96
I I I II I I I II II I I
105
84
I I I II I II II I
90 72
I I
R I I I I I II II I I
7560
I I I II I II II I
60 48
I I I II I I I II II I I
4536
I I I II I II II I
30 24
I I I II I I I II II I I
1512
I I I II I II II I
KILOMETERS X 1000 MONTHS
See Note (1)
European Community Only Except European Community
Note : (1) FOR EVERY 24 MONTHS OR 45,000 KM, WHICHEVER OCCURS FIRST : "R" (2) FOR EVERY 12 MONTHS OR 20,000 KM, WHICHEVER OCCURS FIRST : "R"
See Note (2)
DESCRIPTION
Page 177 of 230
VEHICLE MAINTENANCE REQUIREMENTS 5- 9
F070L01A-AAT
o Suspension Mounting Bolts Check the suspension connections for looseness or damage. Retightento the specified torque. F070M01Y-AAT
o Steering Gear Box, Linkage &
Boots / Lower Arm Ball Joint, Upper Arm Ball Joint
With the vehicle stopped and engine off, check for excessive free-play inthe steering wheel.Check the linkage for bends or dam-age. Check the dust boots and ball joints for deterioration, cracks, or dam- age. Replace any damaged parts. F070N01A-AAT
o Power Steering Pump, Belt and Hoses
Check the power steering pump and hoses for leakage and damage. Re- place any damaged or leaking parts immediately. Inspect the power steer-ing belt for evidence of cuts, cracks,excessive wear, oiliness and propertension. Replace or adjust it if neces-sary. F070P01A-AAT
o Driveshafts and Boots Check the drive shafts, boots and clamps for cracks, deterioration, ordamage. Replace any damaged partsand, if necessary, repack the grease. F070Q01A-AAT
o Air Conditioning Refrigerant Check the air conditioning lines and connections for leakage and damage. Check air conditioning performanceaccording to the relevant shop manualif necessary.
Page 178 of 230

6. Do-It-Yourself Maintenance
Engine Compartment ..................................................................... 6-2
General Checks .............................................................................. 6-5
Checking the Engine Oil ................................................................ 6-6
Changing the Oil and Filter ........................................................... 6-7
Checking and Changing the Engine Coolant ............................... 6-8
Spark Plugs ..................................................................................6-10
Changing the Air Cleaner Filter ................................................... 6-11
Checking the Transaxle Oil (Manual) .......................................... 6-13
Checking the Transaxle Fluid (Automatic) .................................. 6-14
Checking the Brakes .................................................................... 6-15
Checking the Clutch Fluid ............................................................ 6-16
Air Conditioning Care ................................................................... 6-17
Changing the Air Filter (For Evaporator and Blower Unit) ......... 6-18
Checking Drive Belts .................................................................... 6-21
Checking and Replacing Fuses ................................................... 6-21
Power Steering Fluid Level .......................................................... 6-24
Headlight Aiming Adjustment ....................................................... 6-25
Replacement of Light Bulbs ......................................................... 6-26
Bulb Wattage ................................................................................ 6-33
Junction Box Description ............................................................. 6-34
6
Page 179 of 230
6- 2 DO-IT-YOURSELF MAINTENANCE
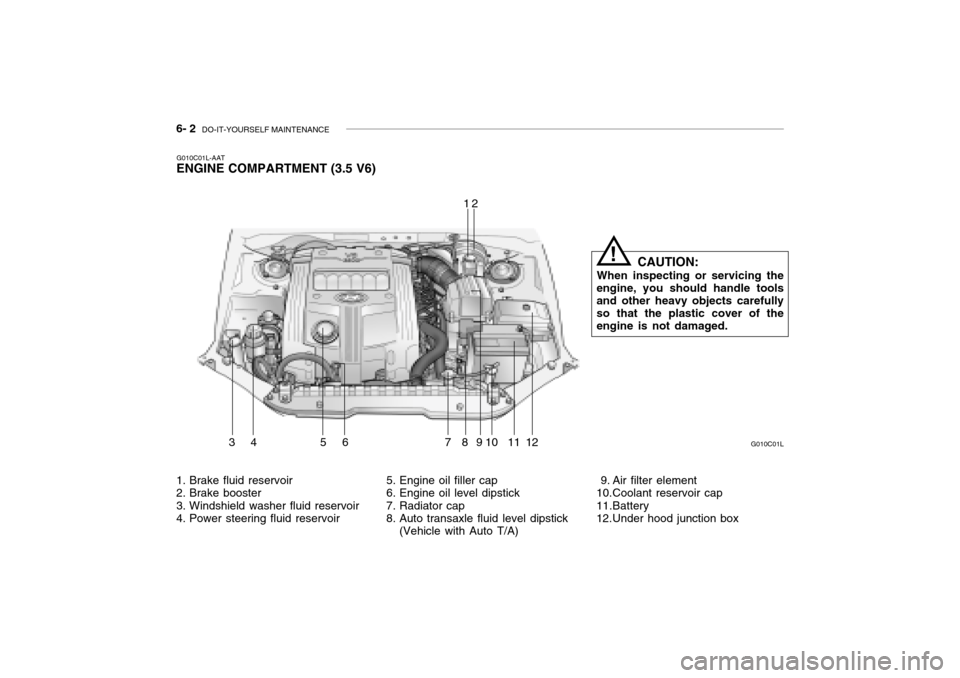
1. Brake fluid reservoir
2. Brake booster
3. Windshield washer fluid reservoir
4. Power steering fluid reservoir 5. Engine oil filler cap
6. Engine oil level dipstick
7. Radiator cap
8. Auto transaxle fluid level dipstick
(Vehicle with Auto T/A) 9. Air filter element
10.Coolant reservoir cap
11.Battery
12.Under hood junction boxG010C01L
12
34 56 7891011
G010C01L-AAT
ENGINE COMPARTMENT (3.5 V6)
12 CAUTION:
When inspecting or servicing the
engine, you should handle tools and other heavy objects carefully so that the plastic cover of the engine is not damaged.
!
Page 180 of 230
DO-IT-YOURSELF MAINTENANCE 6- 3
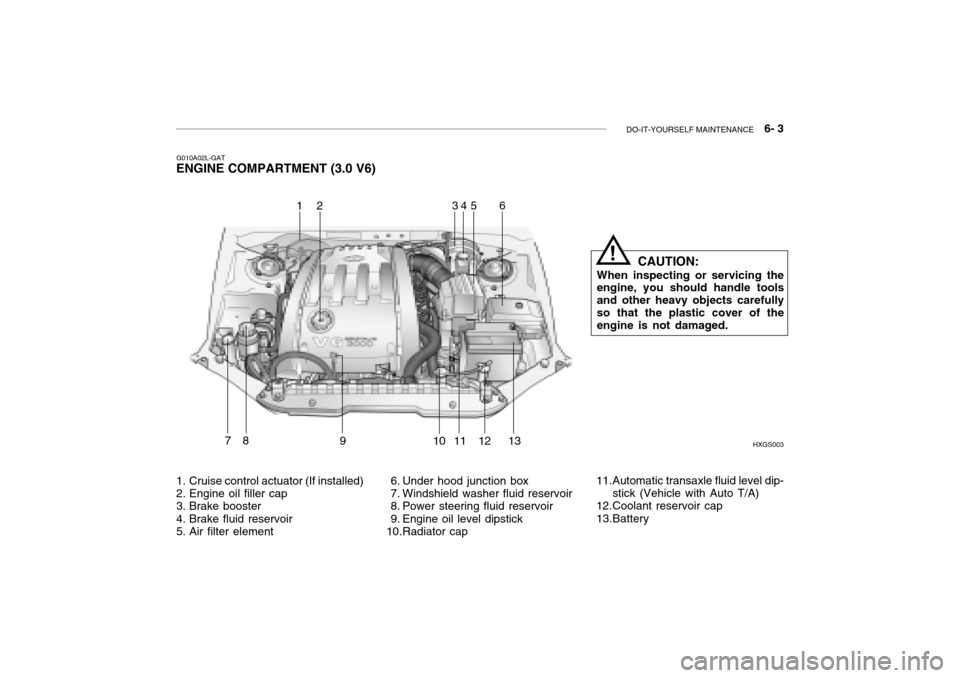
G010A02L-GAT
ENGINE COMPARTMENT (3.0 V6)
HXGS003
164
7891011 1213
1. Cruise control actuator (If installed)
2. Engine oil filler cap
3. Brake booster
4. Brake fluid reservoir
5. Air filter element 6. Under hood junction box
7. Windshield washer fluid reservoir
8. Power steering fluid reservoir
9. Engine oil level dipstick
10.Radiator cap11.Automatic transaxle fluid level dip-
stick (Vehicle with Auto T/A)
12.Coolant reservoir cap
13.Battery
235
CAUTION:
When inspecting or servicing the engine, you should handle tools and other heavy objects carefullyso that the plastic cover of the engine is not damaged.!
Page 181 of 230
6- 4 DO-IT-YOURSELF MAINTENANCE
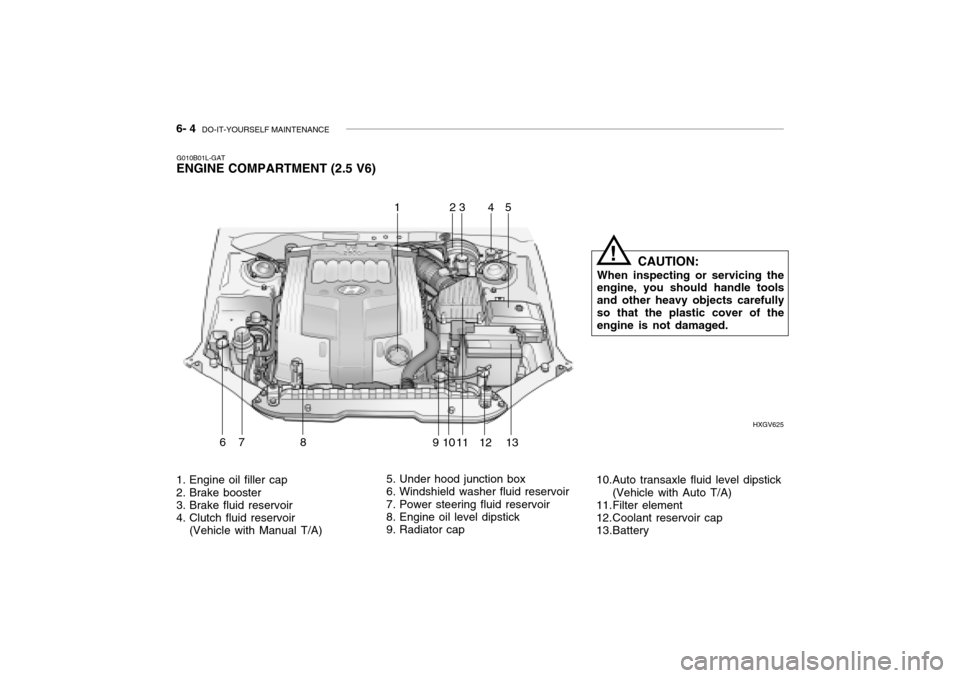
1. Engine oil filler cap
2. Brake booster
3. Brake fluid reservoir
4. Clutch fluid reservoir
(Vehicle with Manual T/A) 5. Under hood junction box
6. Windshield washer fluid reservoir
7. Power steering fluid reservoir
8. Engine oil level dipstick
9. Radiator cap
10.Auto transaxle fluid level dipstick
(Vehicle with Auto T/A)
11.Filter element
12.Coolant reservoir cap
13.Battery HXGV625
G010B01L-GAT
ENGINE COMPARTMENT (2.5 V6)
53
678910 1112
124
13
CAUTION:
When inspecting or servicing the engine, you should handle tools and other heavy objects carefullyso that the plastic cover of the engine is not damaged.!
Page 182 of 230

DO-IT-YOURSELF MAINTENANCE 6- 5
G020A02A-AAT
GENERAL CHECKS Engine Compartment
The following should be checked regu- larly:
o Engine oil level and condition
o Transaxle fluid level and condition
o Brake fluid level
o Clutch fluid level
o Coolant level
o Windshield washer fluid level
o Accessory drive belt condition
o Coolant hose condition
o Fluid leaks (on or below compo- nents)
o Power steering fluid level and con- dition
o Battery condition
o Air filter condition G020C01A-AAT Vehicle Interior The following should be checked each time when the vehicle is driven:
o Lights operation
o Windshield wiper operation
o Horn operation
o Defroster, heater system operation
(and air conditioning, if installed)
o Steering operation and condition
o Mirror condition and operation
o Turn signal operation
o Accelerator pedal operation
o Brake operation, including parking
brake
o Manual transaxle operation, includ- ing clutch operation
o Automatic transaxle operation, in- cluding "Park" mechanism opera-tion
o Seat control condition and opera- tion
o Seat belt condition and operation
o Sunvisor operation If you notice anything that does not operate correctly or appears to befunctioning incorrectly, inspect it care- fully and seek assistance from your Hyundai dealer if service is needed.
G020B01A-AAT
Vehicle Exterior
The following should be checked
monthly:
o Overall appearance and condition
o Wheel condition and wheel nut torgue
o Exhaust system condition
o Light condition and operation
o Windshield glass condition
o Wiper blade condition
o Paint condition and body corrosion
o Fluid leaks
o Door and hood lock condition
o Tire pressure and condition (including spare tire)
Page 195 of 230
6- 18 DO-IT-YOURSELF MAINTENANCE
B145A01L-GAT
CHANGING THE AIR FILTER (For Evaporator and Blower Unit)
The air filter is located in front of the
evaporator unit behind the glove box. It helps to decrease pollutants from
entering the car and to filter the air.
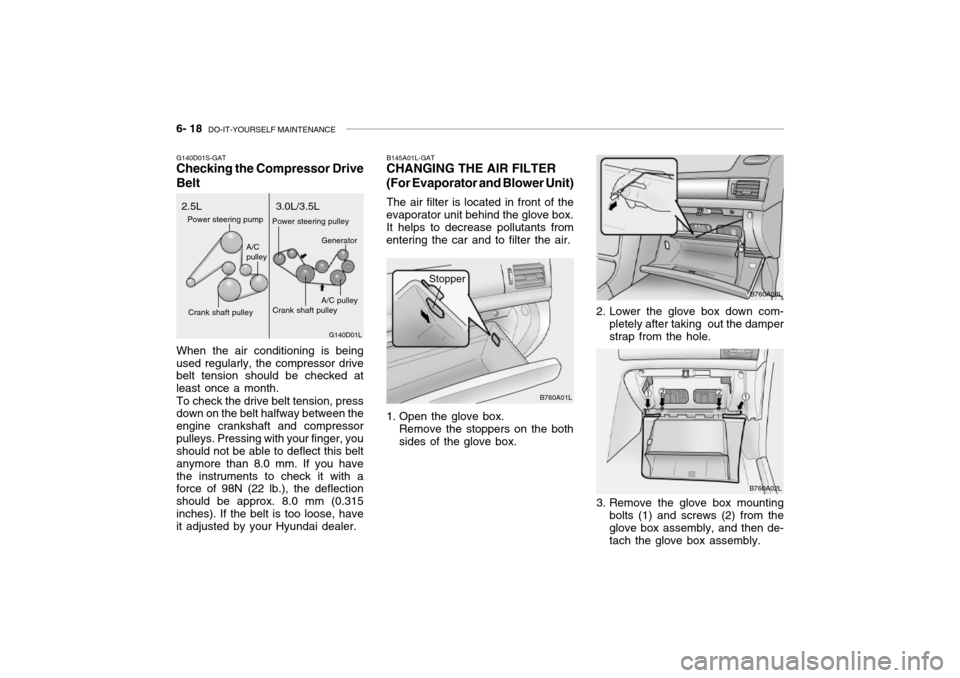
B760A01L
Stopper
1. Open the glove box. Remove the stoppers on the both sides of the glove box. 2. Lower the glove box down com-
pletely after taking out the damperstrap from the hole.
B760A02L
3. Remove the glove box mounting bolts (1) and screws (2) from theglove box assembly, and then de-tach the glove box assembly.
B760A08L
G140D01S-GAT Checking the Compressor Drive Belt When the air conditioning is being used regularly, the compressor drive belt tension should be checked at least once a month. To check the drive belt tension, press down on the belt halfway between the engine crankshaft and compressorpulleys. Pressing with your finger, you should not be able to deflect this belt anymore than 8.0 mm. If you have
the instruments to check it with a force of 98N (22 lb.), the deflection should be approx. 8.0 mm (0.315inches). If the belt is too loose, have it adjusted by your Hyundai dealer. G140D01L
2.5L 3.0L/3.5L
Power steering pump
Crank shaft pulley A/C pulley
Crank shaft pulley
A/C pulley
Power steering pulley
Generator
Page 198 of 230
DO-IT-YOURSELF MAINTENANCE 6- 21
G190A01A-GAT
CHECKING DRIVE BELTS
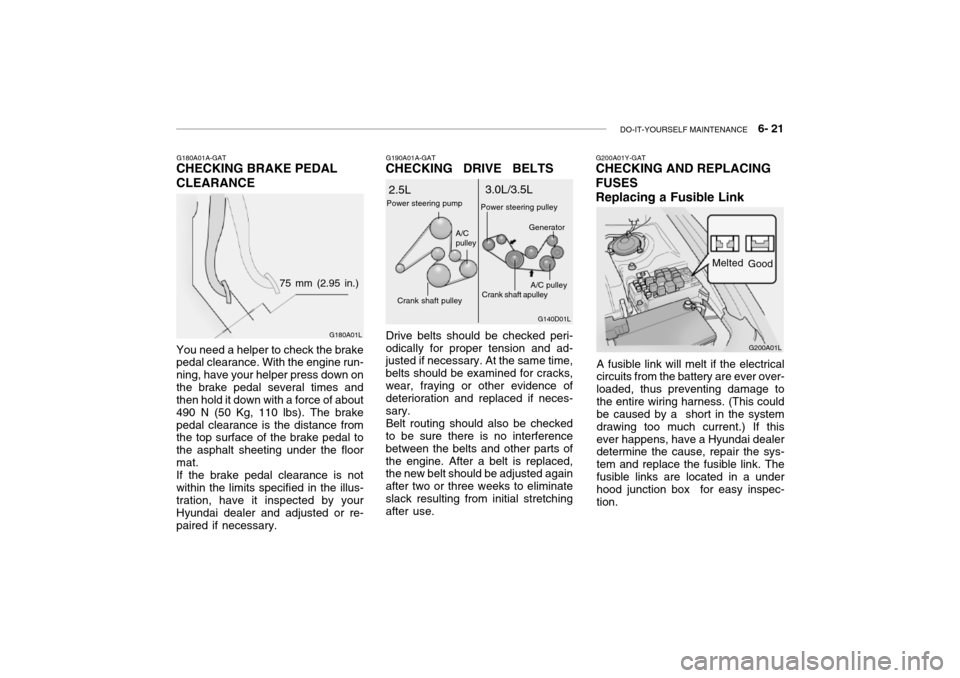
Drive belts should be checked peri-
odically for proper tension and ad- justed if necessary. At the same time, belts should be examined for cracks,wear, fraying or other evidence of deterioration and replaced if neces- sary.
Belt routing should also be checked
to be sure there is no interferencebetween the belts and other parts ofthe engine. After a belt is replaced, the new belt should be adjusted again after two or three weeks to eliminateslack resulting from initial stretching after use.
G180A01A-GAT
CHECKING BRAKE PEDAL CLEARANCE
G180A01L
75 mm (2.95 in.)
You need a helper to check the brake pedal clearance. With the engine run- ning, have your helper press down onthe brake pedal several times and then hold it down with a force of about 490 N (50 Kg, 110 lbs). The brakepedal clearance is the distance from the top surface of the brake pedal to the asphalt sheeting under the floormat.If the brake pedal clearance is notwithin the limits specified in the illus-tration, have it inspected by your Hyundai dealer and adjusted or re- paired if necessary. G140D01L
2.5L
3.0L/3.5L
Power steering pump
Crank shaft pulley A/C pulley
Crank shaft apulley
A/C pulley
Power steering pulley
Generator
G200A01Y-GAT
CHECKING AND REPLACING FUSES Replacing a Fusible Link
A fusible link will melt if the electrical circuits from the battery are ever over- loaded, thus preventing damage tothe entire wiring harness. (This could be caused by a short in the system drawing too much current.) If thisever happens, have a Hyundai dealer determine the cause, repair the sys- tem and replace the fusible link. Thefusible links are located in a under hood junction box for easy inspec- tion. G200A01L
Melted
Good