coolant temperature Hyundai Grandeur 2004 Owner's Manual
[x] Cancel search | Manufacturer: HYUNDAI, Model Year: 2004, Model line: Grandeur, Model: Hyundai Grandeur 2004Pages: 235, PDF Size: 6.64 MB
Page 54 of 235
FEATURES OF YOUR HYUNDAI 1- 41
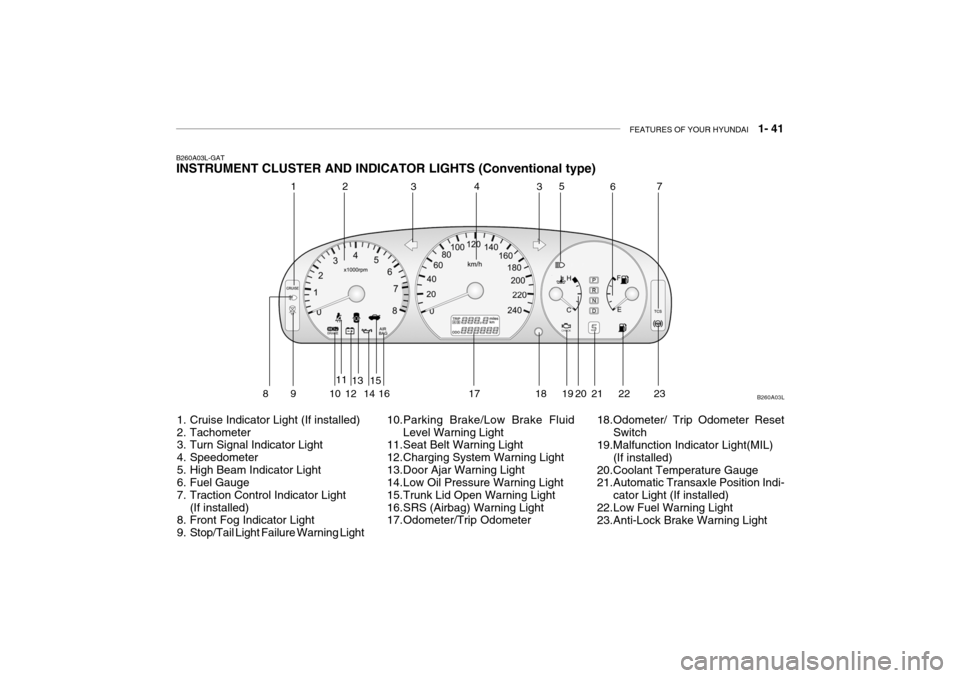
B260A03L-GAT INSTRUMENT CLUSTER AND INDICATOR LIGHTS (Conventional type)
1. Cruise Indicator Light (If installed)
2. Tachometer
3. Turn Signal Indicator Light
4. Speedometer
5. High Beam Indicator Light
6. Fuel Gauge
7. Traction Control Indicator Light (If installed)
8. Front Fog Indicator Light
9. Stop/Tail Light Failure Warning Light 10.Parking Brake/Low Brake Fluid
Level Warning Light
11.Seat Belt Warning Light
12.Charging System Warning Light
13.Door Ajar Warning Light
14.Low Oil Pressure Warning Light
15.Trunk Lid Open Warning Light
16.SRS (Airbag) Warning Light
17.Odometer/Trip Odometer 18.Odometer/ Trip Odometer Reset
Switch
19.Malfunction Indicator Light(MIL)
(If installed)
20.Coolant Temperature Gauge
21.Automatic Transaxle Position Indi-
cator Light (If installed)
22.Low Fuel Warning Light
23.Anti-Lock Brake Warning Light B260A03L
1
2
3435
67
89 1 011
1213
1415
16 17 18 19 20 21 22
23
Page 55 of 235
1- 42 FEATURES OF YOUR HYUNDAI
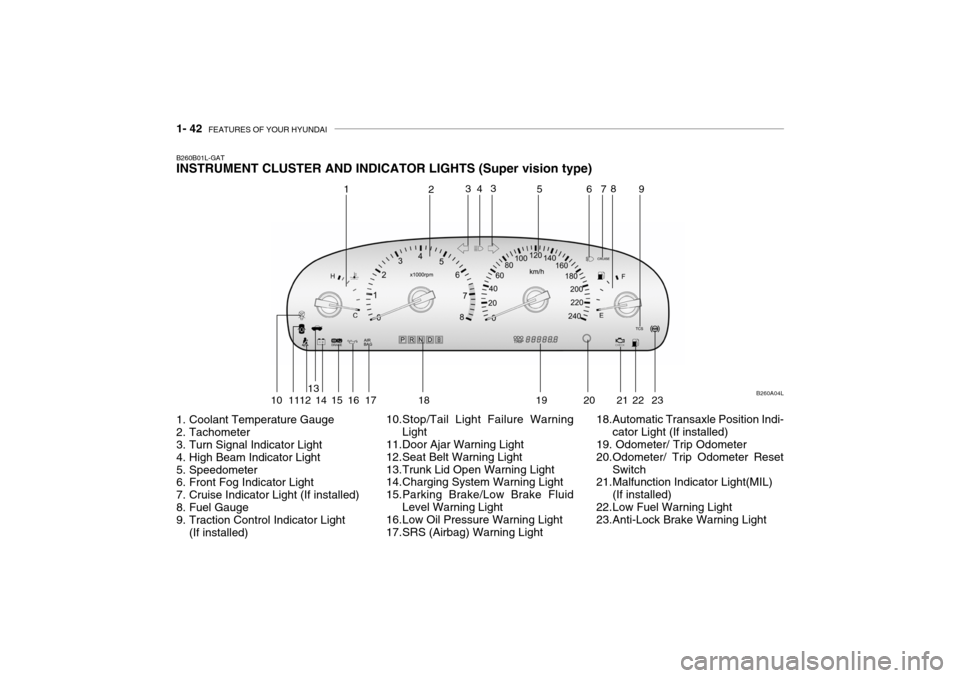
B260B01L-GAT INSTRUMENT CLUSTER AND INDICATOR LIGHTS (Super vision type)
1. Coolant Temperature Gauge
2. Tachometer
3. Turn Signal Indicator Light
4. High Beam Indicator Light
5. Speedometer
6. Front Fog Indicator Light
7. Cruise Indicator Light (If installed)
8. Fuel Gauge
9. Traction Control Indicator Light
(If installed) 10.Stop/Tail Light Failure Warning
Light
11.Door Ajar Warning Light
12.Seat Belt Warning Light
13.Trunk Lid Open Warning Light
14.Charging System Warning Light
15.Parking Brake/Low Brake Fluid
Level Warning Light
16.Low Oil Pressure Warning Light
17.SRS (Airbag) Warning Light 18.Automatic Transaxle Position Indi-
cator Light (If installed)
19. Odometer/ Trip Odometer
20.Odometer/ Trip Odometer Reset
Switch
21.Malfunction Indicator Light(MIL)
(If installed)
22.Low Fuel Warning Light
23.Anti-Lock Brake Warning Light B260A04L
1
2
4
3 3
56 78
9
10 1112 13
14 15 16 17 18 19 20 21 22 23
Page 150 of 235

DRIVING YOUR HYUNDAI 2- 17
C160F01A-AAT Check Spark Plugs and Ignition System Inspect your spark plugs as described in Section 6 and replace them if neces-sary. Also check all ignition wiring and components to be sure they are not cracked, worn or damaged in any way. C160G01A-GAT To Keep Locks from Freezing To keep the locks from freezing, squirt an approved de-icer fluid or glycerineinto the key opening. If a lock is cov- ered with ice, squirt it with an approved de-icing fluid to remove the ice. If thelock is frozen internally, you may be able to thaw it out by using a heated key. Handle the heated key with careto avoid injury. NOTE: The proper temperature for using the immobilizer key is from -40°C to80°C. If you heat the immobilizer key over 80°C to open the frozen lock, it may cause damage to thetransponder in its head.
C160D01A-AAT Check Battery and Cables Winter puts additional burdens on the battery system. Visually inspect thebattery and cables as described in Section 6. The level of charge in your battery can be checked by your Hyun-dai dealer or a service station. C160E01A-AAT Change to "Winter Weight" Oil if Necessary In some climates it is recommended that a lower viscosity "winter weight" oil be used during cold weather. SeeSection 9 for recommendations. If you aren't sure what weight oil you should use, consult your Hyundai dealer.
C160I01A-AAT Don't Let Your Parking Brake Freeze Under some conditions your parking brake can freeze in the engaged posi- tion. This is most likely to happenwhen there is an accumulation of snow or ice around or near the rear brakes or if the brakes are wet. If there is a riskthe parking brake may freeze, apply it only temporarily while you put the gear selector lever in "P" (automatic) or infirst or reverse gear (manual transaxle) and block the rear wheels so the car cannot roll. Then release the parkingbrake.
C160H01A-AAT Use Approved Anti-Freeze in WindowWasher System To keep the water in the window washer system from freezing, add an approved anti-freeze solution in accordance withinstructions on the container. Window washer anti-freeze is available from Hyundai dealers and most auto partsoutlets. Do not use engine coolant or other types of anti-freeze as these may damage the finish.
Page 152 of 235

DRIVING YOUR HYUNDAI 2- 19
C190C01Y-GAT Trailer Brakes If your trailer is equipped with a braking system, make sure it conforms to fed-eral and/or local regulations and that it is properly installed and operating cor- rectly. NOTE: If you tow a trailer or vehicle, your car will require more frequent main- tenance due to the additional load.See "Maintenance Under Severe Usage Conditions" on page 5-6.
CAUTION:
o Never connect a trailer brake sys- tem directly to the vehicle brake system.
o When towing a trailer on steep
grades (in excess of 12%) pay
close attention to the engine cool- ant temperature gauge to ensure the engine does not overheat. Ifthe needle of the coolant tem- perature gauge moves across the dial towards "H" (HOT), pull overand stop as soon as it is safe to
C190B01S-AAT Trailer Hitches Select the proper hitch and ball combi- nation, making sure that it's location is compatible with that of the trailer or vehicle being towed. Use a quality non-equalizing hitch whichdistributes the tongue load uniformly throughout the chassis. The hitch should be bolted securely to the car and installed by a qualified technician. DO NOT USE A HITCHDESIGNED FOR TEMPORARY IN- STALLATION AND NEVER USE ONE THAT ATTACHES ONLY TO THEBUMPER. CAUTION:
Do not do any towing with your car during its first 2,000 km (1,200 miles) in order to allow the engine to prop-erly break in. Failure to heed this caution may result in serious en- gine or transaxle damage.
!
! C190D01A-GAT Safety Chains Should the hitch connection between your car and the trailer or vehicle youare towing fail, the trailer or vehicle could wander dangerously across other lanes of traffic and ultimately collidewith another vehicle. To eliminate this potentially dangerous situation, safety chains, attached between your car and the trailer or towed vehicle, are re- quired in most provinces.do so, and allow the engine to idle until it cools down. You may
proceed once the engine hascooled sufficiently.
Page 159 of 235

3- 4 WHAT TO DO IN AN EMERGENCY
check for coolant leaking from the radiator, hoses or under the car. (If the air conditioning had been in use,it is normal for cold water to be draining from it when you stop).
WARNING:
While the engine is running, keep hair, hands, and clothing away frommoving parts such as the fan and drive belts to prevent injury.
5. If the water pump drive belt is bro- ken or engine coolant is leaking out, stop the engine immediately and call the nearest Hyundai dealer for assistance.
WARNING:
Do not remove the radiator cap whenthe engine is hot. This can allowcoolant to be blown out of the open- ing and cause serious burns.
D030A01A-AAT IF THE ENGINE OVERHEATS If your temperature gauge indicates overheating, you experience a loss ofpower, or hear loud pinging or knock- ing, the engine is probably too hot. If this happens to you, you should:
1. Pull off the road and stop as soon as
it is safe to do so.
2. Place the gear selector lever in "P" (automatic), or neutral (manual transaxle) and set the parking brake.If the air conditioning is on, turn it off.
3. If engine coolant is running out un- der the car or steam is coming outfrom the hood, stop the engine. Do not open the hood until the enginecoolant has stopped running or the steaming has stopped. If there is no visible loss of coolant and no steam,leave the engine running and check to be sure the engine cooling fan is operating. If the fan is not running,turn the engine off.
4. Check to see if the water pump drive
belt is missing. If it is not missing,check to see that it is tight. If the drive belt seems to be satisfactory, 6. If you cannot find the cause of the
overheating, wait until the engine temperature has returned normal.Then, if the engine coolant has been lost, carefully add engine coolant to the reservoir (page 6-9) to bring thefluid level in the reservoir up to the halfway mark.
7. Proceed with caution, keeping alert for further signs of overheating. Ifoverheating happens again, call a Hyundai dealer for assistance.
CAUTION:
Serious loss of engine coolant indi-cates there is a leak in the cooling system and this should be checked as soon as possible by a Hyundaidealer.
!
!
!
Page 181 of 235

5- 8 VEHICLE MAINTENANCE REQUIREMENTS
F060H01A-AAT
o Air Cleaner Filter A Genuine Hyundai air cleaner filter is
recommended when the filter is re- placed. F060J01A-AAT
o Spark Plugs Make sure to install new spark plugs of the correct heat range. F070C02A-AAT
o Coolant The coolant should be changed at the intervals specified in the mainte- nance schedule. F070D01A-AAT
o Manual Transaxle Oil
Inspect the manual transaxle oil ac-cording to the maintenance schedule.
NOTE: If the oil level is low, check forpossible leaks before adding oil. Do not overfill. F070E03A-AAT
o Automatic Transaxle Fluid
The fluid level should be in the "HOT" range of the dipstick, after the engine and transaxle are at normal operatingtemperature. Check the automatic transaxle fluid level with the engine running and the transaxle in neutral,with the parking brake properly ap- plied. Use HYUNDAI GENUINE ATF SP III, DIAMOND ATF SP III, SK ATFSP III or other brands approved by Hyundai Motor Co., when adding or changing fluid. F070F01A-AAT
o Brake Hoses and Lines
Visually check for proper installation,chafing, cracks, deterioration and any leakage. Replace any deteriorated or damaged parts immediately. F070G02A-AAT
o Brake Fluid
Check brake fluid level in the brake fluid reservoir. The level should be between "MIN" and "MAX" marks on the side of the reservoir. Use onlyhydraulic brake fluid conforming to DOT 3 or DOT 4.
F070H01A-AAT
o Rear Brake Drums/Linings,
Parking Brake
Check the rear brake drums and lin-
ings for scoring, burning, leaking fluid,broken parts, and excessive wear. Inspect the parking brake system in-cluding the parking brake lever and cables. For detailed service proce- dures, refer to the Shop Manual.
F070B01A-GAT
o Cooling System Check the cooling system part, such as radiator, coolant reservoir, hosesand connections for leakage and dam- age. Replace any damaged parts.
Page 189 of 235
DO-IT-YOURSELF MAINTENANCE 6- 7
G040A02A-AAT
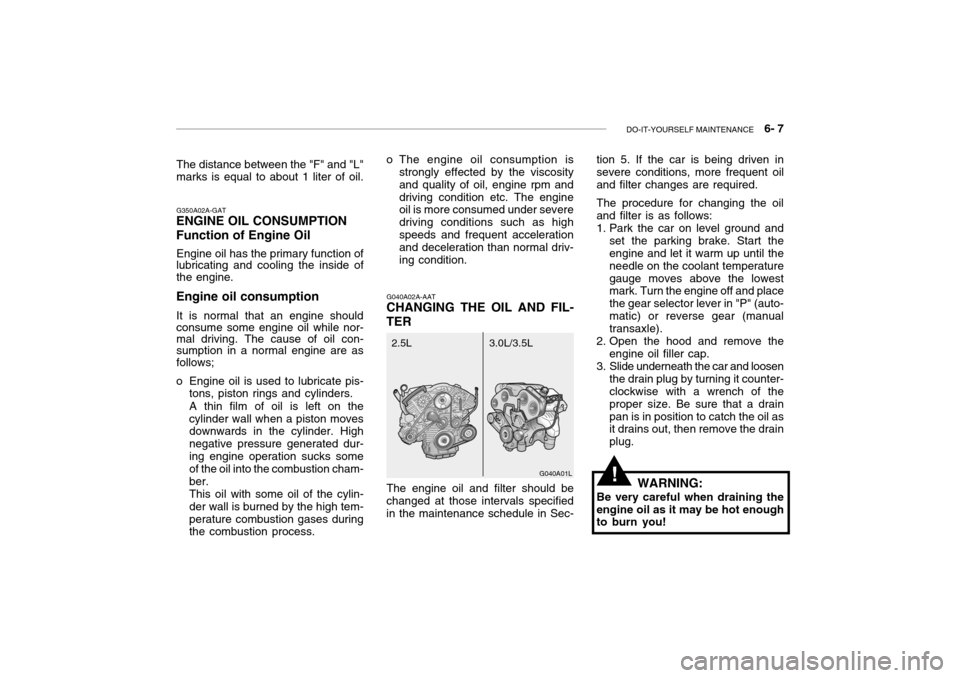
CHANGING THE OIL AND FIL- TER tion 5. If the car is being driven in severe conditions, more frequent oil and filter changes are required. The procedure for changing the oil and filter is as follows:
1. Park the car on level ground and
set the parking brake. Start the engine and let it warm up until the needle on the coolant temperaturegauge moves above the lowest mark. Turn the engine off and place the gear selector lever in "P" (auto-matic) or reverse gear (manual transaxle).
2. Open the hood and remove the engine oil filler cap.
3. Slide underneath the car and loosen the drain plug by turning it counter-clockwise with a wrench of the proper size. Be sure that a drainpan is in position to catch the oil as it drains out, then remove the drain plug.
G040A01L
3.0L/3.5L
2.5L
G350A02A-GAT
ENGINE OIL CONSUMPTION Function of Engine Oil
Engine oil has the primary function of lubricating and cooling the inside of the engine.
Engine oil consumption It is normal that an engine should consume some engine oil while nor- mal driving. The cause of oil con- sumption in a normal engine are as follows;
o Engine oil is used to lubricate pis- tons, piston rings and cylinders. A thin film of oil is left on the cylinder wall when a piston moves downwards in the cylinder. High negative pressure generated dur-ing engine operation sucks some of the oil into the combustion cham- ber.This oil with some oil of the cylin-der wall is burned by the high tem-perature combustion gases during the combustion process.
!
The distance between the "F" and "L" marks is equal to about 1 liter of oil.
WARNING:
Be very careful when draining the engine oil as it may be hot enough to burn you!
o The engine oil consumption is
strongly effected by the viscosity and quality of oil, engine rpm anddriving condition etc. The engine oil is more consumed under severe driving conditions such as highspeeds and frequent acceleration and deceleration than normal driv- ing condition.
The engine oil and filter should be
changed at those intervals specifiedin the maintenance schedule in Sec-
Page 191 of 235
DO-IT-YOURSELF MAINTENANCE 6- 9
G050D02A-AAT To Change the Engine Coolant The engine coolant should be changed at those intervals specified in the ve- hicle maintenance schedule in Sec-tion 5.
CAUTION:
Engine coolant can damage thefinish of your car. If you spill en- gine coolant on the car, wash it off thoroughly with clean water.
1. Park the car on level ground, set the parking brake and remove the radiator cap when cool.
2. Be sure your drain receptacle is in place. Open the drain cock on theradiator. Allow all the engine coolant to drain from the cooling system,then securely close the drain cock.
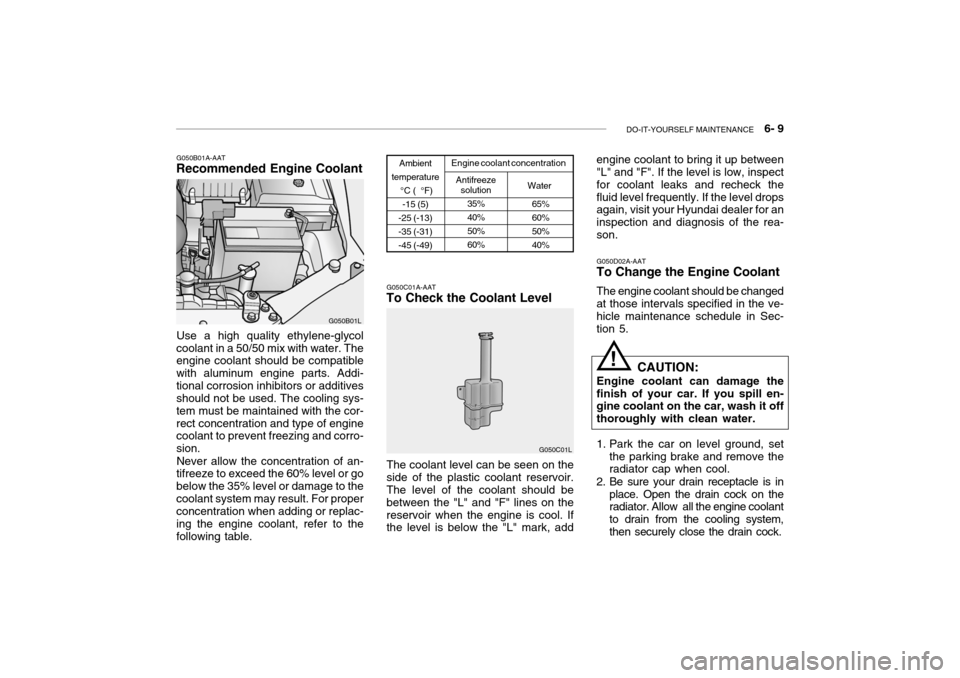
Use a high quality ethylene-glycol
coolant in a 50/50 mix with water. The engine coolant should be compatible with aluminum engine parts. Addi-tional corrosion inhibitors or additives should not be used. The cooling sys- tem must be maintained with the cor-rect concentration and type of engine coolant to prevent freezing and corro- sion.
Never allow the concentration of an-
tifreeze to exceed the 60% level or gobelow the 35% level or damage to thecoolant system may result. For proper concentration when adding or replac- ing the engine coolant, refer to thefollowing table.
Ambient
temperature °C ( °F)-15 (5)
-25 (-13) -35 (-31)-45 (-49) Engine coolant concentration
Antifreeze solution
Water
G050C01A-AAT
To Check the Coolant Level
The coolant level can be seen on the side of the plastic coolant reservoir. The level of the coolant should be between the "L" and "F" lines on thereservoir when the engine is cool. If the level is below the "L" mark, add G050C01L
65% 60%50%40%
35%40%50%60%
G050B01A-AAT
Recommended Engine Coolant
G050B01L engine coolant to bring it up between "L" and "F". If the level is low, inspect for coolant leaks and recheck thefluid level frequently. If the level drops again, visit your Hyundai dealer for an inspection and diagnosis of the rea-son.
!
Page 192 of 235
6- 10 DO-IT-YOURSELF MAINTENANCE
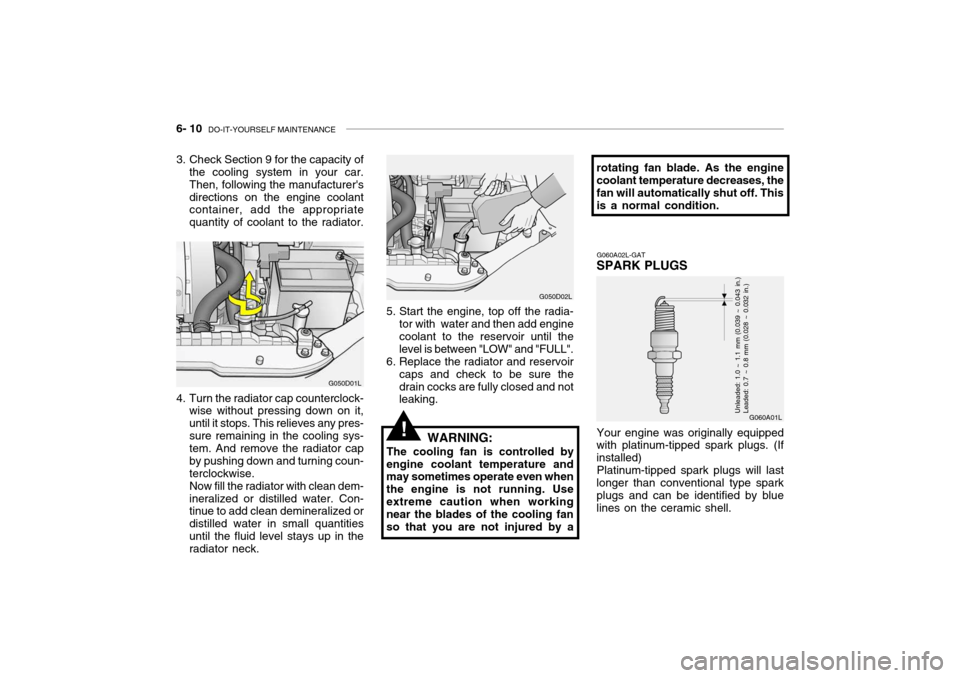
4. Turn the radiator cap counterclock-
wise without pressing down on it, until it stops. This relieves any pres-sure remaining in the cooling sys- tem. And remove the radiator cap by pushing down and turning coun-terclockwise.Now fill the radiator with clean dem-ineralized or distilled water. Con- tinue to add clean demineralized or distilled water in small quantitiesuntil the fluid level stays up in the radiator neck. G050D01L
G050D02L
5. Start the engine, top off the radia- tor with water and then add enginecoolant to the reservoir until the level is between "LOW" and "FULL".
6. Replace the radiator and reservoir
caps and check to be sure thedrain cocks are fully closed and not leaking.
WARNING:
The cooling fan is controlled by
engine coolant temperature andmay sometimes operate even when the engine is not running. Useextreme caution when working near the blades of the cooling fan so that you are not injured by a
3. Check Section 9 for the capacity of
the cooling system in your car.Then, following the manufacturer'sdirections on the engine coolant container, add the appropriate quantity of coolant to the radiator. rotating fan blade. As the engine coolant temperature decreases, the fan will automatically shut off. Thisis a normal condition.
G060A01L
G060A02L-GAT
SPARK PLUGS
Your engine was originally equipped
with platinum-tipped spark plugs. (If installed)
Platinum-tipped spark plugs will last
longer than conventional type sparkplugs and can be identified by blue lines on the ceramic shell.Unleaded: 1.0 ~ 1.1 mm (0.039 ~ 0.043 in.) Leaded: 0.7 ~ 0.8 mm (0.028 ~ 0.032 in.)
!
Page 197 of 235
DO-IT-YOURSELF MAINTENANCE 6- 15
G120A01A-AAT
CHECKING THE BRAKES
CAUTION:
Because brakes are essential to
the safe operation of the car, it is suggested that they be checked and inspected by your Hyundaidealer. The brakes should be checked and inspected for wear at those intervals specified in thevehicle maintenance schedule in Section 5.
G120B01A-A AT
Checking the Brake Fluid Level
WARNING:
Use caution when handling brakefluid. It can damage your vision if it gets into your eyes. It will alsodamage your vehicle's paint if spilled on it and not removed im- mediately.
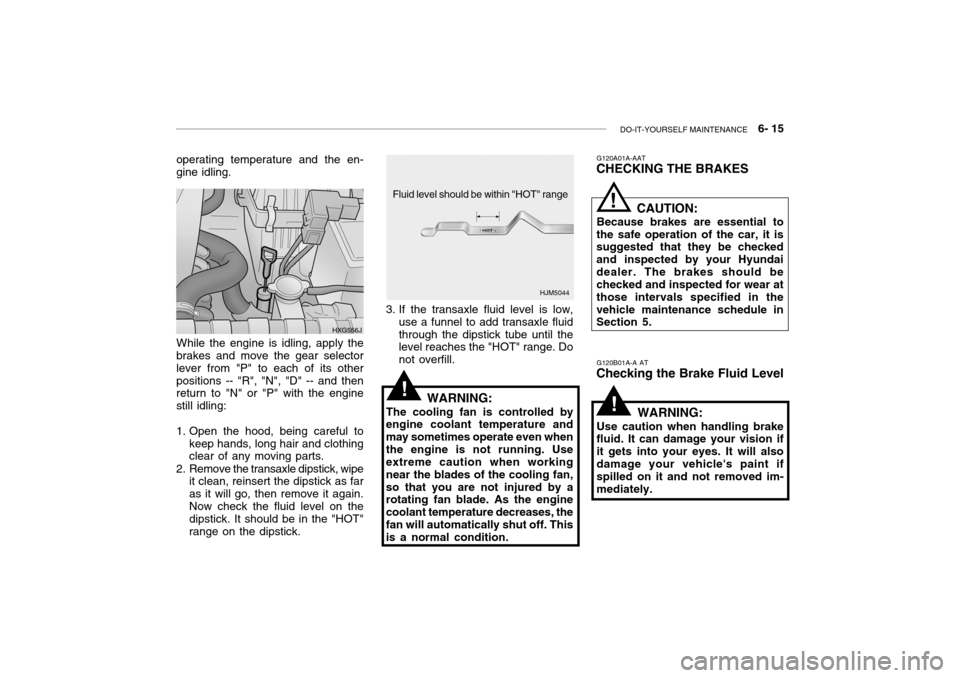
3. If the transaxle fluid level is low,
use a funnel to add transaxle fluidthrough the dipstick tube until the level reaches the "HOT" range. Do not overfill.
WARNING:
The cooling fan is controlled by
engine coolant temperature andmay sometimes operate even whenthe engine is not running. Use extreme caution when working near the blades of the cooling fan,so that you are not injured by a rotating fan blade. As the engine coolant temperature decreases, thefan will automatically shut off. This is a normal condition.
While the engine is idling, apply the
brakes and move the gear selector lever from "P" to each of its otherpositions -- "R", "N", "D" -- and then return to "N" or "P" with the engine still idling:
1. Open the hood, being careful to
keep hands, long hair and clothing clear of any moving parts.
2. Remove the transaxle dipstick, wipe it clean, reinsert the dipstick as far as it will go, then remove it again.Now check the fluid level on the dipstick. It should be in the "HOT" range on the dipstick. HXG556J
!
!
!
operating temperature and the en- gine idling.
HJM5044
Fluid level should be within "HOT" range