tow Hyundai H-1 (Grand Starex) 2006 User Guide
[x] Cancel search | Manufacturer: HYUNDAI, Model Year: 2006, Model line: H-1 (Grand Starex), Model: Hyundai H-1 (Grand Starex) 2006Pages: 284, PDF Size: 12.21 MB
Page 46 of 284
1BEFORE DRIVING YOUR VEHICLE
32
!
!
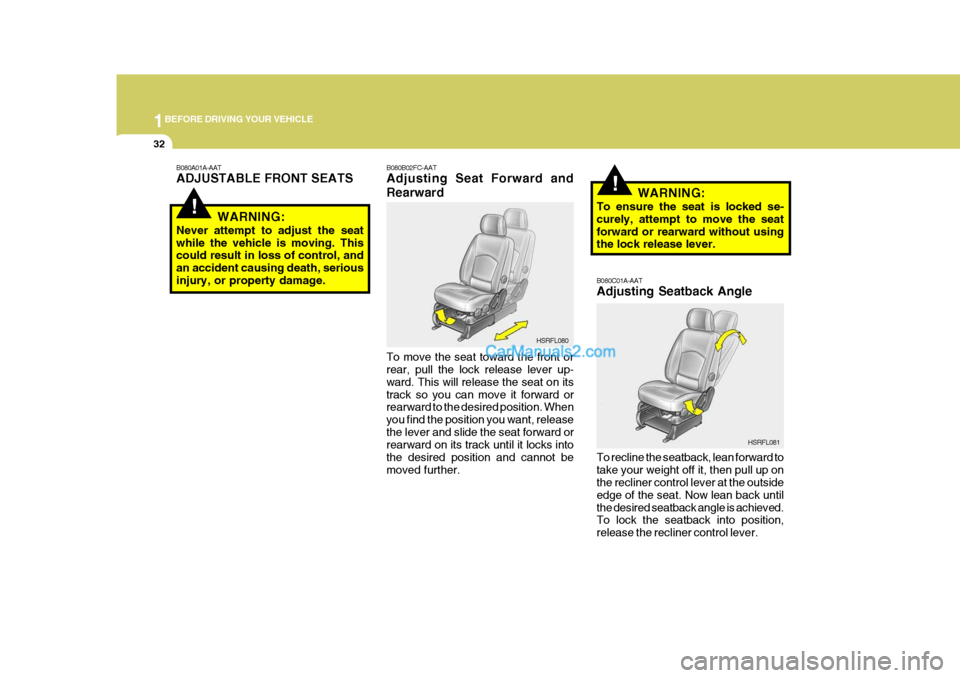
B080A01A-AAT ADJUSTABLE FRONT SEATS
WARNING:
Never attempt to adjust the seat while the vehicle is moving. This could result in loss of control, and an accident causing death, seriousinjury, or property damage. B080B02FC-AAT Adjusting Seat Forward and Rearward To move the seat toward the front or rear, pull the lock release lever up- ward. This will release the seat on itstrack so you can move it forward or rearward to the desired position. When you find the position you want, releasethe lever and slide the seat forward or rearward on its track until it locks into the desired position and cannot bemoved further. B080C01A-AAT Adjusting Seatback Angle To recline the seatback, lean forward to take your weight off it, then pull up on the recliner control lever at the outside edge of the seat. Now lean back untilthe desired seatback angle is achieved. To lock the seatback into position, release the recliner control lever.
HSRFL080
HSRFL081
WARNING:
To ensure the seat is locked se-curely, attempt to move the seatforward or rearward without using the lock release lever.
Page 47 of 284
1
BEFORE DRIVING YOUR VEHICLE
33
!WARNING:
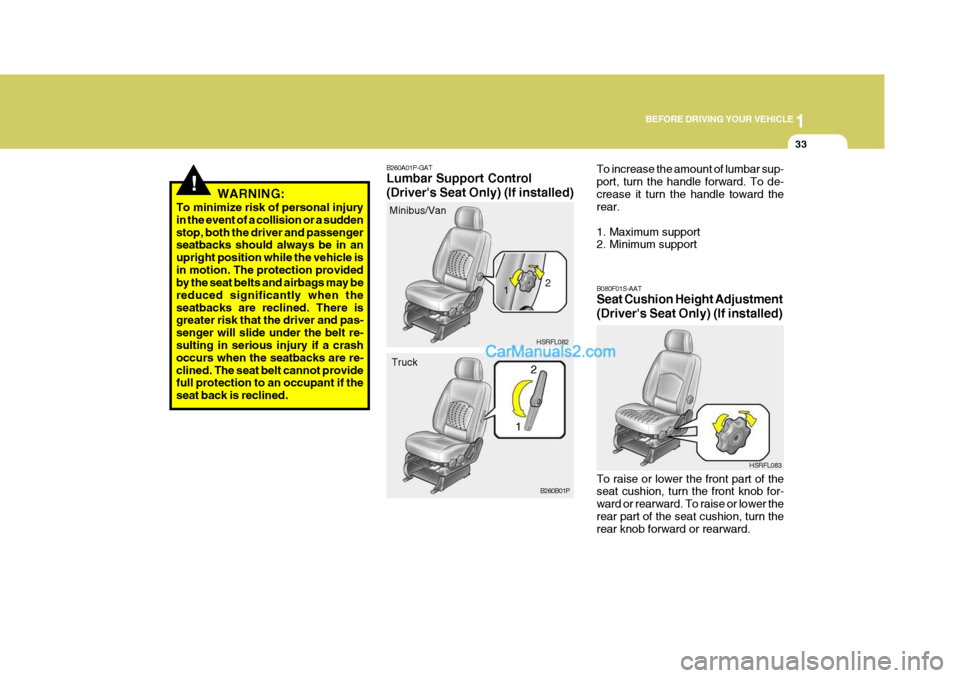
To minimize risk of personal injury in the event of a collision or a suddenstop, both the driver and passenger seatbacks should always be in an upright position while the vehicle isin motion. The protection provided by the seat belts and airbags may be reduced significantly when theseatbacks are reclined. There is greater risk that the driver and pas- senger will slide under the belt re- sulting in serious injury if a crash occurs when the seatbacks are re-clined. The seat belt cannot provide full protection to an occupant if the seat back is reclined. B260A01P-GAT Lumbar Support Control (Driver's Seat Only) (If installed)
Minibus/Van
1HSRFL082 B080F01S-AAT Seat Cushion Height Adjustment (Driver's Seat Only) (If installed) To raise or lower the front part of the seat cushion, turn the front knob for- ward or rearward. To raise or lower therear part of the seat cushion, turn the rear knob forward or rearward.
Truck To increase the amount of lumbar sup- port, turn the handle forward. To de-crease it turn the handle toward the rear.
1. Maximum support
2. Minimum support
B260B01P HSRFL083
2
1 2
Page 49 of 284
1
BEFORE DRIVING YOUR VEHICLE
35
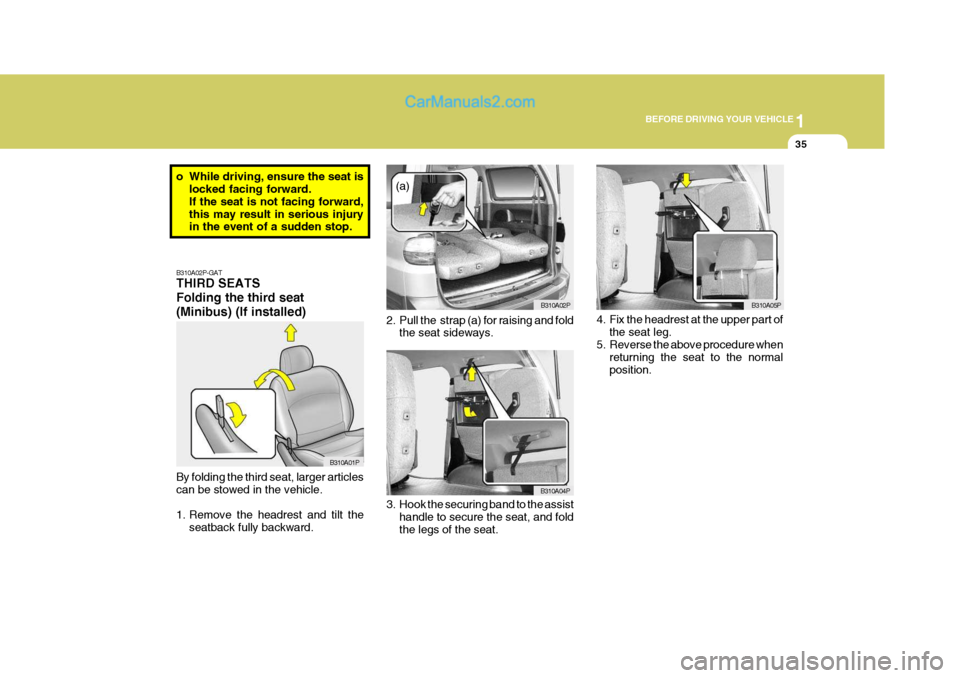
B310A02P-GAT THIRD SEATS Folding the third seat(Minibus) (If installed) By folding the third seat, larger articles can be stowed in the vehicle.
1. Remove the headrest and tilt the
seatback fully backward. 2. Pull the strap (a) for raising and fold
the seat sideways.
3. Hook the securing band to the assist handle to secure the seat, and fold the legs of the seat.
B310A01P B310A02P
B310A04P B310A05P
(a)
4. Fix the headrest at the upper part ofthe seat leg.
5. Reverse the above procedure when returning the seat to the normalposition.
o While driving, ensure the seat is
locked facing forward.If the seat is not facing forward,this may result in serious injury in the event of a sudden stop.
Page 63 of 284
1
BEFORE DRIVING YOUR VEHICLE
49
!
If you need to tighten the belt, pull more webbing toward the retractor. When youunbuckle the seat belt and allow it to retract, the retractor will automatically revert back to its normal seated pas-senger emergency locking usage con- dition. NOTE:
o Before installing the child re-
straint system, read the instruc- tions supplied by the child re- straint system manufacturer.
o If the seat belt does not operate as described, have the systemchecked immediately by yourauthorized Hyundai dealer.
WARNING:
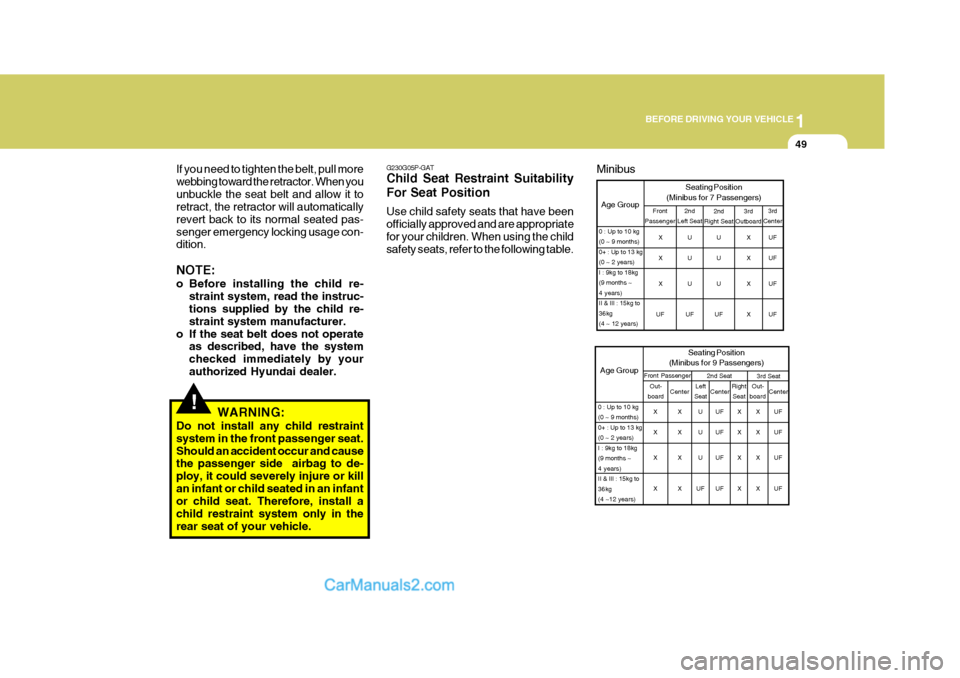
Do not install any child restraintsystem in the front passenger seat.Should an accident occur and cause the passenger side airbag to de- ploy, it could severely injure or killan infant or child seated in an infant or child seat. Therefore, install a child restraint system only in therear seat of your vehicle. G230G05P-GAT Child Seat Restraint Suitability For Seat Position Use child safety seats that have been officially approved and are appropriatefor your children. When using the child safety seats, refer to the following table.
UF UF UF UF
0 : Up to 10 kg (0 ~ 9 months)0+ : Up to 13 kg(0 ~ 2 years)I : 9kg to 18kg(9 months ~4 years)II & III : 15kg to36kg(4 ~ 12 years) 3rd
Center
3rd
Outboard
Age Group Seating Position
(Minibus for 7 Passengers)2nd
Left Seat2nd
Right Seat
U U U
UF U U U
UF X X X X
Front
Passenger
X X X
UF
3rd SeatAge Group Seating Position
(Minibus for 9 Passengers)Front Passenger 2nd Seat
0 : Up to 10 kg (0 ~ 9 months)0+ : Up to 13 kg(0 ~ 2 years)I : 9kg to 18kg(9 months ~4 years)II & III : 15kg to36kg(4 ~12 years)Out-
board Center Left
Seat Right
Seat
Center Out-
board Center
X X X X X X X XU U U
UF UF UF UF UF X X X XX X X XUF UF UF UF
Minibus
Page 69 of 284
1
BEFORE DRIVING YOUR VEHICLE
55
o Do not install a child restraint sys-
tem in the front passenger seat position. A child restraint system mustnever be placed in the front seat. The infant or child could be se- verely injured by an airbag de-ployment in case of an accident.
o If components of the airbag sys-
tem must be discarded, or if thevehicle must be scrapped, cer- tain safety precautions must be observed. Your Hyundai dealerknows these precautions and can give you the necessary informa- tion. Failure to follow these pre-cautions and procedures could increase the risk of personal in- jury.
o If you sell your vehicle, be sure to inform the new owner of theseimportant points and make cer-tain that this manual is trans- ferred to the new owner.o If your car was flooded and has
soaked carpeting or water on flooring, you shouldn't try to startengine; have the car towed to authorized Hyundai dealer.
o Do not replace the bumper or the
bumper guard with other thanHyundai genuine parts. Other- wise, it can adversely affect SRSperformance and lead to unex- pected injury.
Page 78 of 284

2
INSTRUMENTS AND CONTROLS
9
B260G01A-AAT
Low Oil Pressure Warning Light CAUTION:
If the oil pressure warning light stays on while the engine is running, seri-ous engine damage may result. The oil pressure warning light comes on whenever there is insufficient oilpressure. In normal operation, it should come on when the ignition switch is turned on, then go outwhen the engine is started. If the oil pressure warning light stays on while the engine is running, there may bea serious malfunction. If this happens, stop the car as soon as it is safe to do so, turn off theengine and check the oil level. If the oil level is low, fill the engine oil to the proper level and start the engineagain. If the light stays on with the engine running, turn the engine off immediately. In any instance wherethe oil light stays on when the en- gine is running, the engine should be checked by an authorizedHyundai dealer before the car is driven again.
!
!
B260H03A-AAT Parking Brake/Low Brake Fluid Level Warning Light If the parking brake is not applied, the warning light should come on when theignition switch is turned to "ON" or "START", then go out when the engine starts. If the light comes on at anyother time, you should slow the vehicle and bring it to a complete stop in a safe location off the roadway.The brake warning light indicates that the brake fluid level in the brake mas- ter cylinder is low and hydraulic brakefluid conforming to DOT 3 or DOT 4 specifications should be added. After adding fluid, if no other trouble is found,the car should be immediately and carefully driven to a Hyundai dealer for inspection. If further trouble is experi-enced, the vehicle should not be driven at all but taken to a dealer by a professional towing service or someother safe method.
WARNING:
If you suspect brake trouble, have your brakes checked by a Hyundaidealer as soon as possible. Driving your car with a problem in either the brake electrical system or brake hy-draulic system is dangerous, and could result in a serious injury or death. Warning Light Operation The parking brake/brake fluid level warning light should come on when the parking brake is applied and the igni- tion switch is turned to "ON" or"START". After the engine is started, the light should go out when the park- ing brake is released.
Page 89 of 284
2 INSTRUMENTS AND CONTROLS
20
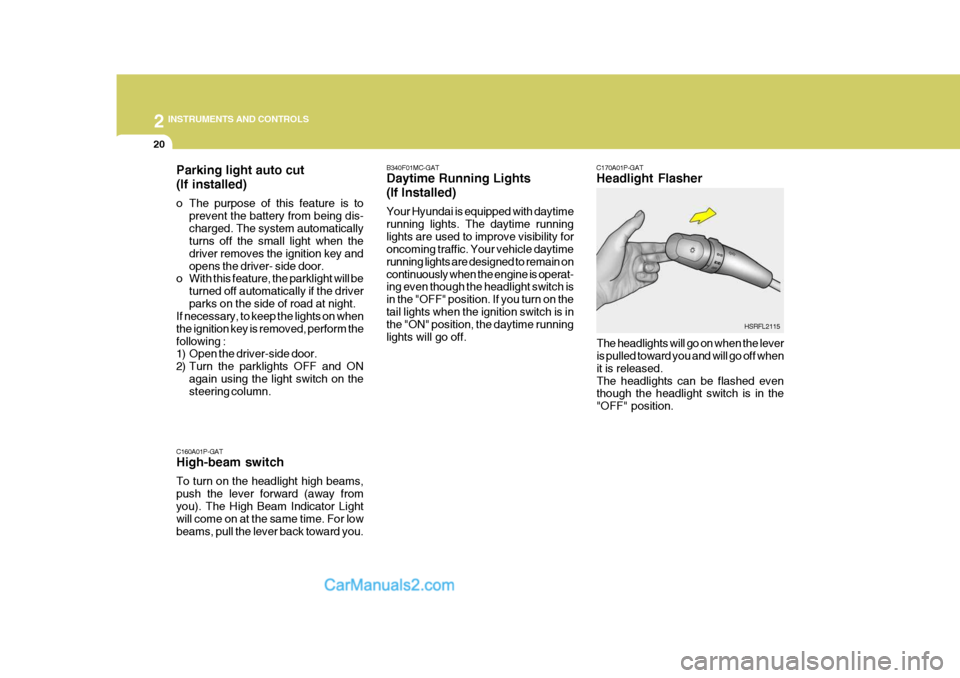
C160A01P-GAT High-beam switch To turn on the headlight high beams, push the lever forward (away fromyou). The High Beam Indicator Light will come on at the same time. For low beams, pull the lever back toward you. C170A01P-GAT Headlight Flasher
The headlights will go on when the lever is pulled toward you and will go off when it is released.The headlights can be flashed even though the headlight switch is in the "OFF" position.
B340F01MC-GAT Daytime Running Lights (If Installed) Your Hyundai is equipped with daytime running lights. The daytime runninglights are used to improve visibility for oncoming traffic. Your vehicle daytime running lights are designed to remain oncontinuously when the engine is operat- ing even though the headlight switch is in the "OFF" position. If you turn on thetail lights when the ignition switch is in the "ON" position, the daytime running lights will go off.
HSRFL2115
Parking light auto cut (If installed)
o The purpose of this feature is to
prevent the battery from being dis- charged. The system automatically turns off the small light when the driver removes the ignition key andopens the driver- side door.
o With this feature, the parklight will be
turned off automatically if the driverparks on the side of road at night.
If necessary, to keep the lights on whenthe ignition key is removed, perform thefollowing :
1) Open the driver-side door.
2) Turn the parklights OFF and ON
again using the light switch on the steering column.
Page 90 of 284

2
INSTRUMENTS AND CONTROLS
21
B350B01A-AAT Windshield Washer Operation To use the windshield washer, pull the wiper/washer lever toward the steer- ing wheel. When the washer lever isoperated, the wipers automatically make two passes across the wind- shield. The washer continues to oper-ate until the lever is released. NOTE:
o Do not operate the washer more
than 15 seconds at a time or when the fluid reservoir is empty.
o In icy or freezing weather, be
sure the wiper blades are notfrozen to the glass prior to oper- ating the wipers. HSRFL2116
NOTE:
o Before operating the wipers in
cold weather, check to be sure that the wiper blades are not fro-zen to the windshield. Attempt- ing to operate the wipers while the blades are frozen to the wind-shield could cause the motor to burn out.
o If the wipers stop during opera- tion because of ice or some otherobstruction on the windshield, the wiper motor could burn outeven if the wiper switch is turned off. If this occurs, promptly stop the vehicle, turn off the ignitionswitch, and clean the windshield to allow proper wiper operation.
o Do not use the wipers when the windshield is dry:doing so couldscratch the windshield and wear the blades prematurely.
WINDSHIELD WIPER AND WASHER SWITCH
C180A02P-GAT The windshield wiper and washer switch can be operated with the ignition switch at the "ON" or "START" position. Movethe switch to operate the windshield wipers or spray the washer fluid. Windshield wipers 1.OFF
2.INT : The interval between wipers
can be varied from 2 to 10 seconds by turning.
3.LOW : Speed operation the interval adjuster switch.
4.HIGH : Speed operation the interval
adjuster switch. HSRFL2111
Page 103 of 284
2 INSTRUMENTS AND CONTROLS
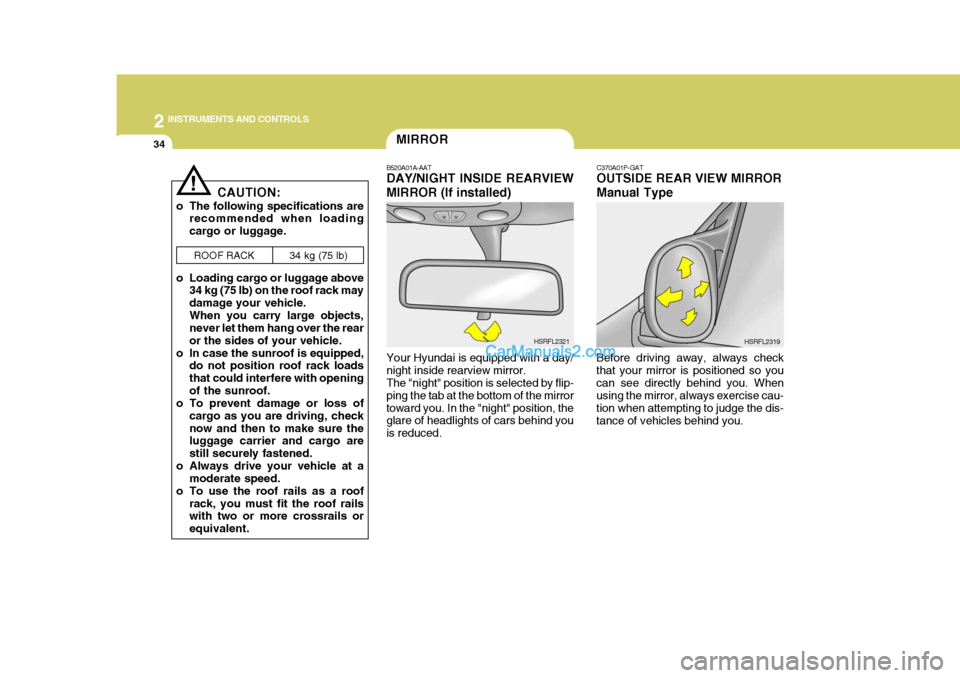
34MIRROR
B520A01A-AAT DAY/NIGHT INSIDE REARVIEW MIRROR (If installed) Your Hyundai is equipped with a day/ night inside rearview mirror. The "night" position is selected by flip- ping the tab at the bottom of the mirrortoward you. In the "night" position, the glare of headlights of cars behind you is reduced. HSRFL2321C370A01P-GAT OUTSIDE REAR VIEW MIRROR Manual Type
Before driving away, always check that your mirror is positioned so youcan see directly behind you. When using the mirror, always exercise cau- tion when attempting to judge the dis-tance of vehicles behind you. HSRFL2319
CAUTION:
o The following specifications are recommended when loadingcargo or luggage.
o Loading cargo or luggage above 34 kg (75 lb) on the roof rack maydamage your vehicle.When you carry large objects, never let them hang over the rear or the sides of your vehicle.
o In case the sunroof is equipped, do not position roof rack loadsthat could interfere with openingof the sunroof.
o To prevent damage or loss of
cargo as you are driving, checknow and then to make sure the luggage carrier and cargo are still securely fastened.
o Always drive your vehicle at a moderate speed.
o To use the roof rails as a roof rack, you must fit the roof rails with two or more crossrails or equivalent.ROOF RACK
34 kg (75 lb)
!
Page 113 of 284

2 INSTRUMENTS AND CONTROLS
44AIR CONDITIONING SYSTEM
C680A01P-GAT (If installed) Cooling To use the air conditioner to cool inte- rior:
o Set the side vent control to "OFF",
to shut off outside air entry.
o Turn on the fan control switch.
o Turn on the air conditioner switch by pushing in on the switch. The air conditioner indicator light should come on at the same time.
o Set the air intake control to the "Fresh" position.
o Set the temperature control to the
"Cool" position. ("Cool" provides maximum cooling. The temperature may be moder- ated by moving the control toward"Warm".)
o Adjust the fan control to the desired
speed. For greater cooling, turn thefan control to one of the higher speeds or temporarily select the "Recirc" position on the air intakecontrol.
C680A01P C680A02P
Rotary and push button type
Lever type Rotary and push button type
Lever type
C690A01P-GAT Dehumidified heating
C690A01P
C690A02P