manual transmission Hyundai H-1 (Grand Starex) 2009 - RHD (UK, Australia) User Guide
[x] Cancel search | Manufacturer: HYUNDAI, Model Year: 2009, Model line: H-1 (Grand Starex), Model: Hyundai H-1 (Grand Starex) 2009Pages: 303, PDF Size: 31.48 MB
Page 198 of 303
Driving your vehicle
44
5
5. Start the vehicle, hold the brakes, shift
to neutral, release the parking brake
and slowly release the brakes until the
trailer chocks absorb the load.
6. Reapply the brakes, reapply the park- ing brake and shift the vehicle to R
(Reverse) for manual transmission or
P (Park) automatic transmission.
7. Shut off the vehicle and release the vehicle brakes but leave the parking
brake set.
When you are ready to leave after park-ing on a hill
1. With the manual transmission in Neutral or automatic transmission in P
(Park), apply your brakes and hold the
brake pedal down whilst you:
and
2. Slowly remove your foot from the
brake pedal.
3. Drive slowly until the trailer is clear of the chocks.
4. Stop and have someone pick up and store the chocks.
E140500AUN-UK
Maintenance when trailer towing
Your vehicle will need service more often
when you regularly pull a trailer.
Important items to pay particular atten-tion to include engine oil, automatic
transmission fluid, axle lubricant and
cooling system fluid. Brake condition is
another important item to frequently
check. Each item is covered in this man-
ual, and the Index will help you find them
quickly. If you’re trailering, it’s a good idea
to review these sections before you start
your trip.
Don’t forget to also maintain your trailer
and towbar. Follow the maintenance
schedule that accompanied your trailer
and check it periodically. Preferably, con-
duct the check at the start of each day’s
driving. Most importantly, all towbar nutsand bolts should be tight.
WARNING - Parking brake
It can be dangerous to get out of
your vehicle if the parking brake is
not firmly set.
If you have left the engine running,
the vehicle can move suddenly. You
or others could be seriously or
fatally injured.
CAUTION
Due to higher load during trailer usage, overheating might occurin hot days or during uphill driv- ing. If the coolant gauge indicates
over-heating, switch off the A/C and stop the vehicle in a safe areato cool down the engine.
When towing check transmission fluid more frequently.
If your vehicle is not equipped with the air conditioner, youshould install a condenser fan to improve engine performance
when towing a trailer.
Page 199 of 303

545
Driving your vehicle
E140600ATQ-UK
If you do decide to pull a trailer
Here are some important points if you
decide to pull a trailer:
Consider using a sway control. You canask a towbar dealer about sway con- trol.
Do not do any towing with your car dur- ing its first 1,000 miles in order to allow
the engine to properly run-in. Failure to
heed this caution may result in serious
engine or transmission damage.
When towing a trailer, be sure to con- sult a HYUNDAI authorised repairer for
further information on additional
requirements such as a towing kit, etc.
Always drive your vehicle at a moder- ate speed (less than 60 mph (100km/h)).
On a long uphill grade, do not exceed 45 mph (70 km/h) or the posted towing
speed limit, whichever is lower.
The chart contains important consider- ations that have to do with weight:
Engine
Item
Maximum
Without brake1653 1543 1653
trailer System (750) (700) (750)
weight With brake 5070 3306 3306 Ibs. (kg) System (2300) (1500) (1500)
Maximum permissible
static vertical load on 220 220 220
the coupling device (100) (100) (100) Ibs. (kg)
Recommended distance
from rear wheel centre 46 46 46
to coupling point (1170) (1170) (1170) Inch (mm)
M/T : Manual transmission
A/T : Automatic transmission Diesel Engine Petrol Engine
M/T M/T A/T
Page 206 of 303

65
What to do in an emergency
F040101AEN-UK
Jump starting procedure
1. Make sure the booster battery is 12-volt and that its negative terminal is
grounded.
2. If the booster battery is in another vehicle, do not allow the vehicles totouch.
3. Turn off all unnecessary electrical loads.
4. Connect the jumper cables in the exact sequence shown in the illustration.First connect one end of a jumper
cable to the positive terminal of the
discharged battery (1), then connect
the other end to the positive terminal
on the booster battery (2).
Proceed to connect one end of the
other jumper cable to the negative ter-
minal of the booster battery (3), then
the other end to a solid, stationary,
metallic point (for example, the engine
lifting bracket) away from the battery
(4). Do not connect it to or near any
part that moves when the engine is
cranked. Do not allow the jumper cables to con-
tact anything except the correct battery
terminals or the correct ground. Do not
lean over the battery when making
connections.
5. Start the engine of the vehicle with the booster battery and let it run at 2,000
rpm, then start the engine of the vehi-
cle with the discharged battery.
If the cause of your battery discharging is
not apparent, you should have your vehi-
cle checked by a HYUNDAI authorised repairer.
F040200AUN
Push-starting
Your manual transmission-equipped
vehicle should not be push-startedbecause it might damage the emissioncontrol system.
Vehicles equipped with automatic trans-
mission cannot be push-started.
Follow the directions in this section for
jump-starting.
CAUTION - Battery cables
Do not connect the jumper cable
from the negative terminal of thebooster battery to the negative ter-
minal of the discharged battery.This can cause the discharged bat- tery to overheat and crack, releas-
ing battery acid.
WARNING
Never tow a vehicle to start it
because the sudden surge forward
when the engine starts could cause
a collision with the tow vehicle.
Page 207 of 303
What to do in an emergency
6
6
IF THE ENGINE OVERHEATS
F050000AFD-UK
If your temperature gauge indicates over-
heating, you experience a loss of power,
or hear loud pinging or knocking, the
engine is probably too hot. If this hap-
pens, you should:
1. Pull off the road and stop as soon as it is safe to do so.
2. Place the gear selector lever in P (automatic transmission) or neutral
(manual transmission) and set the
parking brake. If the air conditioning is
on, turn it off.
3. If engine coolant is running out under the car or steam is coming out from
the bonnet, stop the engine. Do notopen the bonnet until the coolant has
stopped running or the steaming has
stopped. If there is no visible loss of
engine coolant and no steam, leave
the engine running and check to be
sure the engine cooling fan is operat-
ing. If the fan is not running, turn the
engine off.
4. Check to see if the water pump drive belt is missing. If it is not missing,
check to see that it is tight. If the drive
belt seems to be satisfactory, check
for coolant leaking from the radiator,
hoses or under the car. (If the air con-
ditioning had been in use, it is normal
for cold water to be draining from it
when you stop). 5. If the water pump drive belt is broken
or engine coolant is leaking out, stop the engine immediately and call the
nearest HYUNDAI authorised repairer
for assistance. 6. If the cause of the overheating cannot
be found, wait until the engine temper-
ature has returned to normal. Then, ifcoolant has been lost, carefully add
coolant to the reservoir to bring the
fluid level in the reservoir up to the
base of the radiator fill opening. Fill the
coolant expansion tank to the halfway
mark. To ensure the correct water to
coolant mix is obtained after top up,
testing by an authorised repairer isrequired.
7. Proceed with caution until it is estab- lished that the engine is operating nor-
mally. If the engine overheats repeat-
edly, the advice of a HYUNDAI autho-
rised repairer should be sought.
CAUTION
Serious loss of coolant indicates
there is a leak in the cooling systemand this should be checked as soonas possible by a HYUNDAI autho- rised repairer.
WARNING
Whilst the engine is running, keep
hair, hands and clothing away from
moving parts such as the fan and
drive belts to prevent injury.
WARNING
Do not remove the radiator cap when the engine is hot since steam
and boiling water may be ejected
from the radiator resulting in burnsor scalding.
Page 210 of 303
69
What to do in an emergency
4. After the spare tyre reaches theground, continue to turn the
wrench counterclockwise, and
draw the spare tyre outside. Never
rotate the wrench excessively, oth-
erwise the spare tyre carrier maybe damaged.
5. Remove the retainer (1) from the centre of the spare tyre. To store the spare tyre:
1. Lay the tyre on the ground with the
valve stem facing up.
2. Place the wheel under the vehicle and install the retainer (1) through
the wheel centre.
3. Turn the wrench clockwise until it clicks. F070300ATQ-UK Changing tyres
1. Park on a level surface and apply
the parking brake firmly.
2. Shift the shift lever into R (Reverse) with manual transmis-
sion or P (Park) with automatic
transmission.
3. Activate the hazard warning flash- er.
OTQ067006OTQ067007
WARNING
Ensure the spare tyre retainer is
properly aligned with the centre
of the spare tyre to prevent the
spare tyre “rattling”. Otherwise,
it may cause the spare tyre tofall off the carrier and lead to anaccident.
OTQ047006K/H
Page 229 of 303
Maintenance
10
7
G050600AUN-UK
Vapour hose and fuel filler cap
The vapour hose and fuel filler cap
should be inspected at those intervals
specified in the maintenance schedule.
Make sure that a new vapour hose or fuelfiller cap is correctly replaced.
G050700AUN
Vacuum crankcase ventilation hoses (if equipped)
Inspect the surface of hoses for evidence
of heat and/or mechanical damage. Hard
and brittle rubber, cracking, tears, cuts,
abrasions, and excessive swelling indi-
cate deterioration. Particular attention
should be paid to examine those hose
surfaces nearest to high heat sources,
such as the exhaust manifold. Inspect the hose routing to assure that the hoses do not come in contact with
any heat source, sharp edges or movingcomponent which might cause heat dam-
age or mechanical wear. Inspect all hose
connections, such as clamps and cou-
plings, to make sure they are secure, and
that no leaks are present. Hoses should
be replaced immediately if there is any
evidence of deterioration or damage. G050800AEN
Air cleaner filter
A Genuine HYUNDAI air cleaner filter is recommended when the filter isreplaced.
G050900AUN-UK
Spark plugs (for petrol engine)
Make sure to install new spark plugs of
the correct heat range. G051000AEN-UK
Valve clearance (if equipped)
Inspect excessive valve noise and/or
engine vibration and adjust if necessary.
A HYUNDAI authorised repairer should
perform the operation.
G051100AUN Cooling system
Check cooling system components, such
as radiator, coolant reservoir, hoses and
connections for leakage and damage.
Replace any damaged parts.
G051200AUN Coolant The coolant should be changed at the
intervals specified in the maintenance
schedule.
G051300AUN
Manual transmission fluid (if equipped)
Inspect the manual transmission fluid
according to the maintenance schedule.
G051400ATQ-UK
Automatic transmission fluid (if equipped)
The fluid level should be in the "HOT"
range of the dipstick, after the engine
and transmission are at normal operating
temperature. Check the automatic trans-
mission fluid level with the engine run-
ning and the transmission in neutral, with
the parking brake properly applied.
✽✽
NOTICE
If your vehicle is not equipped with the automatic transmission level gauge,have the automatic transmission fluidinspected by a HYUNDAI authorised
repairer according to the maintenanceschedule.
Page 290 of 303
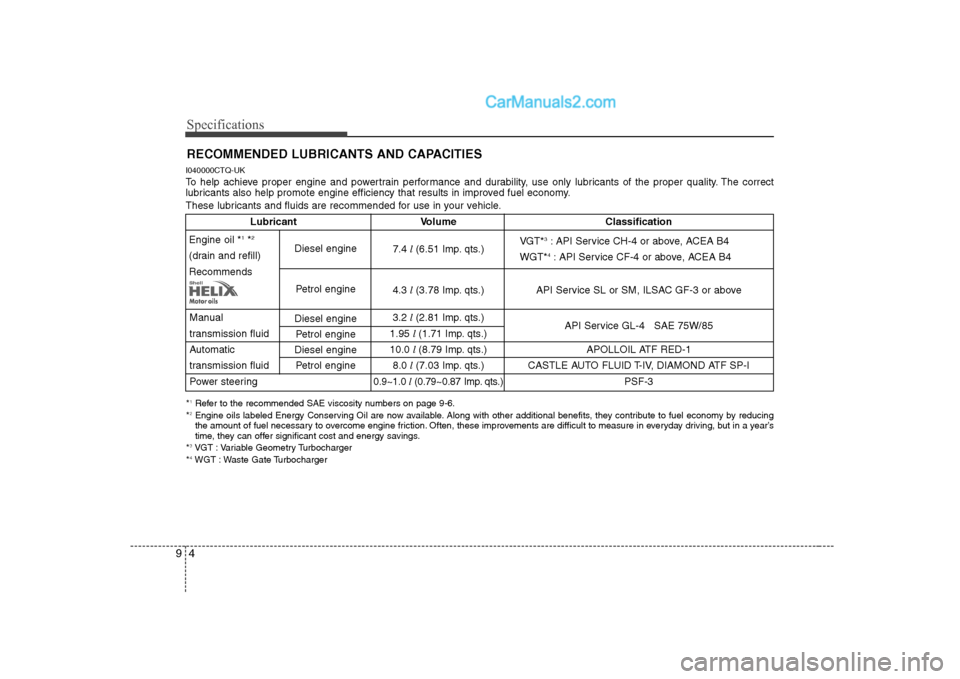
Specifications
4
9
RECOMMENDED LUBRICANTS AND CAPACITIES
I040000CTQ-UK
To help achieve proper engine and powertrain performance and durability, use only lubricants of the proper quality. The correct
lubricants also help promote engine efficiency that results in improved fuel economy.
These lubricants and fluids are recommended for use in your vehicle.
* 1
Refer to the recommended SAE viscosity numbers on page 9-6.
* 2
Engine oils labeled Energy Conserving Oil are now available. Along with other additional benefits, they contribute to fuel econo my by reducing
the amount of fuel necessary to overcome engine friction. Often, these improvements are difficult to measure in everyday driving, but in a year’s
time, they can offer significant cost and energy savings.
* 3
VGT : Variable Geometry Turbocharger
* 4
WGT : Waste Gate Turbocharger
Lubricant Volume Classification
7.4 l (6.51 Imp. qts.)
4.3 l (3.78 Imp. qts.) API Service SL or SM, ILSAC GF-3 or above
Manual 3.2 l (2.81 Imp. qts.)
API Service GL-4 SAE 75W/85
transmission fluid 1.95 l (1.71 Imp. qts.)
Automatic 10.0 l (8.79 Imp. qts.) APOLLOIL ATF RED-1
transmission fluid 8.0 l (7.03 Imp. qts.) CASTLE AUTO FLUID T-IV, DIAMOND ATF SP-I
Power steering
0.9~1.0 l (0.79~0.87 Imp. qts.)PSF-3
Engine oil * 1
*2
(drain and refill) Recommends
Diesel enginePetrol engine
Diesel engine
Petrol engine
Diesel engine
Petrol engineVGT* 3
: API Service CH-4 or above, ACEA B4
WGT* 4
: API Service CF-4 or above, ACEA B4
Page 296 of 303

F4FOREWORD
Hyundai Motor Company wish to take this opportunity to thank you for purchasing a Hyundai product and to welcome you to the
ever increasing number of discriminating motorists who drive Hyundai vehicles. The advanced engineering and construction meth-
ods employed during both design and production of the Hyundai marque are something of which we are proud, and this commit-
ment to providing a high quality product is supported by a comprehensive after sales and warranty service of which we are equal -
ly proud.
This owner's manual will introduce the operating and maintenance requirements for the vehicle and it is recommended that it is
carefully read to ensure that the maximum performance and durability along with safe and satisfactory operation are obtained. Th e
recommended routine maintenance servicing along with any running repairs that may be required should be entrusted to a
Hyundai authorised repairer to ensure that only the latest methods and genuine Hyundai replacement parts are used for the con-
tinued reliability, safety and performance of the vehicle.
Should any question or query exist regarding any aspect of your Hyundai please contact the nearest Hyundai authorised repairer
who will be only too pleased to assist wherever possible. Note : This owners manual should be considered as part of the vehicle and should be kept in the vehicle at all times for ease of
reference.
In the event of the vehicle being sold please ensure that this manual is left in the vehicle for the reference of the new owner .
Copyright 2008 Hyundai Motor Company. All rights reserved. No part of this publication may be reproduced, stored in any retrieva l
system or transmitted in any form or by any means without the prior written permission of Hyundai Motor Company.
CAUTION
Severe engine and transmission damage may result from the use of poor quality fuels and lubricants that do not meet Hyundai specifications. You must always use high quality fuels and lubricants that meet the specifications listed on Page 9-4 in the Vehicle Specifications section of the Owner's Manual.
Page 301 of 303

Index
2
I
Air bag - supplemental restraint system ······················ 3-35
Air cleaner ··································································· 7-22
Appearance care ·························································· 7-56
Audio system ······························································· 4-79
Automatic transmission ··············································· 5-11
Automatic transmission fluid ······································ 7-18
Battery ········································································· 7-27
Before driving ································································ 5-3
Bonnet ·········································································· 4-21
Brake and clutch fluid ················································· 7-16
Brake system ······························································· 5-18
Bulb wattage ·································································· 9-2
Child restraint system ·················································· 3-24
Climate control air filter ·············································· 7-23
Defroster ······································································ 4-58
Dimensions ···································································· 9-2
Door locks ····································································· 4-8 Economical operation ·················································· 5-29
Emergency starting ························································ 6-4
Emission control system ·············································· 7-62
Engine compartment ·············································· 2-4, 7-2
Engine coolant ····························································· 7-13
Engine number ······························································· 8-3
Engine oil ····································································· 7-12
Explanation of scheduled maintenance items ··············· 7-9
Fuel filler lid ································································ 4-23
Fuel filter ····································································· 7-21
Fuel requirements ·························································· 1-2
Fuses ············································································ 7-39
Hazard warning flasher ··············································· 4-46
How to use this manual ················································· 1-2
If the engine overheats ·················································· 6-6
If the engine will not start ············································· 6-3
If you have a flat tyre ···················································· 6-7
A
B
C
D
E
F
H
I
Page 302 of 303

I3
Index
In case of an emergency whilst driving ························ 6-2
Indicator symbols on the instrument cluster ················· 1-6
Instrument cluster ························································ 4-32
Instrument panel overview ············································ 2-3
Interior features ··························································· 4-74
Interior light ································································· 4-55
Interior overview ··························································· 2-2
Key positions ································································· 5-4
Keys ··············································································· 4-2
Light bulbs ··································································· 7-49
Lighting ······································································· 4-47
Locking differential ····················································· 5-28
Maintenance services ····················································· 7-4
Manual climate control system ··································· 4-59
Manual transmission ······················································ 5-8
Mirrors ········································································· 4-28 Owner maintenance ······················································· 7-6
Parking brake ······························································ 7-20
Power steering fluid ····················································· 7-17
Rear parking assist system ·········································· 4-44
Recommended lubricants and capacities ······················· 9-4
Remote keyless entry ····················································· 4-4
Road warning ································································· 6-2
Scheduled maintenance service ····································· 7-8
Seat belts ······································································ 3-13
Seats ··············································································· 3-2
Special driving conditions ··········································· 5-31
Starting the engine ························································· 5-6
Steering wheel ····························································· 4-26
Storage compartment ··················································· 4-72
K
L
M
O
P
R
S