Hyundai H-1 (Grand Starex) 2009 Owner's Manual - RHD (UK, Australia)
Manufacturer: HYUNDAI, Model Year: 2009, Model line: H-1 (Grand Starex), Model: Hyundai H-1 (Grand Starex) 2009Pages: 303, PDF Size: 31.48 MB
Page 241 of 303
Maintenance
22
7
AIR CLEANER
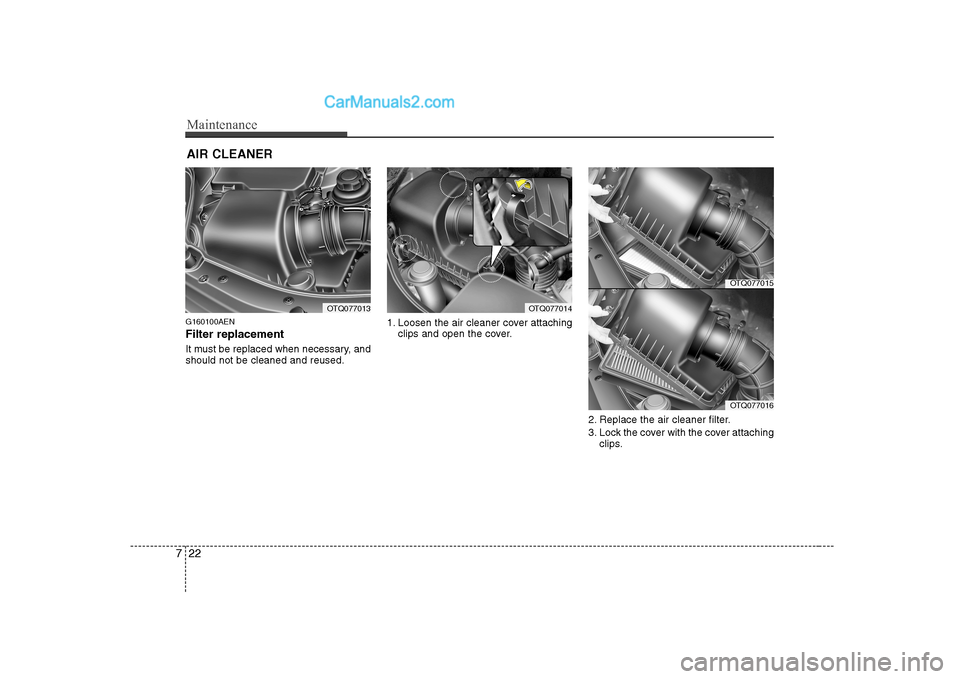
G160100AEN Filter replacement
It must be replaced when necessary, and should not be cleaned and reused. 1. Loosen the air cleaner cover attaching
clips and open the cover.
2. Replace the air cleaner filter.
3. Lock the cover with the cover attachingclips.
OTQ077013OTQ077014
OTQ077015
OTQ077016
Page 242 of 303
723
Maintenance
Replace the filter according to the
Maintenance Schedule.
If the vehicle is operated in extremelydusty or sandy areas, replace the ele-
ment more often than the usual recom-mended intervals.
G170100BEN Filter inspection The climate control air filter should be replaced according to the maintenance
schedule. If the vehicle is operated in
severely air-polluted cities or on dusty
rough roads for a long period, it shouldbe inspected more frequently and
replaced earlier. When you replace the
climate control air filter, replace it per-
forming the following procedure, and be
careful to avoid damaging other compo-
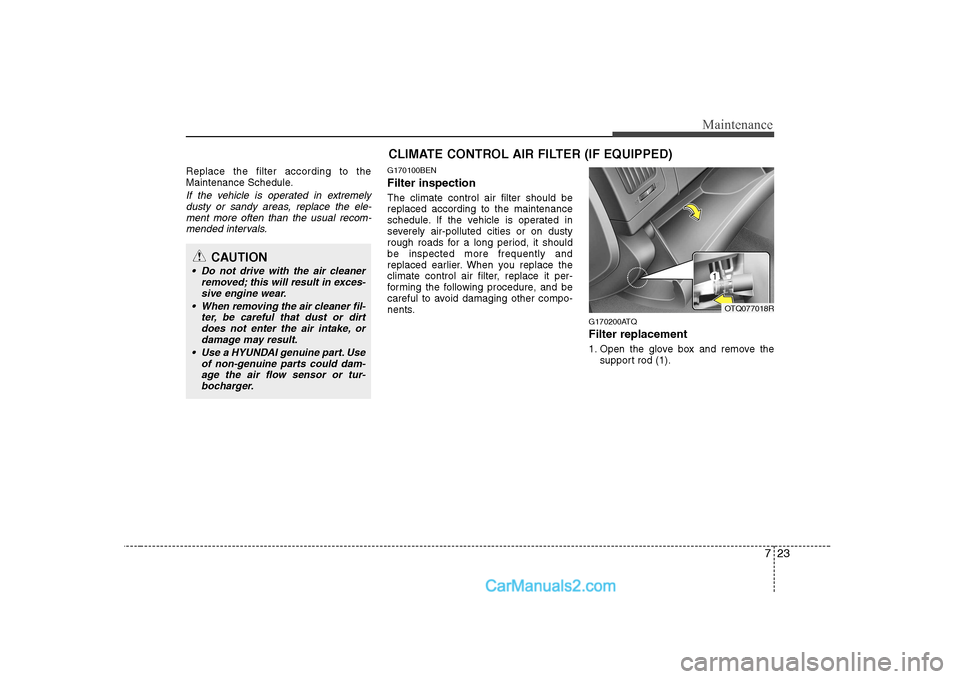
nents. G170200ATQ Filter replacement
1. Open the glove box and remove thesupport rod (1).
CAUTION
Do not drive with the air cleaner
removed; this will result in exces-sive engine wear.
When removing the air cleaner fil- ter, be careful that dust or dirt
does not enter the air intake, or damage may result.
Use a HYUNDAI genuine part. Use of non-genuine parts could dam-
age the air flow sensor or tur- bocharger.
CLIMATE CONTROL AIR FILTER (IF EQUIPPED)
OTQ077018R
Page 243 of 303
Maintenance
24
7
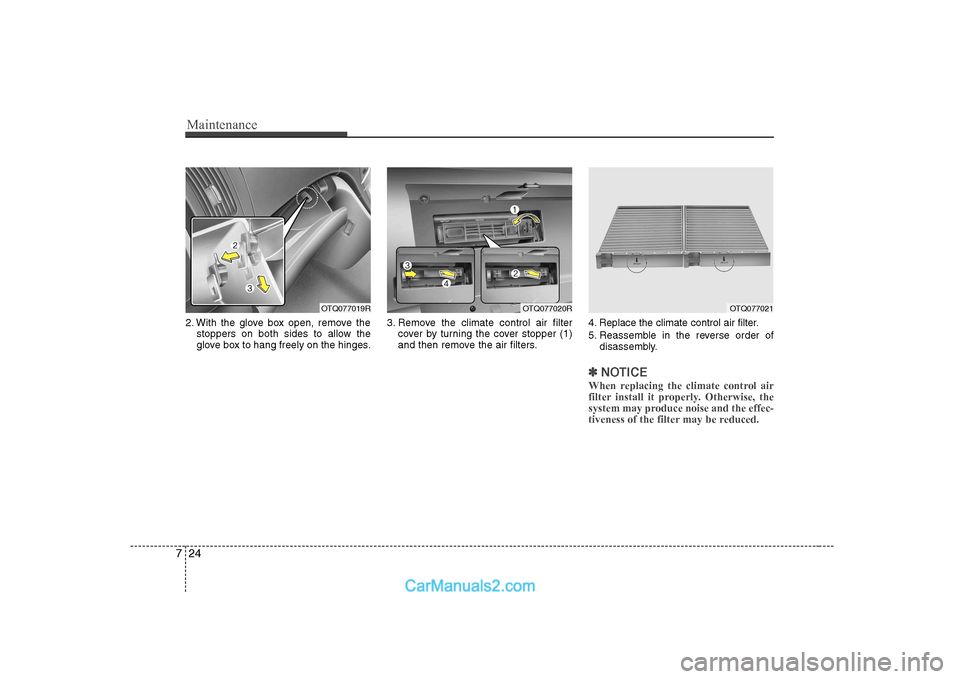
2. With the glove box open, remove the
stoppers on both sides to allow the
glove box to hang freely on the hinges. 3. Remove the climate control air filter
cover by turning the cover stopper (1)
and then remove the air filters. 4. Replace the climate control air filter.
5. Reassemble in the reverse order of
disassembly.
✽✽ NOTICE
When replacing the climate control air
filter install it properly. Otherwise, the
system may produce noise and the effec-
tiveness of the filter may be reduced.
OTQ077019ROTQ077020ROTQ077021
Page 244 of 303
725
Maintenance
WIPER BLADES
G180100AUN-UK Blade inspection
✽✽ NOTICE
Commercial hot waxes applied by auto-
matic car washes have been known to
make the windscreen difficult to clean.
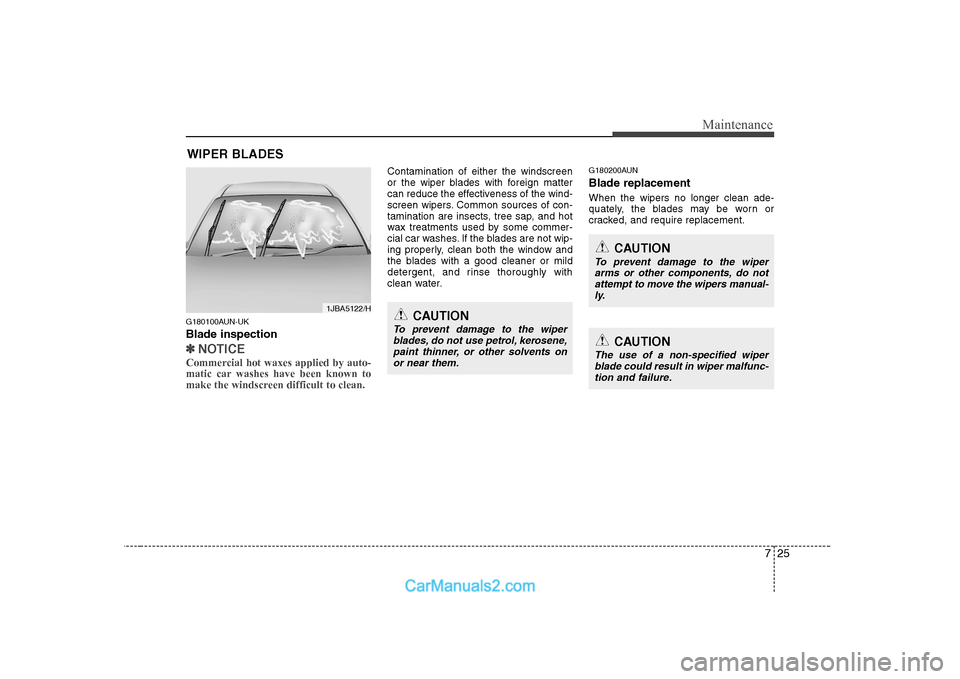
Contamination of either the windscreen
or the wiper blades with foreign matter
can reduce the effectiveness of the wind-
screen wipers. Common sources of con-
tamination are insects, tree sap, and hot
wax treatments used by some commer-
cial car washes. If the blades are not wip-
ing properly, clean both the window and
the blades with a good cleaner or mild
detergent, and rinse thoroughly with
clean water. G180200AUN Blade replacement When the wipers no longer clean ade-
quately, the blades may be worn or
cracked, and require replacement.
1JBA5122/HCAUTION
To prevent damage to the wiper
blades, do not use petrol, kerosene,
paint thinner, or other solvents onor near them.
CAUTION
To prevent damage to the wiper
arms or other components, do not attempt to move the wipers manual-ly.
CAUTION
The use of a non-specified wiper
blade could result in wiper malfunc- tion and failure.
Page 245 of 303
Maintenance
26
7
G180201ATQ-UK
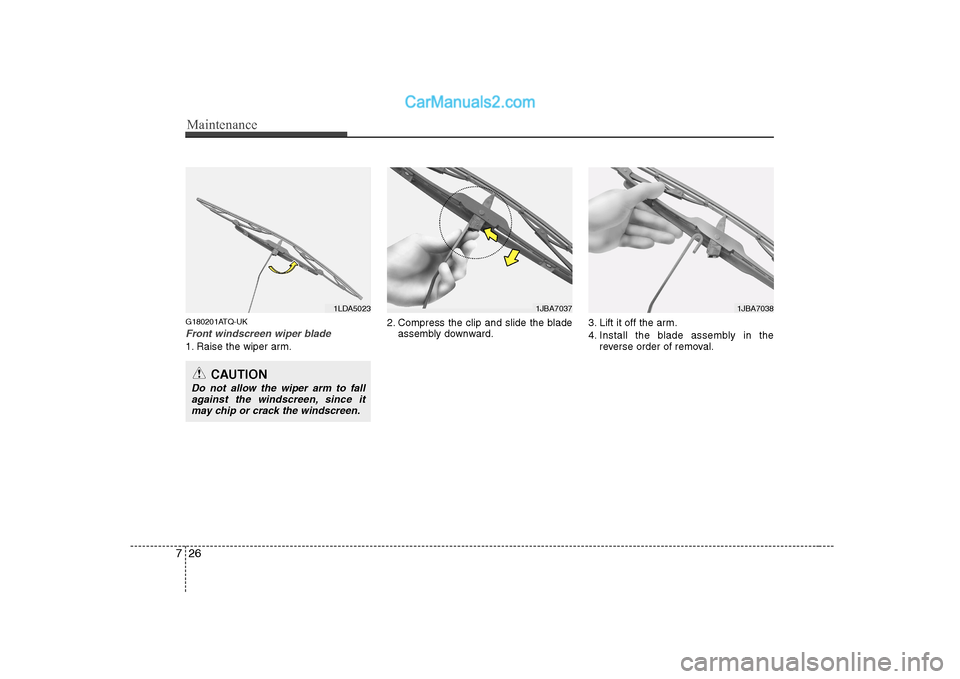
Front windscreen wiper blade
1. Raise the wiper arm. 2. Compress the clip and slide the blade
assembly downward. 3. Lift it off the arm.
4. Install the blade assembly in the
reverse order of removal.
1LDA5023
CAUTION
Do not allow the wiper arm to fall
against the windscreen, since itmay chip or crack the windscreen.
1JBA70381JBA7037
Page 246 of 303
727
Maintenance
G180202AFD-UK
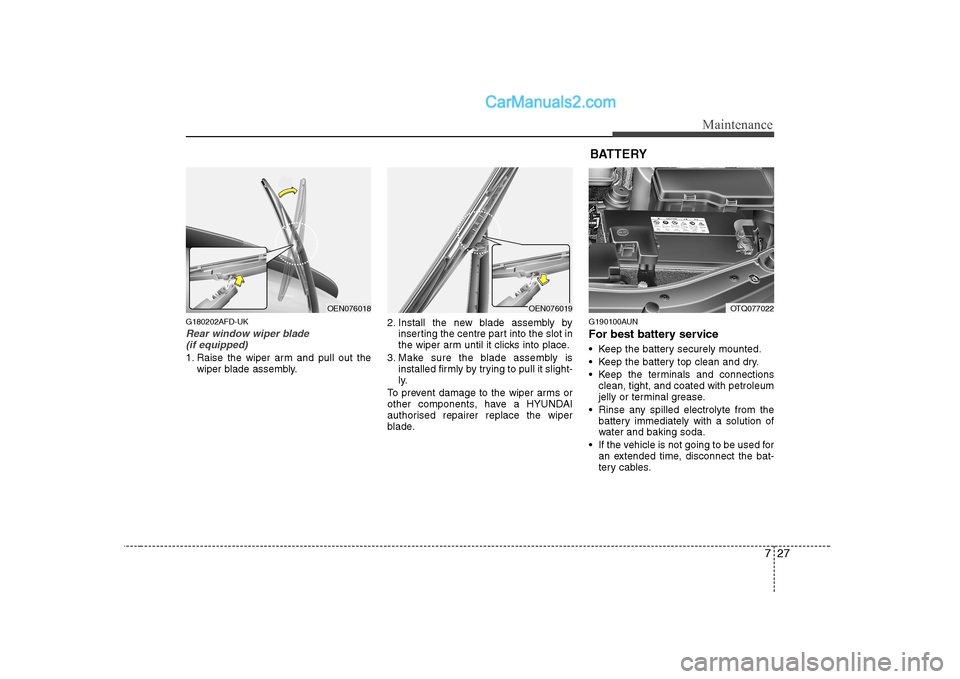
Rear window wiper blade (if equipped)
1. Raise the wiper arm and pull out the wiper blade assembly. 2. Install the new blade assembly by
inserting the centre part into the slot in
the wiper arm until it clicks into place.
3. Make sure the blade assembly is installed firmly by trying to pull it slight-
ly.
To prevent damage to the wiper arms or
other components, have a HYUNDAI
authorised repairer replace the wiper
blade. G190100AUN
For best battery service
Keep the battery securely mounted.
Keep the battery top clean and dry.
Keep the terminals and connections
clean, tight, and coated with petroleum
jelly or terminal grease.
Rinse any spilled electrolyte from the battery immediately with a solution of
water and baking soda.
If the vehicle is not going to be used for an extended time, disconnect the bat-
tery cables.
BATTERY
OTQ077022OEN076019OEN076018
Page 247 of 303
Maintenance
28
7
(Continued)
The electrical ignition system
works with high voltage. Never
touch these components with theengine running or the ignition
switched on.
Failure to follow the above warn-
ings can result in serious bodily
injury or death.WARNING - Battery
dangers
Always read the following
instructions carefully when
handling a battery.
Keep lighted cigarettes and all other flames or sparks
away from the battery.
Hydrogen, a highly com- bustible gas, is always
present in battery cells and
may explode if ignited.
Keep batteries out of the
reach of children because
batteries contain highly
corrosive SULFURIC ACID.
Do not allow battery acid to
contact your skin, eyes,
clothing or paint finish.
(Continued)(Continued)If any electrolyte gets intoyour eyes, flush your eyes
with clean water for at least
15 minutes and get immedi-ate medical attention.
If electrolyte gets on your
skin, thoroughly wash the
contacted area. If you feel a
pain or a burning sensa-
tion, get medical attention
immediately.
Wear eye protection whencharging or working near a
battery. Always provide
ventilation when working in
an enclosed space.
When lifting a plastic-cased bat- tery, excessive pressure on the
case may cause battery acid to
leak, resulting in personal injury.
Lift with a battery carrier or with
your hands on opposite corners.
Never attempt to recharge the battery when the battery cablesare connected.
(Continued)
Page 248 of 303
729
Maintenance
G190200AUN-UK
Battery recharging
Your vehicle has a maintenance-free,
calcium-based battery.
If the battery becomes discharged in ashort time (because, for example, the
headlights or interior lights were left on
whilst the vehicle was not in use),
recharge it by slow charging (trickle)
for 10 hours.
If the battery gradually discharges because of high electric load whilst the
vehicle is being used, recharge it at 20-
30A for two hours.
G190300ATQ Reset items
Items should be reset after the battery
has been discharged or the battery hasbeen disconnected.
Climate control system (See section 4)
Clock (See section 4)
Audio (See section 4)(Continued)
Disconnect the battery charger in the following order.
1. Turn off the battery charger main switch.
2. Unhook the negative clamp from the negative battery terminal.
3. Unhook the positive clamp from the positive battery terminal.
Before performing maintenance or recharging the battery, turn off all accessories and stop the
engine.
The negative battery cable must be removed first and installed
last when the battery is discon-nected.WARNING - Recharging
battery
When recharging the battery,
observe the following precautions:
The battery must be removed from the vehicle and placed in an area with good ventilation.
Do not allow cigarettes, sparks, or flame near the battery.
Watch the battery during charg- ing, and stop or reduce the charg-
ing rate if the battery cells begin
gassing (boiling) violently or if
the temperature of the electrolyte
of any cell exceeds 49°C (120°F).
Wear eye protection when check- ing the battery during charging.
(Continued)
Page 249 of 303
Maintenance
30
7
TYRES AND WHEELS
G200100AUN-UK
Tyre care
For proper maintenance, safety, and
maximum fuel economy, you must
always maintain recommended tyre
inflation pressures and stay within
the load limits and weight distribution
recommended for your vehicle. G200200AEN-UK Recommended cold tyre inflation pressures All tyre pressures (including the
spare) should be checked when the
tyres are cold. “Cold Tyres” means
the vehicle has not been driven for at
least three hours or driven less thanone mile (1.6 km).
Recommended pressures must be
maintained for the best ride, top vehi-
cle handling, and minimum tyre
wear.
For recommended inflation pressure,
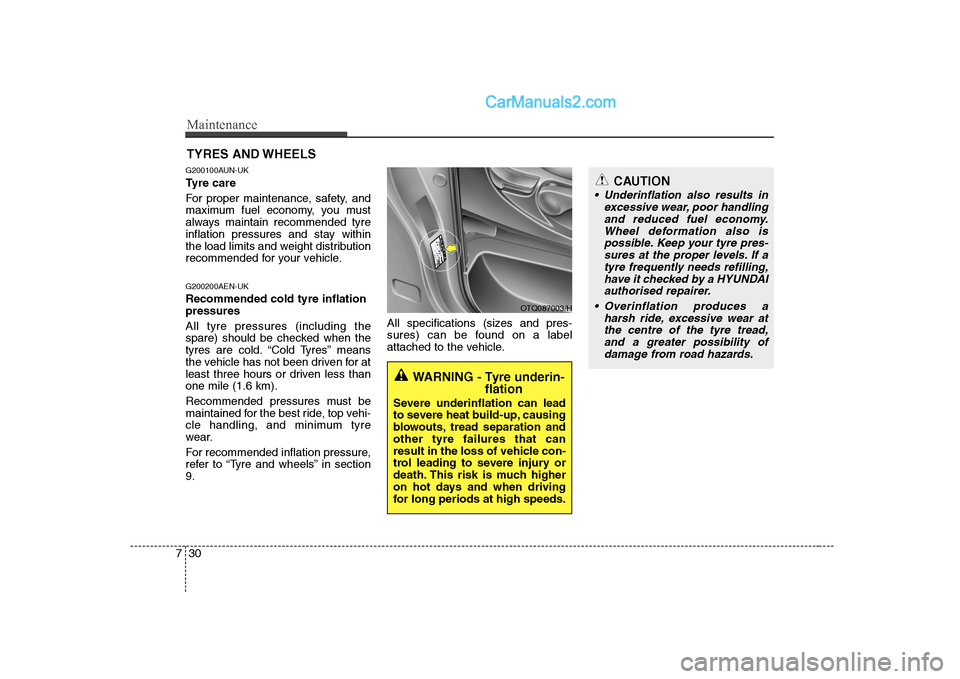
refer to “Tyre and wheels” in section9. All specifications (sizes and pres-
sures) can be found on a label
attached to the vehicle.
WARNING - Tyre underin-
flation
Severe underinflation can lead
to severe heat build-up, causing
blowouts, tread separation andother tyre failures that can
result in the loss of vehicle con-
trol leading to severe injury or
death. This risk is much higher
on hot days and when driving
for long periods at high speeds.
OTQ087003/H
CAUTION
Underinflation also results in excessive wear, poor handlingand reduced fuel economy.Wheel deformation also is possible. Keep your tyre pres-sures at the proper levels. If atyre frequently needs refilling, have it checked by a HYUNDAIauthorised repairer.
Overinflation produces a harsh ride, excessive wear atthe centre of the tyre tread, and a greater possibility ofdamage from road hazards.
Page 250 of 303
731
Maintenance
G200300AUN-UK
Checking tyre inflation pressure
Check your tyres once a month or
more.
Also, check the tyre pressure of the
spare tyre. G200301AEN-UK
How to check
Use a good quality gauge to check
tyre pressure. You can not tell if your
tyres are properly inflated simply by
looking at them. Radial tyres may
look properly inflated even when
they're underinflated.
Check the tyre's inflation pressure
when the tyres are cold. - "Cold"
means your vehicle has been sitting
for at least three hours or driven nomore than 1 mile (1.6 km).
WARNING - Tyre Inflation
Overinflation or underinflation
can reduce tyre life, adversely
affect vehicle handling, and
lead to sudden tyre failure. This
could result in loss of vehicle
control and potential injury.
CAUTION - Tyre pressure
Always observe the following:
Check tyre pressure when the tyres are cold. (After vehiclehas been parked for at leastthree hours or hasn't been driven more than 1.6 km (onemile) since startup.)
Check the pressure of your spare tyre each time youcheck the pressure of othertyres.
Never overload your vehicle. Be careful not to overload avehicle luggage rack if yourvehicle is equipped with one.
Worn, old tyres can cause accidents. If your tread isbadly worn, or if your tyres have been damaged, replacethem.
CAUTION
Warm tyres normally exceed recommended cold tyre pres-sures by 4 to 6 psi (28 to 41kPa). Do not release air from warm tyres to adjust the pres-sure or the tyres will be under-inflated.
Be sure to reinstall the tyre inflation valve caps. Withoutthe valve cap, dirt or moisturecould get into the valve coreand cause air leakage. If a valve cap is missing, install anew one as soon as possible.