tow Hyundai H-1 (Grand Starex) 2009 Owner's Manual
[x] Cancel search | Manufacturer: HYUNDAI, Model Year: 2009, Model line: H-1 (Grand Starex), Model: Hyundai H-1 (Grand Starex) 2009Pages: 312, PDF Size: 23.85 MB
Page 5 of 312
15
Introduction
A020202AUN
Biodiesel
Commercially supplied biodiesel blends of no more than 5% biodiesel, commonly
known as "B5 biodiesel" may be used in
your vehicle if it meets EN 14214 or
equivalent specifications. (EN stands for
"European Norm"). The use of biofuels
made from rapeseed methyl ester
(RME), fatty acid methyl ester (FAME),
vegetable oil methyl ester (VME) etc. ormixing diesel with biodiesel will cause
increased wear or damage to the engine
and fuel system. Repair or replacement
of worn or damaged components due to
the use of non approved fuels will not be
covered by the manufactures warranty.A090000AEN
As with other vehicles of this type, failure
to operate this vehicle correctly mayresult in loss of control, an accident or
vehicle rollover.
Specific design characteristics (higher
ground clearance, track, etc.) give this
vehicle a higher center of gravity than
other types of vehicles. In other words
they are not designed for cornering at the
same speeds as conventional 2-wheel
drive vehicles. Avoid sharp turns or
abrupt maneuvers. Again, failure to oper-
ate this vehicle correctly may result in
loss of control, an accident or vehicle
rollover.
Be sure to read the “Reducing
the risk of a rollover” driving guide-
lines, in section 5 of this manual. A030000AUN
No special break-in period is needed. By
following a few simple precautions for the
first 1,000 km (600 miles) you may add to
the performance, economy and life of
your vehicle.
Do not race the engine.
While driving, keep your engine speed
(rpm, or revolutions per minute)
between 2,000 rpm and 4,000 rpm.
Do not maintain a single speed for long periods of time, either fast or slow.
Varying engine speed is needed to
properly break-in the engine.
Avoid hard stops, except in emergen- cies, to allow the brakes to seat prop-
erly.
Don't let the engine idle longer than 3 minutes at one time.
Don't tow a trailer during the first 2,000 km (1,200 miles) of operation.
VEHICLE BREAK-IN PROCESS
VEHICLE HANDLING
INSTRUCTIONS
CAUTION
Never use any fuel, whether
diesel or B5 biodiesel that fails tomeet the latest petroleum indus-try specification.
Never use any fuel additives or treatments that are not recom-mended or approved by the vehi-cle manufacturer.
Page 22 of 312
Safety features of your vehicle
10
3
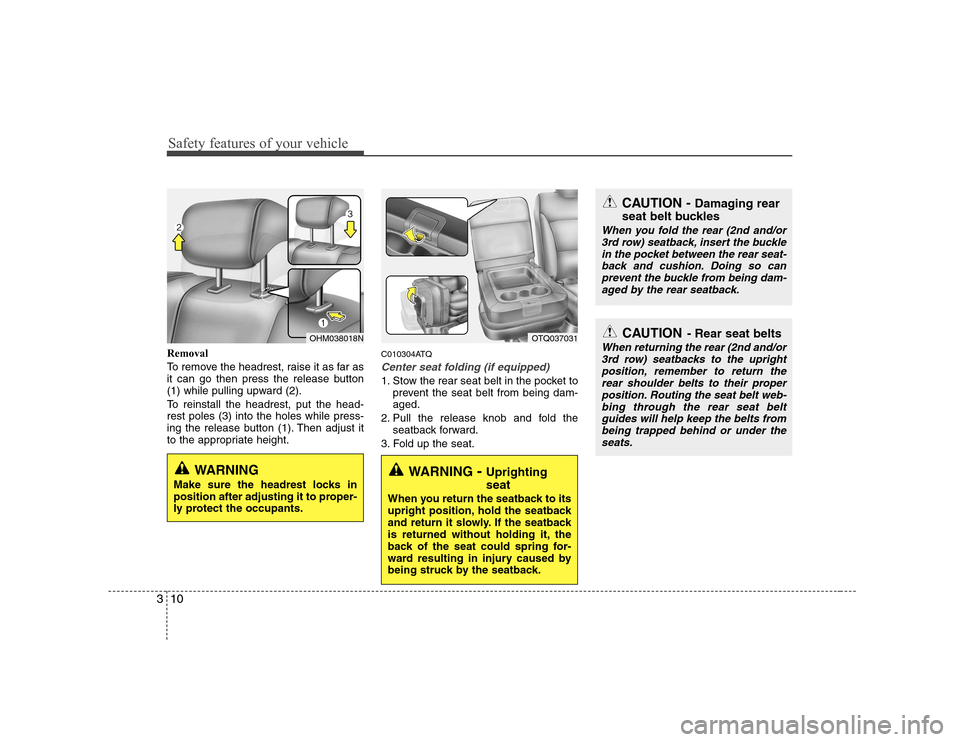
Removal
To remove the headrest, raise it as far as
it can go then press the release button
(1) while pulling upward (2).
To reinstall the headrest, put the head- rest poles (3) into the holes while press-
ing the release button (1). Then adjust it
to the appropriate height. C010304ATQ
Center seat folding (if equipped)
1. Stow the rear seat belt in the pocket to
prevent the seat belt from being dam- aged.
2. Pull the release knob and fold the seatback forward.
3. Fold up the seat.
OHM038018NOTQ037031
WARNING - Uprighting seat
When you return the seatback to its
upright position, hold the seatback
and return it slowly. If the seatback
is returned without holding it, the
back of the seat could spring for-
ward resulting in injury caused by
being struck by the seatback.
CAUTION - Rear seat belts
When returning the rear (2nd and/or
3rd row) seatbacks to the upright position, remember to return therear shoulder belts to their proper
position. Routing the seat belt web-bing through the rear seat belt guides will help keep the belts from
being trapped behind or under theseats.
CAUTION - Damaging rear
seat belt buckles
When you fold the rear (2nd and/or 3rd row) seatback, insert the bucklein the pocket between the rear seat-back and cushion. Doing so can
prevent the buckle from being dam-aged by the rear seatback.
WARNING
Make sure the headrest locks in
position after adjusting it to proper-
ly protect the occupants.
Page 23 of 312
311
Safety features of your vehicle
C010307ATQ
Folding the rear seat (4th row seat, if equipped)
The rear seat cushion may be folded to
facilitate carrying long items or toincrease the luggage capacity of the
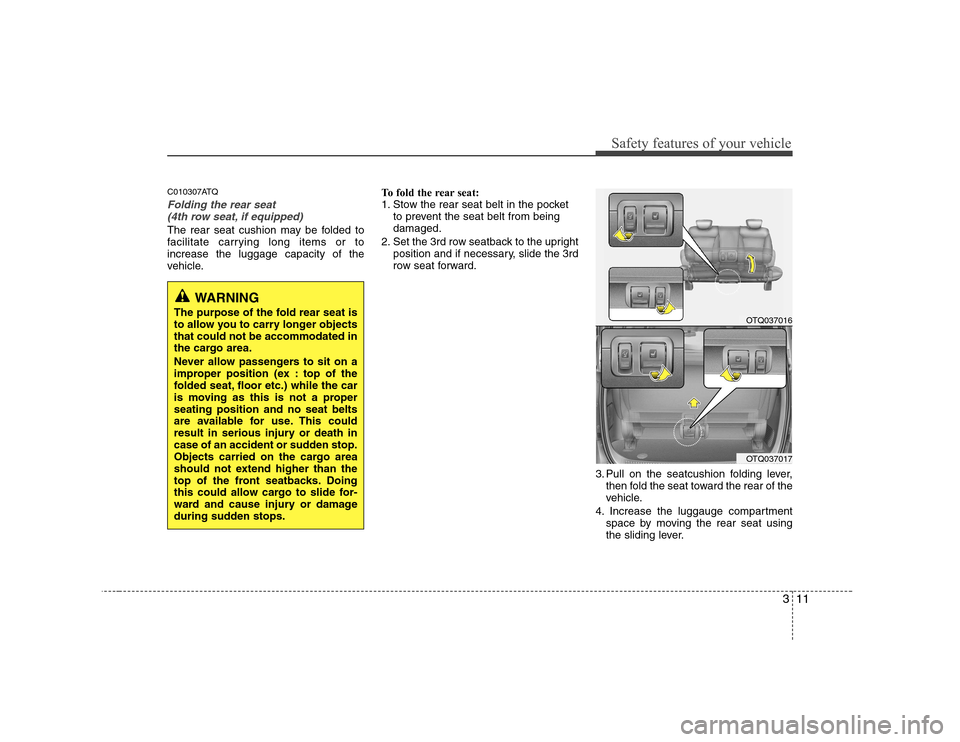
vehicle. To fold the rear seat:
1. Stow the rear seat belt in the pocket
to prevent the seat belt from beingdamaged.
2. Set the 3rd row seatback to the upright position and if necessary, slide the 3rd
row seat forward.
3. Pull on the seatcushion folding lever,then fold the seat toward the rear of the
vehicle.
4. Increase the luggauge compartment space by moving the rear seat using
the sliding lever.
WARNING
The purpose of the fold rear seat is
to allow you to carry longer objectsthat could not be accommodated in
the cargo area.
Never allow passengers to sit on a
improper position (ex : top of the
folded seat, floor etc.) while the car
is moving as this is not a properseating position and no seat belts
are available for use. This could
result in serious injury or death in
case of an accident or sudden stop.
Objects carried on the cargo area
should not extend higher than the
top of the front seatbacks. Doing
this could allow cargo to slide for-
ward and cause injury or damage
during sudden stops.
OTQ037016
OTQ037017
Page 29 of 312
317
Safety features of your vehicle
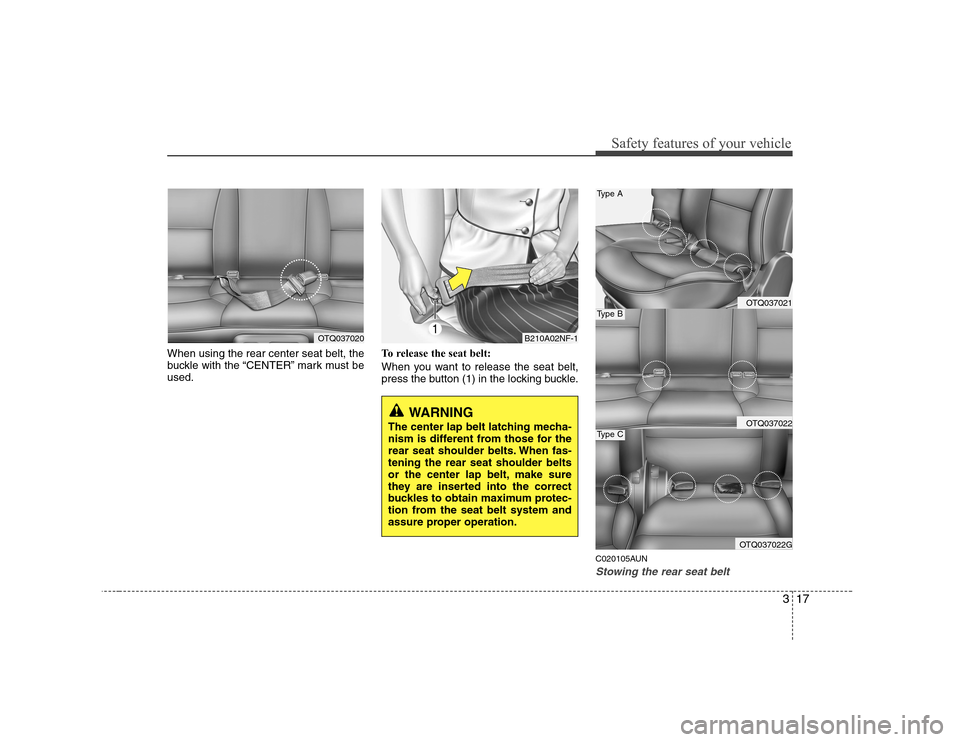
When using the rear center seat belt, the
buckle with the “CENTER” mark must beused.To release the seat belt:
When you want to release the seat belt,
press the button (1) in the locking buckle.
C020105AUN
Stowing the rear seat belt
B210A02NF-1
WARNING
The center lap belt latching mecha-
nism is different from those for the
rear seat shoulder belts. When fas-tening the rear seat shoulder belts
or the center lap belt, make sure
they are inserted into the correct
buckles to obtain maximum protec-
tion from the seat belt system and
assure proper operation.
OTQ037021
OTQ037022
OTQ037022G
Type A
Type B
Type C
OTQ037020
Page 30 of 312
Safety features of your vehicle
18
3
The rear seat belt buckles can be
stowed in the pocket between the rear
seatback and cushion when not in use.
The center seat belt can be stowed with the plate and webbing rolled in the
pocket between the rear seatback andcushion.
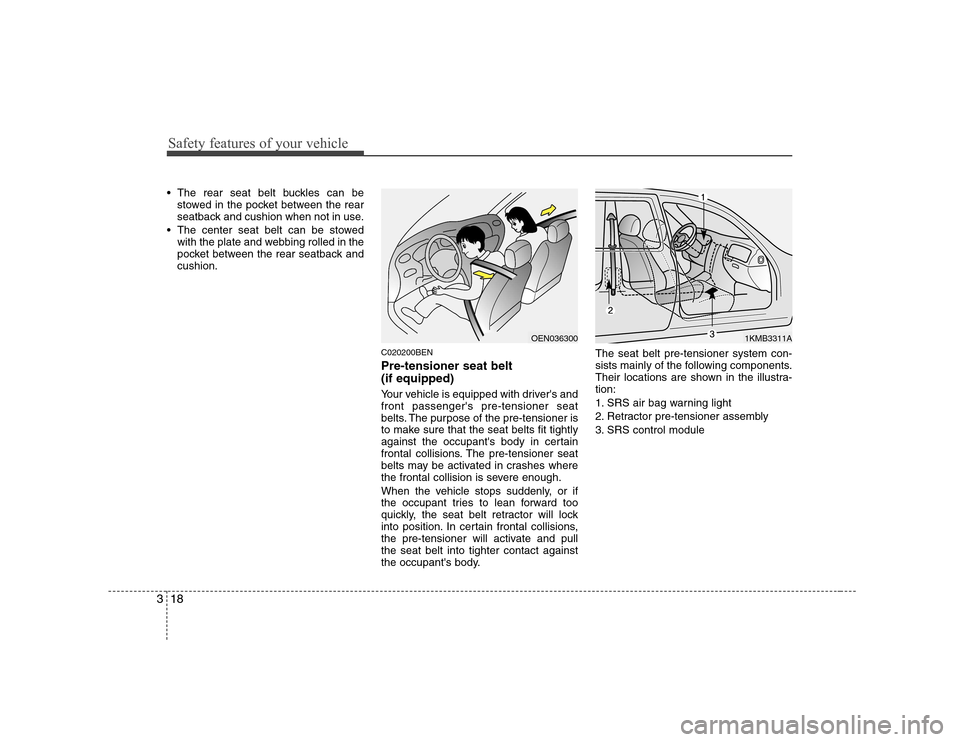
C020200BEN Pre-tensioner seat belt (if equipped)
Your vehicle is equipped with driver's and front passenger's pre-tensioner seat
belts. The purpose of the pre-tensioner is
to make sure that the seat belts fit tightly
against the occupant's body in certain
frontal collisions. The pre-tensioner seat
belts may be activated in crashes where
the frontal collision is severe enough.
When the vehicle stops suddenly, or if
the occupant tries to lean forward too
quickly, the seat belt retractor will lock
into position. In certain frontal collisions,
the pre-tensioner will activate and pullthe seat belt into tighter contact against
the occupant's body. The seat belt pre-tensioner system con-
sists mainly of the following components.
Their locations are shown in the illustra-tion:
1. SRS air bag warning light
2. Retractor pre-tensioner assembly
3. SRS control module
OEN0363001KMB3311A
Page 40 of 312
Safety features of your vehicle
28
3
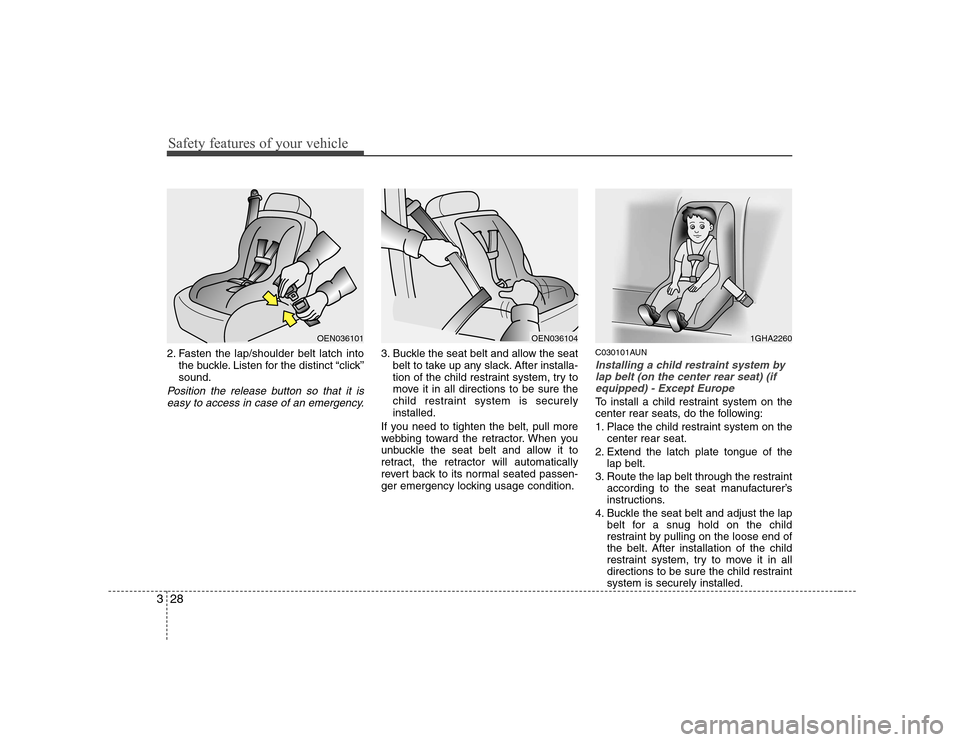
2. Fasten the lap/shoulder belt latch into
the buckle. Listen for the distinct “click” sound.
Position the release button so that it is
easy to access in case of an emergency.
3. Buckle the seat belt and allow the seat belt to take up any slack. After installa-
tion of the child restraint system, try to
move it in all directions to be sure the
child restraint system is securelyinstalled.
If you need to tighten the belt, pull more
webbing toward the retractor. When you
unbuckle the seat belt and allow it to
retract, the retractor will automatically
revert back to its normal seated passen-
ger emergency locking usage condition. C030101AUNInstalling a child restraint system by
lap belt (on the center rear seat) (ifequipped) - Except Europe
To install a child restraint system on the
center rear seats, do the following:
1. Place the child restraint system on the center rear seat.
2. Extend the latch plate tongue of the lap belt.
3. Route the lap belt through the restraint according to the seat manufacturer’s
instructions.
4. Buckle the seat belt and adjust the lap belt for a snug hold on the child
restraint by pulling on the loose end of
the belt. After installation of the child
restraint system, try to move it in all
directions to be sure the child restraintsystem is securely installed.
OEN036101OEN0361041GHA2260
Page 62 of 312
Safety features of your vehicle
50
3
C041300ATQ
Additional safety precautions Never let passengers ride in the
cargo area or on top of a folded-
down back seat. All occupants should
sit upright, fully back in their seats with
their seat belts on and their feet on the
floor.
Passengers should not move out of
or change seats while the vehicle is
moving. A passenger who is not wear-
ing a seat belt during a crash or emer-
gency stop can be thrown against the
inside of the vehicle, against other
occupants, or out of the vehicle.
Each seat belt is designed torestrain one occupant. If more than
one person uses the same seat belt,
they could be seriously injured or killedin a collision.
Do not use any accessories on seatbelts. Devices claiming to improve
occupant comfort or reposition the seat
belt can reduce the protection provided
by the seat belt and increase the
chance of serious injury in a crash.
Passengers should not place hardor sharp objects between them-
selves and the air bags. Carrying
hard or sharp objects on your lap or in
your mouth can result in injuries if an
air bag inflates.
WARNING
Modification to SRS components or wiring, including the addition
of any kind of badges to the pad
covers or modifications to the
body structure, can adversely
affect SRS performance and lead
to possible injury.
For cleaning the air bag pad cov- ers, use only a soft, dry cloth or
one which has been moistened
with plain water. Solvents or
cleaners could adversely affect
the air bag covers and proper
deployment of the system.
No objects should be placed over
or near the air bag modules on the
steering wheel, instrument panel,
and the front passenger's panel
above the glove box, because any
such object could cause harm if the
vehicle is in a crash severe enough
to cause the air bags to inflate.
(Continued)
(Continued)
If the air bags inflate, they must be replaced by an authorized
HYUNDAI dealer.
Do not tamper with or disconnect SRS wiring, or other components
of the SRS system. Doing so
could result in injury, due to acci-
dental inflation of the air bags or
by rendering the SRS inopera-
tive.
If components of the air bag sys- tem must be discarded, or if the
vehicle must be scrapped, certain
safety precautions must be
observed. An authorized
HYUNDAI dealer knows these
precautions and can give you the
necessary information. Failure to
follow these precautions and pro-cedures could increase the risk
of personal injury.
If your car was flooded and has soaked carpeting or water on the
flooring, you shouldn't try to start
the engine; have the car towed to
an authorized HYUNDAI dealer.
Page 71 of 312
Features of your vehicle
8
4
D050100ATQ
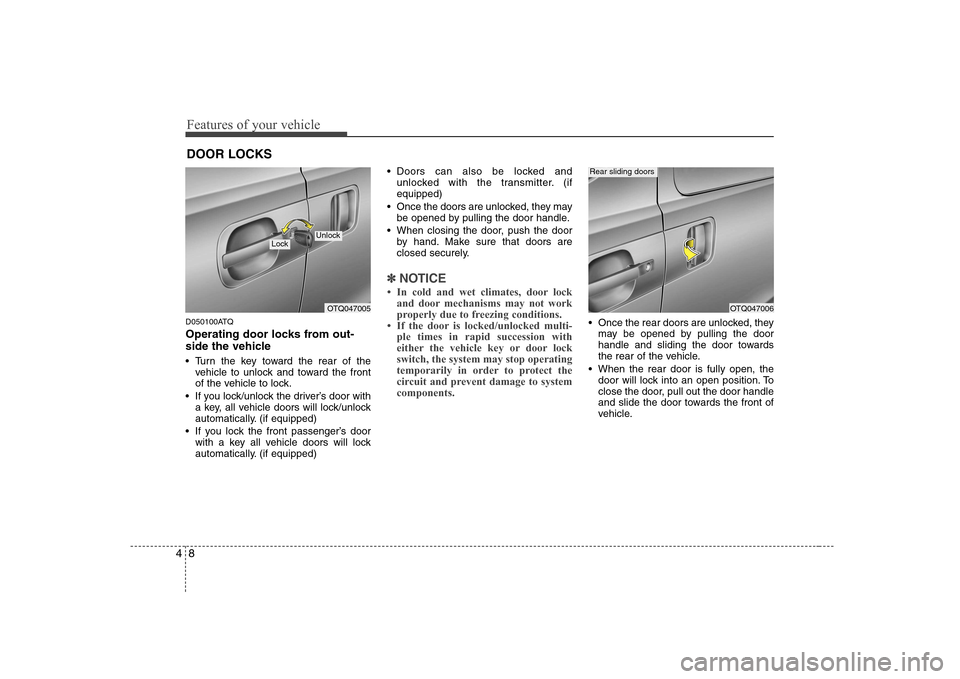
Operating door locks from out-
side the vehicle
Turn the key toward the rear of the
vehicle to unlock and toward the front
of the vehicle to lock.
If you lock/unlock the driver’s door with a key, all vehicle doors will lock/unlock
automatically. (if equipped)
If you lock the front passenger’s door with a key all vehicle doors will lock
automatically. (if equipped) Doors can also be locked and
unlocked with the transmitter. (ifequipped)
Once the doors are unlocked, they may be opened by pulling the door handle.
When closing the door, push the door by hand. Make sure that doors are
closed securely.
✽✽ NOTICE
Page 91 of 312
Features of your vehicle
28
4
D140100AUN
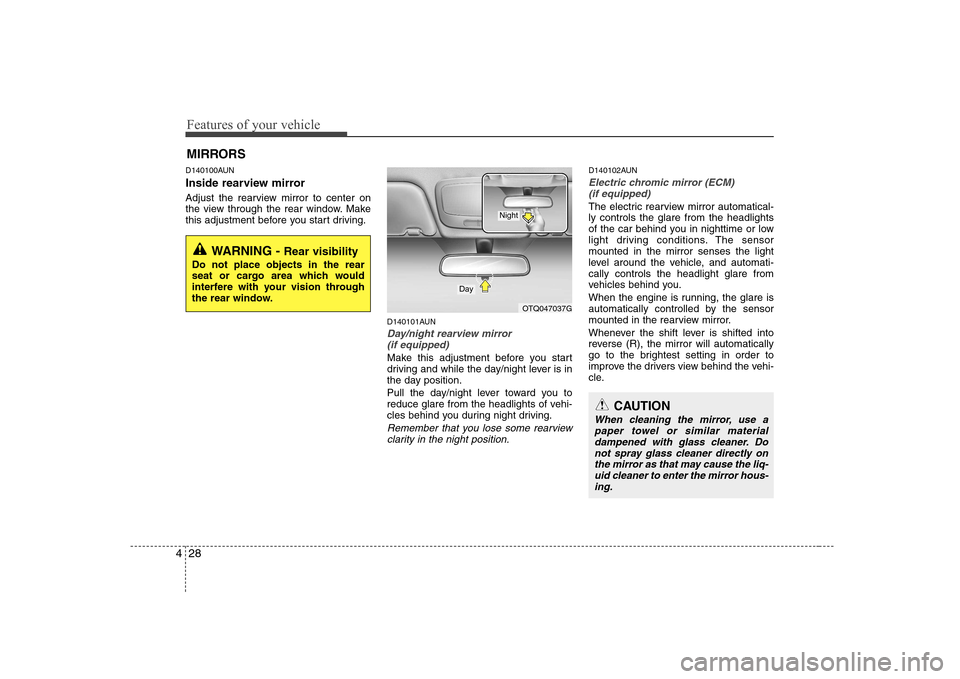
Inside rearview mirror
Adjust the rearview mirror to center on
the view through the rear window. Make
this adjustment before you start driving.
D140101AUN
Day/night rearview mirror (if equipped)
Make this adjustment before you start
driving and while the day/night lever is in
the day position.
Pull the day/night lever toward you to
reduce glare from the headlights of vehi-
cles behind you during night driving.
Remember that you lose some rearviewclarity in the night position.
D140102AUN
Electric chromic mirror (ECM) (if equipped)
The electric rearview mirror automatical- ly controls the glare from the headlights
of the car behind you in nighttime or low
light driving conditions. The sensormounted in the mirror senses the light
level around the vehicle, and automati-cally controls the headlight glare from
vehicles behind you.
When the engine is running, the glare is
automatically controlled by the sensor
mounted in the rearview mirror.
Whenever the shift lever is shifted into
reverse (R), the mirror will automatically
go to the brightest setting in order to
improve the drivers view behind the vehi-
cle.
MIRRORS
WARNING -
Rear visibility
Do not place objects in the rear
seat or cargo area which would
interfere with your vision through
the rear window.
OTQ047037G
CAUTION
When cleaning the mirror, use a paper towel or similar materialdampened with glass cleaner. Do not spray glass cleaner directly onthe mirror as that may cause the liq-
uid cleaner to enter the mirror hous-ing.
Day
Night
Page 94 of 312
431
Features of your vehicle
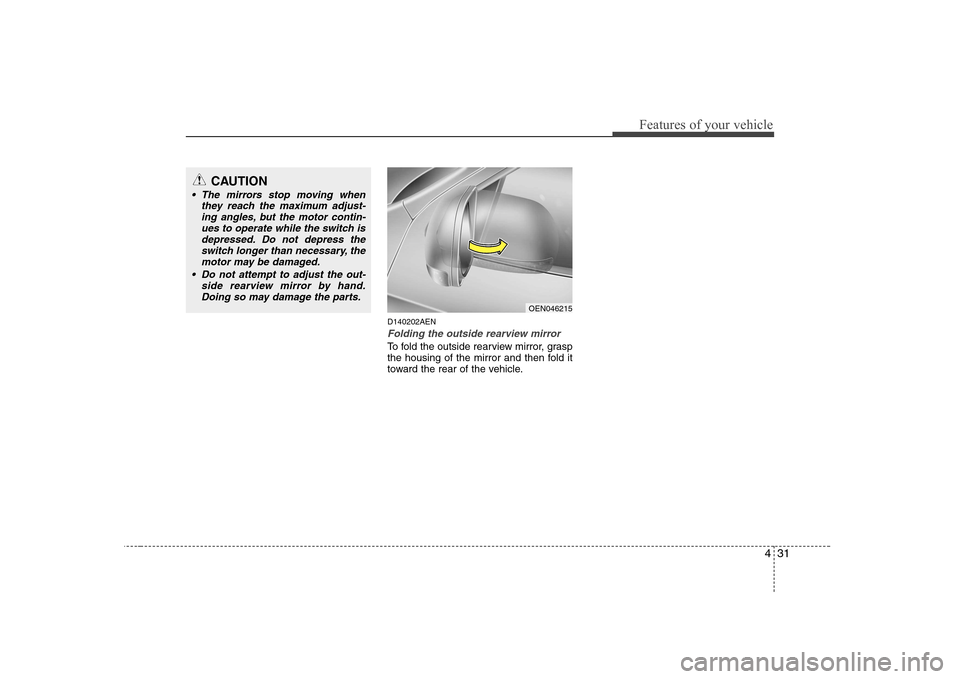
D140202AEN
Folding the outside rearview mirror
To fold the outside rearview mirror, grasp
the housing of the mirror and then fold it
toward the rear of the vehicle.
CAUTION
The mirrors stop moving whenthey reach the maximum adjust-ing angles, but the motor contin-ues to operate while the switch is
depressed. Do not depress theswitch longer than necessary, the motor may be damaged.
Do not attempt to adjust the out- side rearview mirror by hand.
Doing so may damage the parts.
OEN046215