weight Hyundai H-1 (Grand Starex) 2009 Owner's Manual
[x] Cancel search | Manufacturer: HYUNDAI, Model Year: 2009, Model line: H-1 (Grand Starex), Model: Hyundai H-1 (Grand Starex) 2009Pages: 312, PDF Size: 23.85 MB
Page 3 of 312
13
Introduction
A020102AEN
Leaded (if equipped)
For some countries, your vehicle is
designed to use leaded gasoline. When
you are going to use leaded gasoline,
ask to an authorized HYUNDAI dealer
whether leaded gasoline in your vehicle
is available or not. Octane Rating of leaded gasoline is
same with unleaded one.A020103AUN
Gasoline containing alcohol and
methanol
Gasohol, a mixture of gasoline and
ethanol (also known as grain alcohol),and gasoline or gasohol containing
methanol (also known as wood alcohol)
are being marketed along with or instead
of leaded or unleaded gasoline. Do not use gasohol containing more than 10% ethanol, and do not use gasoline or
gasohol containing any methanol. Either
of these fuels may cause drivability prob-lems and damage to the fuel system.
Discontinue using gasohol of any kind if
drivability problems occur.
Vehicle damage or drivability problems
may not be covered by the manufactur-
er’s warranty if they result from the useof:
1. Gasohol containing more than 10% ethanol.
2. Gasoline or gasohol containing methanol.
3. Leaded fuel or leaded gasohol. A020104AEN
Use of MTBE
HYUNDAI recommends avoiding fuels
containing MTBE (Methyl Tertiary Butyl
Ether) over 15.0% vol. (Oxygen Content
2.7% weight) in your vehicle.
Fuel containing MTBE over 15.0% vol.
(Oxygen Content 2.7% weight) may
reduce vehicle performance and produce
vapor lock or hard starting.
WARNING
Do not "top off" after the nozzle automatically shuts off when refueling.
Always check that the fuel cap is installed securely to prevent fuel
spillage in the event of an acci-dent.
CAUTION
Your New Vehicle Limited Warranty
may not cover damage to the fuelsystem and any performance prob-lems that are caused by the use of
fuels containing methanol or fuelscontaining MTBE (Methyl TertiaryButyl Ether) over 15.0% vol.(Oxygen Content 2.7% weight.)
CAUTION
Never use gasohol which contains
methanol. Discontinue use of anygasohol product which impairs dri-vability.
Page 33 of 312
321
Safety features of your vehicle
C020306AUN
Infant or small child
You should be aware of the specific
requirements in your country. Child
and/or infant seats must be properly
placed and installed in the rear seat. For
more information about the use of these
restraints, refer to “Child restraint sys-
tem” in this section.
✽✽NOTICE
Small children are best protected from
injury in an accident when properly
restrained in the rear seat by a child
restraint system that meets the require-
ments of the Safety Standards of your
country. Before buying any child
restraint system, make sure that it has alabel certifying that it meets Safety
Standards of your country. The restraint
must be appropriate for your child'sheight and weight. Check the label on
the child restraint for this information.
Refer to “Child restraint system” in thissection.C020301AUN
Larger children
Children who are too large for child
restraint systems should always occupy
the rear seat and use the available
lap/shoulder belts. The lap portion should
be fastened snug on the hips and as low
as possible. Check belt fit periodically. A
child's squirming could put the belt out of
position. Children are afforded the most
safety in the event of an accident when
they are restrained by a proper restraint
system in the rear seat. If a larger child
(over age 12) must be seated in the frontseat, the child should be securely
restrained by the available lap/shoulderbelt and the seat should be placed in the
rearmost position. Children age 12 and
under should be restrained securely in
the rear seat. NEVER place a child age
12 and under in the front seat. NEVER
place a rear facing child seat in the front
seat of a vehicle.
WARNING
Every person in your vehicle needs
to be properly restrained at all
times, including infants and chil-
dren. Never hold a child in yourarms or lap when riding in a vehi-
cle. The violent forces created dur-
ing a crash will tear the child from
your arms and throw the child
against the interior. Always use a
child restraint appropriate for your
child's height and weight.
Page 114 of 312
451
Features of your vehicle
The rear fog lights turn on when the rear
fog switch is pressed after the front fog
switch is turned to ON and the headlight
switch to the parklight position. (ifequipped)
To turn the rear fog lights off, press the
rear fog light switch again or turn the
headlight switch to the OFF position.
D190900AUN
Daytime running light (if equipped)
Daytime Running Lights (DRL) can make
it easier for others to see the front of your
vehicle during the day. DRL can be help-
ful in many different driving conditions,
and it is especially helpful after dawn and
before sunset.
The DRL system will make the head-
lights turn OFF when:
1. The parklight switch is ON.
2. Engine stops.Headlight leveling device (if equipped)
D191001ATQ
Manual type
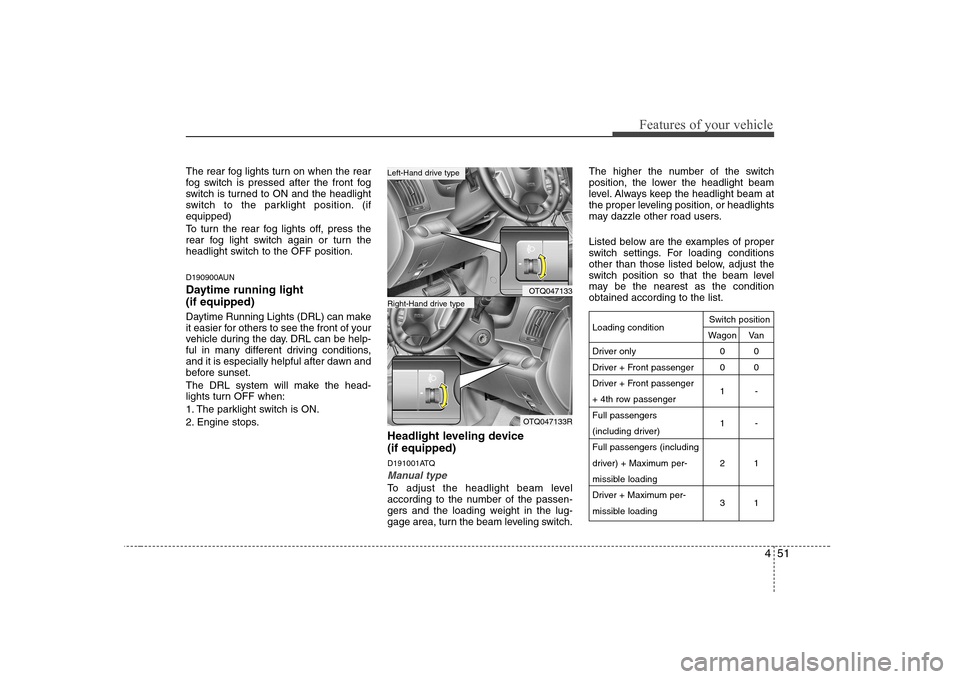
To adjust the headlight beam level
according to the number of the passen-
gers and the loading weight in the lug-
gage area, turn the beam leveling switch.The higher the number of the switch
position, the lower the headlight beam
level. Always keep the headlight beam at
the proper leveling position, or headlights
may dazzle other road users.
Listed below are the examples of proper
switch settings. For loading conditions
other than those listed below, adjust the
switch position so that the beam level
may be the nearest as the conditionobtained according to the list.
OTQ047133
OTQ047133R
Right-Hand drive type
Left-Hand drive type
Loading condition
Driver only
Driver + Front passenger
Driver + Front passenger
+ 4th row passengerFull passengers
(including driver)Full passengers (including
driver) + Maximum per-
missible loading
Driver + Maximum per-
missible loading
Switch position
Wagon Van 0000 1- 1- 21 31
Page 157 of 312
5
Before driving / 5-3 Key positions / 5-4
Starting the engine / 5-6Manual transmission / 5-8
Automatic transmission / 5-11Brake system / 5-18
Locking differential / 5-28Economical operation / 5-29Special driving conditions / 5-31
Winter driving / 5-36
Trailer towing (for Europe) / 5-40
Vehicle weight / 5-47
Driving your vehicle
Page 173 of 312
517
Driving your vehicle
E060203AUN
Moving up a steep grade from a stand-ing start
To move up a steep grade from a stand-
ing start, depress the brake pedal, shift
the shift lever to D (Drive). Select the
appropriate gear depending on load
weight and steepness of the grade, and
release the parking brake. Depress the
accelerator gradually while releasing the
service brakes.
When accelerating from a stop on a
steep hill, the vehicle may have a ten-
dency to roll backwards. Shifting the
shift lever into 2 (Second Gear) will
help prevent the vehicle from rolling
backwards. E060203ATQ
Shift lock system (if equipped)
For your safety, the Automatic
Transmission has a shift lock system
which prevents shifting the transmission
out of P (Park) unless the brake pedal isdepressed.
To shift the transmission out of P (Park):
Type A
1. Depress and hold the brake pedal.
2. Depress the lock release button and
move the shift lever.
Type B (If the ignition key interlock system is equipped)
1. Depress and hold the brake pedal.
2. Start the engine or turn the ignition to the ON position.
3. Depress the lock release button and move the shift lever.
If the brake pedal is repeatedly depressed and released with the shift
lever in the P (Park) position, a chattering
sound near the shift lever may be heard.
This is a normal condition. Ignition key interlock system (if equipped)
The ignition key cannot be removed
unless the shift lever is in the P (Park)
position. If the ignition switch is in any
other position, the key cannot be
removed.
Page 185 of 312
529
Driving your vehicle
E100000AFD
Your vehicle's fuel economy depends
mainly on your style of driving, where you
drive and when you drive.
Each of these factors affects how many
miles (kilometers) you can get from a gal-
lon (liter) of fuel. To operate your vehicle
as economically as possible, use the fol-
lowing driving suggestions to help save
money in both fuel and repairs:
Drive smoothly. Accelerate at a moder-ate rate. Don't make "jack-rabbit" starts or full-throttle shifts and maintain a
steady cruising speed. Don't race
between stoplights. Try to adjust your
speed to that of the other traffic so you
don't have to change speeds unneces-
sarily. Avoid heavy traffic whenever
possible. Always maintain a safe dis-
tance from other vehicles so you can
avoid unnecessary braking. This also
reduces brake wear.
Drive at a moderate speed. The faster you drive, the more fuel your car uses.
Driving at a moderate speed, especial-
ly on the highway, is one of the most
effective ways to reduce fuel consump-tion. Don't "ride" the brake or clutch pedal.
This can increase fuel consumption
and also increase wear on these com-
ponents. In addition, driving with your
foot resting on the brake pedal may
cause the brakes to overheat, which
reduces their effectiveness and may
lead to more serious consequences.
Take care of your tires. Keep them inflated to the recommended pressure.
Incorrect inflation, either too much or
too little, results in unnecessary tire
wear. Check the tire pressures at leastonce a month.
Be sure that the wheels are aligned correctly. Improper alignment can
result from hitting curbs or driving too
fast over irregular surfaces. Poor align-
ment causes faster tire wear and may
also result in other problems as well as
greater fuel consumption.
Keep your car in good condition. For better fuel economy and reduced
maintenance costs, maintain your carin accordance with the maintenance
schedule in Section 7. If you drive your
car in severe conditions, more frequentmaintenance is required (see Section
7 for details). Keep your car clean. For maximum
service, your vehicle should be kept
clean and free of corrosive materials. It
is especially important that mud, dirt,
ice, etc. not be allowed to accumulate
on the underside of the car. This extra
weight can result in increased fuel con-
sumption and also contribute to corro-sion.
Travel lightly. Don't carry unnecessary weight in your car. Weight reduces fuel
economy.
Don't let the engine idle longer than necessary. If you are waiting (and not
in traffic), turn off your engine and
restart only when you're ready to go.
Remember, your vehicle does not require extended warm-up. After the
engine has started, allow the engine to
run for 10 to 20 seconds prior to plac-
ing the vehicle in gear. In very cold
weather, however, give your engine a
slightly longer warm-up period.
Don't "lug" or "over-rev" the engine. Lugging is driving too slowly in toohigh a gear resulting in the engine
bucking. If this happens, shift to a lower
gear. Over-revving is racing the engine
beyond its safe limit. This can be avoid-
ed by shifting at the recommended
speeds.
ECONOMICAL OPERATION
Page 194 of 312
Driving your vehicle
38
5
E120200AUN
Use high quality ethylene glycol coolant
Your vehicle is delivered with high quality
ethylene glycol coolant in the cooling
system. It is the only type of coolant that
should be used because it helps prevent
corrosion in the cooling system, lubri-
cates the water pump and prevents
freezing. Be sure to replace or replenish
your coolant in accordance with themaintenance schedule in section 7.
Before winter, have your coolant tested toassure that its freezing point is sufficient
for the temperatures anticipated during
the winter. E120300AEN
Check battery and cables
Winter puts additional burdens on the
battery system. Visually inspect the bat-
tery and cables as described in section
7. The level of charge in your battery can
be checked by an authorized HYUNDAI
dealer or a service station. E120400AEN
Change to "winter weight" oil if
necessary In some climates it is recommended that
a lower viscosity "winter weight" oil be
used during cold weather. See section 9
for recommendations. If you aren't sure
what weight oil you should use, consult
an authorized HYUNDAI dealer.
E120500AUN
Check spark plugs and ignition system
Inspect your spark plugs as described in
section 7 and replace them if necessary.
Also check all ignition wiring and compo-
nents to be sure they are not cracked,
worn or damaged in any way.
WARNING
- Tire chains
The use of chains may adversely affect vehicle handling.
Do not exceed 30 km/h (20 mph) or the chain manufacturer’s rec-
ommended speed limit, whichev-
er is lower.
Drive carefully and avoid bumps, holes, sharp turns, and other
road hazards, which may cause
the vehicle to bounce.
Avoid sharp turns or locked- wheel braking.
CAUTION
Chains that are the wrong size or
improperly installed can damageyour vehicle's brake lines, sus-pension, body and wheels.
Stop driving and retighten the chains any time you hear themhitting the vehicle.
Page 197 of 312
541
Driving your vehicle
E140100AUN
Hitches
It's important to have the correct hitch
equipment. Crosswinds, large trucks
going by, and rough roads are a few rea-
sons why you’ll need the right hitch. Here
are some rules to follow:
Will you have to make any holes in thebody of your vehicle when you install a
trailer hitch? If you do, then be sure to
seal the holes later when you removethe hitch.
If you don’t seal them, deadly carbon
monoxide (CO) from your exhaust can
get into your vehicle, as well as dirt and
water.
The bumpers on your vehicle are not intended for hitches. Do not attach
rental hitches or other bumper-type
hitches to them. Use only a frame-mounted hitch that does not attach to
the bumper. E140200AUN
Safety chains
You should always attach chains
between your vehicle and your trailer.
Cross the safety chains under the tongue
of the trailer so that the tongue will not
drop to the road if it becomes separatedfrom the hitch.
Instructions about safety chains may be
provided by the hitch manufacturer or by
the trailer manufacturer. Follow the man-
ufacturer’s recommendation for attaching
safety chains. Always leave just enough
slack so you can turn with your trailer.
And, never allow safety chains to drag on
the ground.
E140300AUN
Trailer brakes
If your trailer is equipped with a braking
system, make sure it conforms to your
country’s regulations and that it is prop-
erly installed and operating correctly.
If your trailer weighs more than the max-
imum trailer weight without trailer brakes
loaded, then it needs its own brakes and
they must be adequate. Be sure to read
and follow the instructions for the trailer
brakes so you’ll be able to install, adjust
and maintain them properly.
Don’t tap into your vehicle's brake sys-
tem.
WARNING - Trailer brakes
Do not use a trailer with its own
brakes unless you are absolutely
certain that you have properly set
up the brake system. This is not a
task for amateurs. Use an experi-
enced, competent trailer shop for
this work.
Page 198 of 312
Driving your vehicle
42
5
E140400AUN Driving with a trailer
Towing a trailer requires a certain
amount of experience. Before setting out
for the open road, you must get to know
your trailer. Acquaint yourself with the
feel of handling and braking with the
added weight of the trailer. And always
keep in mind that the vehicle you are
driving is now a good deal longer and not
nearly so responsive as your vehicle is
by itself.
Before you start, check the trailer hitch
and platform, safety chains, electrical
connector(s), lights, tires and mirror
adjustment. If the trailer has electric
brakes, start your vehicle and trailer mov-
ing and then apply the trailer brake con-
troller by hand to be sure the brakes are
working. This lets you check your electri-
cal connection at the same time.
During your trip, check occasionally to be
sure that the load is secure, and that the
lights and any trailer brakes are still work-ing.
E140401AUN
Following distance
Stay at least twice as far behind the vehi-
cle ahead as you would when driving
your vehicle without a trailer. This can
help you avoid situations that require
heavy braking and sudden turns. E140402AUN
Passing
You’ll need more passing distance up
ahead when you’re towing a trailer. And,
because of the increased vehicle length,
you’ll need to go much farther beyond the
passed vehicle before you can return to
your lane.
E140403AUN
Backing up
Hold the bottom of the steering wheel
with one hand. Then, to move the trailer
to the left, just move your hand to the left.
To move the trailer to the right, move your
hand to the right. Always back up slowly
and, if possible, have someone guide
you.
E140404AUN
Making turns
When you’re turning with a trailer, make
wider turns than normal. Do this so your
trailer won’t strike soft shoulders, curbs,
road signs, trees, or other objects. Avoid
jerky or sudden maneuvers. Signal well
in advance.
E140405AFD
Turn signals when towing a trailer
When you tow a trailer, your vehicle has
to have a different turn signal flasher and
extra wiring. The green arrows on your
instrument panel will flash whenever you
signal a turn or lane change. Properly
connected, the trailer lights will also flash
to alert other drivers you’re about to turn,
change lanes, or stop.
When towing a trailer, the green arrows
on your instrument panel will flash for
turns even if the bulbs on the trailer are
burned out. Thus, you may think drivers
behind you are seeing your signals
when, in fact, they are not. It’s important
to check occasionally to be sure the trail-
er bulbs are still working. You must also
check the lights every time you discon-
nect and then reconnect the wires.
Do not connect a trailer lighting system
directly to your vehicle’s lighting system.
Use only an approved trailer wiring har-
ness.
An authorized HYUNDAI dealer can
assist you in installing the wiring harness.
WARNING
Failure to use an approved trailer wiring harness could result in dam-
age to the vehicle electrical system
and/or personal injury.
Page 199 of 312
543
Driving your vehicle
E140406ATQ
Driving on grades
Reduce speed and shift to a lower gear
before you start down a long or steep
downgrade. If you don’t shift down, you
might have to use your brakes so much
that they would get hot and no longer
operate efficiently.
On a long uphill grade, shift down and
reduce your speed to around 70 km/h (45mph) to reduce the possibility of engine
and transmission overheating.
If your trailer weighs more than the max-
imum trailer weight without trailer brakes
and you have an automatic transmission,
you should drive in D (Drive) when tow-
ing a trailer.
Operating your vehicle in D (Drive) when
towing a trailer will minimize heat build up
and extend the life of your transmission.E140407BUN
Parking on hills
Generally, if you have a trailer attached to
your vehicle, you should not park your
vehicle on a hill. People can be seriously
or fatally injured, and both your vehicle
and the trailer can be damaged if unex-
pectedly roll down hill.
However, if you ever have to park your
trailer on a hill, here's how to do it:
1. Pull the vehicle into the parking space.
Turn the steering wheel in the direction
of the curb (right if headed down hill,left if headed up hill).
2. If the vehicle has a manual transmis- sion, place the car in neutral. If the
vehicle has an automatic transmission,
place the car in P (Park).
3. Set the parking brake and shut off the vehicle.
4. Place chocks under the trailer wheels on the down hill side of the wheels.
WARNING - Parking on a
hill
Parking your vehicle on a hill with a
trailer attached could cause seri-
ous injury or death, should the trail-
er break loose.
CAUTION
When towing a trailer on steep grades (in excess of 6%) payclose attention to the engine coolant temperature gauge to
ensure the engine does not over-heat.
(Continued)
(Continued)If the needle of the coolant tem-perature gauge moves across the
dial towards “H” (HOT), pull overand stop as soon as it is safe to do so, and allow the engine to idleuntil it cools down. You may pro-
ceed once the engine has cooledsufficiently.
You must decide driving speed depending on trailer weight and
uphill grade to reduce the possi- bility of engine and transmissionoverheating.
CAUTION
Going uphill under hot ambient temperature (above 35°C) with GVW
and/or trailer, a minimal fuel tank level of 5 liter has to be assured inorder to prevent power limitation due to fuel overheating as well as
further damages in the fuel injec- tion equipment.