fog Hyundai H-1 (Grand Starex) 2013 User Guide
[x] Cancel search | Manufacturer: HYUNDAI, Model Year: 2013, Model line: H-1 (Grand Starex), Model: Hyundai H-1 (Grand Starex) 2013Pages: 353, PDF Size: 9.18 MB
Page 324 of 353
Maintenance
60 7
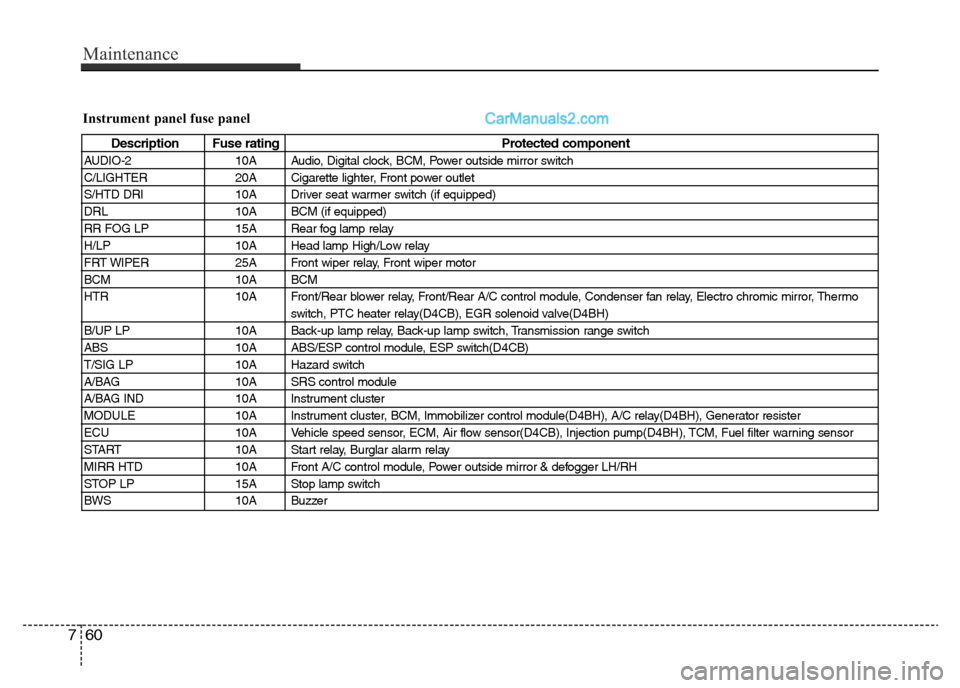
Instrument panel fuse panel
Description Fuse rating Protected component
AUDIO-2 10A Audio, Digital clock, BCM, Power outside mirror switch
C/LIGHTER 20A Cigarette lighter, Front power outlet
S/HTD DRI 10A Driver seat warmer switch (if equipped)
DRL 10A BCM (if equipped)
RR FOG LP 15A Rear fog lamp relay
H/LP 10A Head lamp High/Low relay
FRT WIPER 25A Front wiper relay, Front wiper motor
BCM 10A BCM
HTR 10A Front/Rear blower relay, Front/Rear A/C control module, Condenser fan relay, Electro chromic mirror, Thermo
switch, PTC heater relay(D4CB), EGR solenoid valve(D4BH)
B/UP LP 10A Back-up lamp relay, Back-up lamp switch, Transmission range switch
ABS 10A ABS/ESP control module, ESP switch(D4CB)
T/SIG LP 10A Hazard switch
A/BAG 10A SRS control module
A/BAG IND 10A Instrument cluster
MODULE 10A Instrument cluster, BCM, Immobilizer control module(D4BH), A/C relay(D4BH), Generator resister
ECU 10A Vehicle speed sensor, ECM, Air flow sensor(D4CB), Injection pump(D4BH), TCM, Fuel filter warning sensor
START 10A Start relay, Burglar alarm relay
MIRR HTD 10A Front A/C control module, Power outside mirror & defogger LH/RH
STOP LP 15A Stop lamp switch
BWS 10A Buzzer
Page 325 of 353
761
Maintenance
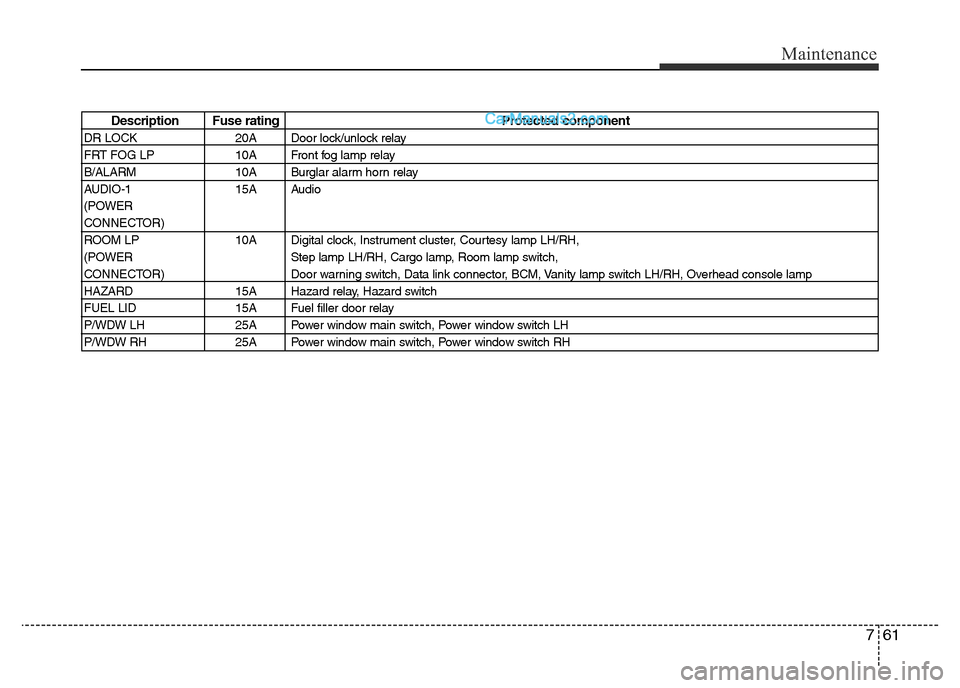
Description Fuse rating Protected component
DR LOCK 20A Door lock/unlock relay
FRT FOG LP 10A Front fog lamp relay
B/ALARM 10A Burglar alarm horn relay
AUDIO-1 15A Audio
(POWER
CONNECTOR)
ROOM LP 10A Digital clock, Instrument cluster, Courtesy lamp LH/RH,
(POWER Step lamp LH/RH, Cargo lamp, Room lamp switch,
CONNECTOR) Door warning switch, Data link connector, BCM, Vanity lamp switch LH/RH, Overhead console lamp
HAZARD 15A Hazard relay, Hazard switch
FUEL LID 15A Fuel filler door relay
P/WDW LH 25A Power window main switch, Power window switch LH
P/WDW RH 25A Power window main switch, Power window switch RH
Page 326 of 353
Maintenance
62 7
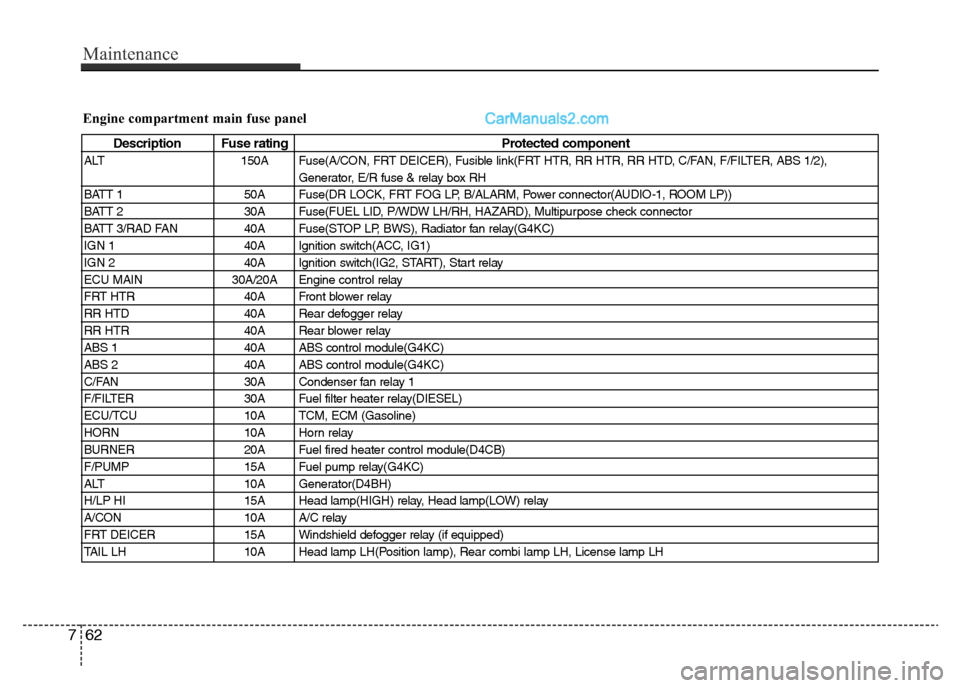
Engine compartment main fuse panel
Description Fuse rating Protected component
ALT 150A Fuse(A/CON, FRT DEICER), Fusible link(FRT HTR, RR HTR, RR HTD, C/FAN, F/FILTER, ABS 1/2),
Generator, E/R fuse & relay box RH
BATT 1 50A Fuse(DR LOCK, FRT FOG LP, B/ALARM, Power connector(AUDIO-1, ROOM LP))
BATT 2 30A Fuse(FUEL LID, P/WDW LH/RH, HAZARD), Multipurpose check connector
BATT 3/RAD FAN 40A Fuse(STOP LP, BWS), Radiator fan relay(G4KC)
IGN 1 40A Ignition switch(ACC, IG1)
IGN 2 40A Ignition switch(IG2, START), Start relay
ECU MAIN 30A/20A Engine control relay
FRT HTR 40A Front blower relay
RR HTD 40A Rear defogger relay
RR HTR 40A Rear blower relay
ABS 1 40A ABS control module(G4KC)
ABS 2 40A ABS control module(G4KC)
C/FAN 30A Condenser fan relay 1
F/FILTER 30A Fuel filter heater relay(DIESEL)
ECU/TCU 10A TCM, ECM (Gasoline)
HORN 10A Horn relay
BURNER 20A Fuel fired heater control module(D4CB)
F/PUMP 15A Fuel pump relay(G4KC)
ALT 10A Generator(D4BH)
H/LP HI 15A Head lamp(HIGH) relay, Head lamp(LOW) relay
A/CON 10A A/C relay
FRT DEICER 15A Windshield defogger relay (if equipped)
TAIL LH 10A Head lamp LH(Position lamp), Rear combi lamp LH, License lamp LH
Page 328 of 353
Maintenance
64 7
LIGHT BULBS
G220000AEN
Use only the bulbs of the specified
wattage.
✽NOTICE
After heavy, driving rain or washing,
headlight and taillight lenses could
appear frosty. This condition is caused by
the temperature difference between the
lamp inside and outside. This is similar
to the condensation on your windows
inside your vehicle during the rain and
doesn’t indicate a problem with your
vehicle. If the water leaks into the lamp
bulb circuitry, we recommend that the
system be checked by an authorized
HYUNDAI dealer.
G220100AUN
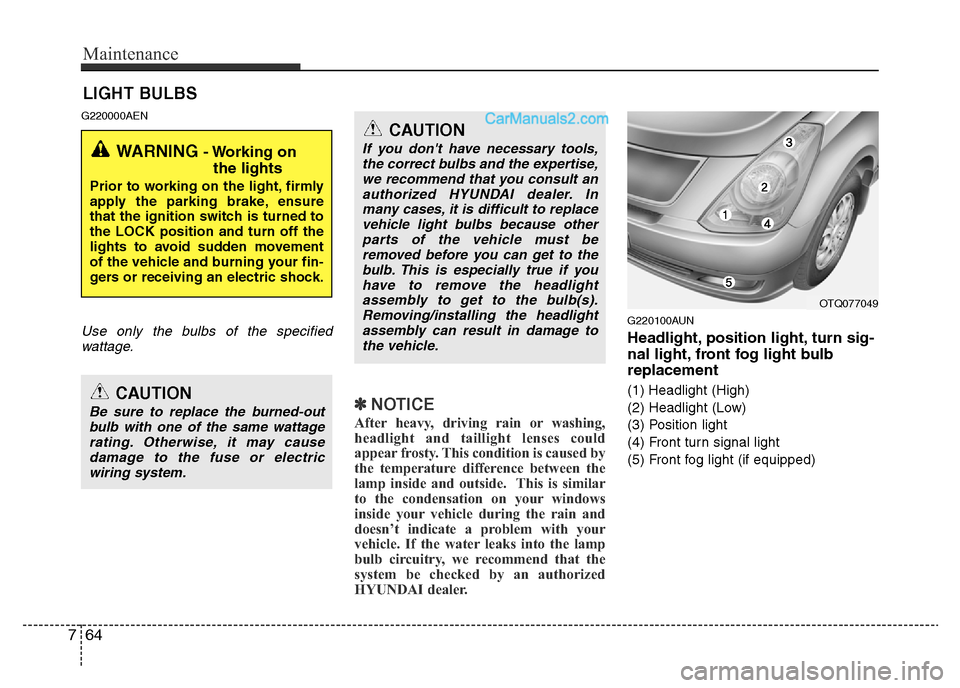
Headlight, position light, turn sig-
nal light, front fog light bulb
replacement
(1) Headlight (High)
(2) Headlight (Low)
(3) Position light
(4) Front turn signal light
(5) Front fog light (if equipped)
WARNING - Working on
the lights
Prior to working on the light, firmly
apply the parking brake, ensure
that the ignition switch is turned to
the LOCK position and turn off the
lights to avoid sudden movement
of the vehicle and burning your fin-
gers or receiving an electric shock.
CAUTION
Be sure to replace the burned-out
bulb with one of the same wattage
rating. Otherwise, it may cause
damage to the fuse or electric
wiring system.
CAUTION
If you don't have necessary tools,
the correct bulbs and the expertise,
we recommend that you consult an
authorized HYUNDAI dealer. In
many cases, it is difficult to replace
vehicle light bulbs because other
parts of the vehicle must be
removed before you can get to the
bulb. This is especially true if you
have to remove the headlight
assembly to get to the bulb(s).
Removing/installing the headlight
assembly can result in damage to
the vehicle.
OTQ077049
Page 330 of 353
Maintenance
66 7
G220102ATQ
Turn signal light/position light, fog
light bulb (if equipped)
Turn signal light
1. If necessary, remove the headlight
assembly by loosening the headlight
installation bolts. When you remove
the headlight assembly, you may need
to remove the bumper according to the
vehicle.
2. Replace the malfunctioned light bulb.
3. Install the headlight assembly.
Fog light bulb (if equipped)
1. Remove the fog light under cover by
loosening the screw.
2. Replace the malfunctioned light bulb.
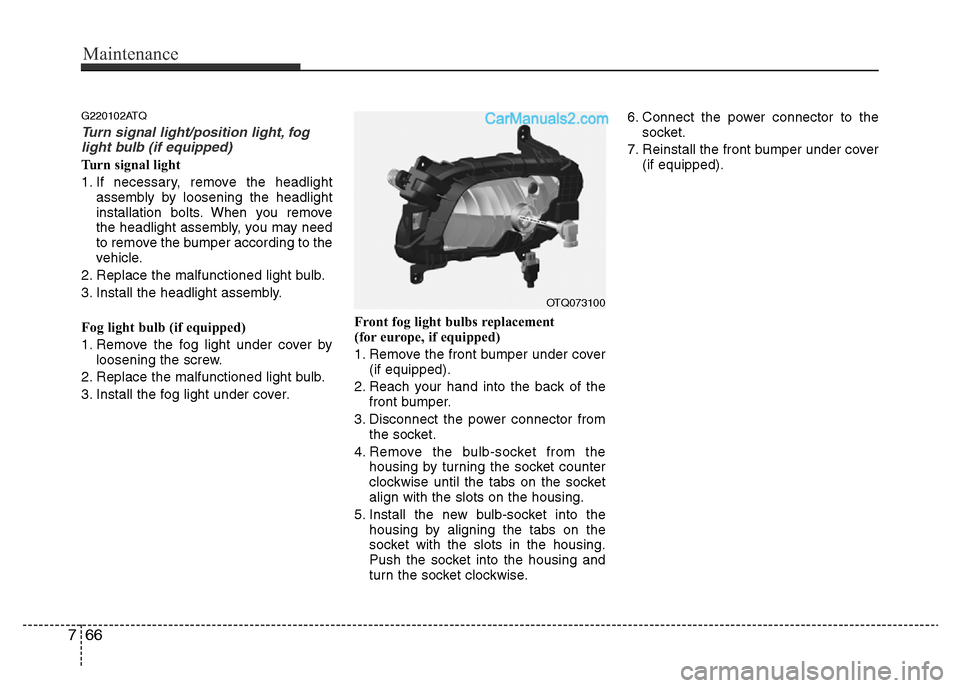
3. Install the fog light under cover.Front fog light bulbs replacement
(for europe, if equipped)
1. Remove the front bumper under cover
(if equipped).
2. Reach your hand into the back of the
front bumper.
3. Disconnect the power connector from
the socket.
4. Remove the bulb-socket from the
housing by turning the socket counter
clockwise until the tabs on the socket
align with the slots on the housing.
5. Install the new bulb-socket into the
housing by aligning the tabs on the
socket with the slots in the housing.
Push the socket into the housing and
turn the socket clockwise.6. Connect the power connector to the
socket.
7. Reinstall the front bumper under cover
(if equipped).
OTQ073100
Page 331 of 353
767
Maintenance
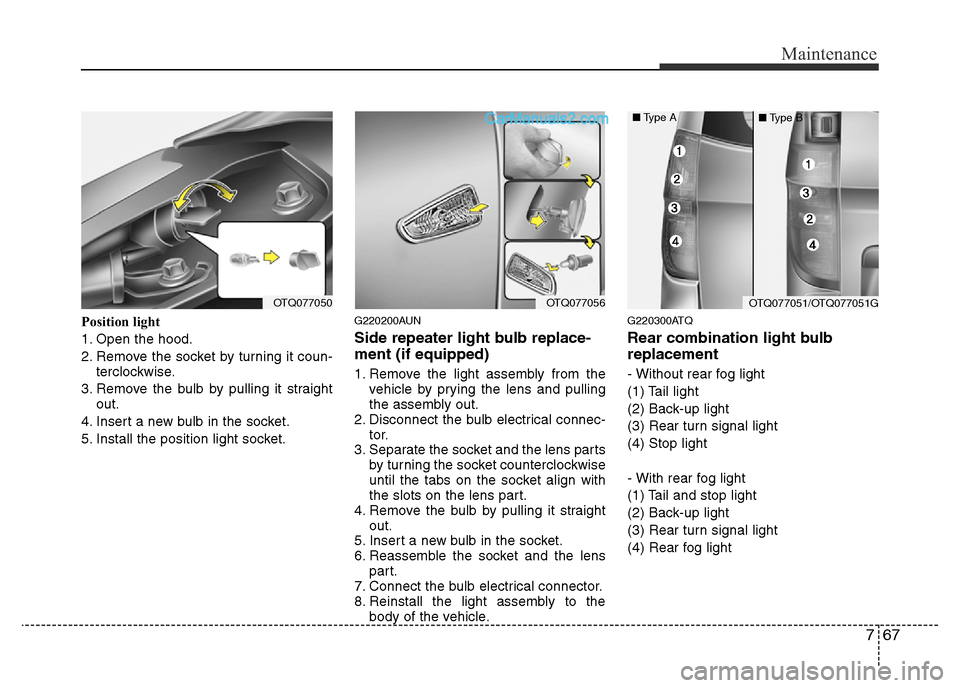
Position light
1. Open the hood.
2. Remove the socket by turning it coun-
terclockwise.
3. Remove the bulb by pulling it straight
out.
4. Insert a new bulb in the socket.
5. Install the position light socket.G220200AUN
Side repeater light bulb replace-
ment (if equipped)
1. Remove the light assembly from the
vehicle by prying the lens and pulling
the assembly out.
2. Disconnect the bulb electrical connec-
tor.
3. Separate the socket and the lens parts
by turning the socket counterclockwise
until the tabs on the socket align with
the slots on the lens part.
4. Remove the bulb by pulling it straight
out.
5. Insert a new bulb in the socket.
6. Reassemble the socket and the lens
part.
7. Connect the bulb electrical connector.
8. Reinstall the light assembly to the
body of the vehicle.
G220300ATQ
Rear combination light bulb
replacement
- Without rear fog light
(1) Tail light
(2) Back-up light
(3) Rear turn signal light
(4) Stop light
- With rear fog light
(1) Tail and stop light
(2) Back-up light
(3) Rear turn signal light
(4) Rear fog light
OTQ077050OTQ077056OTQ077051/OTQ077051G
■Type A
■Type B
Page 339 of 353
775
Maintenance
Interior care
G230201CUN
Interior general precautions
Prevent chemicals such as perfume, cos-
metic oil, sun cream, hand cleaner and
air freshener from contacting the interior
parts because they may cause damage
or discoloration. If they do contact the
interior parts, wipe them off immediately.
See the instructions that follow for the
proper way to clean vinyl.
G230202AUN
Cleaning the upholstery and interior
trim
Vinyl
Remove dust and loose dirt from vinyl
with a whisk broom or vacuum cleaner.
Clean vinyl surfaces with a vinyl cleaner.
Fabric
Remove dust and loose dirt from fabric
with a whisk broom or vacuum cleaner.
Clean with a mild soap solution recom-
mended for upholstery or carpets.
Remove fresh spots immediately with a
fabric spot cleaner. If fresh spots do not
receive immediate attention, the fabric
can be stained and its color can be
affected. Also, its fire-resistant properties
can be reduced if the material is not
properly maintained.
G230203AUN
Cleaning the lap/shoulder belt web-
bing
Clean the belt webbing with any mild
soap solution recommended for cleaning
upholstery or carpet. Follow the instruc-
tions provided with the soap. Do not
bleach or re-dye the webbing because
this may weaken it.
G230204AUN
Cleaning the interior window glass
If the interior glass surfaces of the vehi-
cle become fogged (that is, covered with
an oily, greasy or waxy film), they should
be cleaned with glass cleaner. Follow the
directions on the glass cleaner container.CAUTION
Never allow water or other liquids
to come in contact with electrical/
electronic components inside the
vehicle as this may damage them.
CAUTION
Using anything but recommended
cleaners and procedures may affect
the fabric’s appearance and fire-
resistant properties.
CAUTION
Do not scrape or scratch the inside
of the rear window. This may result
in damage to the rear window
defroster grid.CAUTION
When cleaning leather products
(steering wheel, seats etc.), use
neutral detergents or low alcohol
content solutions. If you use high
alcohol content solutions or
acid/alkaline detergents, the color
of the leather may fade or the sur-
face may get stripped off.
Page 349 of 353
Specifications
2 9
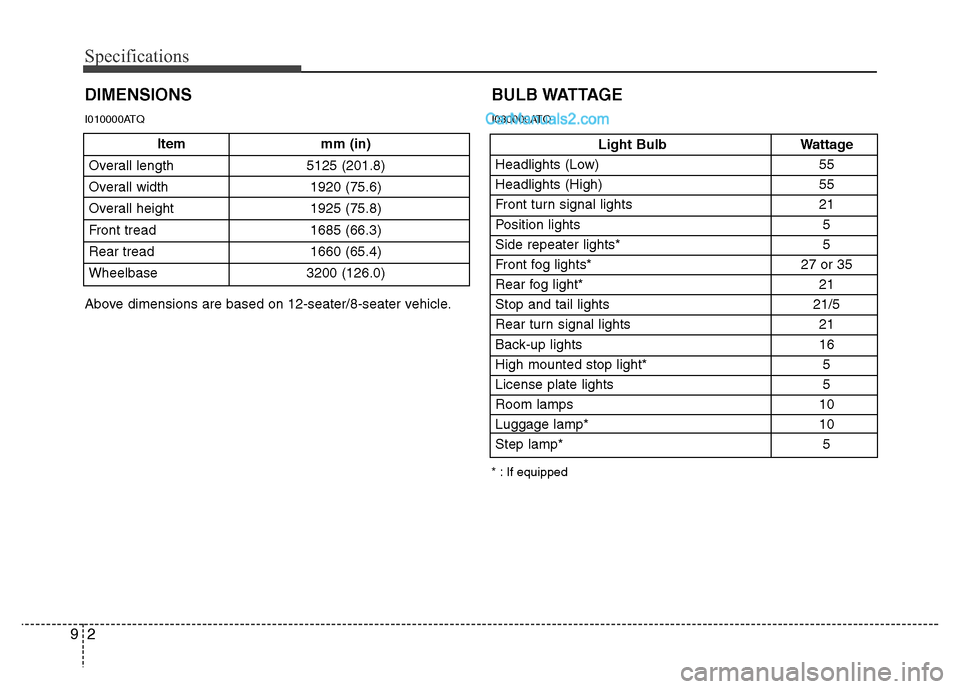
Item mm (in)
Overall length 5125 (201.8)
Overall width 1920 (75.6)
Overall height 1925 (75.8)
Front tread 1685 (66.3)
Rear tread 1660 (65.4)
Wheelbase 3200 (126.0)
DIMENSIONS
Light Bulb Wattage
Headlights (Low) 55
Headlights (High) 55
Front turn signal lights 21
Position lights 5
Side repeater lights* 5
Front fog lights* 27 or 35
Rear fog light* 21
Stop and tail lights 21/5
Rear turn signal lights 21
Back-up lights 16
High mounted stop light* 5
License plate lights 5
Room lamps 10
Luggage lamp* 10
Step lamp* 5
BULB WATTAGE
* : If equipped
Above dimensions are based on 12-seater/8-seater vehicle.
I010000ATQI030000ATQ