tailgate Hyundai H-1 (Grand Starex) 2015 User Guide
[x] Cancel search | Manufacturer: HYUNDAI, Model Year: 2015, Model line: H-1 (Grand Starex), Model: Hyundai H-1 (Grand Starex) 2015Pages: 353, PDF Size: 9.18 MB
Page 193 of 353

Driving your vehicle
2 5
E010000AEN
WARNING- ENGINE EXHAUST CAN BE DANGEROUS!
Engine exhaust fumes can be extremely dangerous. If, at any time, you smell exhaust fumes inside the vehicle, open the win-
dows immediately.
• Do not inhale exhaust fumes.
Exhaust fumes contain carbon monoxide, a colorless, odorless gas that can cause unconsciousness and death by asphyxia-
tion.
• Be sure the exhaust system does not leak.
The exhaust system should be checked whenever the vehicle is raised to change the oil or for any other purpose. If you hear
a change in the sound of the exhaust or if you drive over something that strikes the underneath side of the car, we recom-
mend that the system be checked by an authorized HYUNDAI dealer.
• Do not run the engine in an enclosed area.
Letting the engine idle in your garage, even with the garage door open, is a hazardous practice. Never run the engine in your
garage any longer than it takes to start the engine and back the car out.
• Avoid idling the engine for prolonged periods with people inside the car.
If it is necessary to idle the engine for a prolonged period with people inside the car, be sure to do so only in an open area
with the air intake set at "Fresh" and fan operating at one of the higher speeds so fresh air is drawn into the interior.
If you must drive with the tailgate open because you are carrying objects that make this necessary:
1. Close all windows.
2. Open side vents.
3. Set the air intake control at "Fresh", the air flow control at "Floor" or "Face" and the fan at one of the higher speeds.
To assure proper operation of the ventilation system, be sure the ventilation air intakes located just in front of the windshield are
kept clear of snow, ice, leaves or other obstructions.
Page 251 of 353

What to do in an emergency
12 6
F070200AEN
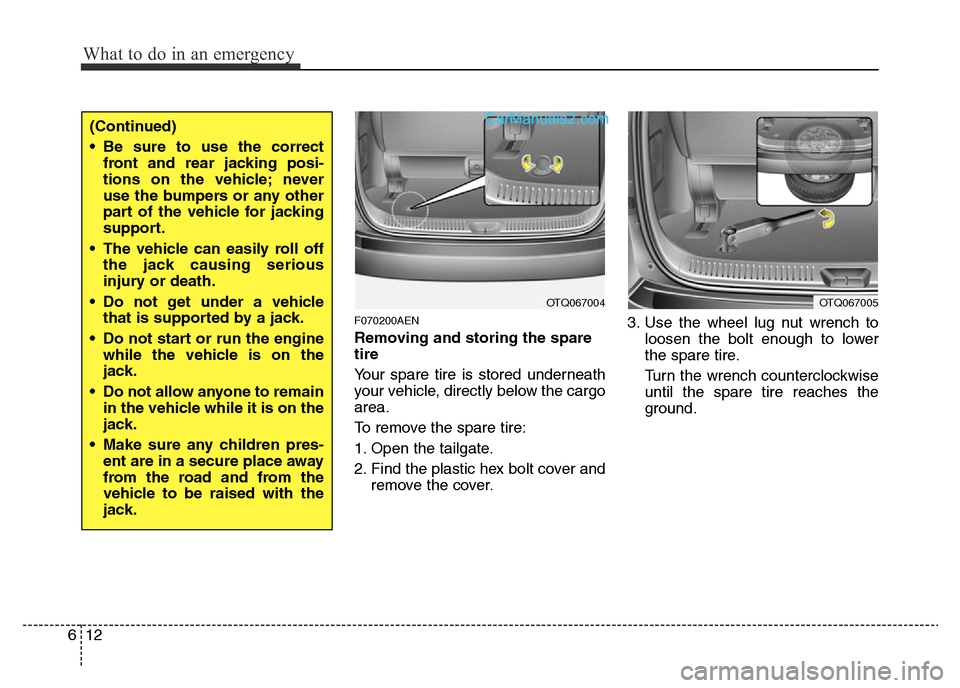
Removing and storing the spare
tire
Your spare tire is stored underneath
your vehicle, directly below the cargo
area.
To remove the spare tire:
1. Open the tailgate.
2. Find the plastic hex bolt cover and
remove the cover.3. Use the wheel lug nut wrench to
loosen the bolt enough to lower
the spare tire.
Turn the wrench counterclockwise
until the spare tire reaches the
ground.
OTQ067004OTQ067005
(Continued)
• Be sure to use the correct
front and rear jacking posi-
tions on the vehicle; never
use the bumpers or any other
part of the vehicle for jacking
support.
• The vehicle can easily roll off
the jack causing serious
injury or death.
• Do not get under a vehicle
that is supported by a jack.
• Do not start or run the engine
while the vehicle is on the
jack.
• Do not allow anyone to remain
in the vehicle while it is on the
jack.
• Make sure any children pres-
ent are in a secure place away
from the road and from the
vehicle to be raised with the
jack.
Page 332 of 353

Maintenance
68 7
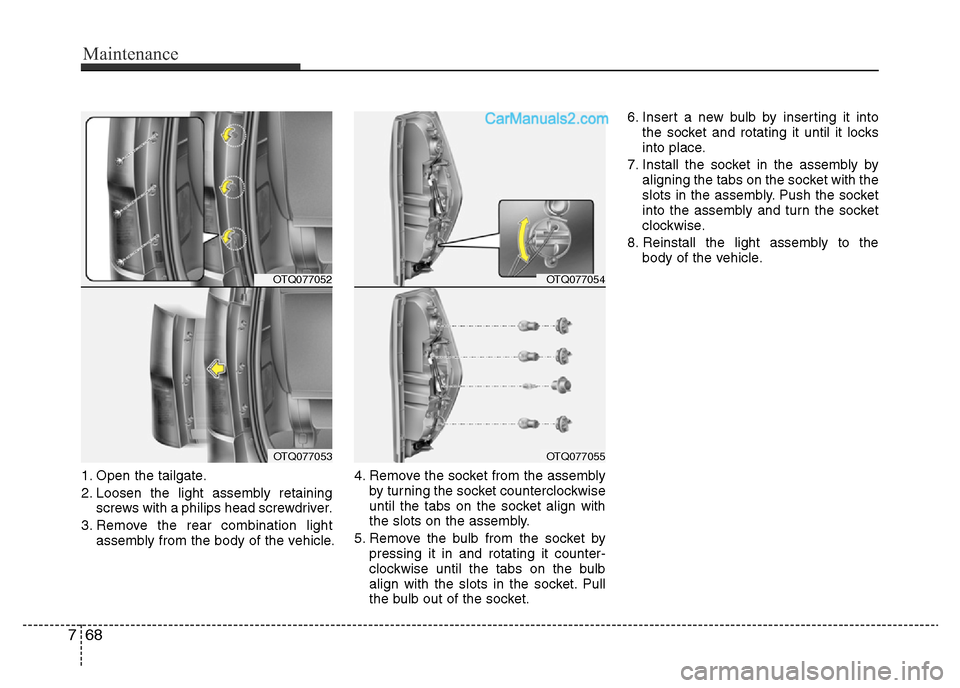
1. Open the tailgate.
2. Loosen the light assembly retaining
screws with a philips head screwdriver.
3. Remove the rear combination light
assembly from the body of the vehicle.4. Remove the socket from the assembly
by turning the socket counterclockwise
until the tabs on the socket align with
the slots on the assembly.
5. Remove the bulb from the socket by
pressing it in and rotating it counter-
clockwise until the tabs on the bulb
align with the slots in the socket. Pull
the bulb out of the socket.6. Insert a new bulb by inserting it into
the socket and rotating it until it locks
into place.
7. Install the socket in the assembly by
aligning the tabs on the socket with the
slots in the assembly. Push the socket
into the assembly and turn the socket
clockwise.
8. Reinstall the light assembly to the
body of the vehicle.
OTQ077054
OTQ077055
OTQ077052
OTQ077053
Page 333 of 353

769
Maintenance
G220400ATQ
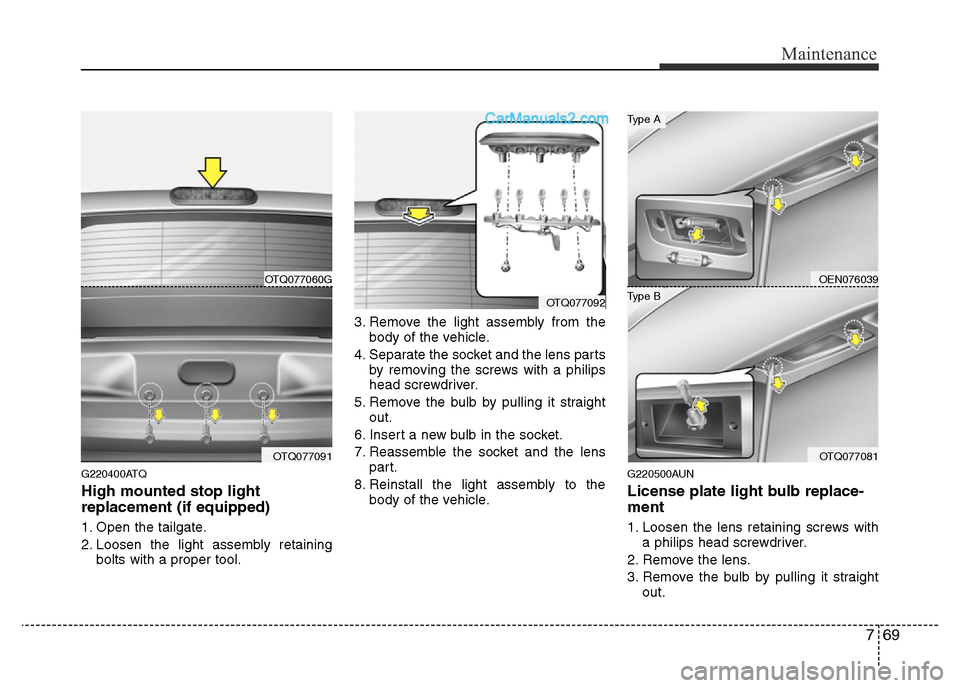
High mounted stop light
replacement (if equipped)
1. Open the tailgate.
2. Loosen the light assembly retaining
bolts with a proper tool.3. Remove the light assembly from the
body of the vehicle.
4. Separate the socket and the lens parts
by removing the screws with a philips
head screwdriver.
5. Remove the bulb by pulling it straight
out.
6. Insert a new bulb in the socket.
7. Reassemble the socket and the lens
part.
8. Reinstall the light assembly to the
body of the vehicle.
G220500AUN
License plate light bulb replace-
ment
1. Loosen the lens retaining screws with
a philips head screwdriver.
2. Remove the lens.
3. Remove the bulb by pulling it straight
out.
OTQ077092
OEN076039
OTQ077081
Type B
Type A
OTQ077060G
OTQ077091