bulb Hyundai H-1 (Grand Starex) 2016 Owner's Manual - RHD (UK, Australia)
[x] Cancel search | Manufacturer: HYUNDAI, Model Year: 2016, Model line: H-1 (Grand Starex), Model: Hyundai H-1 (Grand Starex) 2016Pages: 332, PDF Size: 6.89 MB
Page 108 of 332
Features of your vehicle
40 4
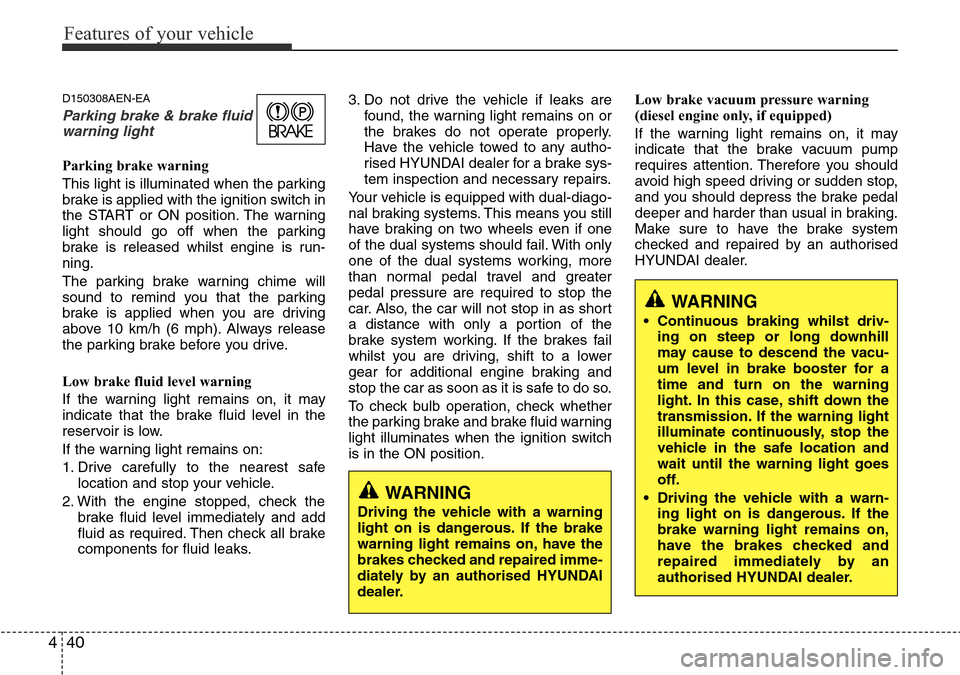
D150308AEN-EA
Parking brake & brake fluid
warning light
Parking brake warning
This light is illuminated when the parking
brake is applied with the ignition switch in
the START or ON position. The warning
light should go off when the parking
brake is released whilst engine is run-
ning.
The parking brake warning chime will
sound to remind you that the parking
brake is applied when you are driving
above 10 km/h (6 mph). Always release
the parking brake before you drive.
Low brake fluid level warning
If the warning light remains on, it may
indicate that the brake fluid level in the
reservoir is low.
If the warning light remains on:
1. Drive carefully to the nearest safe
location and stop your vehicle.
2. With the engine stopped, check the
brake fluid level immediately and add
fluid as required. Then check all brake
components for fluid leaks.3. Do not drive the vehicle if leaks are
found, the warning light remains on or
the brakes do not operate properly.
Have the vehicle towed to any autho-
rised HYUNDAI dealer for a brake sys-
tem inspection and necessary repairs.
Your vehicle is equipped with dual-diago-
nal braking systems. This means you still
have braking on two wheels even if one
of the dual systems should fail. With only
one of the dual systems working, more
than normal pedal travel and greater
pedal pressure are required to stop the
car. Also, the car will not stop in as short
a distance with only a portion of the
brake system working. If the brakes fail
whilst you are driving, shift to a lower
gear for additional engine braking and
stop the car as soon as it is safe to do so.
To check bulb operation, check whether
the parking brake and brake fluid warning
light illuminates when the ignition switch
is in the ON position.Low brake vacuum pressure warning
(diesel engine only, if equipped)
If the warning light remains on, it may
indicate that the brake vacuum pump
requires attention. Therefore you should
avoid high speed driving or sudden stop,
and you should depress the brake pedal
deeper and harder than usual in braking.
Make sure to have the brake system
checked and repaired by an authorised
HYUNDAI dealer.
WARNING
Driving the vehicle with a warning
light on is dangerous. If the brake
warning light remains on, have the
brakes checked and repaired imme-
diately by an authorised HYUNDAI
dealer.
WARNING
• Continuous braking whilst driv-
ing on steep or long downhill
may cause to descend the vacu-
um level in brake booster for a
time and turn on the warning
light. In this case, shift down the
transmission. If the warning light
illuminate continuously, stop the
vehicle in the safe location and
wait until the warning light goes
off.
• Driving the vehicle with a warn-
ing light on is dangerous. If the
brake warning light remains on,
have the brakes checked and
repaired immediately by an
authorised HYUNDAI dealer.
Page 117 of 332
449
Features of your vehicle
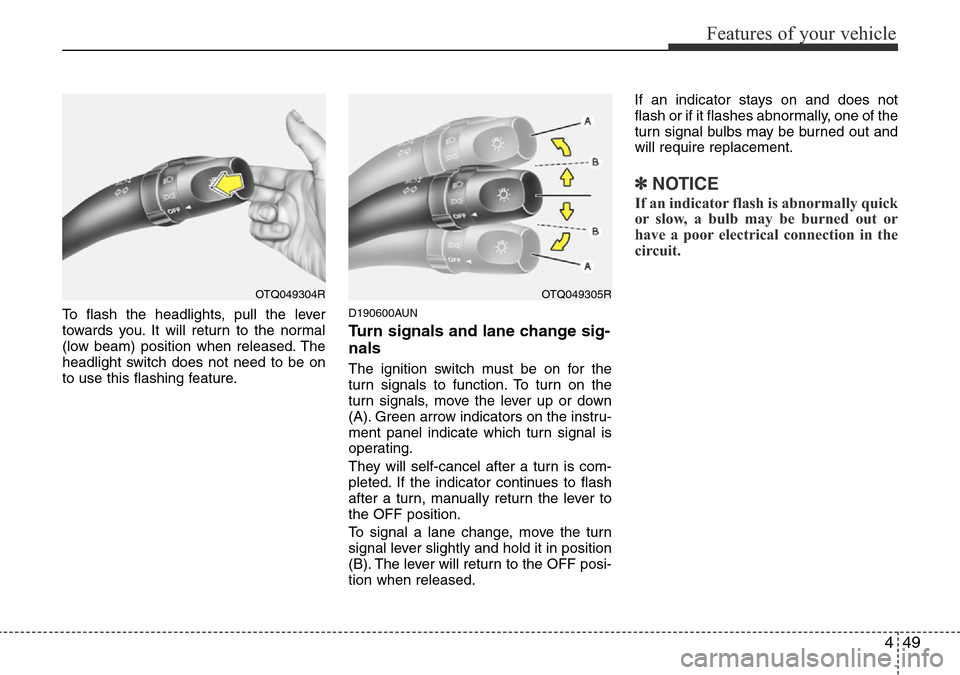
To flash the headlights, pull the lever
towards you. It will return to the normal
(low beam) position when released. The
headlight switch does not need to be on
to use this flashing feature.D190600AUN
Turn signals and lane change sig-
nals
The ignition switch must be on for the
turn signals to function. To turn on the
turn signals, move the lever up or down
(A). Green arrow indicators on the instru-
ment panel indicate which turn signal is
operating.
They will self-cancel after a turn is com-
pleted. If the indicator continues to flash
after a turn, manually return the lever to
the OFF position.
To signal a lane change, move the turn
signal lever slightly and hold it in position
(B). The lever will return to the OFF posi-
tion when released.If an indicator stays on and does not
flash or if it flashes abnormally, one of the
turn signal bulbs may be burned out and
will require replacement.
✽NOTICE
If an indicator flash is abnormally quick
or slow, a bulb may be burned out or
have a poor electrical connection in the
circuit.
OTQ049304ROTQ049305R
Page 227 of 332
Driving your vehicle
42 5
E140402AUN-EA
Passing
You’ll need more passing distance up
ahead when you’re towing a trailer. Due
to the increased vehicle length, you’ll
need to go much farther beyond the
passed vehicle before you can return to
your lane.
E140403AUN
Backing up
Hold the bottom of the steering wheel
with one hand. Then, to move the trailer
to the left, just move your hand to the left.
To move the trailer to the right, move your
hand to the right. Always back up slowly
and, if possible, have someone guide
you.
E140404AUN-EA
Making turns
When you’re turning with a trailer, make
wider turns than normal. Do this so your
trailer won’t strike soft shoulders, kerbs,
road signs, trees, or other objects. Avoid
jerky or sudden manoeuvres. Signal well
in advance.
E140405AFD-EA
Turn signals when towing a trailer
When you tow a trailer, your vehicle has
to have a different turn signal flasher and
extra wiring. The green arrows on your
instrument panel will flash whenever you
signal a turn or lane change. Properly
connected, the trailer lights will also flash
to alert other drivers you’re about to turn,
change lanes, or stop. When towing a
trailer, the green arrows on your instru-
ment panel will flash for turns even if the
bulbs on the trailer are burned out. Thus,
you may think drivers behind you are
seeing your signals when, in fact, they
are not. It’s important to check occasion-
ally to be sure the trailer bulbs are still
working. You must also check the lights
every time you disconnect and then
reconnect the wires. Do not connect a
trailer lighting system directly to your
vehicle’s lighting system. Use only an
approved trailer wiring harness.
An authorised HYUNDAI dealer can
assist you in installing the wiring har-
ness.
E140406ATQ-EA
Driving on grades
Reduce speed and shift to a lower gear
before you start down a long or steep
downgrade. If you don’t shift down, you
might have to use your brakes so much
that they would get hot and no longer
operate efficiently.
On a long uphill grade, shift down and
reduce your speed to around 70 km/h (45
mph) to reduce the possibility of engine
and transmission overheating.
If your trailer weighs more than the max-
imum trailer weight without trailer brakes
and you have an automatic transmission,
you should drive in D (Drive) when tow-
ing a trailer.
Operating your vehicle in D (Drive) when
towing a trailer will minimise heat build up
and extend the life of your transmission.
WARNING
Failure to use an approved trailer
wiring harness could result in dam-
age to the vehicle electrical system
and/or personal injury.
Page 252 of 332
7
Engine compartment / 7-2
Maintenance services / 7-4
Owner maintenance / 7-6
Scheduled maintenance service / 7-8
Explanation of scheduled maintenance items / 7-14
Engine oil / 7-17
Engine coolant / 7-18
Brake and clutch fluid / 7-21
Power steering fluid / 7-22
Automatic transmission fluid / 7-23
Washer fluid / 7-25
Parking brake / 7-25
Fuel filter / 7-26
Air cleaner / 7-27
Climate control air filter / 7-28
Wiper blades / 7-30
Battery / 7-33
Tyres and wheels / 7-35
Fuses / 7-46
Light bulbs / 7-56
Appearance care / 7-63
Emission control system / 7-69
Maintenance
Page 256 of 332
75
Maintenance
G020300ATQ
WARNING- Maintenance
work
• Performing maintenance work on
a vehicle can be dangerous. You
can be seriously injured whilst
performing some maintenance
procedures. If you lack sufficient
knowledge and experience or the
proper tools and equipment to do
the work, we recommend that the
system be servied by an autho-
rised HYUNDAI dealer.
• Working under the bonnet with
the engine running is dangerous.
It becomes even more dangerous
when you wear jewelry or loose
clothing. These can become
entangled in moving parts and
result in injury. Therefore, if you
must run the engine whilst work-
ing under the bonnet, make cer-
tain that you remove all jewelry
(especially rings, bracelets,
watches, and necklaces) and all
neckties, scarves, and similar
loose clothing before getting
near the engine or cooling fans.WARNING- Diesel Engine
Never work on injection system
with engine running or within 30
seconds after shutting off engine.
High-pressure pump, rail, injectors
and high-pressure pipes are sub-
ject to high pressure even after the
engine stopped. The fuel jet pro-
duced by fuel leaks may cause seri-
ous injury, if it touches the body.
People using pacemakers should
not move than 30cm closer to the
ECU or wiring harness within the
engine room whilst engine is run-
ning, since the high currents in the
electronic engine control system
produce considerable magnetic
fields.
CAUTION
• Do not put heavy objects or apply
excessive force on top of the
engine cover (if equipped) or fuel
related parts.
• When you inspect the fuel system
(fuel lines and fuel injection
devices), we recommend that you
contact an authorised HYUNDAI
dealer.
• Do not drive long time with the
engine cover(if equipped)
removed.
• When checking the engine room,
do not go near fire. Fuel, washer
fluid, etc. are flammable oils that
may cause fire.
• Before touching the battery, igni-
tion cables and electrical wiring,
you should disconnect the bat-
tery "-" terminal. You may get an
electric shock from the electric
current.
• When you remove the interior
trim cover with a flat head (-) driv-
er, be careful not to damage the
cover.
• Be careful when you replace and
clean bulbs to avoid burns or
electrical shock.
Page 262 of 332
711
Maintenance
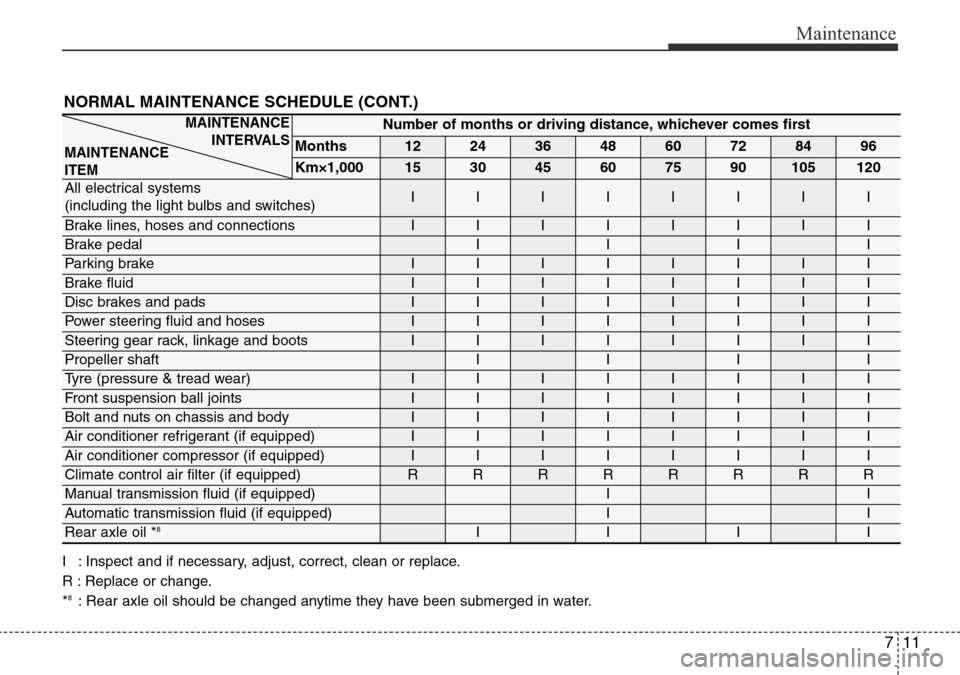
NORMAL MAINTENANCE SCHEDULE (CONT.)
I : Inspect and if necessary, adjust, correct, clean or replace.
R : Replace or change.
*
8: Rear axle oil should be changed anytime they have been submerged in water.
Number of months or driving distance, whichever comes first
Months1224364860728496
Km×1,000153045607590105120
All electrical systems
(including the light bulbs and switches)IIIIIIII
Brake lines, hoses and connectionsIIIIIIII
Brake pedalIIII
Parking brakeIIIIIIII
Brake fluidIIIIIIII
Disc brakes and padsIIIIIIII
Power steering fluid and hosesIIIIIIII
Steering gear rack, linkage and bootsIIIIIIII
Propeller shaft IIII
Tyre (pressure & tread wear) IIIIIIII
Front suspension ball jointsIIIIIIII
Bolt and nuts on chassis and bodyIIIIIIII
Air conditioner refrigerant (if equipped)IIIIIIII
Air conditioner compressor (if equipped)IIIIIIII
Climate control air filter (if equipped)RRRRRRRR
Manual transmission fluid (if equipped)II
Automatic transmission fluid (if equipped)II
Rear axle oil *8IIII
MAINTENANCE
INTERVALS
MAINTENANCE
ITEM
Page 307 of 332
Maintenance
56 7
LIGHT BULBS
G220000AEN-EA
Use only the bulbs of the specified
wattage.
All bulbs are available from your
HYUNDAI dealers Parts Department.
✽NOTICE
After washing or driving through heavy
rain, condensation may form in the head
and tail lamp lenses. This condition is
caused by the temperature difference
between the lamp inside and outside.
This is similar to the condensation on
your windows inside your vehicle during
the rain and doesn’t indicate a problem
with your vehicle. If the water leaks into
the lamp bulb circuitry, have the vehicle
checked by an authorised HYUNDAI
dealer.
G220100AUN
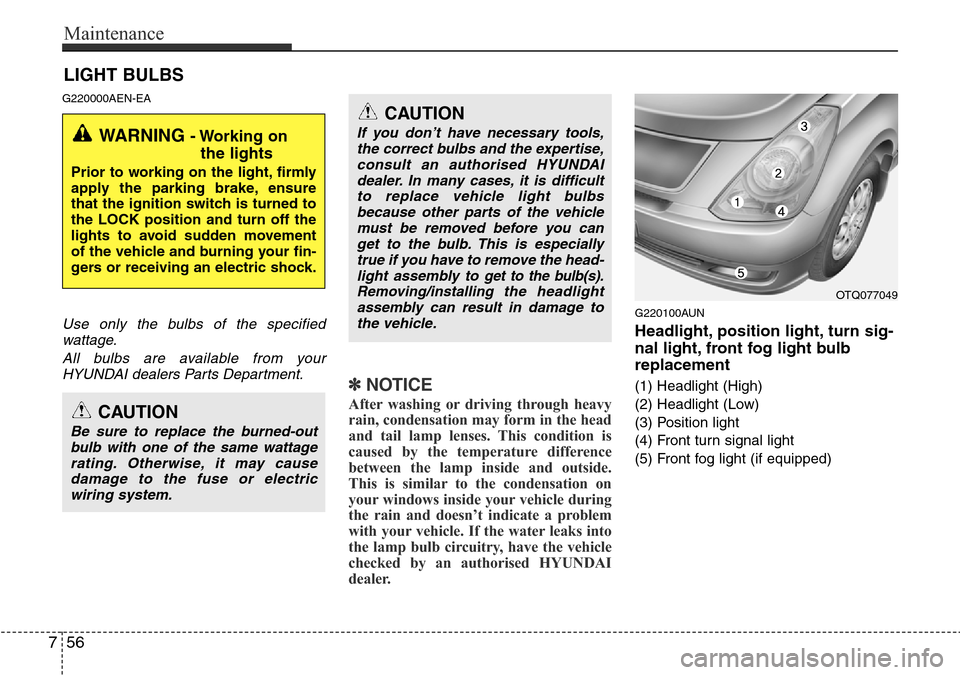
Headlight, position light, turn sig-
nal light, front fog light bulb
replacement
(1) Headlight (High)
(2) Headlight (Low)
(3) Position light
(4) Front turn signal light
(5) Front fog light (if equipped)
WARNING - Working on
the lights
Prior to working on the light, firmly
apply the parking brake, ensure
that the ignition switch is turned to
the LOCK position and turn off the
lights to avoid sudden movement
of the vehicle and burning your fin-
gers or receiving an electric shock.
CAUTION
Be sure to replace the burned-out
bulb with one of the same wattage
rating. Otherwise, it may cause
damage to the fuse or electric
wiring system.
CAUTION
If you don’t have necessary tools,
the correct bulbs and the expertise,
consult an authorised HYUNDAI
dealer. In many cases, it is difficult
to replace vehicle light bulbs
because other parts of the vehicle
must be removed before you can
get to the bulb. This is especially
true if you have to remove the head-
light assembly to
get to the bulb(s).
Removing/installingthe headlight
assembly can result in damage to
the vehicle.OTQ077049
Page 308 of 332
757
Maintenance
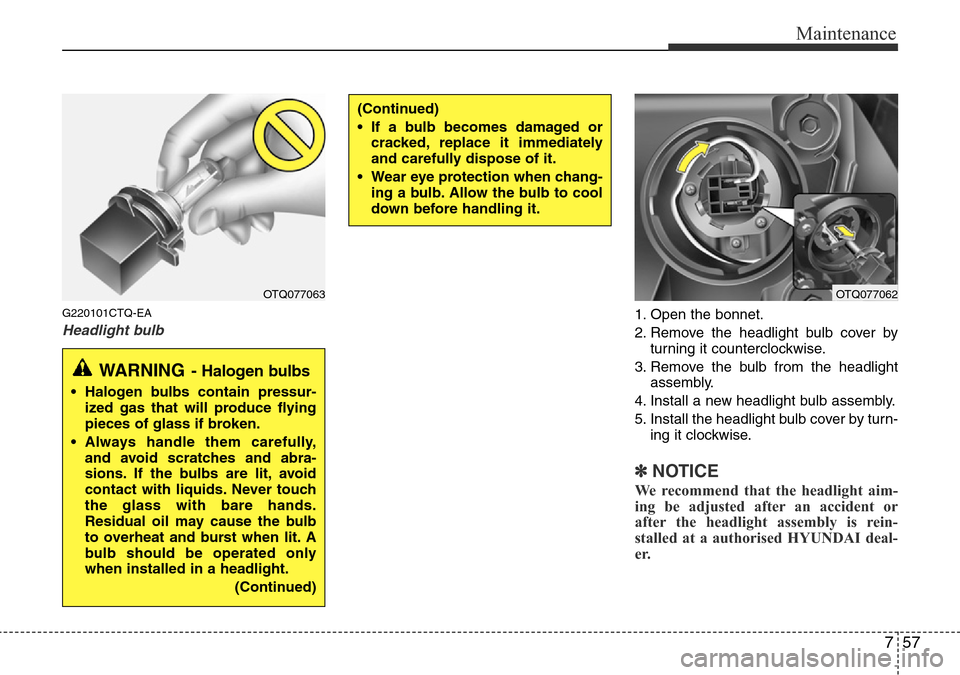
G220101CTQ-EA
Headlight bulb1. Open the bonnet.
2. Remove the headlight bulb cover by
turning it counterclockwise.
3. Remove the bulb from the headlight
assembly.
4. Install a new headlight bulb assembly.
5. Install the headlight bulb cover by turn-
ing it clockwise.
✽NOTICE
We recommend that the headlight aim-
ing be adjusted after an accident or
after the headlight assembly is rein-
stalled at a authorised HYUNDAI deal-
er.
(Continued)
• If a bulb becomes damaged or
cracked, replace it immediately
and carefully dispose of it.
• Wear eye protection when chang-
ing a bulb. Allow the bulb to cool
down before handling it.
OTQ077063OTQ077062
WARNING- Halogen bulbs
• Halogen bulbs contain pressur-
ized gas that will produce flying
pieces of glass if broken.
• Always handle them carefully,
and avoid scratches and abra-
sions. If the bulbs are lit, avoid
contact with liquids. Never touch
the glass with bare hands.
Residual oil may cause the bulb
to overheat and burst when lit. A
bulb should be operated only
when installed in a headlight.
(Continued)
Page 309 of 332
Maintenance
58 7
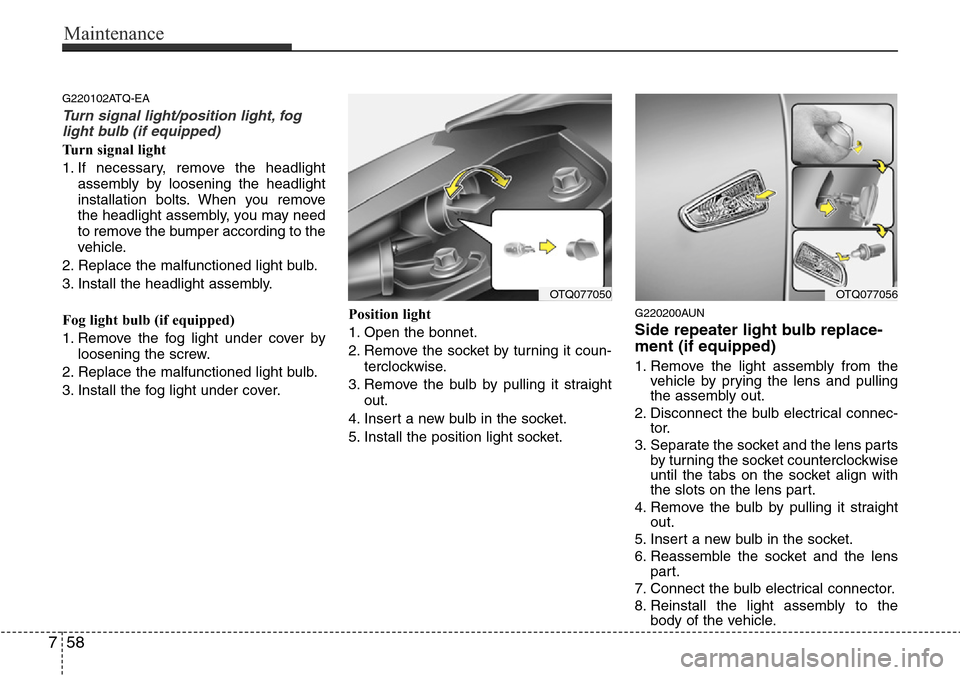
G220102ATQ-EA
Turn signal light/position light, fog
light bulb (if equipped)
Turn signal light
1. If necessary, remove the headlight
assembly by loosening the headlight
installation bolts. When you remove
the headlight assembly, you may need
to remove the bumper according to the
vehicle.
2. Replace the malfunctioned light bulb.
3. Install the headlight assembly.
Fog light bulb (if equipped)
1. Remove the fog light under cover by
loosening the screw.
2. Replace the malfunctioned light bulb.
3. Install the fog light under cover.Position light
1. Open the bonnet.
2. Remove the socket by turning it coun-
terclockwise.
3. Remove the bulb by pulling it straight
out.
4. Insert a new bulb in the socket.
5. Install the position light socket.
G220200AUN
Side repeater light bulb replace-
ment (if equipped)
1. Remove the light assembly from the
vehicle by prying the lens and pulling
the assembly out.
2. Disconnect the bulb electrical connec-
tor.
3. Separate the socket and the lens parts
by turning the socket counterclockwise
until the tabs on the socket align with
the slots on the lens part.
4. Remove the bulb by pulling it straight
out.
5. Insert a new bulb in the socket.
6. Reassemble the socket and the lens
part.
7. Connect the bulb electrical connector.
8. Reinstall the light assembly to the
body of the vehicle.
OTQ077056OTQ077050
Page 310 of 332
759
Maintenance
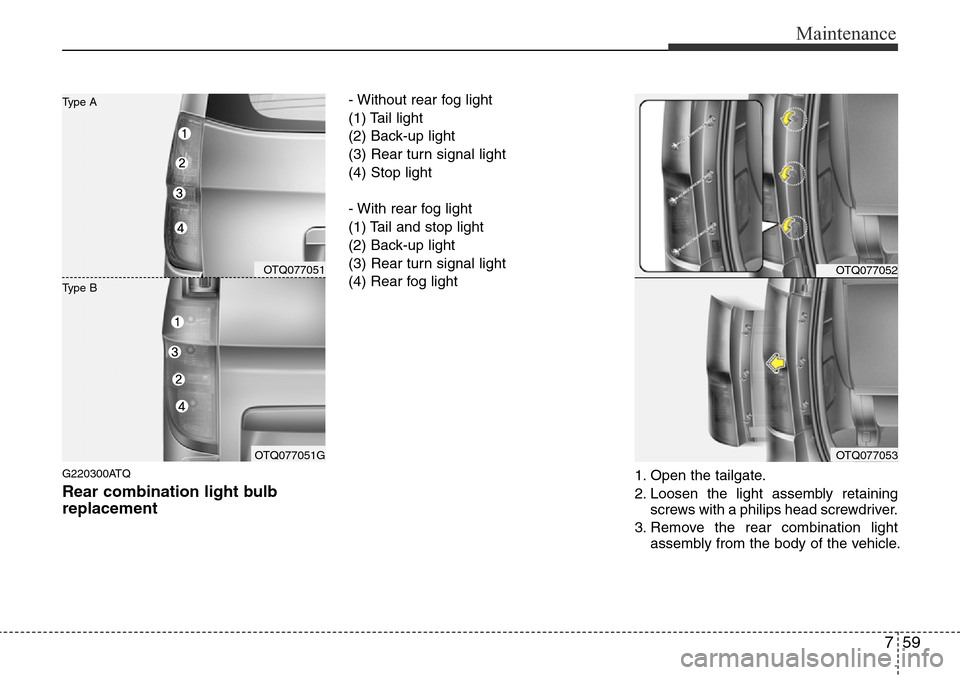
G220300ATQ
Rear combination light bulb
replacement
- Without rear fog light
(1) Tail light
(2) Back-up light
(3) Rear turn signal light
(4) Stop light
- With rear fog light
(1) Tail and stop light
(2) Back-up light
(3) Rear turn signal light
(4) Rear fog light
1. Open the tailgate.
2. Loosen the light assembly retaining
screws with a philips head screwdriver.
3. Remove the rear combination light
assembly from the body of the vehicle.
OTQ077052
OTQ077053
OTQ077051
OTQ077051G
Type B
Type A