tow Hyundai H-1 (Grand Starex) 2016 Owner's Manual - RHD (UK, Australia)
[x] Cancel search | Manufacturer: HYUNDAI, Model Year: 2016, Model line: H-1 (Grand Starex), Model: Hyundai H-1 (Grand Starex) 2016Pages: 332, PDF Size: 6.89 MB
Page 13 of 332
Introduction
6 1
Biodiesel (for New Zealand)
Commercially supplied Diesel blends of
no more than 7% biodiesel, commonly
known as "B7 Diesel" may be used in
your vehicle if Biodiesel meets EN 14214
or equivalent specifications. (EN stands
for "European Norm"). The use of biofu-
els exceeding 7%, made from rapeseed
methyl ester (RME), vegetable oil methyl
ester (VME) etc. or mixing diesel exceed-
ing 7% with biodiesel will cause
increased wear or damage to the engine
and fuel system. Repair or replacement
of worn or damaged components due to
the use of non approved fuels will not be
covered by the manufactures warranty.A090000AEN-EA
As with other vehicles of this type, failure
to operate this vehicle correctly may
result in loss of control, an accident or
vehicle rollover.
Specific design characteristics (higher
ground clearance, track, etc.) give this
vehicle a higher centre of gravity than
other types of vehicles. In other words
they are not designed for cornering at the
same speeds as conventional 2-wheel
drive vehicles. Avoid sharp turns or
abrupt manoeuvres. Again, failure to
operate this vehicle correctly may result
in loss of control, an accident or vehicle
rollover.Be sure to read the “Reducing
the risk of a rollover” driving guide-
lines, in section 5 of this manual.
A030000AUN-EA
No special run-in period is needed. By
following a few simple precautions for the
first 1,000 km (600 miles) you may add to
the performance, economy and life of
your vehicle.
• Do not race the engine.
• Whilst driving, keep your engine speed
(rpm, or revolutions per minute)
between 2,000 rpm and 4,000 rpm.
• Do not maintain a single speed for long
periods of time, either fast or slow.
Varying engine speed is needed to
properly run-in the engine.
• Avoid hard stops, except in emergen-
cies, to allow the brakes to seat prop-
erly.
• Don't tow a trailer during the first 2,000
km (1,200 miles) of operation.
VEHICLE RUN-IN PROCESS VEHICLE HANDLING
INSTRUCTIONS
CAUTION
• Never use any fuel, whether
diesel or B7 biodiesel or other-
wise, that fails to meet the latest
petroleum industry specification.
• Never use any fuel additives or
treatments that are not recom-
mended or approved by the vehi-
cle manufacturer.
Page 25 of 332
37
Safety features of your vehicle
C010104BTQ
Headrest
The driver's and front passenger's seats are
equipped with a headrest for the occupant's
safety and comfort. The headrest not only
provides comfort for the driver and front
passenger, but also helps to protect the
head and neck in the event of a collision.
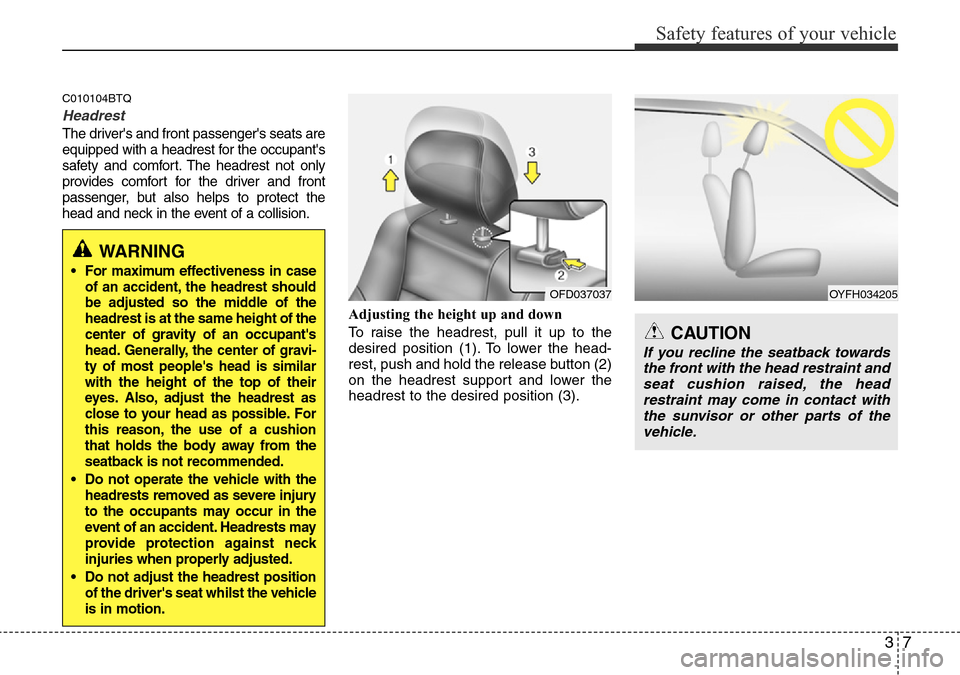
Adjusting the height up and down
To raise the headrest, pull it up to the
desired position (1). To lower the head-
rest, push and hold the release button (2)
on the headrest support and lower the
headrest to the desired position (3).
WARNING
• For maximum effectiveness in case
of an accident, the headrest should
be adjusted so the middle of the
headrest is at the same height of the
center of gravity of an occupant's
head. Generally, the center of gravi-
ty of most people's head is similar
with the height of the top of their
eyes. Also, adjust the headrest as
close to your head as possible. For
this reason, the use of a cushion
that holds the body away from the
seatback is not recommended.
• Do not operate the vehicle with the
headrests removed as severe injury
to the occupants may occur in the
event of an accident. Headrests may
provide protection against neck
injuries when properly adjusted.
• Do not adjust the headrest position
of the driver's seat whilst the vehicle
is in motion.
OFD037037OYFH034205
CAUTION
If you recline the seatback towards
the front with the head restraint and
seat cushion raised, the head
restraint may come in contact with
the sunvisor or other parts of the
vehicle.
Page 29 of 332
311
Safety features of your vehicle
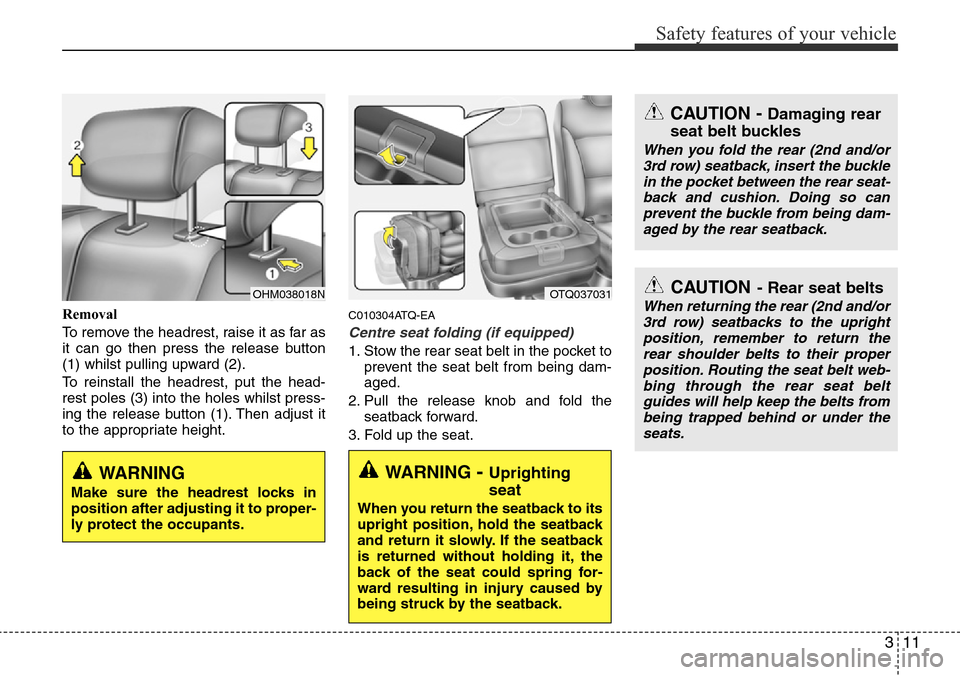
Removal
To remove the headrest, raise it as far as
it can go then press the release button
(1) whilst pulling upward (2).
To reinstall the headrest, put the head-
rest poles (3) into the holes whilst press-
ing the release button (1). Then adjust it
to the appropriate height.C010304ATQ-EA
Centre seat folding (if equipped)
1. Stow the rear seat belt in the pocket to
prevent the seat belt from being dam-
aged.
2. Pull the release knob and fold the
seatback forward.
3. Fold up the seat.
OHM038018NOTQ037031
WARNING - Uprighting
seat
When you return the seatback to its
upright position, hold the seatback
and return it slowly. If the seatback
is returned without holding it, the
back of the seat could spring for-
ward resulting in injury caused by
being struck by the seatback.
WARNING
Make sure the headrest locks in
position after adjusting it to proper-
ly protect the occupants.
CAUTION- Rear seat belts
When returning the rear (2nd and/or
3rd row) seatbacks to the upright
position, remember to return the
rear shoulder belts to their proper
position. Routing the seat belt web-
bing through the rear seat belt
guides will help keep the belts from
being trapped behind or under the
seats.
CAUTION - Damaging rear
seat belt buckles
When you fold the rear (2nd and/or
3rd row) seatback, insert the buckle
in the pocket between the rear seat-
back and cushion. Doing so can
prevent the buckle from being dam-
aged by the rear seatback.
Page 30 of 332
Safety features of your vehicle
12 3
C010307ATQ
Folding the rear seat
(4th row seat, if equipped)
The rear seat cushion may be folded to
facilitate carrying long items or to
increase the luggage capacity of the
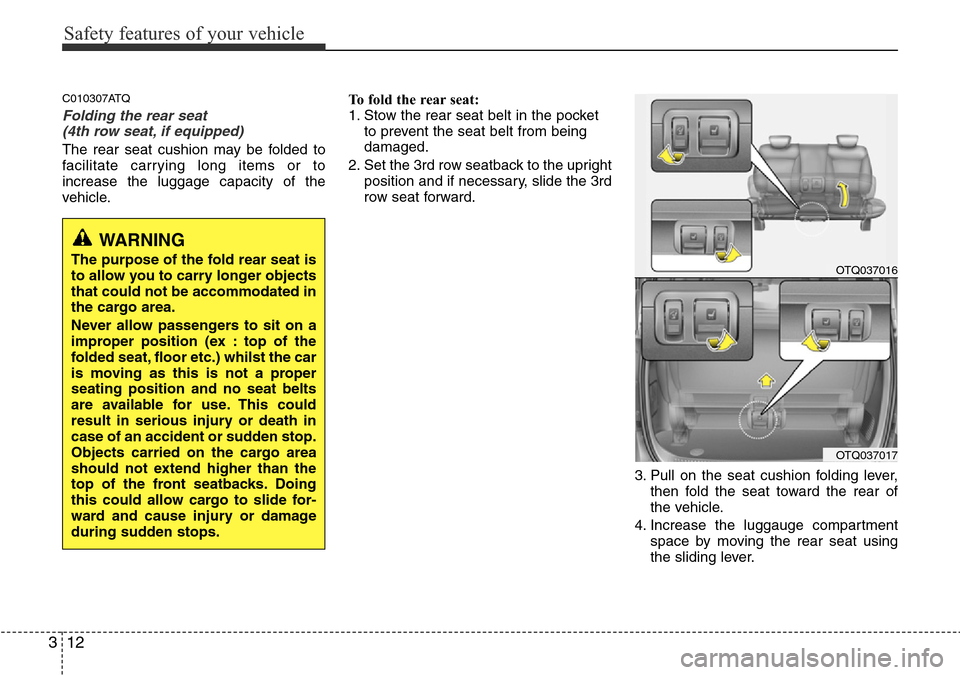
vehicle.To fold the rear seat:
1. Stow the rear seat belt in the pocket
to prevent the seat belt from being
damaged.
2. Set the 3rd row seatback to the upright
position and if necessary, slide the 3rd
row seat forward.
3. Pull on the seat cushion folding lever,
then fold the seat toward the rear of
the vehicle.
4. Increase the luggauge compartment
space by moving the rear seat using
the sliding lever.
WARNING
The purpose of the fold rear seat is
to allow you to carry longer objects
that could not be accommodated in
the cargo area.
Never allow passengers to sit on a
improper position (ex : top of the
folded seat, floor etc.) whilst the car
is moving as this is not a proper
seating position and no seat belts
are available for use. This could
result in serious injury or death in
case of an accident or sudden stop.
Objects carried on the cargo area
should not extend higher than the
top of the front seatbacks. Doing
this could allow cargo to slide for-
ward and cause injury or damage
during sudden stops.OTQ037016
OTQ037017
Page 37 of 332
319
Safety features of your vehicle
C020105AUN-EA
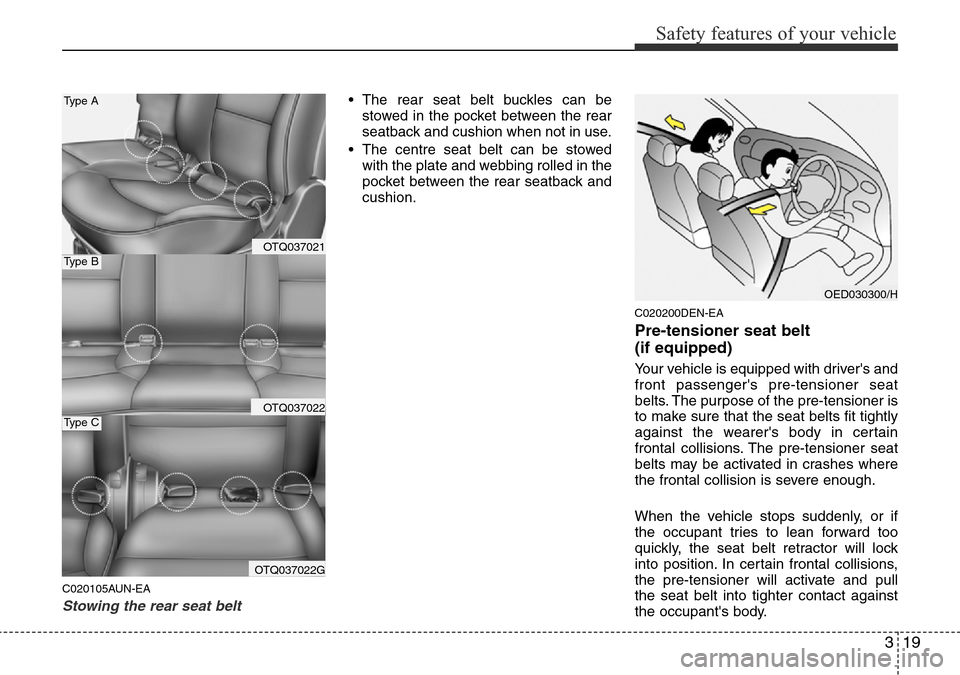
Stowing the rear seat belt
• The rear seat belt buckles can be
stowed in the pocket between the rear
seatback and cushion when not in use.
• The centre seat belt can be stowed
with the plate and webbing rolled in the
pocket between the rear seatback and
cushion.
C020200DEN-EA
Pre-tensioner seat belt
(if equipped)
Your vehicle is equipped with driver's and
front passenger's pre-tensioner seat
belts. The purpose of the pre-tensioner is
to make sure that the seat belts fit tightly
against the wearer's body in certain
frontal collisions. The pre-tensioner seat
belts may be activated in crashes where
the frontal collision is severe enough.
When the vehicle stops suddenly, or if
the occupant tries to lean forward too
quickly, the seat belt retractor will lock
into position. In certain frontal collisions,
the pre-tensioner will activate and pull
the seat belt into tighter contact against
the occupant's body.
OED030300/H
OTQ037021
OTQ037022
OTQ037022G
Type A
Type B
Type C
Page 47 of 332
329
Safety features of your vehicle
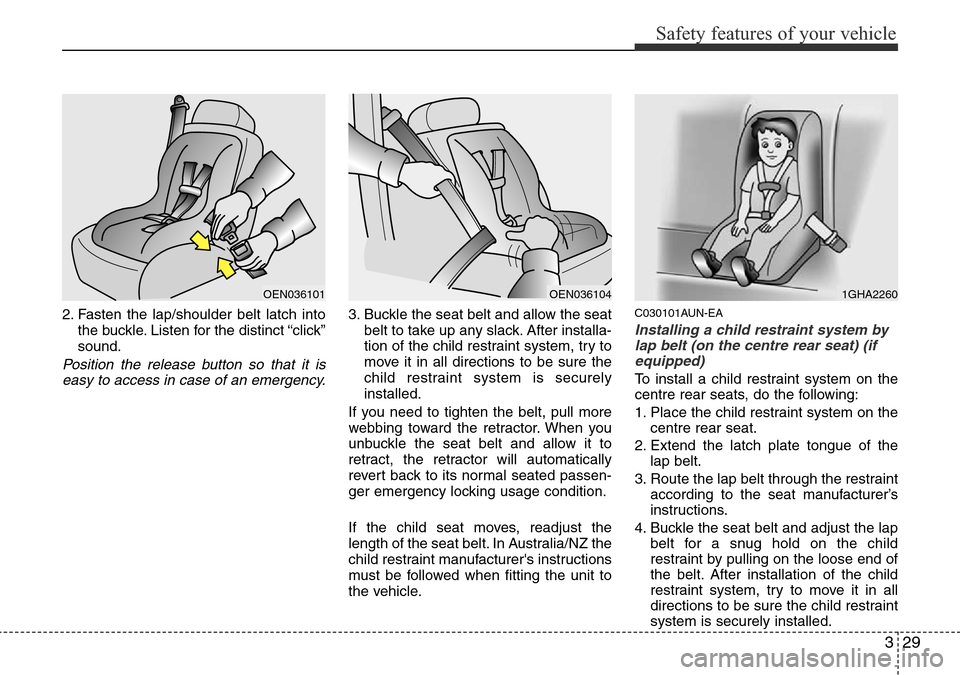
2. Fasten the lap/shoulder belt latch into
the buckle. Listen for the distinct “click”
sound.
Position the release button so that it is
easy to access in case of an emergency.
3. Buckle the seat belt and allow the seat
belt to take up any slack. After installa-
tion of the child restraint system, try to
move it in all directions to be sure the
child restraint system is securely
installed.
If you need to tighten the belt, pull more
webbing toward the retractor. When you
unbuckle the seat belt and allow it to
retract, the retractor will automatically
revert back to its normal seated passen-
ger emergency locking usage condition.
If the child seat moves, readjust the
length of the seat belt. In Australia/NZ the
child restraint manufacturer's instructions
must be followed when fitting the unit to
the vehicle.C030101AUN-EA
Installing a child restraint system by
lap belt (on the centre rear seat) (if
equipped)
To install a child restraint system on the
centre rear seats, do the following:
1. Place the child restraint system on the
centre rear seat.
2. Extend the latch plate tongue of the
lap belt.
3. Route the lap belt through the restraint
according to the seat manufacturer’s
instructions.
4. Buckle the seat belt and adjust the lap
belt for a snug hold on the child
restraint by pulling on the loose end of
the belt. After installation of the child
restraint system, try to move it in all
directions to be sure the child restraint
system is securely installed.
OEN036101OEN0361041GHA2260
Page 76 of 332
Features of your vehicle
8 4
D050100CTQ
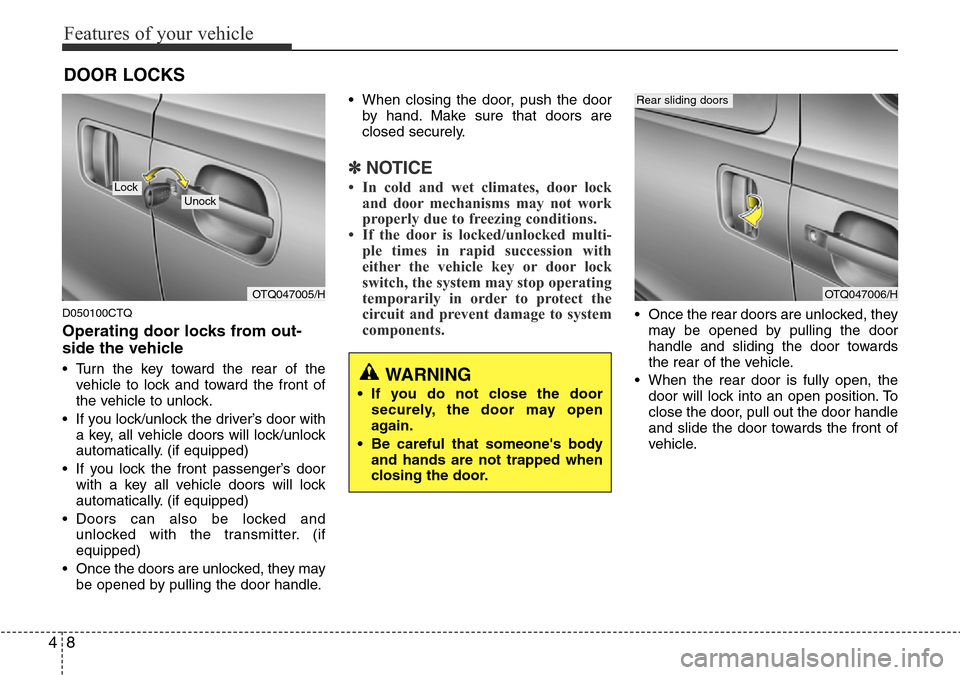
Operating door locks from out-
side the vehicle
• Turn the key toward the rear of the
vehicle to lock and toward the front of
the vehicle to unlock.
• If you lock/unlock the driver’s door with
a key, all vehicle doors will lock/unlock
automatically. (if equipped)
• If you lock the front passenger’s door
with a key all vehicle doors will lock
automatically. (if equipped)
• Doors can also be locked and
unlocked with the transmitter. (if
equipped)
• Once the doors are unlocked, they may
be opened by pulling the door handle.• When closing the door, push the door
by hand. Make sure that doors are
closed securely.
✽NOTICE
• In cold and wet climates, door lock
and door mechanisms may not work
properly due to freezing conditions.
• If the door is locked/unlocked multi-
ple times in rapid succession with
either the vehicle key or door lock
switch, the system may stop operating
temporarily in order to protect the
circuit and prevent damage to system
components.
• Once the rear doors are unlocked, they
may be opened by pulling the door
handle and sliding the door towards
the rear of the vehicle.
• When the rear door is fully open, the
door will lock into an open position. To
close the door, pull out the door handle
and slide the door towards the front of
vehicle.
DOOR LOCKS
OTQ047005/H
UnockLock
OTQ047006/H
Rear sliding doors
WARNING
• If you do not close the door
securely, the door may open
again.
• Be careful that someone's body
and hands are not trapped when
closing the door.
Page 96 of 332
Features of your vehicle
28 4
D140100BUN-EA
Inside rearview mirror
Adjust the rearview mirror to centre on
the view through the rear window. Make
this adjustment before you start driving.
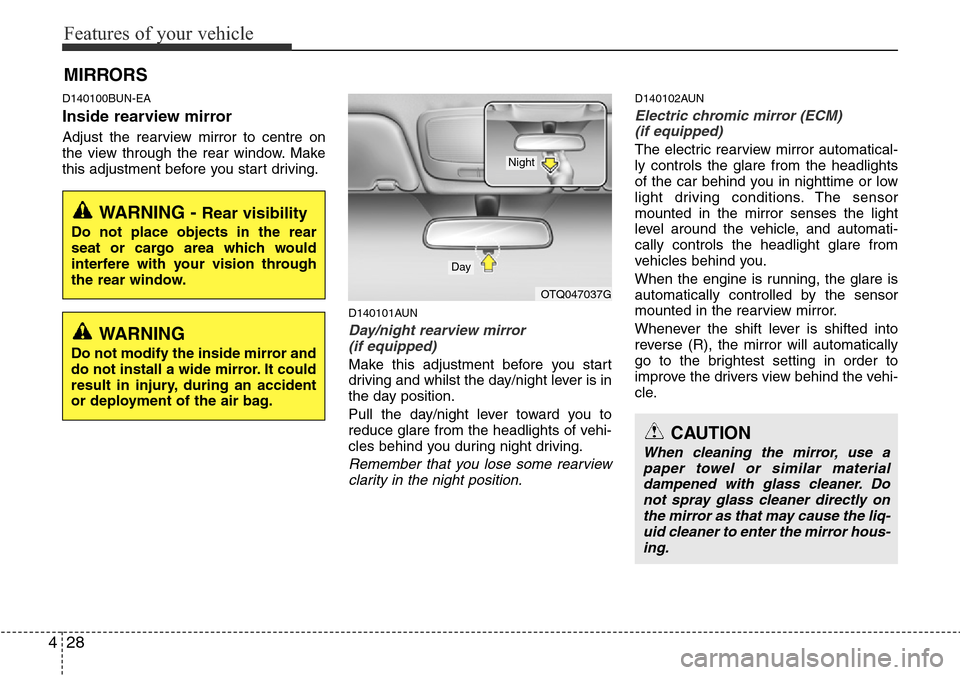
D140101AUN
Day/night rearview mirror
(if equipped)
Make this adjustment before you start
driving and whilst the day/night lever is in
the day position.
Pull the day/night lever toward you to
reduce glare from the headlights of vehi-
cles behind you during night driving.
Remember that you lose some rearview
clarity in the night position.
D140102AUN
Electric chromic mirror (ECM)
(if equipped)
The electric rearview mirror automatical-
ly controls the glare from the headlights
of the car behind you in nighttime or low
light driving conditions. The sensor
mounted in the mirror senses the light
level around the vehicle, and automati-
cally controls the headlight glare from
vehicles behind you.
When the engine is running, the glare is
automatically controlled by the sensor
mounted in the rearview mirror.
Whenever the shift lever is shifted into
reverse (R), the mirror will automatically
go to the brightest setting in order to
improve the drivers view behind the vehi-
cle.
MIRRORS
WARNING - Rear visibility
Do not place objects in the rear
seat or cargo area which would
interfere with your vision through
the rear window.
OTQ047037G
CAUTION
When cleaning the mirror, use a
paper towel or similar material
dampened with glass cleaner. Do
not spray glass cleaner directly on
the mirror as that may cause the liq-
uid cleaner to enter the mirror hous-
ing.
Day
Night
WARNING
Do not modify the inside mirror and
do not install a wide mirror. It could
result in injury, during an accident
or deployment of the air bag.
Page 99 of 332
431
Features of your vehicle
D140202ATQ
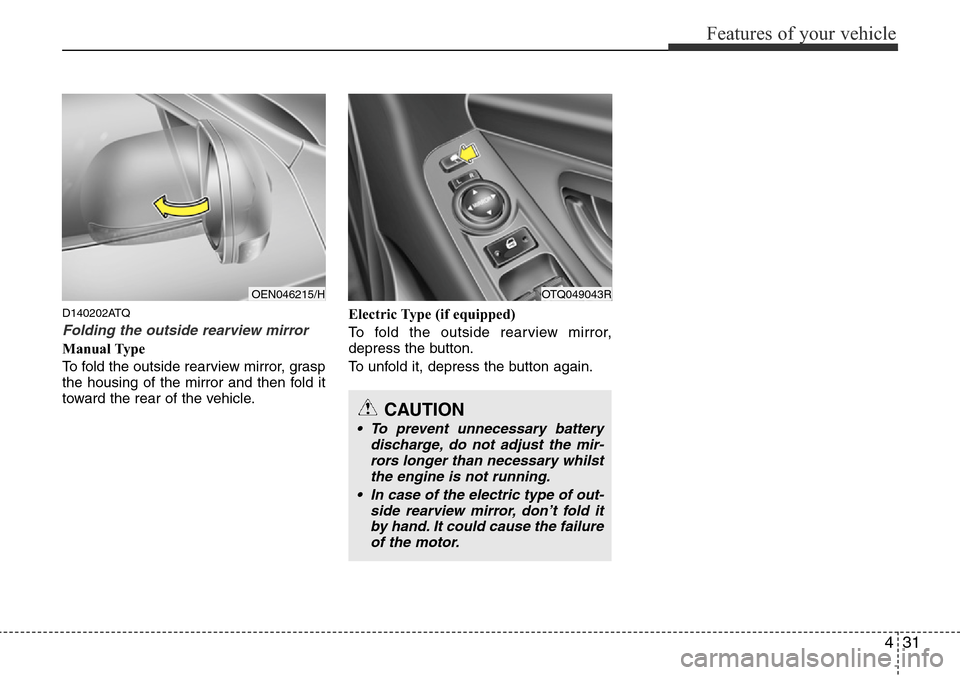
Folding the outside rearview mirror
Manual Type
To fold the outside rearview mirror, grasp
the housing of the mirror and then fold it
toward the rear of the vehicle.Electric Type (if equipped)
To fold the outside rearview mirror,
depress the button.
To unfold it, depress the button again.
OEN046215/HOTQ049043R
CAUTION
• To prevent unnecessary battery
discharge, do not adjust the mir-
rors longer than necessary whilst
the engine is not running.
• In case of the electric type of out-
side rearview mirror, don’t fold it
by hand. It could cause the failure
of the motor.
Page 102 of 332
Features of your vehicle
34 4
D150203AUN
Engine temperature gauge
This gauge shows the temperature of the
engine coolant when the ignition switch
is ON.
Do not continue driving with an overheat-
ed engine. If your vehicle overheats, refer
to “If the engine overheats” in section 6.
D150204BUN
Fuel gauge
The fuel gauge indicates the approxi-
mate amount of fuel remaining in the fuel
tank.
The fuel tank capacity is given in sec-
tion 9.The fuel gauge is supplemented by
a low fuel warning light, which will illumi-
nate when the fuel tank is near empty.
On inclines or curves, the fuel gauge
pointer may fluctuate or the low fuel
warning light may come on earlier than
usual due to the movement of fuel in the
tank.
D150205AUN
Odometer/Tripmeter (if equipped)
Odometer (km or mi)
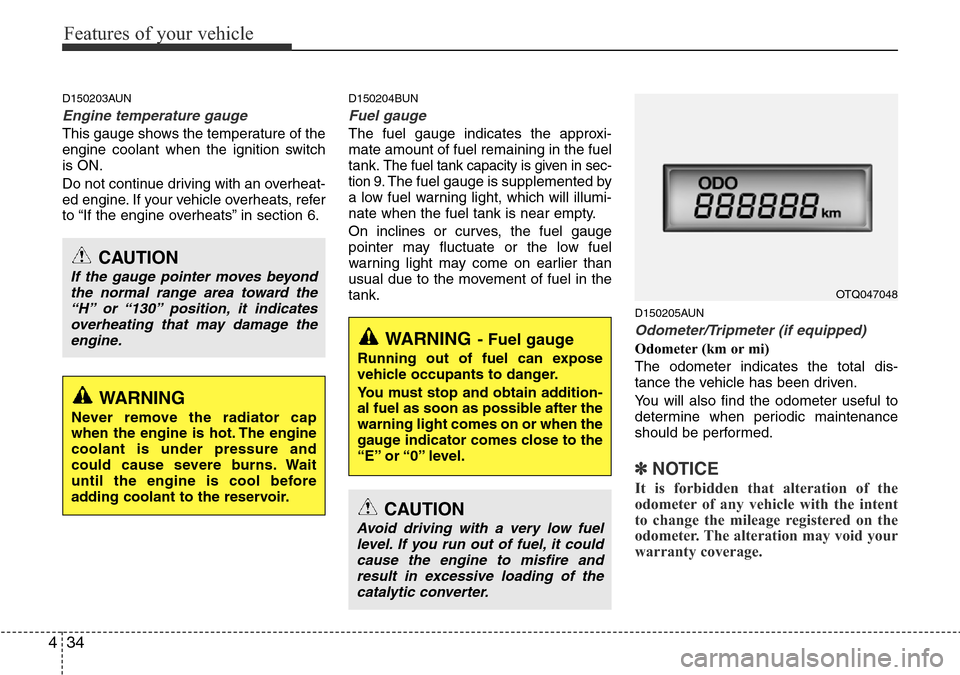
The odometer indicates the total dis-
tance the vehicle has been driven.
You will also find the odometer useful to
determine when periodic maintenance
should be performed.
✽NOTICE
It is forbidden that alteration of the
odometer of any vehicle with the intent
to change the mileage registered on the
odometer. The alteration may void your
warranty coverage.
OTQ047048
WARNING- Fuel gauge
Running out of fuel can expose
vehicle occupants to danger.
You must stop and obtain addition-
al fuel as soon as possible after the
warning light comes on or when the
gauge indicator comes close to the
“E” or “0” level.
CAUTION
Avoid driving with a very low fuel
level. If you run out of fuel, it could
cause the engine to misfire and
result in excessive loading of the
catalytic converter.
CAUTION
If the gauge pointer moves beyond
the normal range area toward the
“H” or “130” position, it indicates
overheating that may damage the
engine.
WARNING
Never remove the radiator cap
when the engine is hot. The engine
coolant is under pressure and
could cause severe burns. Wait
until the engine is cool before
adding coolant to the reservoir.