engine Hyundai H-1 (Grand Starex) 2016 Owner's Manual
[x] Cancel search | Manufacturer: HYUNDAI, Model Year: 2016, Model line: H-1 (Grand Starex), Model: Hyundai H-1 (Grand Starex) 2016Pages: 417, PDF Size: 9.94 MB
Page 353 of 417

731
Maintenance
PARKING BRAKE
G140100AFD
Checking the parking brake
Check the stroke of the parking brake by
counting the number of “clicks’’ heard
while fully applying it from the released
position. Also, the parking brake alone
should securely hold the vehicle on a fair-
ly steep grade. If the stroke is more or
less than specified, we recommend that
the system be serviced by an authorized
HYUNDAI dealer.
Stroke : 7 “clicks’’ at a force of
20 kg (44 lbs, 196 N).
G150100AFD
Draining water from fuel filter
The fuel filter for diesel engine plays an
important role of separating water from
fuel and accumulating the water in its
bottom.
If water accumulates in the
fuel filter, the warning light
comes on when the ignition
switch is in the ON position.
If this warning light turned
on, we recommend that the
system be serviced by an
authorized HYUNDAI dealer.
G150200AEN
Fuel filter cartridge replacement
✽NOTICE
When replacing the fuel filter cartridge,
we recommend that you use parts for
replacement from an authorized
HYUNDAI dealer.
OTQ057008
FUEL FILTER (FOR DIESEL)
OTQ077012
CAUTION
If the water accumulated in the fuel
filter is not drained at proper times,
damages to the major parts such as
the fuel system can be caused by
water permeation in the fuel filter.
Page 355 of 417
733
Maintenance
Replace the filter according to the
Maintenance Schedule.
If the vehicle is operated in extremely
dusty or sandy areas, replace the ele-
ment more often than the usual recom-
mended intervals. (Refer to
“Maintenance under severe usage condi-
tions” in this section.)
G170100BEN
Filter inspection
The climate control air filter should be
replaced according to the maintenance
schedule. If the vehicle is operated in
severely air-polluted cities or on dusty
rough roads for a long period, it should
be inspected more frequently and
replaced earlier. When you replace the
climate control air filter, replace it per-
forming the following procedure, and be
careful to avoid damaging other compo-
nents.
G170200ATQ
Filter replacement
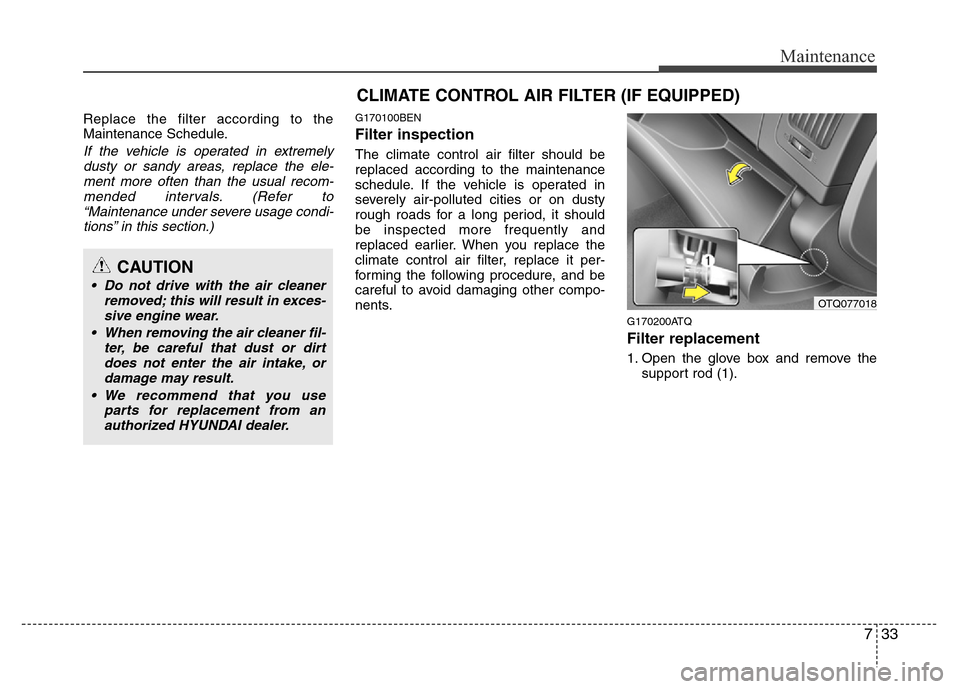
1. Open the glove box and remove the
support rod (1).
CAUTION
• Do not drive with the air cleaner
removed; this will result in exces-
sive engine wear.
• When removing the air cleaner fil-
ter, be careful that dust or dirt
does not enter the air intake, or
damage may result.
• We recommend that you use
parts for replacement from an
authorized HYUNDAI dealer.
CLIMATE CONTROL AIR FILTER (IF EQUIPPED)
OTQ077018
Page 361 of 417
739
Maintenance
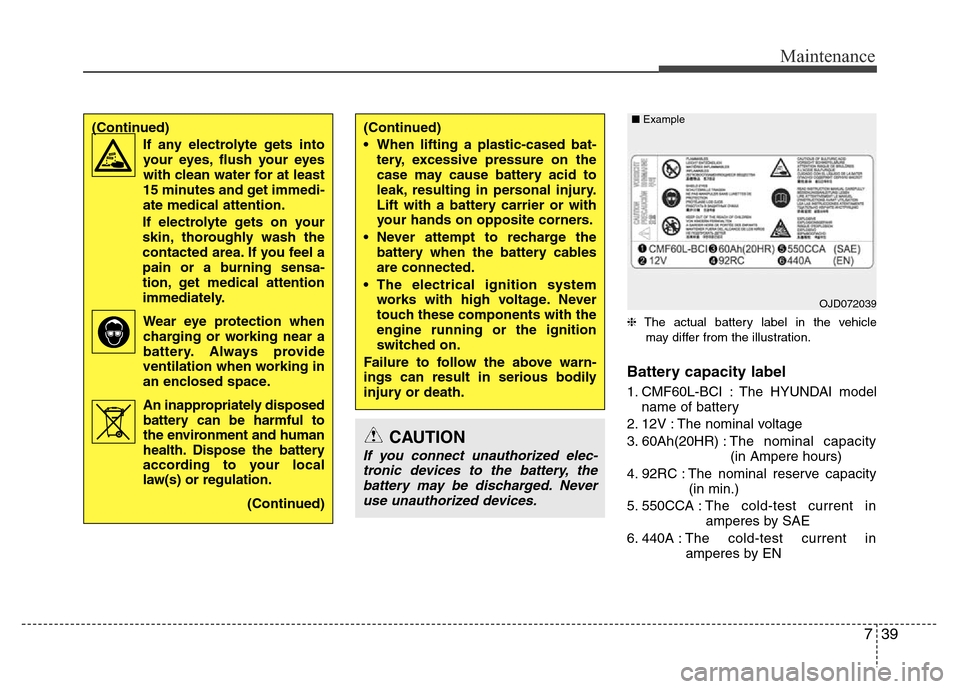
❈The actual battery label in the vehicle
may differ from the illustration.
Battery capacity label
1. CMF60L-BCI : The HYUNDAI model
name of battery
2. 12V : The nominal voltage
3. 60Ah(20HR) :The nominal capacity
(in Ampere hours)
4. 92RC : The nominal reserve capacity
(in min.)
5. 550CCA :The cold-test current in
amperes by SAE
6. 440A :The cold-test current in
amperes by EN
(Continued)
• When lifting a plastic-cased bat-
tery, excessive pressure on the
case may cause battery acid to
leak, resulting in personal injury.
Lift with a battery carrier or with
your hands on opposite corners.
• Never attempt to recharge the
battery when the battery cables
are connected.
• The electrical ignition system
works with high voltage. Never
touch these components with the
engine running or the ignition
switched on.
Failure to follow the above warn-
ings can result in serious bodily
injury or death.(Continued)
If any electrolyte gets into
your eyes, flush your eyes
with clean water for at least
15 minutes and get immedi-
ate medical attention.
If electrolyte gets on your
skin, thoroughly wash the
contacted area. If you feel a
pain or a burning sensa-
tion, get medical attention
immediately.
Wear eye protection when
charging or working near a
battery. Always provide
ventilation when working in
an enclosed space.
An inappropriately disposed
battery can be harmful to
the environment and human
health. Dispose the battery
according to your local
law(s) or regulation.
(Continued)
CAUTION
If you connect unauthorized elec-
tronic devices to the battery, the
battery may be discharged. Never
use unauthorized devices.
OJD072039 ■Example
Page 362 of 417
Maintenance
40 7
G190200AUN
Battery recharging
Your vehicle has a maintenance-free,
calcium-based battery.
• If the battery becomes discharged in a
short time (because, for example, the
headlights or interior lights were left on
while the vehicle was not in use),
recharge it by slow charging (trickle)
for 10 hours.
• If the battery gradually discharges
because of high electric load while the
vehicle is being used, recharge it at 20-
30A for two hours.
G190300BTQ
Reset items
Items should be reset after the battery
has been discharged or the battery has
been disconnected.
• Climate control system
(See section 4)
• Clock (See section 4)
• Audio (See section 4)
• Auto up/down window (See section 4)
• Trip computer (See section 4)
WARNING
• Before performing maintenance
or recharging the battery, turn off
all accessories and stop the
engine.
• The negative battery cable must
be removed first and installed
last when the battery is discon-
nected.
WARNING- Recharging
battery
When recharging the battery,
observe the following precautions:
• The battery must be removed
from the vehicle and placed in an
area with good ventilation.
• Do not allow cigarettes, sparks,
or flame near the battery.
• Watch the battery during charg-
ing, and stop or reduce the charg-
ing rate if the battery cells begin
gassing (boiling) violently or if
the temperature of the electrolyte
of any cell exceeds 49°C (120°F).
• Wear eye protection when check-
ing the battery during charging.
• Disconnect the battery charger in
the following order.
1. Turn off the battery charger main
switch.
2. Unhook the negative clamp from
the negative battery terminal.
3. Unhook the positive clamp from
the positive battery terminal.
Page 374 of 417
Maintenance
52 7
FUSES
G210000CEN
A vehicle’s electrical system is protected
from electrical overload damage by fuses.This vehicle has 3 fuse panels, one locat-
ed in the driver’s side panel bolster, the
other in the engine compartment.
If any of your vehicle’s lights, acces-
sories, or controls do not work, check the
appropriate circuit fuse. If a fuse has
blown, the element inside the fuse will be
melted.
If the electrical system does not work,
first check the driver’s side fuse panel.
Before replacing a blown fuse, turn off
the ignition. and then disconnect the neg-
ative battery cable. replace it in a safe
place.
Always replace a blown fuse with one of
the same rating.
If the replacement fuse blows, this indi-
cates an electrical problem. Avoid using
the system involved and we recommend
that you consult an authorized HYUNDAI
dealer.
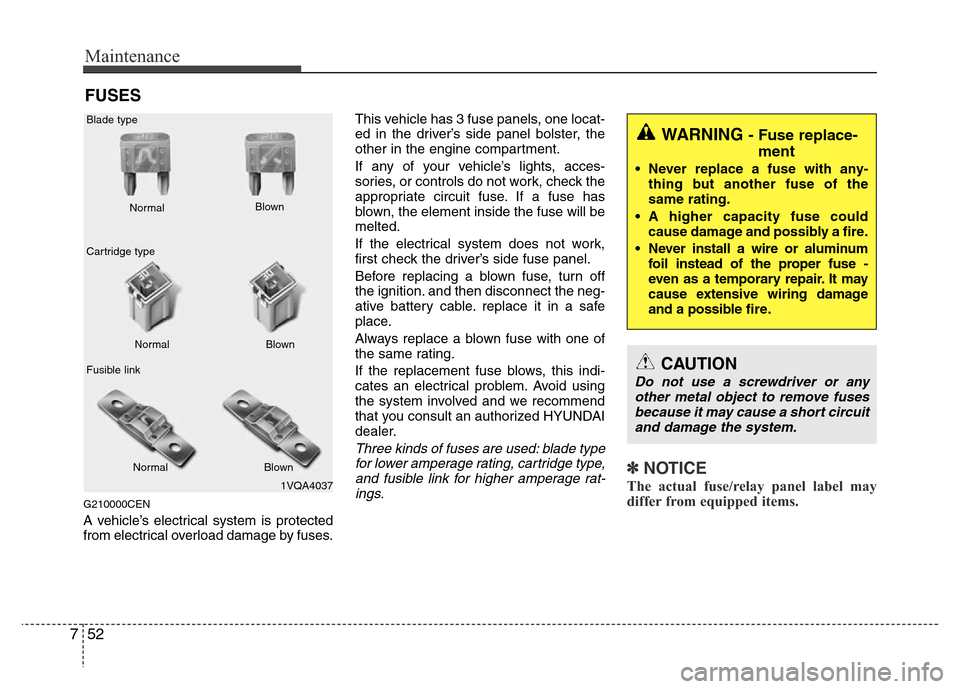
Three kinds of fuses are used: blade type
for lower amperage rating, cartridge type,
and fusible link for higher amperage rat-
ings.
✽NOTICE
The actual fuse/relay panel label may
differ from equipped items. 1VQA4037 Normal Normal Blade type
Cartridge type
Fusible linkBlown
Blown
Normal Blown
WARNING - Fuse replace-
ment
• Never replace a fuse with any-
thing but another fuse of the
same rating.
• A higher capacity fuse could
cause damage and possibly a fire.
• Never install a wire or aluminum
foil instead of the proper fuse -
even as a temporary repair. It may
cause extensive wiring damage
and a possible fire.
CAUTION
Do not use a screwdriver or any
other metal object to remove fuses
because it may cause a short circuit
and damage the system.
Page 375 of 417
753
Maintenance
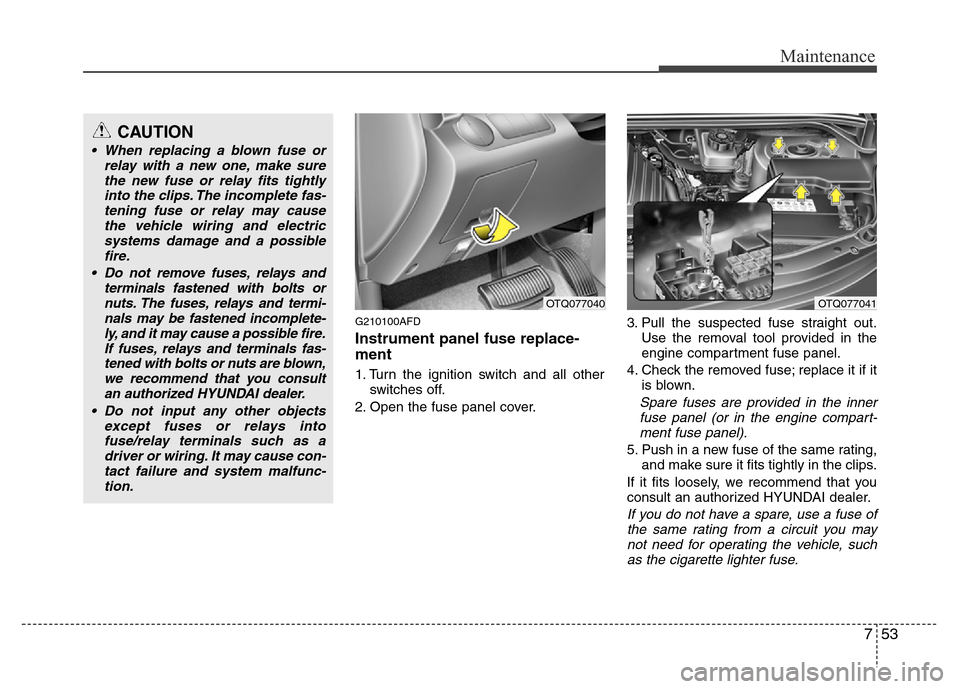
G210100AFD
Instrument panel fuse replace-
ment
1. Turn the ignition switch and all other
switches off.
2. Open the fuse panel cover.3. Pull the suspected fuse straight out.
Use the removal tool provided in the
engine compartment fuse panel.
4. Check the removed fuse; replace it if it
is blown.
Spare fuses are provided in the inner
fuse panel (or in the engine compart-
ment fuse panel).
5. Push in a new fuse of the same rating,
and make sure it fits tightly in the clips.
If it fits loosely, we recommend that you
consult an authorized HYUNDAI dealer.
If you do not have a spare, use a fuse of
the same rating from a circuit you may
not need for operating the vehicle, such
as the cigarette lighter fuse.
OTQ077041OTQ077040
CAUTION
• When replacing a blown fuse or
relay with a new one, make sure
the new fuse or relay fits tightly
into the clips. The incomplete fas-
tening fuse or relay may cause
the vehicle wiring and electric
systems damage and a possible
fire.
• Do not remove fuses, relays and
terminals fastened with bolts or
nuts. The fuses, relays and termi-
nals may be fastened incomplete-
ly, and it may cause a possible fire.
If fuses, relays and terminals fas-
tened with bolts or nuts are blown,
we recommend that you consult
an authorized HYUNDAI dealer.
• Do not input any other objects
except fuses or relays into
fuse/relay terminals such as a
driver or wiring. It may cause con-
tact failure and system malfunc-
tion.
Page 376 of 417
Maintenance
54 7
If the headlights or other electrical com-
ponents do not work and the fuses are
OK, check the fuse panel in the engine
compartment. If a fuse is blown, it must
be replaced.
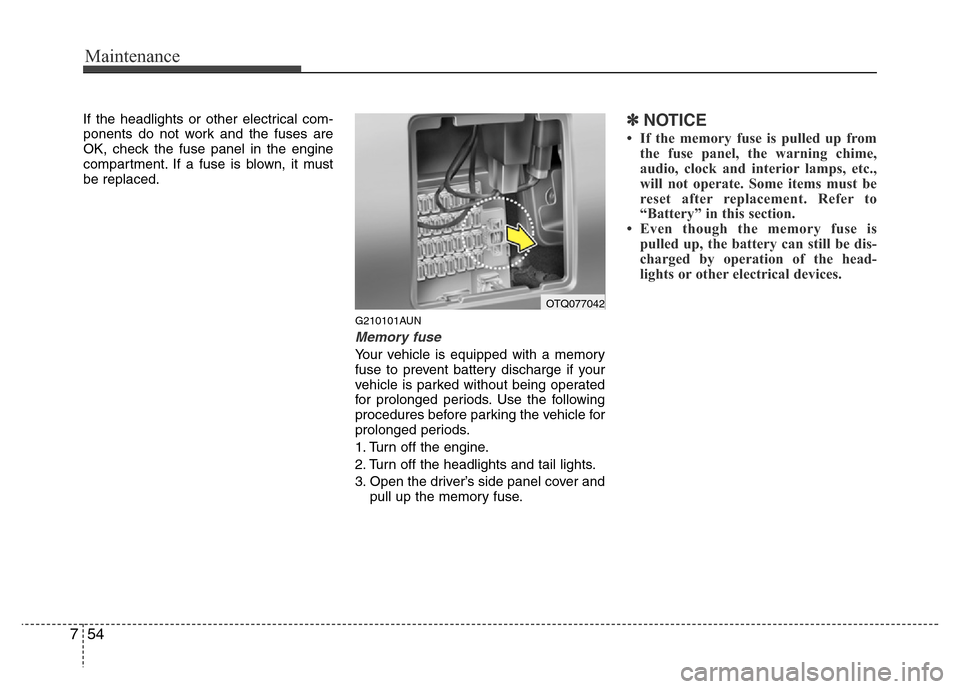
G210101AUN
Memory fuse
Your vehicle is equipped with a memory
fuse to prevent battery discharge if your
vehicle is parked without being operated
for prolonged periods. Use the following
procedures before parking the vehicle for
prolonged periods.
1. Turn off the engine.
2. Turn off the headlights and tail lights.
3. Open the driver’s side panel cover and
pull up the memory fuse.
✽NOTICE
• If the memory fuse is pulled up from
the fuse panel, the warning chime,
audio, clock and interior lamps, etc.,
will not operate. Some items must be
reset after replacement. Refer to
“Battery” in this section.
• Even though the memory fuse is
pulled up, the battery can still be dis-
charged by operation of the head-
lights or other electrical devices.
OTQ077042
Page 377 of 417
755
Maintenance
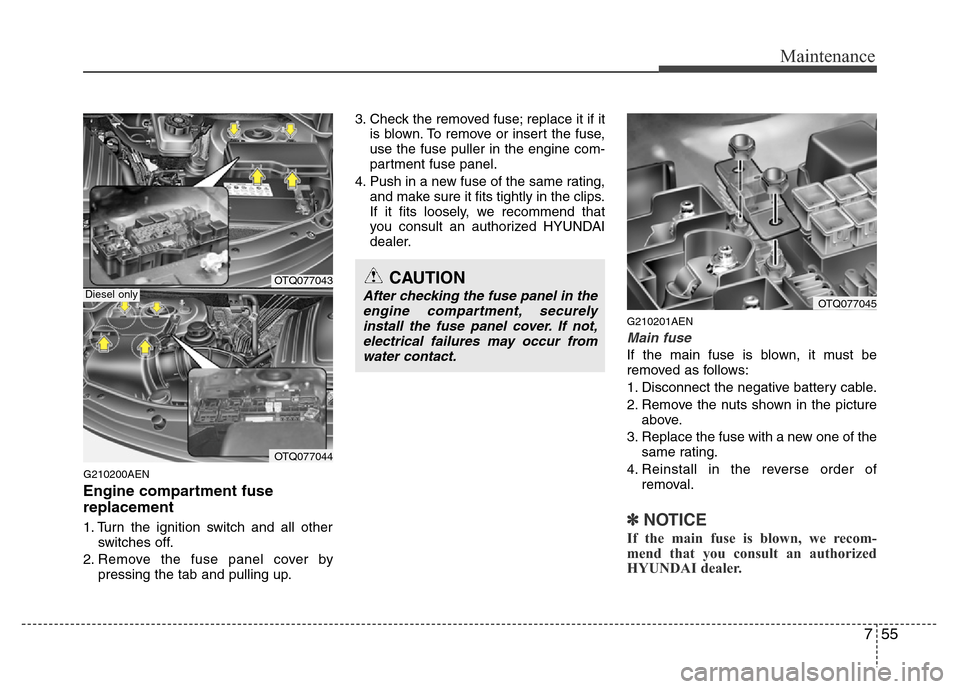
G210200AEN
Engine compartment fuse
replacement
1. Turn the ignition switch and all other
switches off.
2. Remove the fuse panel cover by
pressing the tab and pulling up.3. Check the removed fuse; replace it if it
is blown. To remove or insert the fuse,
use the fuse puller in the engine com-
partment fuse panel.
4. Push in a new fuse of the same rating,
and make sure it fits tightly in the clips.
If it fits loosely, we recommend that
you consult an authorized HYUNDAI
dealer.
G210201AEN
Main fuse
If the main fuse is blown, it must be
removed as follows:
1. Disconnect the negative battery cable.
2. Remove the nuts shown in the picture
above.
3. Replace the fuse with a new one of the
same rating.
4. Reinstall in the reverse order of
removal.
✽NOTICE
If the main fuse is blown, we recom-
mend that you consult an authorized
HYUNDAI dealer.
CAUTION
After checking the fuse panel in the
engine compartment, securely
install the fuse panel cover. If not,
electrical failures may occur from
water contact.OTQ077045
OTQ077043
OTQ077044
Diesel only
Page 381 of 417
759
Maintenance
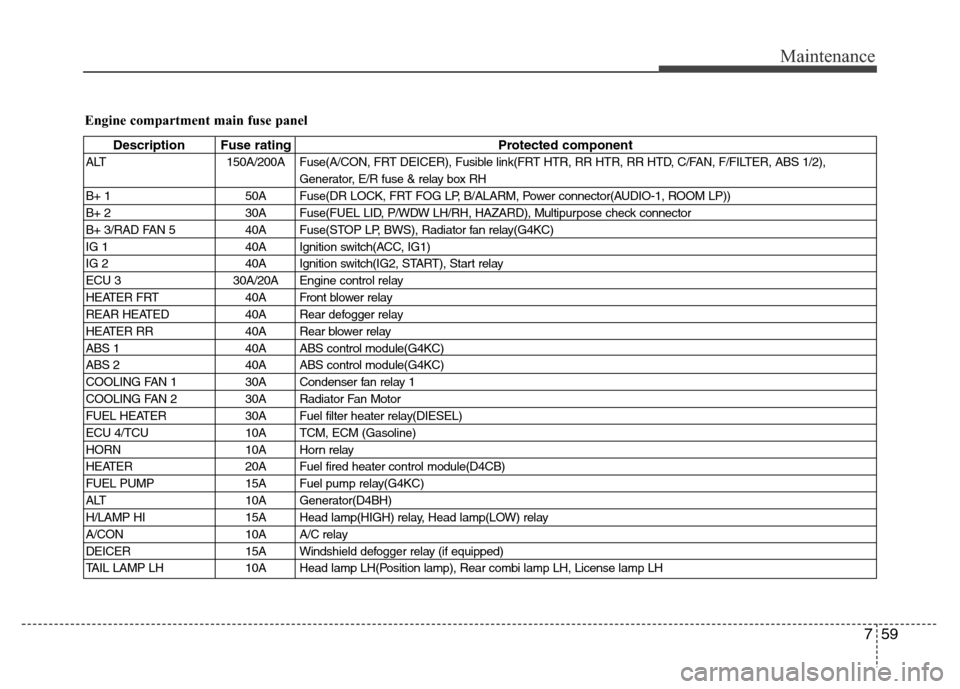
Engine compartment main fuse panel
Description Fuse rating Protected component
ALT 150A/200A Fuse(A/CON, FRT DEICER), Fusible link(FRT HTR, RR HTR, RR HTD, C/FAN, F/FILTER, ABS 1/2),
Generator, E/R fuse & relay box RH
B+ 1 50A Fuse(DR LOCK, FRT FOG LP, B/ALARM, Power connector(AUDIO-1, ROOM LP))
B+ 2 30A Fuse(FUEL LID, P/WDW LH/RH, HAZARD), Multipurpose check connector
B+ 3/RAD FAN 5 40A Fuse(STOP LP, BWS), Radiator fan relay(G4KC)
IG 1 40A Ignition switch(ACC, IG1)
IG 2 40A Ignition switch(IG2, START), Start relay
ECU 3 30A/20A Engine control relay
HEATER FRT 40A Front blower relay
REAR HEATED 40A Rear defogger relay
HEATER RR 40A Rear blower relay
ABS 1 40A ABS control module(G4KC)
ABS 2 40A ABS control module(G4KC)
COOLING FAN 1 30A Condenser fan relay 1
COOLING FAN 2 30A Radiator Fan Motor
FUEL HEATER 30A Fuel filter heater relay(DIESEL)
ECU 4/TCU 10A TCM, ECM (Gasoline)
HORN 10A Horn relay
HEATER 20A Fuel fired heater control module(D4CB)
FUEL PUMP 15A Fuel pump relay(G4KC)
ALT 10A Generator(D4BH)
H/LAMP HI 15A Head lamp(HIGH) relay, Head lamp(LOW) relay
A/CON 10A A/C relay
DEICER 15A Windshield defogger relay (if equipped)
TAIL LAMP LH 10A Head lamp LH(Position lamp), Rear combi lamp LH, License lamp LH
Page 382 of 417
Maintenance
60 7
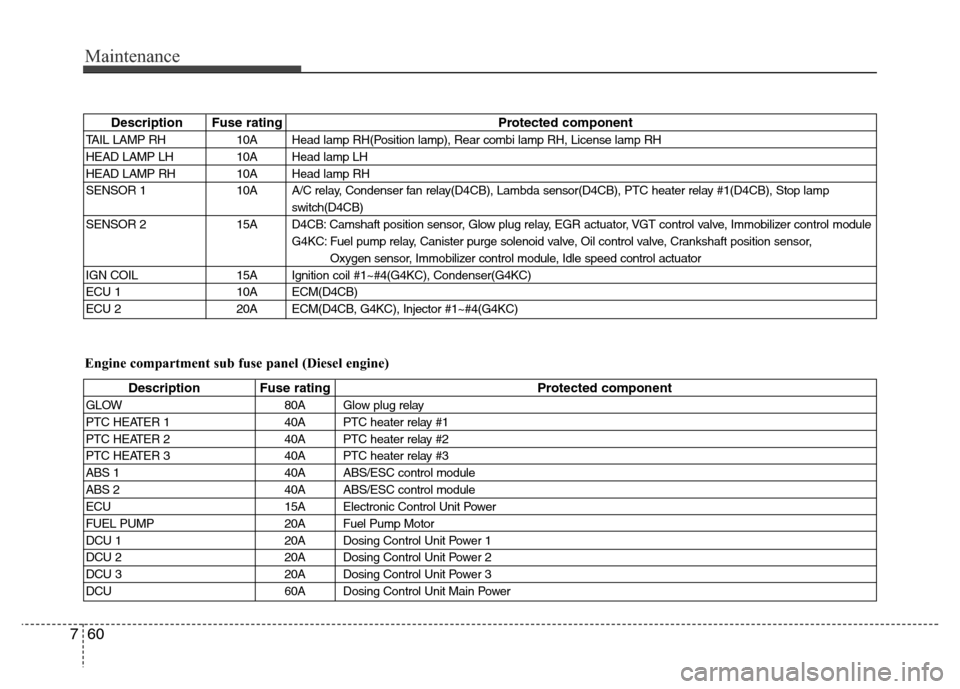
Description Fuse rating Protected component
TAIL LAMP RH 10A Head lamp RH(Position lamp), Rear combi lamp RH, License lamp RH
HEAD LAMP LH 10A Head lamp LH
HEAD LAMP RH 10A Head lamp RH
SENSOR 1 10A A/C relay, Condenser fan relay(D4CB), Lambda sensor(D4CB), PTC heater relay #1(D4CB), Stop lamp
switch(D4CB)
SENSOR 2 15A D4CB: Camshaft position sensor, Glow plug relay, EGR actuator, VGT control valve, Immobilizer control module
G4KC: Fuel pump relay, Canister purge solenoid valve, Oil control valve, Crankshaft position sensor,
Oxygen sensor, Immobilizer control module, Idle speed control actuator
IGN COIL 15A Ignition coil #1~#4(G4KC), Condenser(G4KC)
ECU 1 10A ECM(D4CB)
ECU 2 20A ECM(D4CB, G4KC), Injector #1~#4(G4KC)
Engine compartment sub fuse panel (Diesel engine)
Description Fuse rating Protected component
GLOW 80A Glow plug relay
PTC HEATER 1 40A PTC heater relay #1
PTC HEATER 2 40A PTC heater relay #2
PTC HEATER 3 40A PTC heater relay #3
ABS 1 40A ABS/ESC control module
ABS 2 40A ABS/ESC control module
ECU 15A Electronic Control Unit Power
FUEL PUMP 20A Fuel Pump Motor
DCU 1 20A Dosing Control Unit Power 1
DCU 2 20A Dosing Control Unit Power 2
DCU 3 20A Dosing Control Unit Power 3
DCU 60A Dosing Control Unit Main Power