adding oil Hyundai H-100 Truck 2012 Owner's Manual
[x] Cancel search | Manufacturer: HYUNDAI, Model Year: 2012, Model line: H-100 Truck, Model: Hyundai H-100 Truck 2012Pages: 217, PDF Size: 9.37 MB
Page 144 of 217
5
VEHICLE MAINTENANCE REQUIREMENTS
5
50 40
I I I I I I I I I I
See Note (5)
KILOMETERS X 1000 MONTHS
NO.
1 2 3 4 5 6 7 8 9
1011 12 13 14 15 16 17 18 19 20 DESCRIPTION
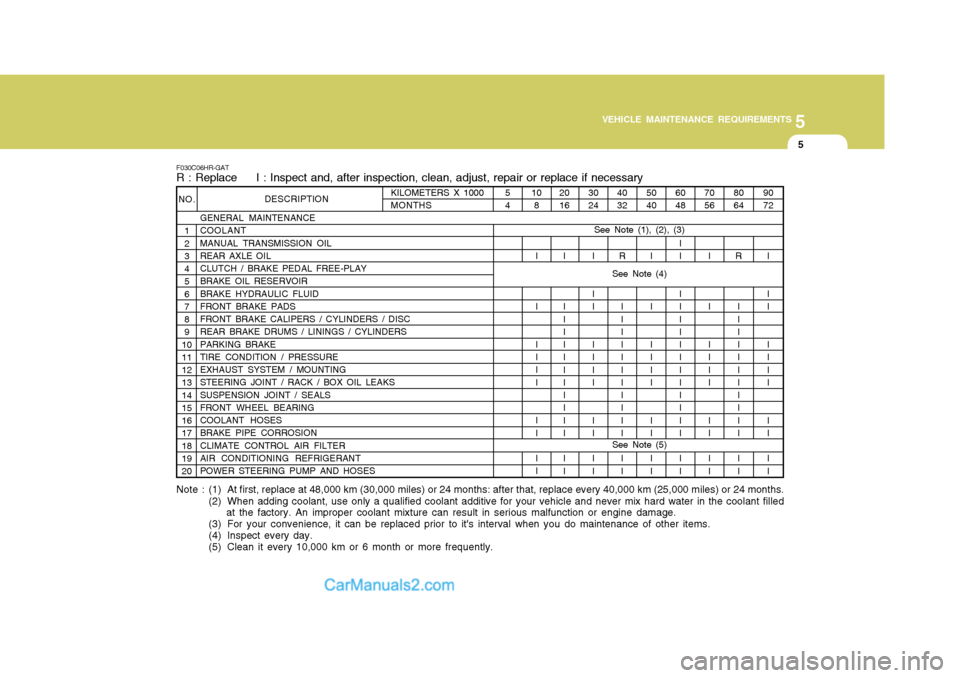
GENERAL MAINTENANCE COOLANT MANUAL TRANSMISSION OIL REAR AXLE OIL CLUTCH / BRAKE PEDAL FREE-PLAY BRAKE OIL RESERVOIR BRAKE HYDRAULIC FLUID FRONT BRAKE PADS FRONT BRAKE CALIPERS / CYLINDERS / DISC REAR BRAKE DRUMS / LININGS / CYLINDERS PARKING BRAKE TIRE CONDITION / PRESSURE EXHAUST SYSTEM / MOUNTING STEERING JOINT / RACK / BOX OIL LEAKS SUSPENSION JOINT / SEALS FRONT WHEEL BEARING COOLANT HOSES BRAKE PIPE CORROSION CLIMATE CONTROL AIR FILTER AIR CONDITIONING REFRIGERANT POWER STEERING PUMP AND HOSES
F030C06HR-GAT R : Replace I : Inspect and, after inspection, clean, adjust, repair or replace if necessary
80 64
R I I I I I I I I I I I I I 90 72
I I I I I I I I I I I
70 56
I I I I I I I I I I
60 48
II I I I I I I I I I I I I I I
40 32
R I I I I I I I I I I I I I
30 24
I I I I I I I I I I I
20 16
I I I I I I I I I I I I I I108
I I I I I I I I I I
54
See Note (1), (2), (3)
Note : (1) At first, replace at 48,000 km (30,000 miles) or 24 months: after that, replace every 40,000 km (25,000 miles) or 24 m onths.
(2) When adding coolant, use only a qualified coolant additive for your vehicle and never mix hard water in the coolant filled at the factory. An improper coolant mixture can result in serious malfunction or engine damage.
(3) For your convenience, it can be replaced prior to it's interval when you do maintenance of other items.
(4) Inspect every day.
(5) Clean it every 10,000 km or 6 month or more frequently.
See Note (4)
Page 146 of 217
5
VEHICLE MAINTENANCE REQUIREMENTS
7
45 36
R I I I I I I I I
15 12
I I I I I I I I I
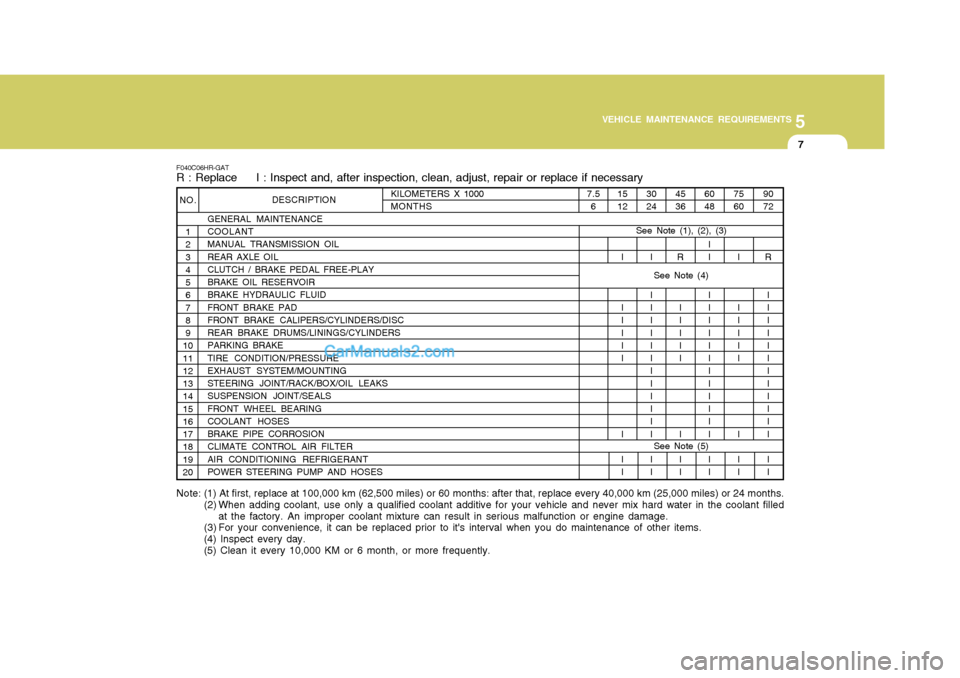
F040C06HR-GAT R : Replace I : Inspect and, after inspection, clean, adjust, repair or replace if necessary
KILOMETERS X 1000 MONTHS
NO.
1 2 3 4 5 6 7 8 9
1011 12 13 14 15 16 17 18 19 20 DESCRIPTION
GENERAL MAINTENANCE COOLANT MANUAL TRANSMISSION OIL REAR AXLE OIL CLUTCH / BRAKE PEDAL FREE-PLAY BRAKE OIL RESERVOIR BRAKE HYDRAULIC FLUID FRONT BRAKE PAD FRONT BRAKE CALIPERS/CYLINDERS/DISC REAR BRAKE DRUMS/LININGS/CYLINDERS PARKING BRAKE TIRE CONDITION/PRESSURE EXHAUST SYSTEM/MOUNTING STEERING JOINT/RACK/BOX/OIL LEAKS SUSPENSION JOINT/SEALS FRONT WHEEL BEARING COOLANT HOSES BRAKE PIPE CORROSION CLIMATE CONTROL AIR FILTER AIR CONDITIONING REFRIGERANT POWER STEERING PUMP AND HOSES
75 60
I I I I I I I I I 90 72
R II I I I I I I I I I I I I
60 48
II I I I I I I I I I I I I I I
30 24
I I I I I I I I I I I I I I I
7.5
6
See Note (1), (2), (3)
Note: (1) At first, replace at 100,000 km (62,500 miles) or 60 months: after that, replace every 40,000 km (25,000 miles) or 24 months.
(2) When adding coolant, use only a qualified coolant additive for your vehicle and never mix hard water in the coolant filled at the factory. An improper coolant mixture can result in serious malfunction or engine damage.
(3) For your convenience, it can be replaced prior to it's interval when you do maintenance of other items. (4) Inspect every day. (5) Clean it every 10,000 KM or 6 month, or more frequently.
See Note (4) See Note (5)
Page 150 of 217
5
VEHICLE MAINTENANCE REQUIREMENTS
11
F060F01A-AAT
o Vacuum and Crankcase
Ventilation Hoses
Inspect the surface of hoses for evi-
dence of heat and/or mechanical dam- age. Hard and brittle rubber, cracking, tears, cuts, abrasions, and excessiveswelling indicate deterioration. Particu- lar attention should be paid to examin- ing those hose surfaces nearest tohigh heat sources, such as the ex- haust manifold.
Inspect the hose routing to assure that
the hoses do not come in contact withany heat source, sharp edges or mov- ing component which might cause heatdamage or mechanical wear. Inspect all hose connections, such as clamps and couplings, to make sure they aresecure, and that no leaks are present. Hoses should be replaced immedi- ately if there is any evidence of dete-rioration or damage. F060B01HR-GAT
o Drive Belts
Inspect all drive belts (water pump andalternator) for evidence of cuts, cracks, excessive wear or oiliness, and re- place if necessary. Drive belts shouldbe checked periodically for proper ten- sion and adjusted as necessary. F060E01A-GAT
o Timing Belt
Inspect all parts related with the timing
belt for damage and deformation. Re- place any damaged parts immediately.
F060H01A-AAT
o Air Cleaner Filter
A Genuine Hyundai air cleaner filter isrecommended when the filter is re-placed.
F060G01A-AAT
o Vapor Hose and Fuel Filler Cap
The vapor hose and fuel filler cap
should be inspected at those intervals specified in the maintenance sched- ule. Make sure that a new vapor hoseor fuel filler cap is correctly replaced.
F070B01A-GAT
o Cooling System
Check the cooling system part, suchas radiator, coolant reservoir, hoses and connections for leakage and dam- age. Replace any damaged parts. F070C01A-AAT
o Coolant
The coolant should be changed at the intervals specified in the mainte- nance schedule. F070D01HP-GAT
o Manual Transmission Oil Inspect the manual transmission oil according to the maintenance sched- ule. NOTE: If the oil level is low, check for possible leaks before adding oil.Do not overfill.
Page 159 of 217
6
DO-IT-YOURSELF MAINTENANCE
7
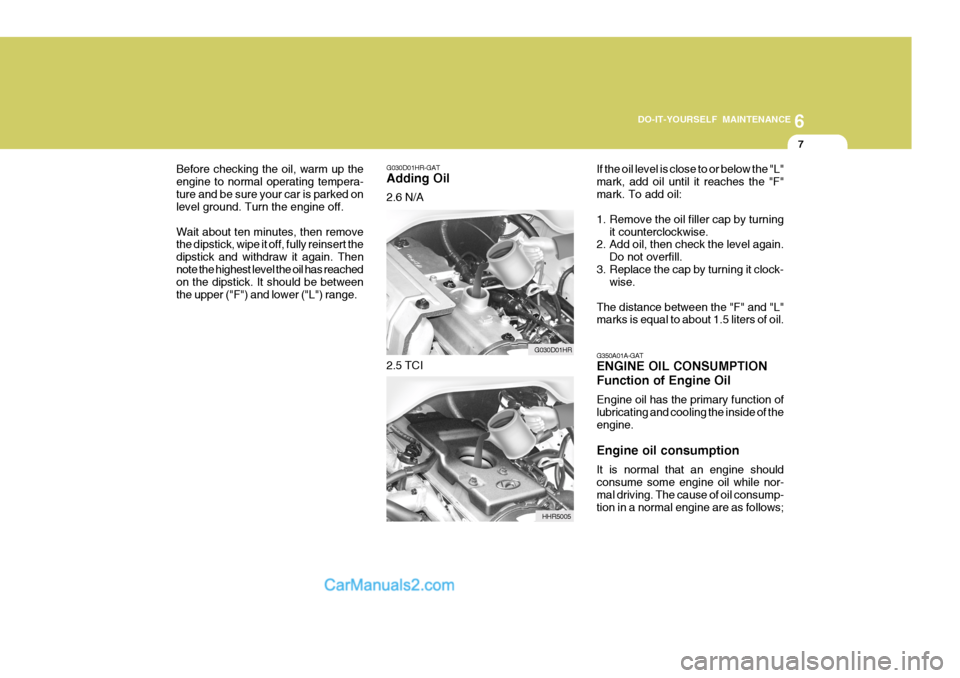
G030D01HR-GAT Adding Oil 2.6 N/A
Before checking the oil, warm up the engine to normal operating tempera-ture and be sure your car is parked on level ground. Turn the engine off. Wait about ten minutes, then remove the dipstick, wipe it off, fully reinsert the dipstick and withdraw it again. Thennote the highest level the oil has reached on the dipstick. It should be between the upper ("F") and lower ("L") range.
G030D01HR
2.5 TCI
HHR5005If the oil level is close to or below the "L"mark, add oil until it reaches the "F"mark. To add oil:
1. Remove the oil filler cap by turning
it counterclockwise.
2. Add oil, then check the level again.
Do not overfill.
3. Replace the cap by turning it clock- wise.
The distance between the "F" and "L" marks is equal to about 1.5 liters of oil. G350A01A-GAT ENGINE OIL CONSUMPTION Function of Engine Oil Engine oil has the primary function of
lubricating and cooling the inside of theengine. Engine oil consumption It is normal that an engine should consume some engine oil while nor- mal driving. The cause of oil consump- tion in a normal engine are as follows;
Page 168 of 217
6 DO-IT-YOURSELF MAINTENANCE
16
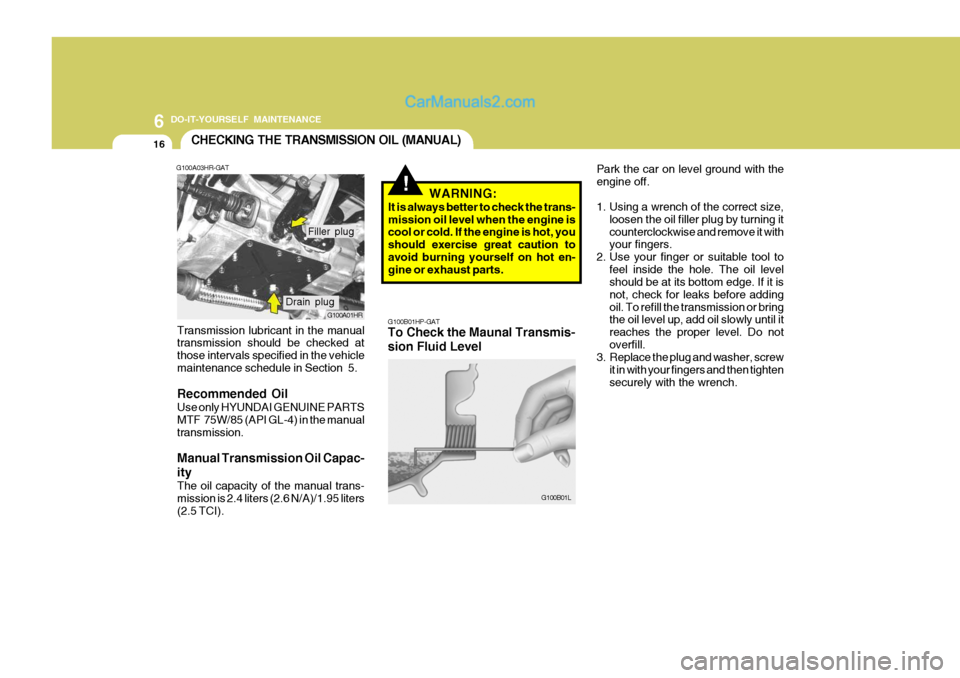
Park the car on level ground with the engine off.
1. Using a wrench of the correct size,loosen the oil filler plug by turning it counterclockwise and remove it with your fingers.
2. Use your finger or suitable tool to
feel inside the hole. The oil levelshould be at its bottom edge. If it is not, check for leaks before addingoil. To refill the transmission or bring the oil level up, add oil slowly until it reaches the proper level. Do notoverfill.
3. Replace the plug and washer, screw
it in with your fingers and then tightensecurely with the wrench.CHECKING THE TRANSMISSION OIL (MANUAL)
G100A03HR-GAT
G100A01HR
Transmission lubricant in the manual transmission should be checked at those intervals specified in the vehiclemaintenance schedule in Section 5. Recommended Oil Use only HYUNDAI GENUINE PARTS MTF 75W/85 (API GL-4) in the manualtransmission. Manual Transmission Oil Capac- ity The oil capacity of the manual trans- mission is 2.4 liters (2.6 N/A)/1.95 liters(2.5 TCI).
Drain plug Filler plug
!
G100B01HP-GAT To Check the Maunal Transmis- sion Fluid Level
G100B01L
WARNING:
It is always better to check the trans- mission oil level when the engine is cool or cold. If the engine is hot, you should exercise great caution toavoid burning yourself on hot en- gine or exhaust parts.
Page 169 of 217
6
DO-IT-YOURSELF MAINTENANCE
17CHECKING THE REAR AXLE OIL
!
G130A01HR-GAT
G130A01HR
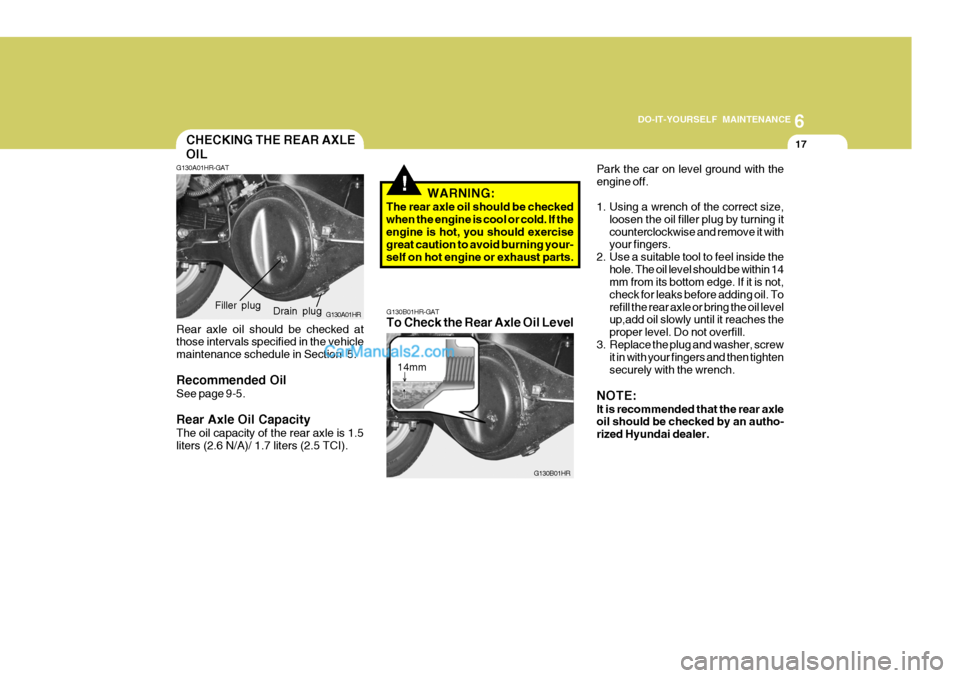
Rear axle oil should be checked at those intervals specified in the vehicle maintenance schedule in Section 5. Recommended Oil See page 9-5. Rear Axle Oil Capacity The oil capacity of the rear axle is 1.5 liters (2.6 N/A)/ 1.7 liters (2.5 TCI). WARNING:
The rear axle oil should be checkedwhen the engine is cool or cold. If the engine is hot, you should exercise great caution to avoid burning your-self on hot engine or exhaust parts.
Drain plug
Filler plug
G130B01HR-GAT To Check the Rear Axle Oil Level
G130B01HR
14mmPark the car on level ground with the engine off.
1. Using a wrench of the correct size,
loosen the oil filler plug by turning it counterclockwise and remove it with your fingers.
2. Use a suitable tool to feel inside the
hole. The oil level should be within 14mm from its bottom edge. If it is not, check for leaks before adding oil. Torefill the rear axle or bring the oil level up,add oil slowly until it reaches the proper level. Do not overfill.
3. Replace the plug and washer, screw it in with your fingers and then tightensecurely with the wrench.
NOTE: It is recommended that the rear axle oil should be checked by an autho- rized Hyundai dealer.