load Hyundai H350 2015 Owner's Manual
[x] Cancel search | Manufacturer: HYUNDAI, Model Year: 2015, Model line: H350, Model: Hyundai H350 2015Pages: 473, PDF Size: 26.4 MB
Page 39 of 473
2-19
Safety system of your vehicle
2
Pregnant women/child
The use of a seat belt is recom-
mended for pregnant women/child to
reduce the risk of injury in an acci-
dent. The lap belt should be fastened
as low and snugly as possible across
the hips, not across the abdomen.
For specific recommendations, con-
sult a physician.
Pre-tensioner seat belt (if equipped)
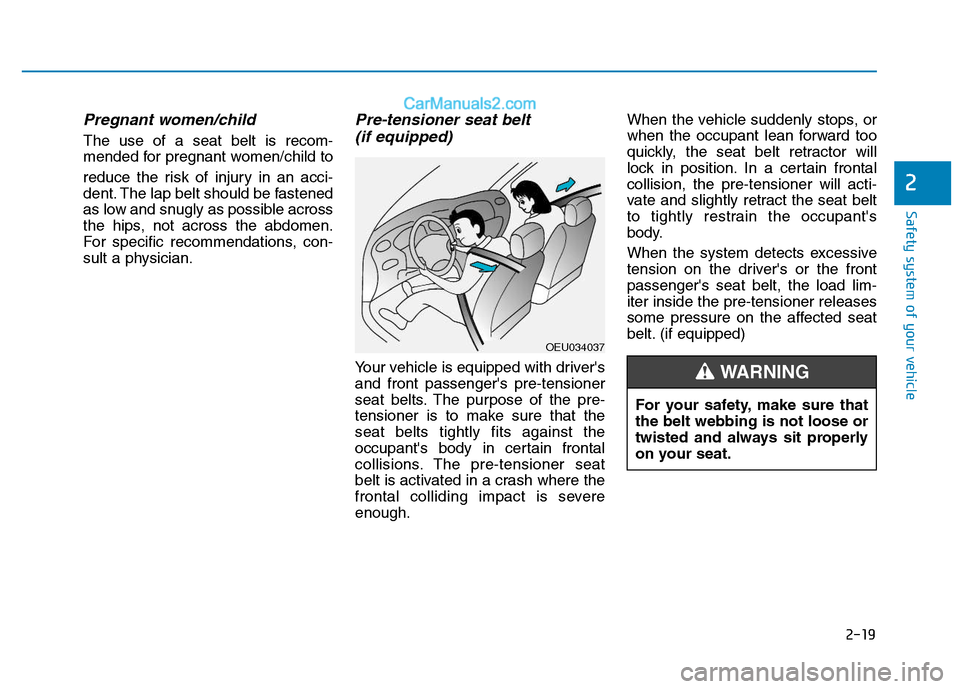
Your vehicle is equipped with driver'sand front passenger's pre-tensioner
seat belts. The purpose of the pre-
tensioner is to make sure that theseat belts tightly fits against the
occupant's body in certain frontal
collisions. The pre-tensioner seat
belt is activated in a crash where the
frontal colliding impact is severeenough. When the vehicle suddenly stops, or
when the occupant lean forward too
quickly, the seat belt retractor will
lock in position. In a certain frontalcollision, the pre-tensioner will acti-
vate and slightly retract the seat belt
to tightly restrain the occupant's
body.
When the system detects excessive
tension on the driver's or the frontpassenger's seat belt, the load lim-iter inside the pre-tensioner releases
some pressure on the affected seat
belt. (if equipped)
OEU034037
For your safety, make sure that the belt webbing is not loose or
twisted and always sit properly
on your seat.
WARNING
Page 80 of 473
3-18The default setting of the STEP
switch is the ON position.
Press the STEP switch, when the
electrical step is not in use in regard-less of opening/closing of the mid-
sliding door.
In this case, the LED indicator on the
STEP switch goes OFF.
To use the electrical step, re-press
the STEP switch. Then, the LED indi-
cator on the STEP switch will illumi-
nate.
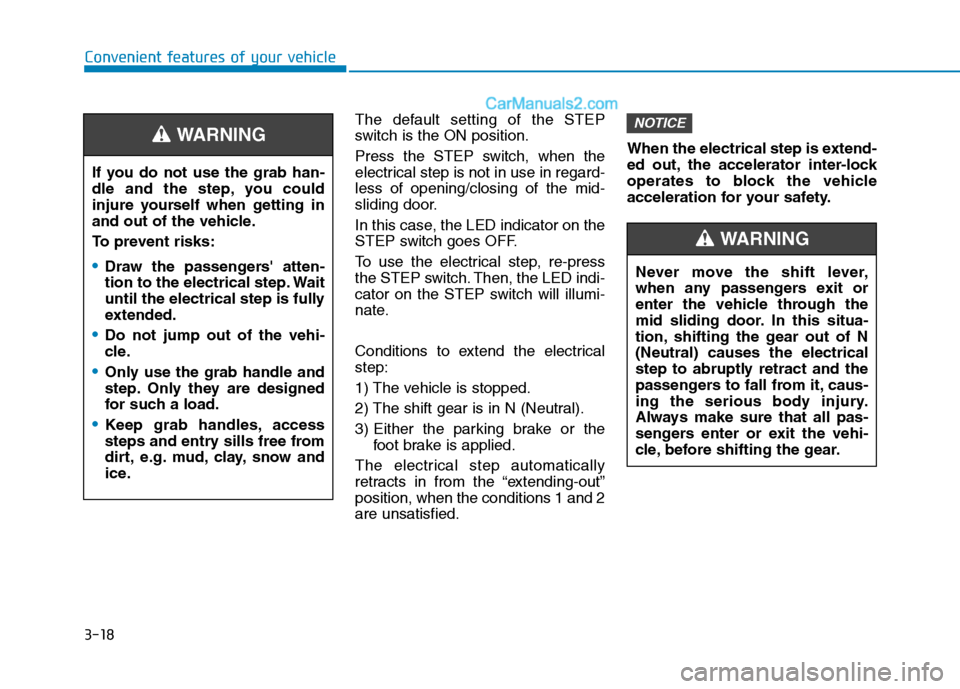
Conditions to extend the electrical step:
1) The vehicle is stopped.
2) The shift gear is in N (Neutral).
3) Either the parking brake or the
foot brake is applied.
The electrical step automatically
retracts in from the “extending-out”position, when the conditions 1 and 2are unsatisfied. When the electrical step is extend-
ed out, the accelerator inter-lock
operates to block the vehicle
acceleration for your safety.
NOTICE
Convenient features of your vehicle
Never move the shift lever,
when any passengers exit or
enter the vehicle through the
mid sliding door. In this situa-
tion, shifting the gear out of N(Neutral) causes the electrical
step to abruptly retract and the
passengers to fall from it, caus-
ing the serious body injury.
Always make sure that all pas-
sengers enter or exit the vehi-
cle, before shifting the gear.
WARNING
If you do not use the grab han-
dle and the step, you could
injure yourself when getting in
and out of the vehicle.
To prevent risks:
Draw the passengers' atten-
tion to the electrical step. Wait
until the electrical step is fully
extended.
Do not jump out of the vehi-
cle.
Only use the grab handle and
step. Only they are designed
for such a load.
Keep grab handles, access
steps and entry sills free from
dirt, e.g. mud, clay, snow and
ice.
WARNING
Page 81 of 473
3-19
Convenient features of your vehicle
Operation and obstacle detec- tion
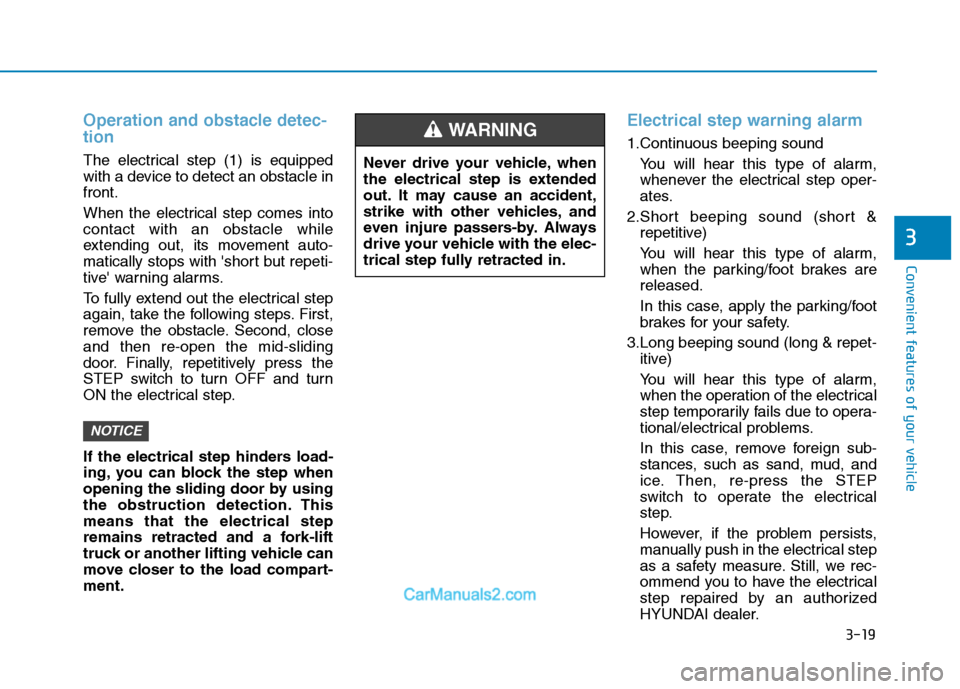
The electrical step (1) is equipped
with a device to detect an obstacle infront.
When the electrical step comes into contact with an obstacle while
extending out, its movement auto-
matically stops with 'short but repeti-
tive' warning alarms.
To fully extend out the electrical step
again, take the following steps. First,
remove the obstacle. Second, closeand then re-open the mid-sliding
door. Finally, repetitively press the
STEP switch to turn OFF and turn
ON the electrical step.
If the electrical step hinders load-
ing, you can block the step when
opening the sliding door by using
the obstruction detection. Thismeans that the electrical step
remains retracted and a fork-lift
truck or another lifting vehicle can
move closer to the load compart-ment.
Electrical step warning alarm
1.Continuous beeping sound You will hear this type of alarm,
whenever the electrical step oper-
ates.
2.Short beeping sound (short & repetitive)
You will hear this type of alarm,
when the parking/foot brakes arereleased.
In this case, apply the parking/foot
brakes for your safety.
3.Long beeping sound (long & repet- itive)
You will hear this type of alarm,
when the operation of the electrical
step temporarily fails due to opera-
tional/electrical problems.
In this case, remove foreign sub-
stances, such as sand, mud, and
ice. Then, re-press the STEP
switch to operate the electrical
step.
However, if the problem persists,
manually push in the electrical step
as a safety measure. Still, we rec-
ommend you to have the electrical
step repaired by an authorized
HYUNDAI dealer.
NOTICE
3
Never drive your vehicle, when
the electrical step is extended
out. It may cause an accident,
strike with other vehicles, and
even injure passers-by. Always
drive your vehicle with the elec-
trical step fully retracted in.
WARNING
Page 87 of 473
3-25
Convenient features of your vehicle
3
Vehicles with 270° pivoting rear
doors: If door retainer (1) malfunctions
while loading, you can swivel it
180° against the spring force and
onto the door and engage it. Thedoor retainer remains in this posi-
tion and will not swivel back to itsoriginal position.
Before closing the door, release
door retainer (1) from the detentand return it to its original posi-tion.
Closing the rear doors from the outside (if equipped)
Pull the rear door away from mag-
netic door retainer.
Close the left-hand rear door firmly
from the outside.
Child-protector rear door lock (if equipped)
The child safety lock is provided to
help prevent children from acciden-tally opening the rear door from
inside the vehicle. The rear door
safety locks should be used whenev-
er children are in the vehicle.
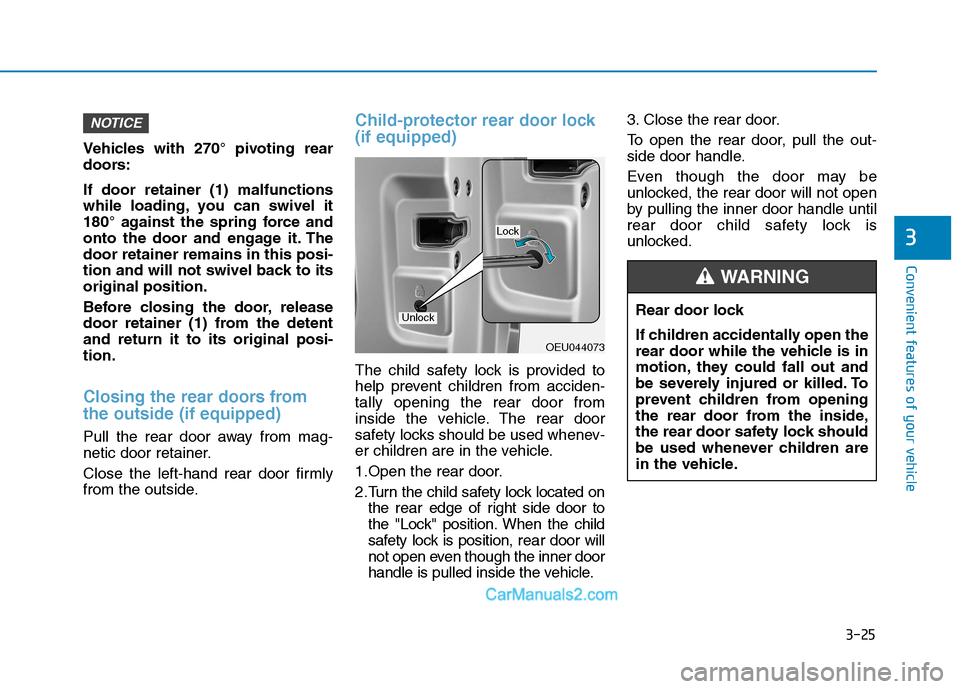
1.Open the rear door.
2.Turn the child safety lock located onthe rear edge of right side door to
the "Lock" position. When the child
safety lock is position, reardoor will
not open even though the inner door
handle is pulled inside the vehicle. 3. Close the rear door.
To open the rear door, pull the out-
side door handle.
Even though the door may be
unlocked, the rear door will not open
by pulling the inner door handle until
rear door child safety lock is
unlocked.
NOTICE
OEU044073
Rear door lock
If children accidentally open the
rear door while the vehicle is in
motion, they could fall out and
be severely injured or killed. To
prevent children from opening
the rear door from the inside,
the rear door safety lock should
be used whenever children are
in the vehicle.
WARNING
Lock
Unlock
Page 142 of 473
3-80
Convenient features of your vehicle
Warning sound
Overspeed warning (if equipped)
Overspeed warning light
If you drive with the speed of
120km/h or more, the overspeed
warning light will blink. This is to pre-
vent from driving your vehicle with
overspeed.
Overspeed warning chime
If you drive with the speed of
120km/h or more, the overspeed
warning chime will sound for about 5
seconds. This is to prevent you from
driving your vehicle with overspeed.
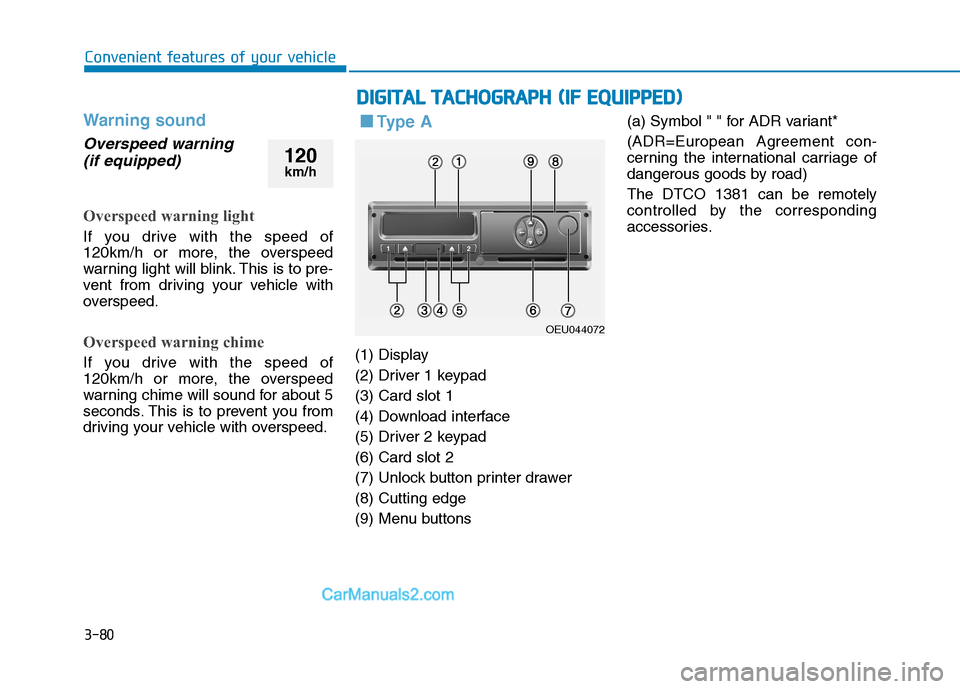
■■ Ty p e A
(1) Display
(2) Driver 1 keypad(3) Card slot 1
(4) Download interface
(5) Driver 2 keypad(6) Card slot 2
(7) Unlock button printer drawer(8) Cutting edge
(9) Menu buttons (a) Symbol " " for ADR variant*
(ADR=European Agreement con-
cerning the international carriage of
dangerous goods by road) The DTCO 1381 can be remotely
controlled by the corresponding
accessories.
DD
IIGG IITT AA LL TT AA CCHH OO GGRRAA PPHH (( IIFF EE QQ UUIIPP PP EEDD ))
OEU044072
120
km/h
Page 143 of 473
3-81
Convenient features of your vehicle
3
Description
Display (1)
Depending on the vehicle's opera-
tional condition, different displays will
appear or data can be displayed.
Driver 1 keypad (2)
( ) activity button for driver 1
( ) ejection button for card slot 1
Card slot 1 (3)
Driver 1, who will drive the vehicle at
this moment in time, inserts his driv-er card into slot 1.
Download interface (4)
The download interface is located
under the cover. The access rights of
this interface are regulated according
to the inserted tachograp card.
Driver 2 keypad (5)
( ) activity button for driver 2
( ) ejection button for card slot 2
Card slot 2 (6)
Driver 2, who is not driving the vehi-
cle at this moment in time, inserts his
driver card into slot 2 (crew opera-tion).
Unlock button (7)
Use this button to unlock the printer
drawer, for example when inserting a
roll of paper.
Cutting edge (8)
You can use the cutting edge to tear
off a printout generated by integrated
printer.
Menu buttons (9)
Use the following buttons to enter,
display, or print out data. (/) Use the paging function to
select the desired function or
selection.(This is possible by
pressing and holding down
the auto-repeat function key.)
( ) Confirm or acknowledge desired function/selection.
( ) Press and hold, repeatedly until the last entry field.
( ) Back to the last entry field, abort the entry of a country, or leave
the menu one step at a time.
OK
OK
22
2
1
Page 144 of 473
3-82
Convenient features of your vehicle
ADR variant*(a)
- Some functions, such as insertionor removal of the tachograph
cards, printing or display of data
are possible only while the ignition
is switched on.
- The download interface dap on the DTCO 1381 must be closed duringloading and unloading of haz-
ardous materials. ❈ For more detail information,
refer to operating instructions
(book or CD) from the manufac-
turing company.
■■
Type B
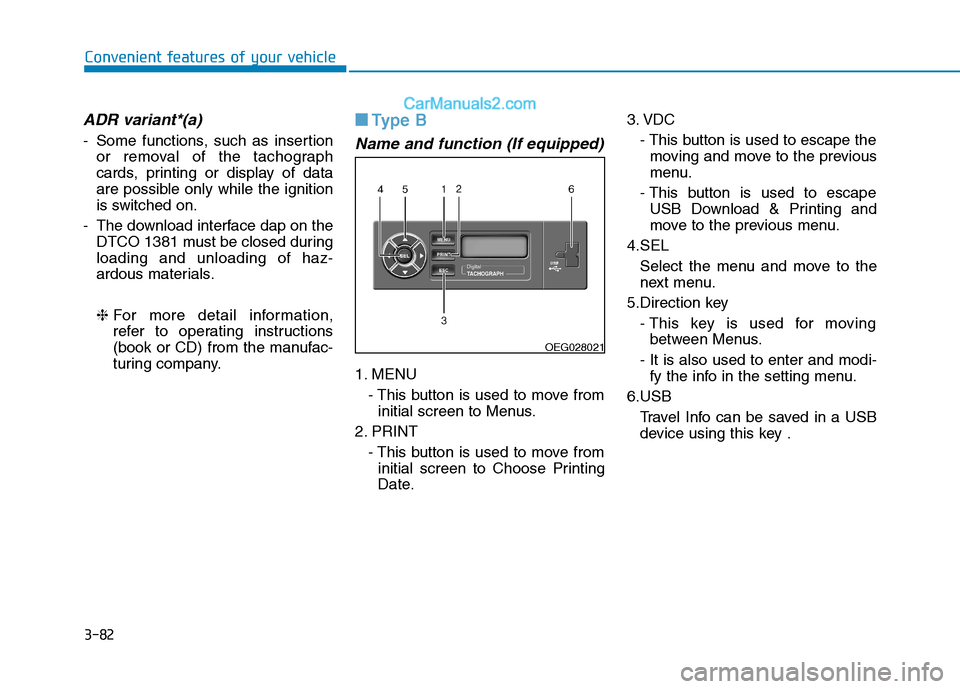
Name and function (If equipped)
1. MENU
- This button is used to move frominitial screen to Menus.
2. PRINT - This button is used to move frominitial screen to Choose Printing
Date. 3. VDC
- This button is used to escape themoving and move to the previous
menu.
- This button is used to escape USB Download & Printing and
move to the previous menu.
4.SEL Select the menu and move to the
next menu.
5.Direction key - This key is used for movingbetween Menus.
- It is also used to enter and modi- fy the info in the setting menu.
6.USB Travel Info can be saved in a USBdevice using this key .
OEG028021
Page 146 of 473
3-84
Convenient features of your vehicle
3.Select travel data you want toinquire:
Nothing displays when there is no
travel info recorded.
4.Select travel time you want to inquire:
Displays the time elapsed from Key
On to Key Off.
5.Displays travel time info you inquired:
The travel info calculated above (4)
will be displayed.USB Download
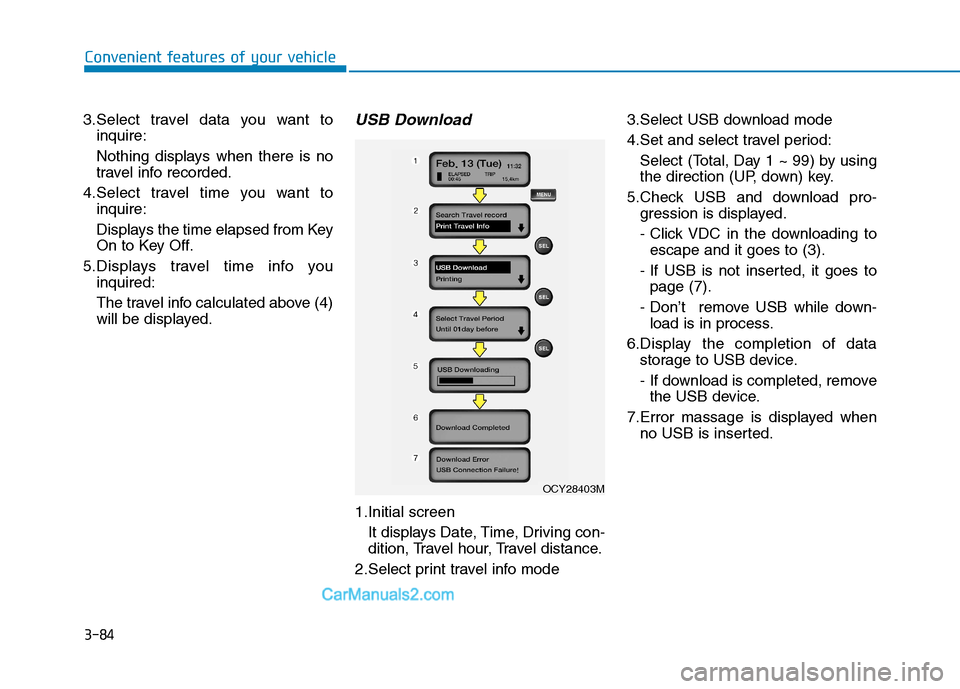
1.Initial screen
It displays Date, Time, Driving con-
dition, Travel hour, Travel distance.
2.Select print travel info mode 3.Select USB download mode
4.Set and select travel period:
Select (Total, Day 1 ~ 99) by using
the direction (UP, down) key.
5.Check USB and download pro- gression is displayed.
- Click VDC in the downloading toescape and it goes to (3).
- If USB is not inserted, it goes to page (7).
- Don’t remove USB while down- load is in process.
6.Display the completion of data storage to USB device.
- If download is completed, removethe USB device.
7.Error massage is displayed when no USB is inserted.
OCY28403M
Page 163 of 473
3-101
Convenient features of your vehicle
3
Daytime running light (if equipped)
Daytime Running Lights (DRL) can
make it easier for others to see the
front of your vehicle during the day.
DRL can be helpful in many different
driving conditions, and it is especial-
ly helpful after dawn and before sun-set.
The DRL system will make the head-
lights turn OFF when:
1. The parklight switch is ON.
2. Engine stops.
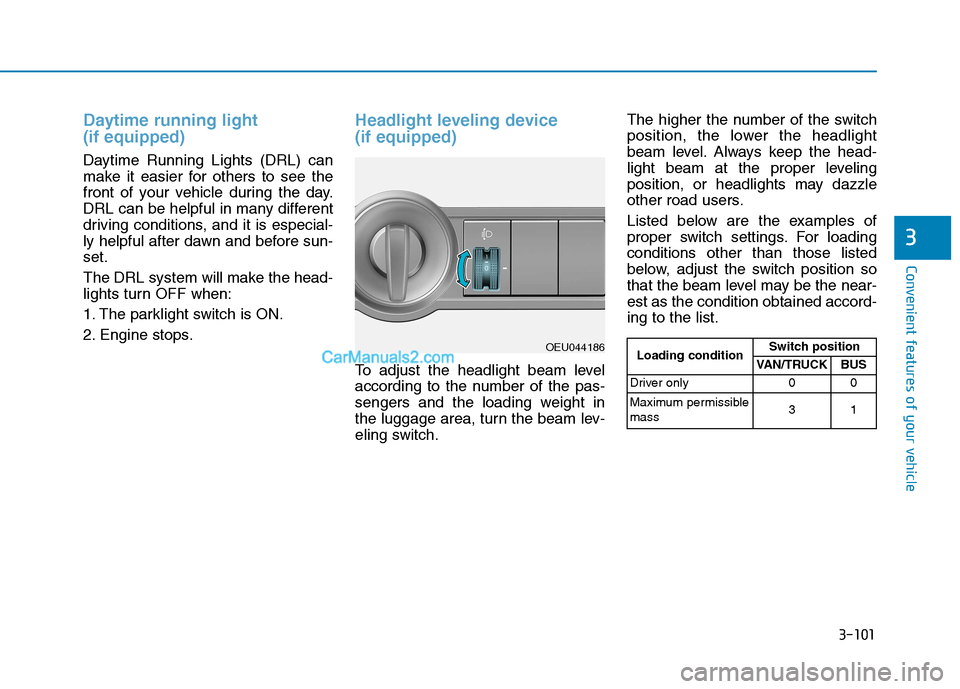
Headlight leveling device (if equipped)
To adjust the headlight beam level
according to the number of the pas-
sengers and the loading weight in
the luggage area, turn the beam lev-
eling switch.The higher the number of the switch
position, the lower the headlight
beam level. Always keep the head-
light beam at the proper leveling
position, or headlights may dazzle
other road users.
Listed below are the examples of
proper switch settings. For loadingconditions other than those listed
below, adjust the switch position so
that the beam level may be the near-est as the condition obtained accord-ing to the list.
OEU044186
Loading condition Switch position
VAN/TRUCK BUS
Driver only 0 0
Maximum permissible mass 31
Page 166 of 473
3-104
Convenient features of your vehicle
When washing the vehicle, set
the wiper switch in the OFFposition to stop the auto wiperoperation.
The wiper may operate and be
damaged if the switch is set in
the AUTO mode while washing
the vehicle.
Do not remove the sensor cover located on the upper end of the
passenger side windshield
glass. Damage to system parts
could occur and may not be
covered by your vehicle warran-
ty.
When starting the vehicle in
winter, set the wiper switch in
the OFF position. Otherwise,
wipers may operate and ice may
damage the windshield wiper
blades. Always remove all snow
and ice and defrost the wind-
shield properly prior to operat-
ing the windshield wipers.
CAUTION(Continued)
Activation of the Safe Mode
Automatic change to LO from HI
Automatic change to INT from LO
Automatic stop from INT
❈
❈ The safe mode function is
installed in the automatic
wiper motor. This is to protect
wiper components from the
system overload, which may
be caused by snow or other
foreign substances on awindshield.
Those do not signify a problem
with the wiper system. In this
case, take the below measures.
Stop the engine and the wiper operation after stopping or
parking a vehicle (Continued)
Some wiper operation modes
may be changed, while operat-
ing, as the wiper-motor protect-
ing function activates (in the
safe mode) under the belowconditions:
Wiper operation for an extend period of time while
parking/stopping a vehiclewith the engine running
Wiper operation in the HI posi-
tion for an extend period of
time, while driving at a lowspeed or driving with highRPM
Wiper operation for an extend period of time on the wind-
shield that is dry without rain
water or window washer (Continued)
CAUTION