tow HYUNDAI I10 2008 Owner's Guide
[x] Cancel search | Manufacturer: HYUNDAI, Model Year: 2008, Model line: I10, Model: HYUNDAI I10 2008Pages: 354, PDF Size: 37.04 MB
Page 256 of 354
What to do in an emergency
18
6
Distributing the sealant
Immediately drive approximately 3
km (2 miles) to evenly distribute the
sealant in the tire. Producing the tire inflation pres- sure
1) After driving approximately 3 km
(2 miles), stop at a suitable loca- tion.
2) Connect connection hose 9 of the compressor directly to the tire
valve.
3) Connect between compressor and the vehicle power outlet using
the cable and connectors.
4) Adjust the tire inflation pressure to 230 kPa (33 psi). With the ignition
switched on, proceed as follows.
- To increase the inflation pres- sure: Switch on the compressor,
position I. To check the current
inflation pressure setting, briefly
switch off the compressor. - To reduce the inflation pres-
sure: Press the button 8 on the
compressor.
WARNING
Do not let the compressor run for
more than 10 minutes, otherwise
the device will overheat and may
be damaged.
WARNING
The tire inflation pressure must
be at least 230 kPa (33 psi). If it is
not, do not continue driving. Call
for road side service or towing.
CAUTION
Do not exceed a speed of 60 km/h (35 mph). If possible, donot fall below a speed of 20 km/h (12 mph).
While driving, if you experienceany unusual vibration, ride dis-turbance or noise, reduce yourspeed and drive with caution until you can safely pull off ofthe side of the road.
Call for road side service or tow-ing.
CAUTION
If the inflation pressure is notmaintained, drive the vehicle asecond time, refer to Distributing the sealant. Then repeat steps 1to 4.
Use of the TireMobilityKit maybe ineffectual for tire damagelarger than approximately 4 mm (0.16 in).
Please contact the nearestHYUNDAI A/S center, or a work-shop that works according toHYUNDAI repair procedures with correspondingly trainedpersonnel if the tire cannot bemade roadworthy with the TireMobilityKit.
Page 258 of 354
What to do in an emergency
20
6
TOWING
F080100BPA
Towing service
If emergency towing is necessary, we
recommend having it done by an author-
ized HYUNDAI dealer or a commercial
tow-truck service. Proper lifting and tow-
ing procedures are necessary to prevent
damage to the vehicle. The use of wheeldollies or flatbed is recommended.
For trailer towing guidelines information, refer to “Trailer towing” in section 5.
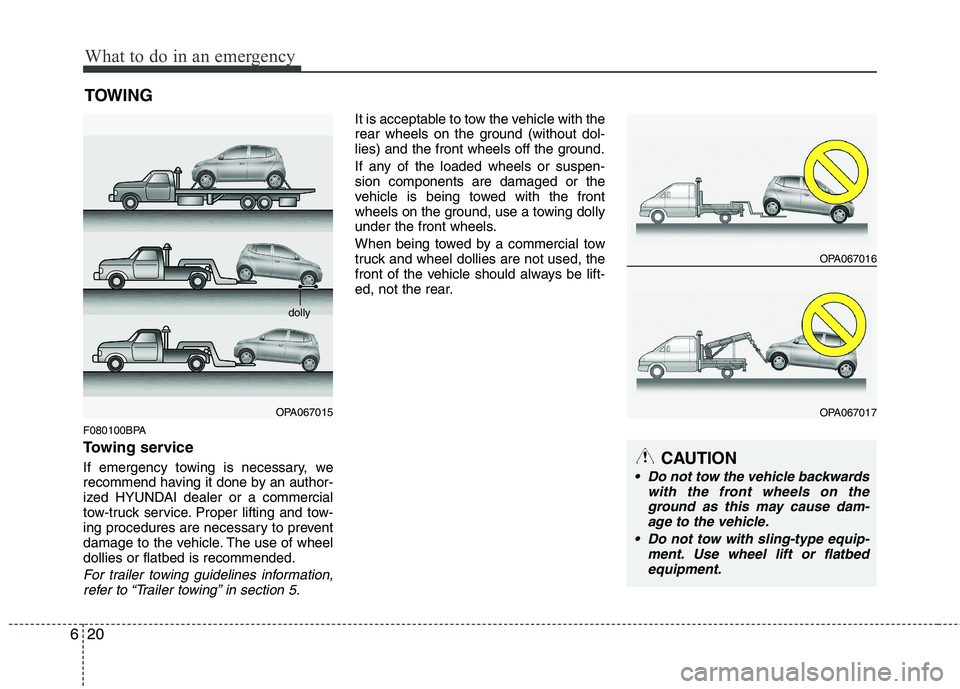
It is acceptable to tow the vehicle with the
rear wheels on the ground (without dol-
lies) and the front wheels off the ground.
If any of the loaded wheels or suspen- sion components are damaged or the
vehicle is being towed with the front
wheels on the ground, use a towing dolly
under the front wheels.
When being towed by a commercial tow
truck and wheel dollies are not used, the
front of the vehicle should always be lift-
ed, not the rear.
OPA067015 dolly
OPA067016
OPA067017
CAUTION
Do not tow the vehicle backwards
with the front wheels on theground as this may cause dam-
age to the vehicle.
Do not tow with sling-type equip- ment. Use wheel lift or flatbedequipment.
Page 259 of 354
621
What to do in an emergency
When towing your vehicle in an emer- gency without wheel dollies :
1. Set the ignition switch in the ACC posi-tion.
2. Place the transaxle shift lever in N (Neutral).
3. Release the parking brake.
F080200APA
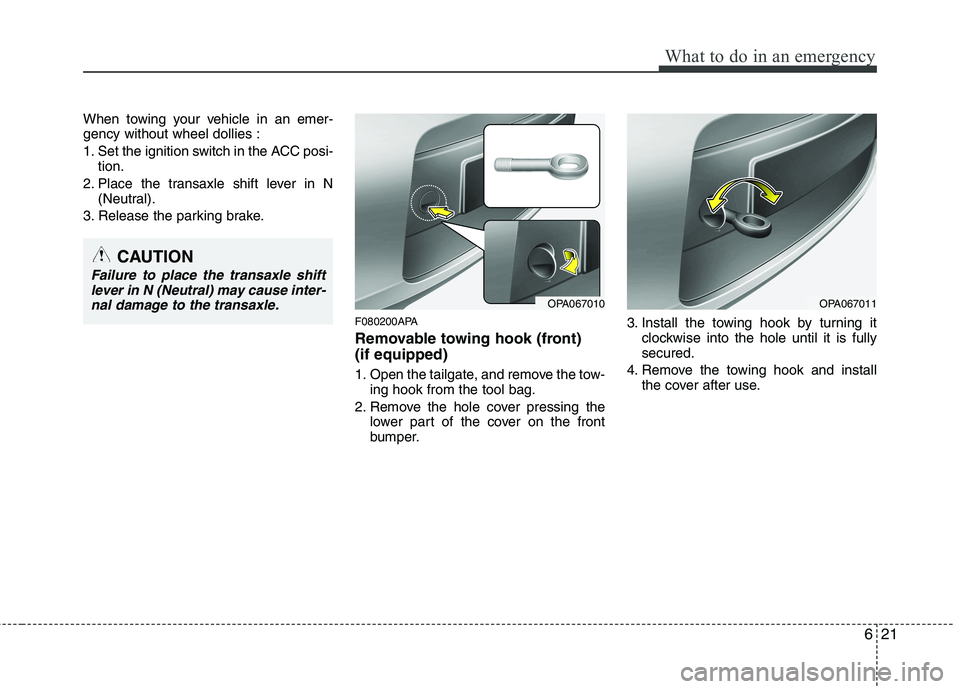
Removable towing hook (front) (if equipped)
1. Open the tailgate, and remove the tow-ing hook from the tool bag.
2. Remove the hole cover pressing the lower part of the cover on the front
bumper. 3. Install the towing hook by turning it
clockwise into the hole until it is fullysecured.
4. Remove the towing hook and install the cover after use.
CAUTION
Failure to place the transaxle shift
lever in N (Neutral) may cause inter-nal damage to the transaxle.
OPA067010OPA067011
Page 260 of 354
What to do in an emergency
22
6
F080300AEN
Emergency towing
If towing is necessary, we recommend
you to have it done by an authorized
HYUNDAI dealer or a commercial tow
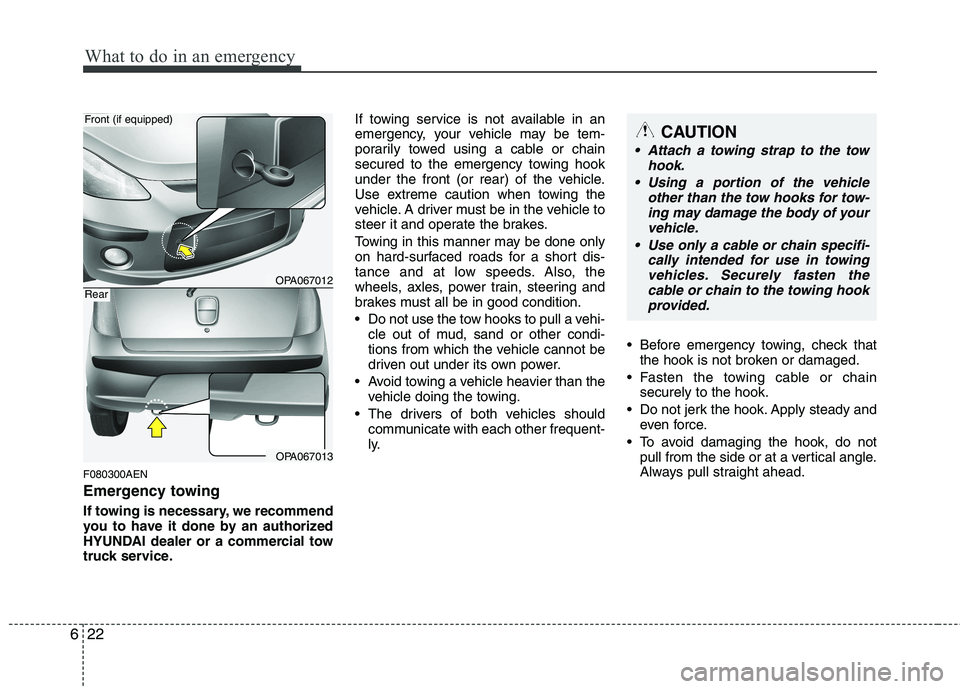
truck service. If towing service is not available in an
emergency, your vehicle may be tem-
porarily towed using a cable or chain
secured to the emergency towing hook
under the front (or rear) of the vehicle.
Use extreme caution when towing the
vehicle. A driver must be in the vehicle to
steer it and operate the brakes.
Towing in this manner may be done only
on hard-surfaced roads for a short dis-
tance and at low speeds. Also, the
wheels, axles, power train, steering and
brakes must all be in good condition.
Do not use the tow hooks to pull a vehi-
cle out of mud, sand or other condi-
tions from which the vehicle cannot be
driven out under its own power.
Avoid towing a vehicle heavier than the vehicle doing the towing.
The drivers of both vehicles should communicate with each other frequent-
ly. Before emergency towing, check that
the hook is not broken or damaged.
Fasten the towing cable or chain securely to the hook.
Do not jerk the hook. Apply steady and even force.
To avoid damaging the hook, do not pull from the side or at a vertical angle.
Always pull straight ahead.
OPA067012
OPA067013
Front (if equipped)
Rear
CAUTION
Attach a towing strap to the tow
hook.
Using a portion of the vehicle other than the tow hooks for tow-ing may damage the body of yourvehicle.
Use only a cable or chain specifi- cally intended for use in towingvehicles. Securely fasten thecable or chain to the towing hookprovided.
Page 261 of 354
623
What to do in an emergency
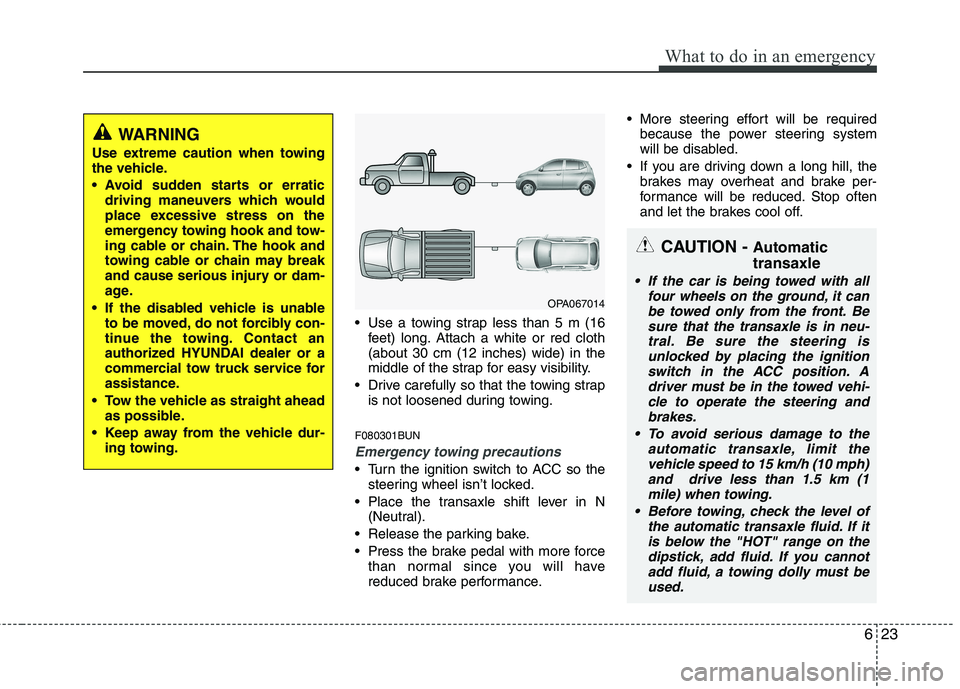
Use a towing strap less than 5 m (16feet) long. Attach a white or red cloth (about 30 cm (12 inches) wide) in the
middle of the strap for easy visibility.
Drive carefully so that the towing strap is not loosened during towing.
F080301BUN
Emergency towing precautions
Turn the ignition switch to ACC so the steering wheel isn’t locked.
Place the transaxle shift lever in N (Neutral).
Release the parking bake.
Press the brake pedal with more force than normal since you will have
reduced brake performance. More steering effort will be required
because the power steering system
will be disabled.
If you are driving down a long hill, the brakes may overheat and brake per-
formance will be reduced. Stop often
and let the brakes cool off.
WARNING
Use extreme caution when towing
the vehicle.
driving maneuvers which would
place excessive stress on the
emergency towing hook and tow-
ing cable or chain. The hook and
towing cable or chain may break
and cause serious injury or dam-
age.
If the disabled vehicle is unable to be moved, do not forcibly con-
tinue the towing. Contact an
authorized HYUNDAI dealer or a
commercial tow truck service for
assistance.
Tow the vehicle as straight ahead as possible.
Keep away from the vehicle dur- ing towing.
OPA067014
CAUTION - Automatic transaxle
If the car is being towed with all
four wheels on the ground, it can
be towed only from the front. Be sure that the transaxle is in neu-tral. Be sure the steering is unlocked by placing the ignition
switch in the ACC position. A driver must be in the towed vehi-cle to operate the steering and brakes.
To avoid serious damage to the automatic transaxle, limit thevehicle speed to 15 km/h (10 mph)and drive less than 1.5 km (1 mile) when towing.
Before towing, check the level of the automatic transaxle fluid. If itis below the "HOT" range on the dipstick, add fluid. If you cannot
add fluid, a towing dolly must be used.
Page 262 of 354
What to do in an emergency
24
6
EMERGENCY COMMODITY (IF EQUIPPED)
F110000AUN There are some emergency commodities
in the vehicle to help you respond to theemergency situation.
F110100AUN
Fire extinguisher
If there is small fire and you know how to
use the fire extinguisher, take the follow-
ing steps carefully.
1. Pull the pin at the top of the extin- guisher that keeps the handle from being accidentally pressed.
2. Aim the nozzle toward the base of the fire.
3. Stand approximately 2.5 m (8 ft) away from the fire and squeeze the handle
to discharge the extinguisher. If you
release the handle, the discharge will
stop.
4. Sweep the nozzle back and forth at the base of the fire. After the fire appears
to be out, watch it carefully since it
may re-ignite. F110200AUN
First aid kit
There are some items such as scissors,
bandage and adhesive tape and etc. in
the kit to give first aid to an injured per-son.
F110300AUN
Triangle reflector
Place the triangle reflector on the road to
warn oncoming vehicles during emer-
gencies, such as when the vehicle is
parked by the roadside due to any prob-
lems.
F110400AUN
Tire pressure gauge (If equipped)
Tires normally lose some air in day-to-
day use, and you may have to add a few
pounds of air periodically and it is not
usually a sign of a leaking tire, but of nor-
mal wear. Always check tire pressurewhen the tires are cold because tire pres-
sure increases with temperature. To check the tire pressure, take the fol-
lowing steps;
1. Unscrew the inflation valve cap that is
located on the rim of the tire.
2. Press and hold the gauge against the tire valve. Some air will escape as you
begin and more will escape if you don't
press the gauge in firmly.
3. A firm non-leaking push will activate the gauge.
4. Read the tire pressure on the gauge to know whether the tire pressure is lowor high.
5. Adjust the tire pressures to the speci- fied pressure. Refer to “Tires and
wheels” in section 9.
6. Reinstall the inflation valve cap.
Page 277 of 354
715
Maintenance
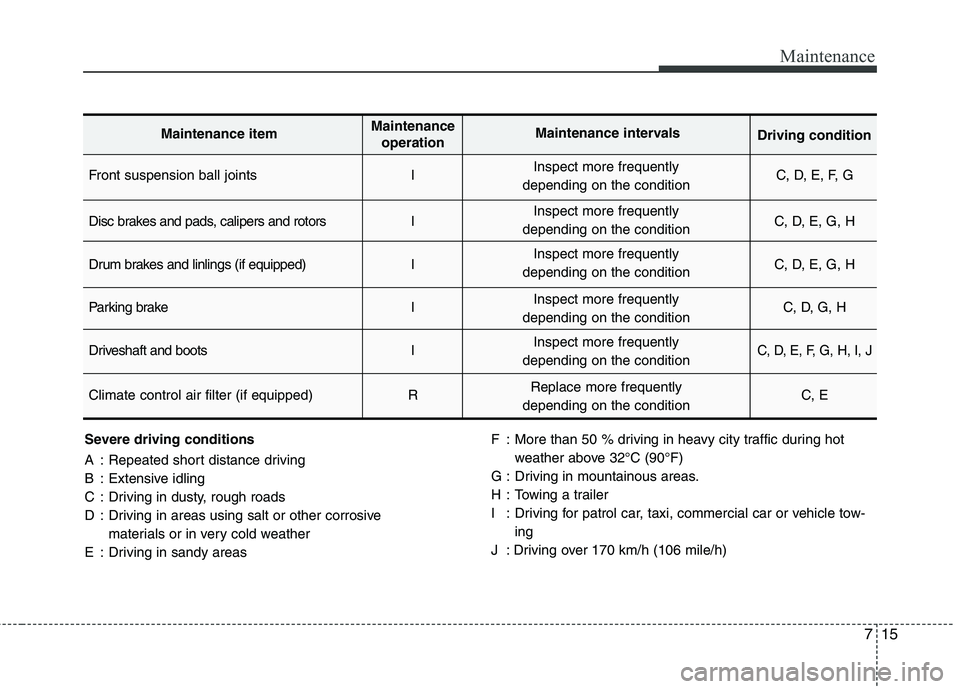
Severe driving conditions
A : Repeated short distance driving
B : Extensive idling
C : Driving in dusty, rough roads
D : Driving in areas using salt or other corrosive materials or in very cold weather
E : Driving in sandy areas F : More than 50 % driving in heavy city traffic during hot
weather above 32°C (90°F)
G : Driving in mountainous areas.
H : Towing a trailer
I : Driving for patrol car, taxi, commercial car or vehicle tow- ing
J : Driving over 170 km/h (106 mile/h)
Front suspension ball joints I C, D, E, F, G
Disc brakes and pads, calipers and rotors I C, D, E, G, H
Drum brakes and linlings (if equipped) I C, D, E, G, H
Parking brake I C, D, G, H
Driveshaft and boots I
C, D, E, F, G, H, I, J
Climate control air filter (if equipped) R C, E
Maintenance itemMaintenance
operation Maintenance intervals
Driving condition
Inspect more frequently
depending on the condition
Inspect more frequently
depending on the condition
Inspect more frequently
depending on the condition
Inspect more frequently
depending on the condition
Inspect more frequently
depending on the condition
Replace more frequently
depending on the condition
Page 283 of 354
721
Maintenance
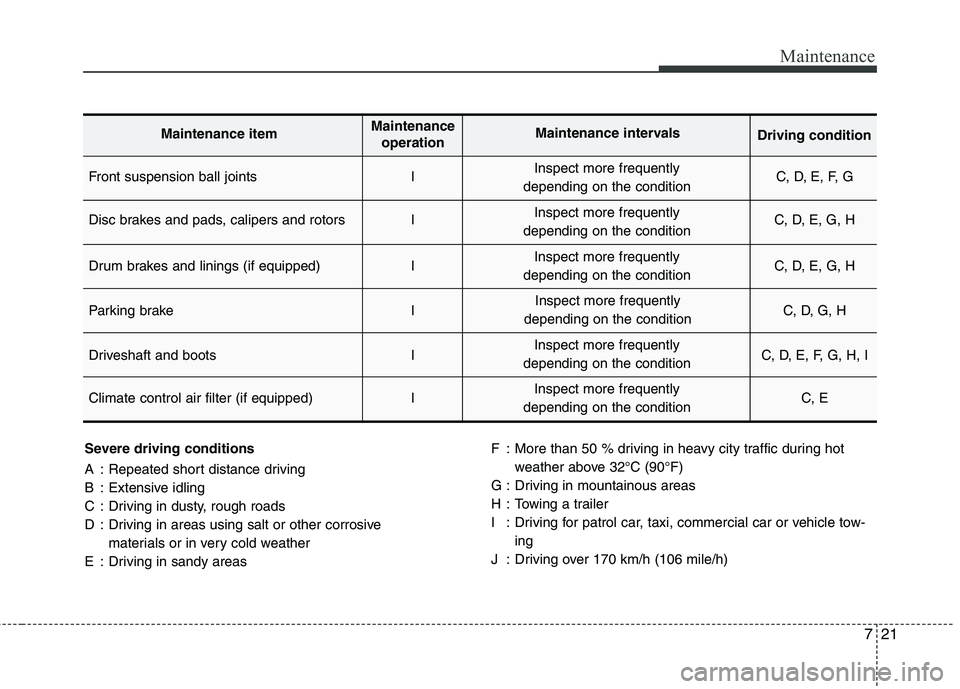
Severe driving conditions
A : Repeated short distance driving
B : Extensive idling
C : Driving in dusty, rough roads
D : Driving in areas using salt or other corrosive materials or in very cold weather
E : Driving in sandy areas F : More than 50 % driving in heavy city traffic during hot
weather above 32°C (90°F)
G : Driving in mountainous areas
H : Towing a trailer
I : Driving for patrol car, taxi, commercial car or vehicle tow- ing
J : Driving over 170 km/h (106 mile/h)
Front suspension ball joints I C, D, E, F, G
Disc brakes and pads, calipers and rotors I C, D, E, G, H
Drum brakes and linings (if equipped) I C, D, E, G, H
Parking brake I C, D, G, H
Driveshaft and boots I C, D, E, F, G, H, I
Climate control air filter (if equipped) I C, E
Maintenance itemMaintenance
operation Maintenance intervals
Driving condition
Inspect more frequently
depending on the condition
Inspect more frequently
depending on the condition
Inspect more frequently
depending on the condition
Inspect more frequently
depending on the condition
Inspect more frequently
depending on the condition
Inspect more frequently
depending on the condition
Page 289 of 354
727
Maintenance
ENGINE COOLANT
G070000AUN The high-pressure cooling system has a
reservoir filled with year-round antifreeze
coolant. The reservoir is filled at the fac-
tory.
Check the antifreeze protection and
coolant level at least once a year, at thebeginning of the winter season, and
before traveling to a colder climate.G070100AEN
Checking the coolant level
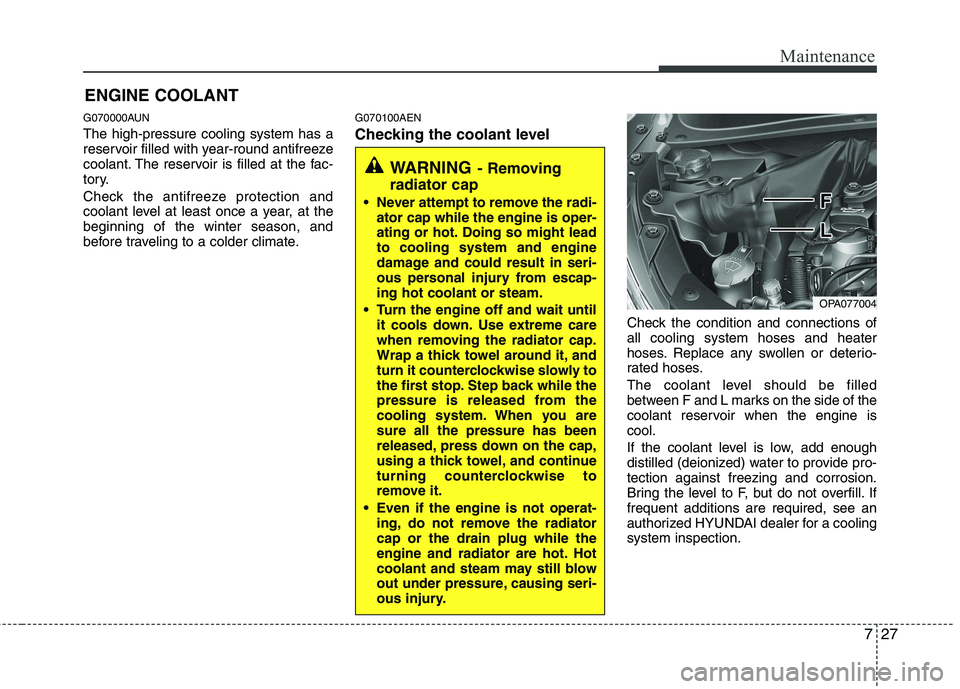
Check the condition and connections of all cooling system hoses and heater
hoses. Replace any swollen or deterio-
rated hoses.
The coolant level should be filled
between F and L marks on the side of the
coolant reservoir when the engine iscool.
If the coolant level is low, add enough
distilled (deionized) water to provide pro-tection against freezing and corrosion.
Bring the level to F, but do not overfill. Iffrequent additions are required, see an
authorized HYUNDAI dealer for a coolingsystem inspection.
WARNING- Removing
radiator cap
Never attempt to remove the radi- ator cap while the engine is oper-
ating or hot. Doing so might leadto cooling system and engine
damage and could result in seri-
ous personal injury from escap-ing hot coolant or steam.
Turn the engine off and wait until it cools down. Use extreme care
when removing the radiator cap.
Wrap a thick towel around it, and
turn it counterclockwise slowly to
the first stop. Step back while the
pressure is released from the
cooling system. When you aresure all the pressure has been
released, press down on the cap,
using a thick towel, and continue
turning counterclockwise to
remove it.
Even if the engine is not operat- ing, do not remove the radiatorcap or the drain plug while the
engine and radiator are hot. Hot
coolant and steam may still blow
out under pressure, causing seri-
ous injury.
OPA077004
Page 354 of 354
Index
4
I
Scheduled maintenance service ······································ 7-9
Seat belts ······································································· 3-15
Seats ················································································ 3-2
Special driving conditions ············································ 5-30
Starting the engine ·························································· 5-5
Steering wheel ······························································ 4-25
Storage compartment ···················································· 4-67
Sunroof ········································································· 4-22
Tailgate ·········································································· 4-13
Theft-alarm system ························································· 4-8
Tire specification and pressure label ······························ 8-3
Tires and wheels ··························································· 7-41
Tires and wheels ····························································· 9-3
Towing ·········································································· 6-20
Trailer towing ······························································· 5-38
Vehicle break-in process ················································· 1-5
Vehicle certification label ··············································· 8-2
Vehicle identification number (VIN) ······························ 8-2
Vehicle weight ······························································ 5-46 Washer fluid ·································································· 7-32
Windows ······································································· 4-14
Windshield defrosting and defogging ··························· 4-66
Winter driving ······························································· 5-34
Wiper blades ································································· 7-36
Wipers and washers ······················································ 4-52
V
W
T
S