engine HYUNDAI I10 2009 Owners Manual
[x] Cancel search | Manufacturer: HYUNDAI, Model Year: 2009, Model line: I10, Model: HYUNDAI I10 2009Pages: 354, PDF Size: 37.04 MB
Page 287 of 354
725
Maintenance
ENGINE OIL
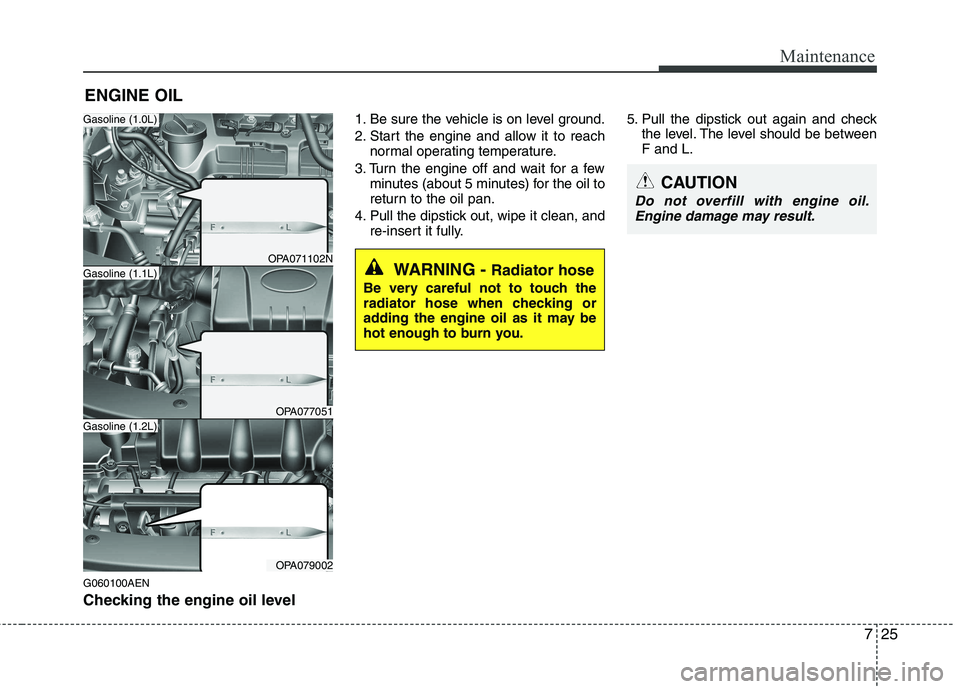
G060100AEN
Checking the engine oil level 1. Be sure the vehicle is on level ground.
2. Start the engine and allow it to reach
normal operating temperature.
3. Turn the engine off and wait for a few minutes (about 5 minutes) for the oil to
return to the oil pan.
4. Pull the dipstick out, wipe it clean, and re-insert it fully. 5. Pull the dipstick out again and check
the level. The level should be betweenF and L.
WARNING - Radiator hose
Be very careful not to touch the
radiator hose when checking or
adding the engine oil as it may be
hot enough to burn you.
CAUTION
Do not overfill with engine oil. Engine damage may result.
OPA071102N
OPA077051
OPA079002
Gasoline (1.1L)
Gasoline (1.0L)
Gasoline (1.2L)
Page 288 of 354
Maintenance
26
7
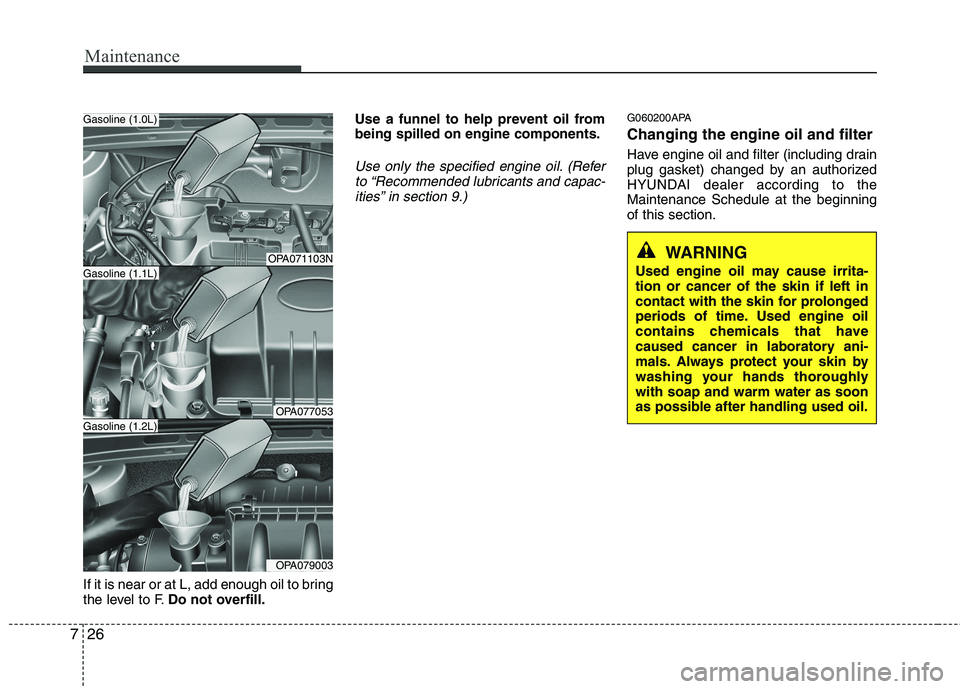
If it is near or at L, add enough oil to bring
the level to F. Do not overfill. Use a funnel to help prevent oil frombeing spilled on engine components.
Use only the specified engine oil. (Refer
to “Recommended lubricants and capac-ities” in section 9.)
G060200APA Changing the engine oil and filter
Have engine oil and filter (including drain
plug gasket) changed by an authorized
HYUNDAI dealer according to theMaintenance Schedule at the beginningof this section.
WARNING
Used engine oil may cause irrita- tion or cancer of the skin if left in
contact with the skin for prolonged
periods of time. Used engine oil
contains chemicals that have
caused cancer in laboratory ani-
mals. Always protect your skin by
washing your hands thoroughlywith soap and warm water as soon
as possible after handling used oil.OPA071103N
OPA077053
OPA079003
Gasoline (1.1L)
Gasoline (1.0L)
Gasoline (1.2L)
Page 289 of 354
727
Maintenance
ENGINE COOLANT
G070000AUN The high-pressure cooling system has a
reservoir filled with year-round antifreeze
coolant. The reservoir is filled at the fac-
tory.
Check the antifreeze protection and
coolant level at least once a year, at thebeginning of the winter season, and
before traveling to a colder climate.G070100AEN
Checking the coolant level
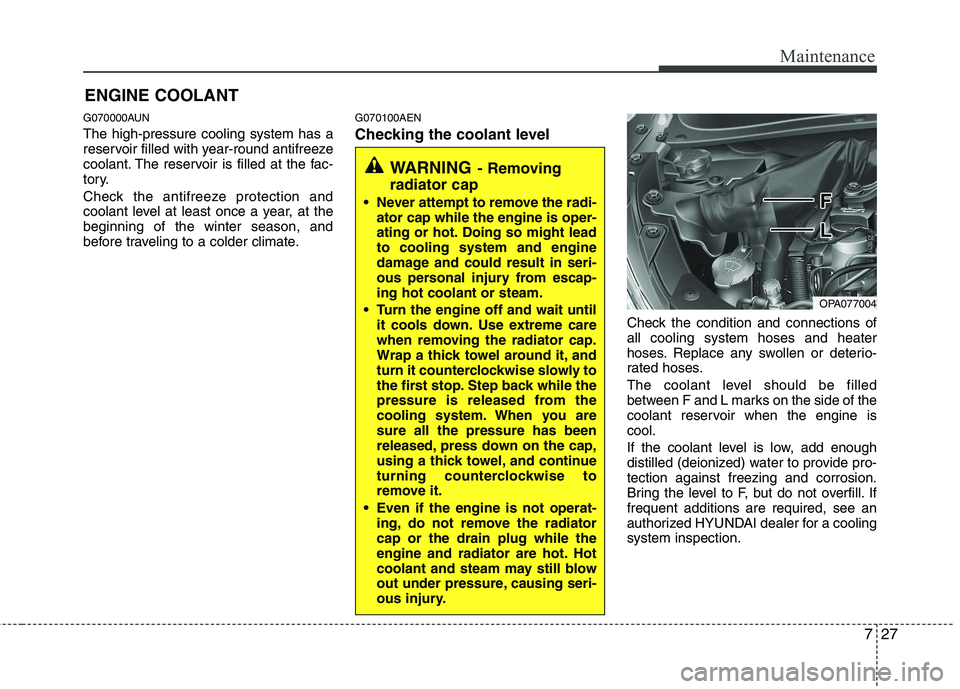
Check the condition and connections of all cooling system hoses and heater
hoses. Replace any swollen or deterio-
rated hoses.
The coolant level should be filled
between F and L marks on the side of the
coolant reservoir when the engine iscool.
If the coolant level is low, add enough
distilled (deionized) water to provide pro-tection against freezing and corrosion.
Bring the level to F, but do not overfill. Iffrequent additions are required, see an
authorized HYUNDAI dealer for a coolingsystem inspection.
WARNING- Removing
radiator cap
Never attempt to remove the radi- ator cap while the engine is oper-
ating or hot. Doing so might leadto cooling system and engine
damage and could result in seri-
ous personal injury from escap-ing hot coolant or steam.
Turn the engine off and wait until it cools down. Use extreme care
when removing the radiator cap.
Wrap a thick towel around it, and
turn it counterclockwise slowly to
the first stop. Step back while the
pressure is released from the
cooling system. When you aresure all the pressure has been
released, press down on the cap,
using a thick towel, and continue
turning counterclockwise to
remove it.
Even if the engine is not operat- ing, do not remove the radiatorcap or the drain plug while the
engine and radiator are hot. Hot
coolant and steam may still blow
out under pressure, causing seri-
ous injury.
OPA077004
Page 290 of 354
Maintenance
28
7
G070101AUN
Recommended engine coolant
Use only soft (de-mineralized) water in
the coolant mixture.
The engine in your vehicle has alu- minum engine parts and must be pro-
tected by an ethylene-glycol-based
coolant to prevent corrosion and freez-ing.
DO NOT USE alcohol or methanol coolant or mix them with the specifiedcoolant.
Do not use a solution that contains more than 60% antifreeze or less than
35% antifreeze, which would reduce
the effectiveness of the solution.
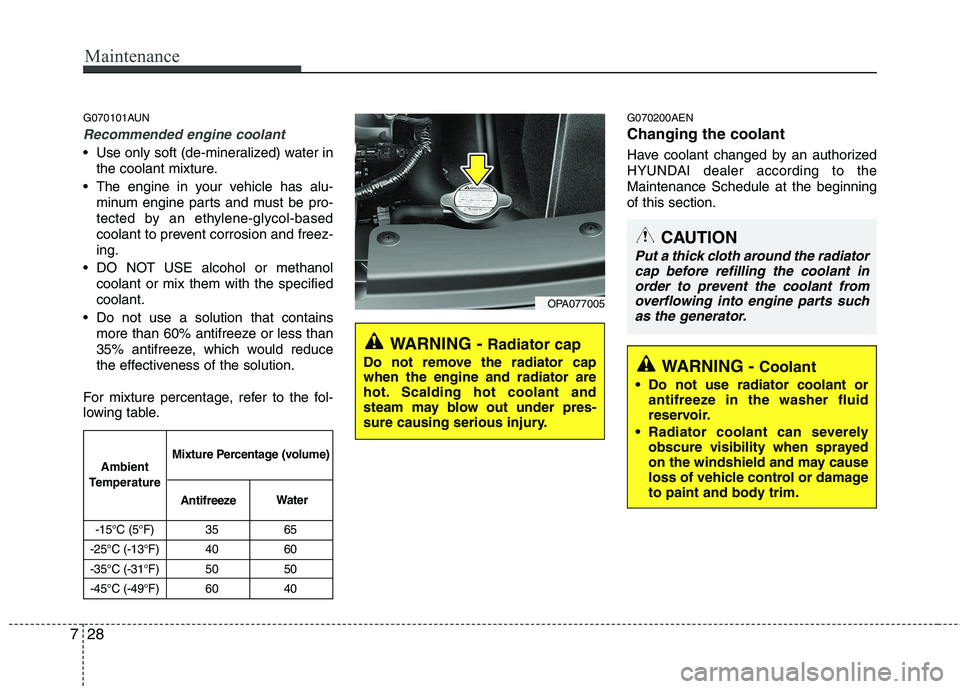
For mixture percentage, refer to the fol-
lowing table. G070200AEN Changing the coolant
Have coolant changed by an authorized
HYUNDAI dealer according to theMaintenance Schedule at the beginningof this section.
-15°C (5°F) 35 65
-25°C (-13°F) 40 60
-35°C (-31°F) 50 50
-45°C (-49°F) 60 40
Ambient
Temperature Mixture Percentage (volume)
Antifreeze Water
WARNING -
Radiator cap
Do not remove the radiator cap when the engine and radiator are
hot. Scalding hot coolant and
steam may blow out under pres-
sure causing serious injury.
OPA077005
CAUTION
Put a thick cloth around the radiator cap before refilling the coolant in order to prevent the coolant from
overflowing into engine parts suchas the generator.
WARNING - Coolant
Do not use radiator coolant or antifreeze in the washer fluid
reservoir.
Radiator coolant can severely obscure visibility when sprayed
on the windshield and may cause
loss of vehicle control or damage
to paint and body trim.
Page 291 of 354
729
Maintenance
BRAKE/CLUTCH FLUID
G080100APA
Checking the brake/clutch fluid
level
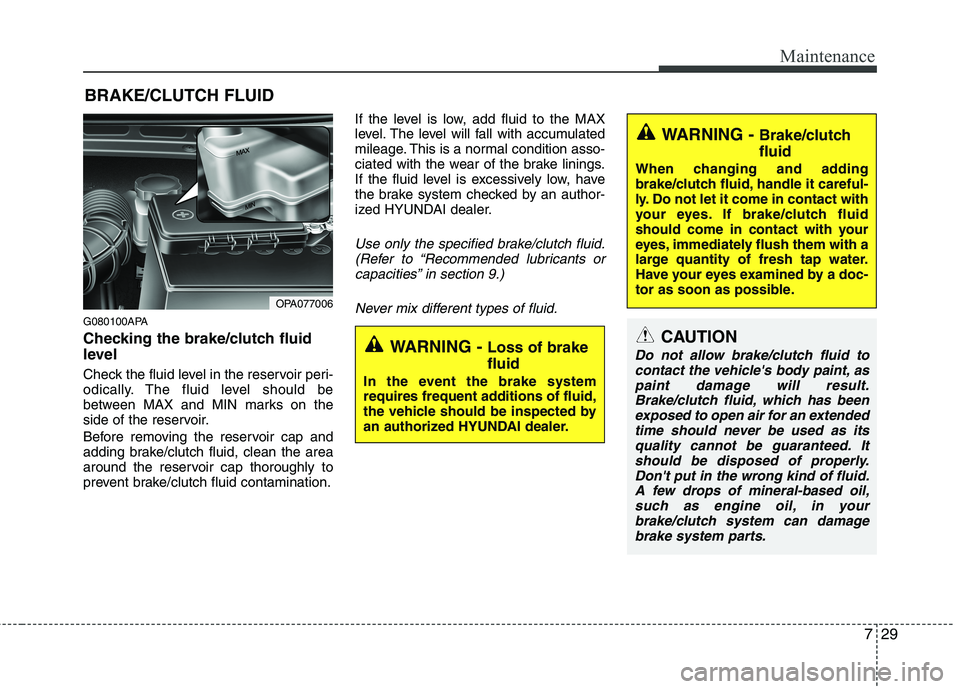
Check the fluid level in the reservoir peri-
odically. The fluid level should be
between MAX and MIN marks on the
side of the reservoir.
Before removing the reservoir cap and
adding brake/clutch fluid, clean the area
around the reservoir cap thoroughly to
prevent brake/clutch fluid contamination. If the level is low, add fluid to the MAX
level. The level will fall with accumulated
mileage. This is a normal condition asso-
ciated with the wear of the brake linings.
If the fluid level is excessively low, have
the brake system checked by an author-
ized HYUNDAI dealer.
Use only the specified brake/clutch fluid.
(Refer to “Recommended lubricants orcapacities” in section 9.)
Never mix different types of fluid.
OPA077006
WARNING - Loss of brake fluid
In the event the brake system
requires frequent additions of fluid,
the vehicle should be inspected by
an authorized HYUNDAI dealer.
WARNING - Brake/clutch fluid
When changing and adding
brake/clutch fluid, handle it careful-
ly. Do not let it come in contact with
your eyes. If brake/clutch fluid
should come in contact with your
eyes, immediately flush them with a
large quantity of fresh tap water.
Have your eyes examined by a doc-
tor as soon as possible.
CAUTION
Do not allow brake/clutch fluid to contact the vehicle's body paint, aspaint damage will result. Brake/clutch fluid, which has been exposed to open air for an extendedtime should never be used as its
quality cannot be guaranteed. Itshould be disposed of properly. Don't put in the wrong kind of fluid.A few drops of mineral-based oil,
such as engine oil, in your brake/clutch system can damagebrake system parts.
Page 292 of 354
Maintenance
30
7
AUTOMATIC TRANSAXLE FLUID (IF EQUIPPED)
G100100APA
Checking the automatic transaxle
fluid level
The automatic transaxle fluid level
should be checked regularly.
Keep the vehicle on the level ground with
the parking brake applied and check the
fluid level according to the following pro-
cedure.
1. Place the shift lever in N (Neutral) posi- tion and confirm the engine is running
at normal idle speed.
2. After the transaxle is warmed up suffi- ciently [fluid temperature 70~80°C
(158~176°F)], for example by 10 min-
utes usual driving, move the shift leverthrough all positions then place the
shift lever in N(Neutral) or P(Park)position. 3. Confirm if the fluid level is in the "HOT"
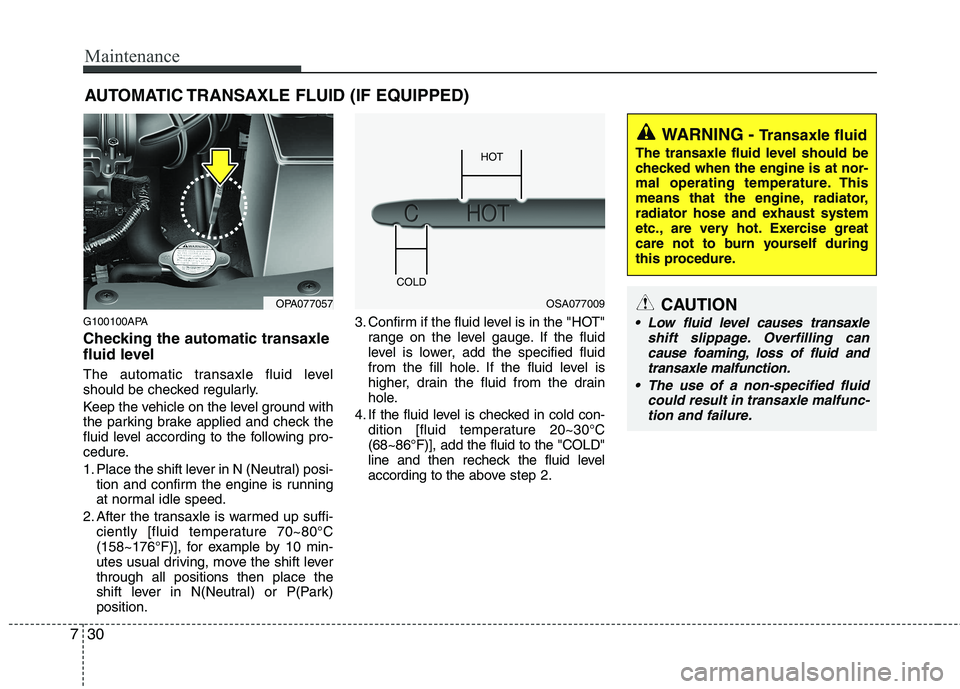
range on the level gauge. If the fluid
level is lower, add the specified fluid
from the fill hole. If the fluid level is
higher, drain the fluid from the drain
hole.
4. If the fluid level is checked in cold con- dition [fluid temperature 20~30°C(68~86°F)], add the fluid to the "COLD"
line and then recheck the fluid level
according to the above step 2.
OPA077057OSA077009
HOT
COLD
WARNING - Transaxle fluid
The transaxle fluid level should be
checked when the engine is at nor-
mal operating temperature. This
means that the engine, radiator,
radiator hose and exhaust system
etc., are very hot. Exercise great
care not to burn yourself during
this procedure.
CAUTION
Low fluid level causes transaxle shift slippage. Overfilling cancause foaming, loss of fluid andtransaxle malfunction.
The use of a non-specified fluid could result in transaxle malfunc-
tion and failure.
Page 293 of 354
731
Maintenance
✽✽NOTICE
“COLD” range is for reference only and
should NOT be used to determine
transaxle fluid level.
✽
✽ NOTICE
New automatic transaxle fluid should be
red. The red dye is added so the assem-
bly plant can identify it as automatic
transaxle fluid and distinguish it from
engine oil or antifreeze. The red dye,
which is not an indicator of fluid quali-
ty, is not permanent. As the vehicle is
driven, the automatic transaxle fluid
will begin to look darker. The color may
eventually appear light brown.
Therefore, have an authorized
HYUNDAI dealer change the automatic
transaxle fluid according to the
Scheduled Maintenance at the begin-
ning of this section.
Use only the specified automatic
transaxle fluid. (Refer to "Recommended
lubricants or capacities" in section 9.) G100200APA Changing the automatic transaxle fluid
Have automatic transaxle fluid changed
by an authorized HYUNDAI dealeraccording to the Maintenance Scheduleat the beginning of this section.
WARNING
- Parking brake
To avoid sudden movement of the
vehicle, apply parking brake and
depress the brake pedal before
moving the shift lever.
Page 296 of 354
Maintenance
34
7
Replace the filter according to the
Maintenance Schedule.
If the vehicle is operated in extremely
dusty or sandy areas, replace the ele-ment more often than the usual recom-
mended intervals. (Refer to“Maintenance under severe usage condi-tions” in this section.)
CAUTION
Do not drive with the air cleaner removed; this will result in exces-sive engine wear.
When removing the air cleaner fil- ter, be careful that dust or dirtdoes not enter the air intake, or damage may result.
Use a HYUNDAI genuine part. Use of non-genuine parts could dam-age the air flow sensor or tur-bocharger (diesel engine only).
Page 302 of 354
Maintenance
40
7
G190200AUN
Battery recharging
Your vehicle has a maintenance-free,
calcium-based battery.
If the battery becomes discharged in a
short time (because, for example, the
headlights or interior lights were left on
while the vehicle was not in use),
recharge it by slow charging (trickle)
for 10 hours.
If the battery gradually discharges because of high electric load while the
vehicle is being used, recharge it at 20-
30A for two hours. G190300APA Reset items
Items should be reset after the battery
has been discharged or the battery hasbeen disconnected.
Sunroof (See section 4)
Digital clock (See section 4)
Audio (See section 4)
(Continued)
The electrical ignition system
works with high voltage. Never
touch these components with theengine running or the ignition
switched on.
Failure to follow the above warn-
ings can result in serious bodily
injury or death.(Continued)
Before performing maintenance or recharging the battery, turn off all accessories and stop the
engine.
The negative battery cable must be removed first and installed
last when the battery is discon-nected.WARNING - Recharging
battery
When recharging the battery,
observe the following precautions:
The battery must be removed from the vehicle and placed in an area with good ventilation.
Do not allow cigarettes, sparks, or flame near the battery.
Watch the battery during charg- ing, and stop or reduce the charg-
ing rate if the battery cells begin
gassing (boiling) violently or if
the temperature of the electrolyte
of any cell exceeds 49°C (120°F).
Wear eye protection when check- ing the battery during charging.
Disconnect the battery charger in the following order.
1. Turn off the battery charger main switch.
2. Unhook the negative clamp from the negative battery terminal.
3. Unhook the positive clamp from the positive battery terminal.
(Continued)
Page 313 of 354
751
Maintenance
FUSES
G210000APA
A vehicle’s electrical system is protected
from electrical overload damage by
fuses. This vehicle has 2 (or 3) fuse panels, one
located in the driver’s side panel bolster,
the other(s) in the engine compartment.
If any of your vehicle’s lights, acces-
sories, or controls do not work, check the
appropriate circuit fuse. If a fuse has
blown, the element inside the fuse will bemelted.
If the electrical system does not work,
first check the driver’s side fuse panel.
Always replace a blown fuse with one of
the same rating.
If the replacement fuse blows, this indi-
cates an electrical problem. Avoid using
the system involved and immediately
consult an authorized HYUNDAI dealer.
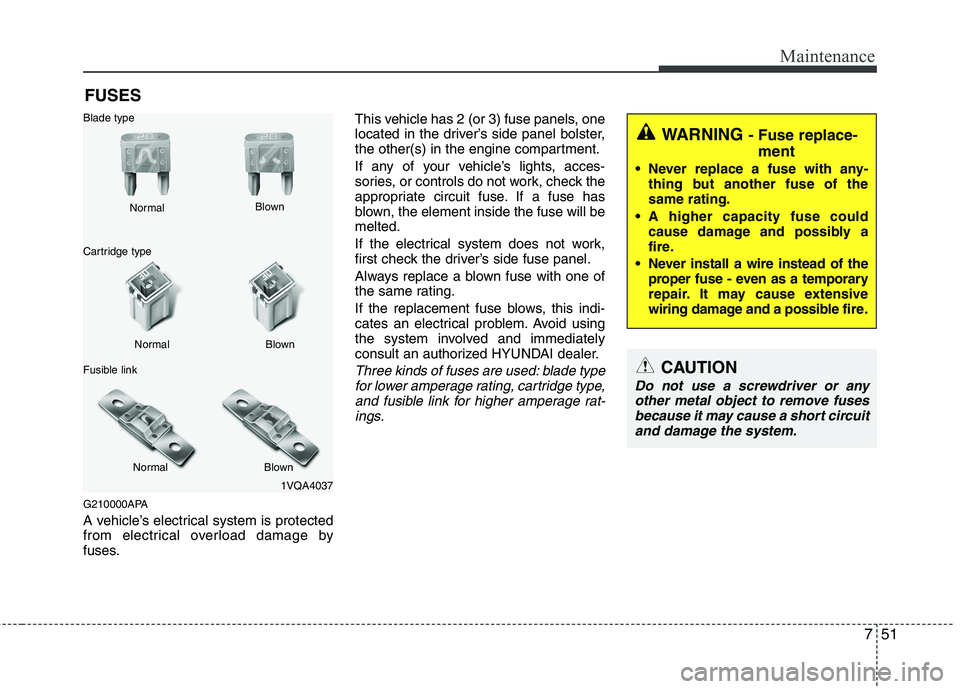
Three kinds of fuses are used: blade type
for lower amperage rating, cartridge type,
and fusible link for higher amperage rat- ings.
1VQA4037
Normal
Normal
Blade type
Cartridge type
Fusible link Blown
Blown
Normal Blown
WARNING - Fuse replace-
ment
Never replace a fuse with any- thing but another fuse of the same rating.
A higher capacity fuse could cause damage and possibly a
fire.
Never install a wire instead of the proper fuse - even as a temporary
repair. It may cause extensive
wiring damage and a possible fire.
CAUTION
Do not use a screwdriver or any
other metal object to remove fuses because it may cause a short circuitand damage the system.