Brake HYUNDAI I10 2012 Repair Manual
[x] Cancel search | Manufacturer: HYUNDAI, Model Year: 2012, Model line: I10, Model: HYUNDAI I10 2012Pages: 354, PDF Size: 37.04 MB
Page 246 of 354
What to do in an emergency
8
6
F070200APA
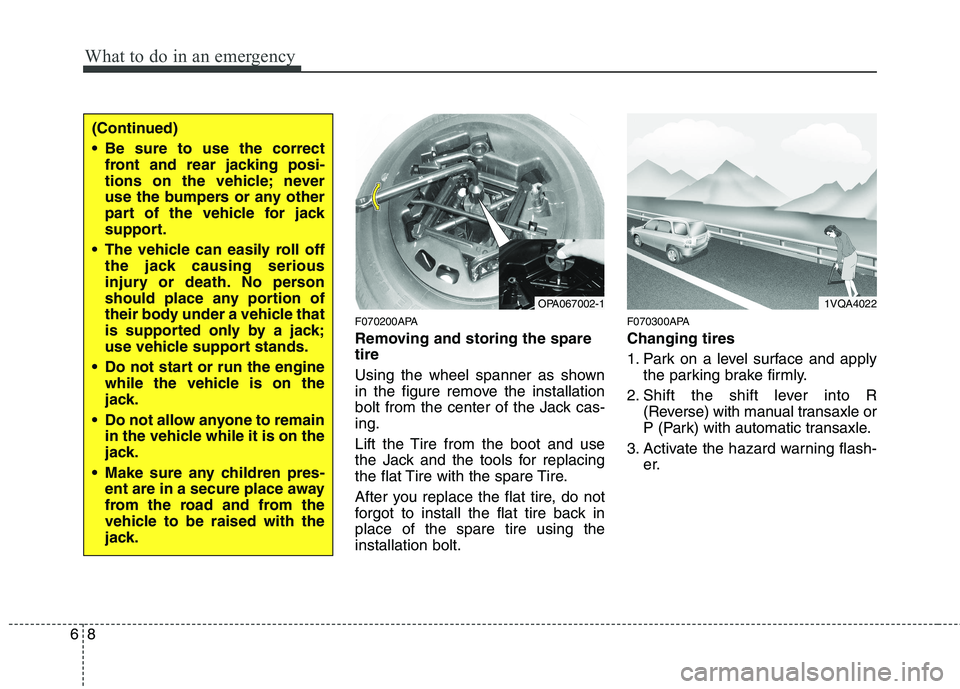
Removing and storing the spare tire
Using the wheel spanner as shown
in the figure remove the installation
bolt from the center of the Jack cas-ing.
Lift the Tire from the boot and use
the Jack and the tools for replacing
the flat Tire with the spare Tire.
After you replace the flat tire, do not
forgot to install the flat tire back inplace of the spare tire using theinstallation bolt. F070300APA Changing tires
1. Park on a level surface and apply
the parking brake firmly.
2. Shift the shift lever into R (Reverse) with manual transaxle or
P (Park) with automatic transaxle.
3. Activate the hazard warning flash- er.
OPA067002-1
(Continued)
Be sure to use the correctfront and rear jacking posi-
tions on the vehicle; never
use the bumpers or any other
part of the vehicle for jack
support.
The vehicle can easily roll off the jack causing serious
injury or death. No person
should place any portion of
their body under a vehicle that
is supported only by a jack;
use vehicle support stands.
Do not start or run the engine while the vehicle is on the
jack.
Do not allow anyone to remain in the vehicle while it is on the
jack.
Make sure any children pres- ent are in a secure place away
from the road and from the
vehicle to be raised with the
jack.
1VQA4022
Page 247 of 354
69
What to do in an emergency
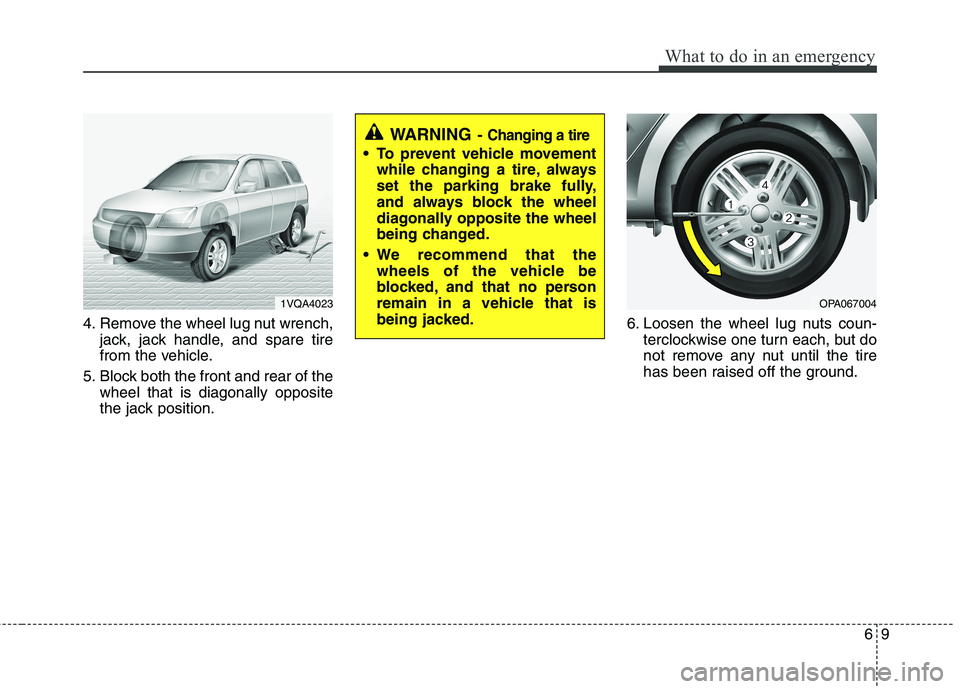
4. Remove the wheel lug nut wrench,jack, jack handle, and spare tire
from the vehicle.
5. Block both the front and rear of the wheel that is diagonally opposite
the jack position. 6. Loosen the wheel lug nuts coun-
terclockwise one turn each, but do
not remove any nut until the tire
has been raised off the ground.
1VQA4023OPA067004
WARNING - Changing a tire
To prevent vehicle movement
while changing a tire, always
set the parking brake fully,
and always block the wheel
diagonally opposite the wheel
being changed.
We recommend that the wheels of the vehicle be
blocked, and that no person
remain in a vehicle that is
being jacked.
Page 257 of 354
619
What to do in an emergency
Notes on the safe use of the TireMobilityKit
Park your car at the side of theroad so that you can work with the
TireMobilityKit away from moving
traffic. Place your warning triangle
in a prominent place to make pass-
ing vehicles aware of your location.
To be sure your vehicle won't move, even when you're on fairly
level ground, always set your park-
ing brake.
Only use the TireMobilityKit for sealing/inflation passenger car
tires. Do not use on motorcycles,
bicycles or any other type of tires.
Do not remove any foreign objects- such as nails or screws -that have
penetrated the tire.
Before using the TireMobilityKit, read the precautionary advice
printed on the sealant bottle!
Provided the car is outdoors, leave the engine running. Otherwise
operating the compressor may
eventually drain the car battery. Never leave the TireMobilityKit
unattended while it is being used.
Do not leave the compressor run- ning for more than 10 min. at a time
or it may overheat.
Do not use the TireMobilityKit if the ambient temperature is below -30°C (-22°F).
Do not use the sealing compound after its expiration date which can
be found on the label of the bottle.
Keep away from children. Technical Data
System voltage: DC 12 V
Working voltage: DC 10 - 15 V
Amperage rating: max. 15 A
Suitable for use at temperatures:
-30 ~ +70°C (-22 ~ +158°F)
Max. working pressure: 6 bar (87 psi)
Size
Compressor: 170 x 150 x 60 mm (6.7 x 5.9 x 2.4 in.)
Sealant bottle: 85 x 77 ø mm (3.3 x 3.0 ø in.)
Compressor weight: 0.8 kg (1.8 lbs)
Sealant volume: 200 ml (12.2 cu. in.)
❈ Sealing compound and spare
parts can be obtained and
replaced at an authorized vehicle
or tire dealer. Empty sealing com-
pound bottles may be disposed of
at home. Liquid residue from thesealing compound should be dis-
posed of by your vehicle or tiredealer or in accordance with local
waste disposal regulations.
Page 259 of 354
621
What to do in an emergency
When towing your vehicle in an emer- gency without wheel dollies :
1. Set the ignition switch in the ACC posi-tion.
2. Place the transaxle shift lever in N (Neutral).
3. Release the parking brake.
F080200APA
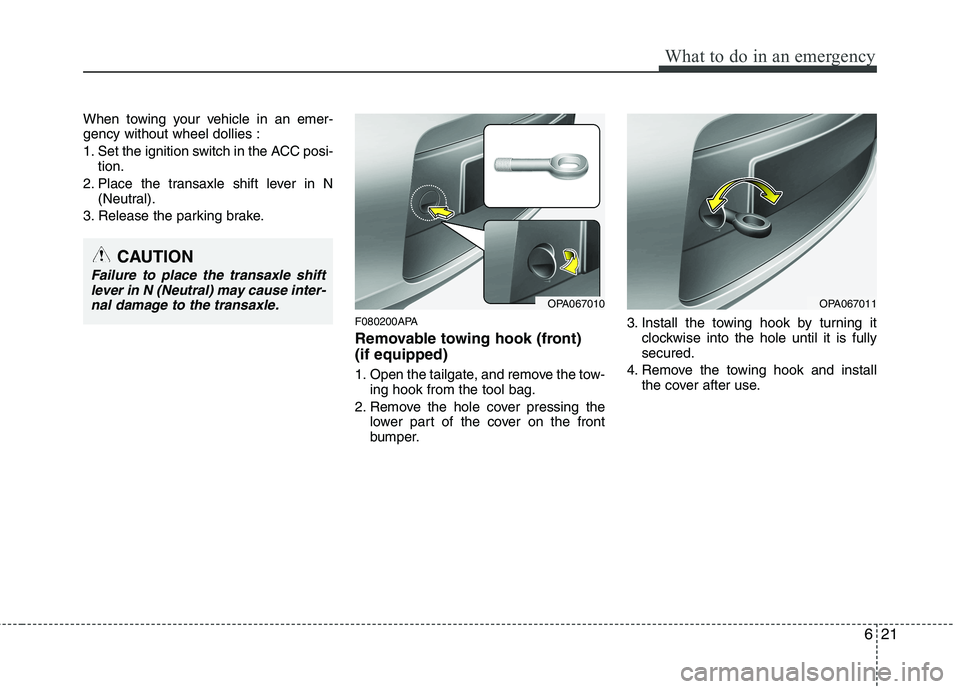
Removable towing hook (front) (if equipped)
1. Open the tailgate, and remove the tow-ing hook from the tool bag.
2. Remove the hole cover pressing the lower part of the cover on the front
bumper. 3. Install the towing hook by turning it
clockwise into the hole until it is fullysecured.
4. Remove the towing hook and install the cover after use.
CAUTION
Failure to place the transaxle shift
lever in N (Neutral) may cause inter-nal damage to the transaxle.
OPA067010OPA067011
Page 260 of 354
What to do in an emergency
22
6
F080300AEN
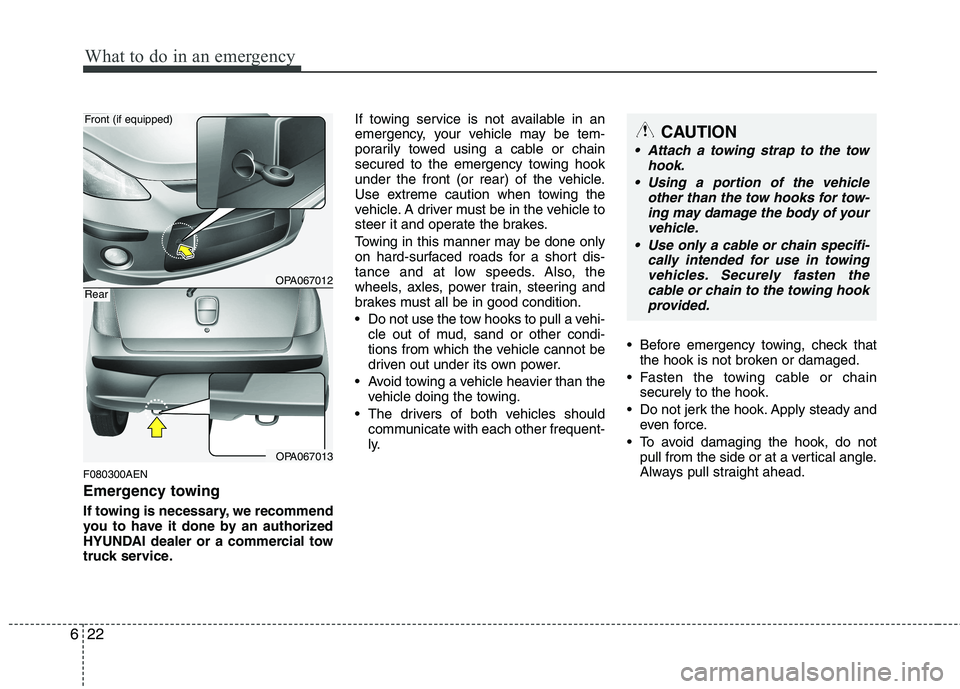
Emergency towing
If towing is necessary, we recommend
you to have it done by an authorized
HYUNDAI dealer or a commercial tow
truck service. If towing service is not available in an
emergency, your vehicle may be tem-
porarily towed using a cable or chain
secured to the emergency towing hook
under the front (or rear) of the vehicle.
Use extreme caution when towing the
vehicle. A driver must be in the vehicle to
steer it and operate the brakes.
Towing in this manner may be done only
on hard-surfaced roads for a short dis-
tance and at low speeds. Also, the
wheels, axles, power train, steering and
brakes must all be in good condition.
Do not use the tow hooks to pull a vehi-
cle out of mud, sand or other condi-
tions from which the vehicle cannot be
driven out under its own power.
Avoid towing a vehicle heavier than the vehicle doing the towing.
The drivers of both vehicles should communicate with each other frequent-
ly. Before emergency towing, check that
the hook is not broken or damaged.
Fasten the towing cable or chain securely to the hook.
Do not jerk the hook. Apply steady and even force.
To avoid damaging the hook, do not pull from the side or at a vertical angle.
Always pull straight ahead.
OPA067012
OPA067013
Front (if equipped)
Rear
CAUTION
Attach a towing strap to the tow
hook.
Using a portion of the vehicle other than the tow hooks for tow-ing may damage the body of yourvehicle.
Use only a cable or chain specifi- cally intended for use in towingvehicles. Securely fasten thecable or chain to the towing hookprovided.
Page 261 of 354
623
What to do in an emergency
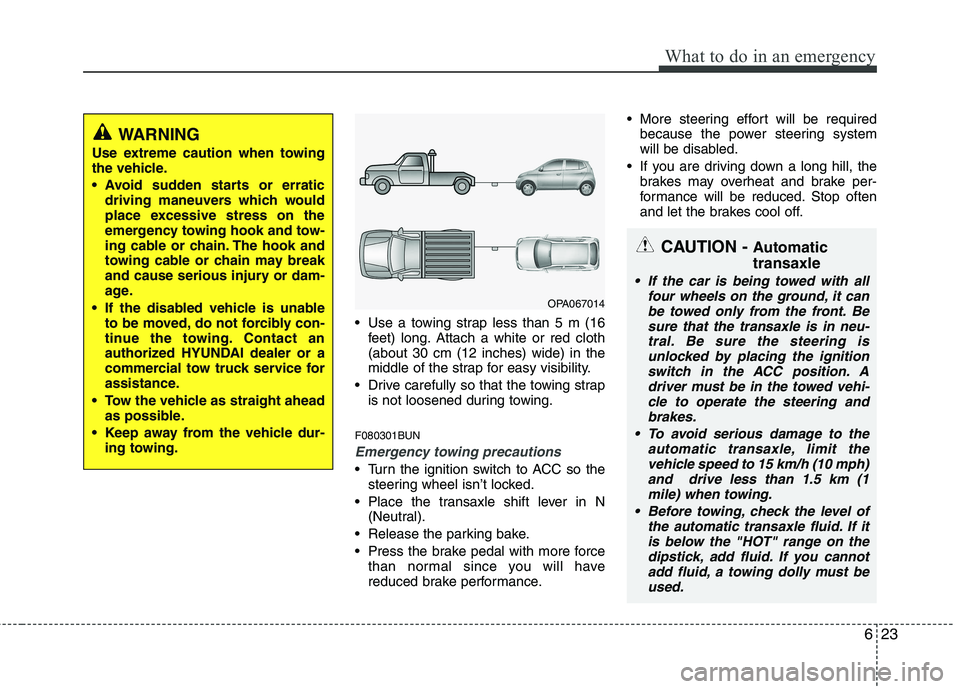
Use a towing strap less than 5 m (16feet) long. Attach a white or red cloth (about 30 cm (12 inches) wide) in the
middle of the strap for easy visibility.
Drive carefully so that the towing strap is not loosened during towing.
F080301BUN
Emergency towing precautions
Turn the ignition switch to ACC so the steering wheel isn’t locked.
Place the transaxle shift lever in N (Neutral).
Release the parking bake.
Press the brake pedal with more force than normal since you will have
reduced brake performance. More steering effort will be required
because the power steering system
will be disabled.
If you are driving down a long hill, the brakes may overheat and brake per-
formance will be reduced. Stop often
and let the brakes cool off.
WARNING
Use extreme caution when towing
the vehicle.
driving maneuvers which would
place excessive stress on the
emergency towing hook and tow-
ing cable or chain. The hook and
towing cable or chain may break
and cause serious injury or dam-
age.
If the disabled vehicle is unable to be moved, do not forcibly con-
tinue the towing. Contact an
authorized HYUNDAI dealer or a
commercial tow truck service for
assistance.
Tow the vehicle as straight ahead as possible.
Keep away from the vehicle dur- ing towing.
OPA067014
CAUTION - Automatic transaxle
If the car is being towed with all
four wheels on the ground, it can
be towed only from the front. Be sure that the transaxle is in neu-tral. Be sure the steering is unlocked by placing the ignition
switch in the ACC position. A driver must be in the towed vehi-cle to operate the steering and brakes.
To avoid serious damage to the automatic transaxle, limit thevehicle speed to 15 km/h (10 mph)and drive less than 1.5 km (1 mile) when towing.
Before towing, check the level of the automatic transaxle fluid. If itis below the "HOT" range on the dipstick, add fluid. If you cannot
add fluid, a towing dolly must be used.
Page 263 of 354
7
Engine compartment ............................................ 7-2
Maintenance services ............................................ 7-5
Owner maintenance .............................................. 7-7
Scheduled maintenance service ........................... 7-9
Explanation of scheduled maintenance items .. 7-22
Engine oil ............................................................. 7-25
Engine coolant ..................................................... 7-27
Brakes/clutch fluid ............................................. 7-29
Automatic transaxle fluid .................................. 7-30
Washer fluid ........................................................ 7-32
Parking brake .................................................... 7-32
Air cleaner ........................................................... 7-33
Climate control air filter .................................... 7-35
Wiper blades ....................................................... 7-36
Battery ................................................................. 7-39
Tires and wheels ................................................. 7-41
Fuses ..................................................................... 7-51
Light bulbs .......................................................... 7-63
Appearance care ................................................. 7-71
Emission control system ..................................... 7-78
Maintenance
Page 264 of 354
Maintenance
2
7
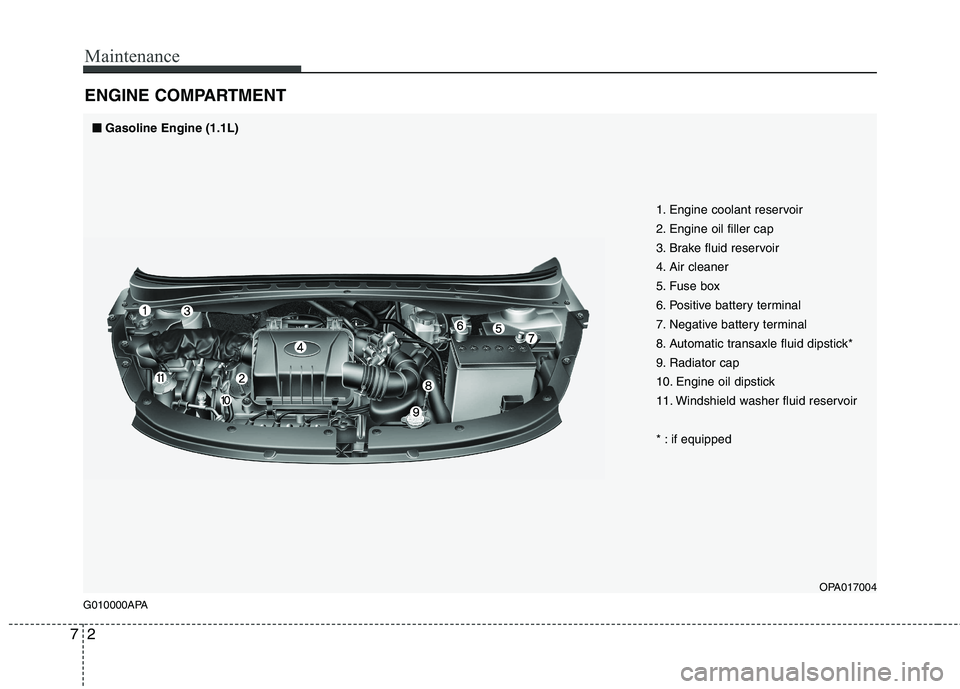
ENGINE COMPARTMENT
G010000APA
OPA017004
1. Engine coolant reservoir
2. Engine oil filler cap
3. Brake fluid reservoir
4. Air cleaner
5. Fuse box
6. Positive battery terminal
7. Negative battery terminal
8. Automatic transaxle fluid dipstick*
9. Radiator cap
10. Engine oil dipstick
11. Windshield washer fluid reservoir
* : if equipped
■
■
Gasoline Engine (1.1L)
Page 265 of 354
73
Maintenance
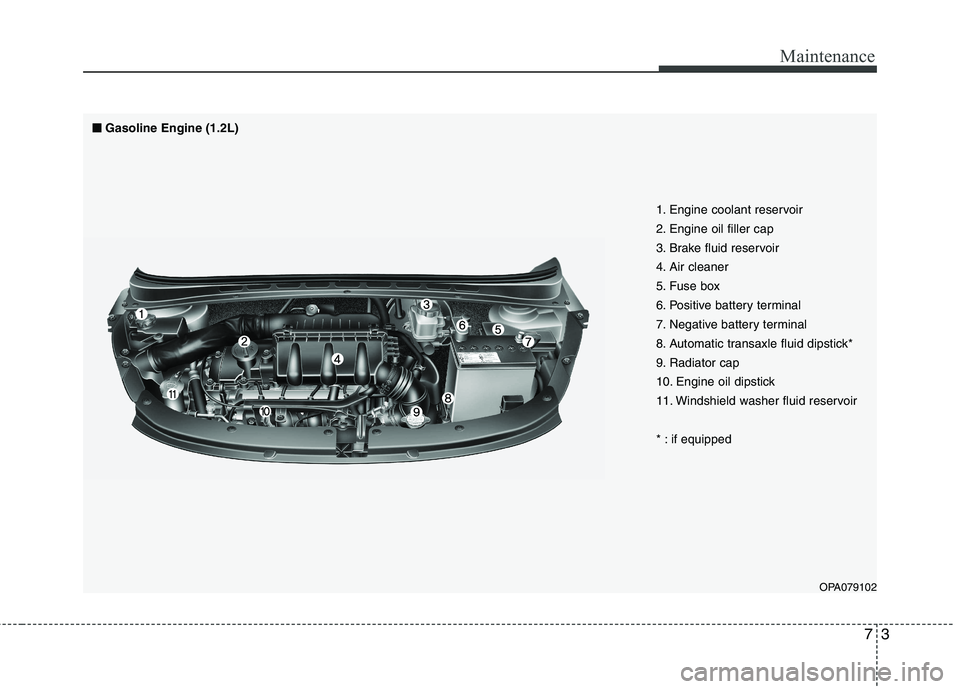
OPA079102
1. Engine coolant reservoir
2. Engine oil filler cap
3. Brake fluid reservoir
4. Air cleaner
5. Fuse box
6. Positive battery terminal
7. Negative battery terminal
8. Automatic transaxle fluid dipstick*
9. Radiator cap
10. Engine oil dipstick
11. Windshield washer fluid reservoir
* : if equipped
■
■
Gasoline Engine (1.2L)
Page 266 of 354
Maintenance
4
7
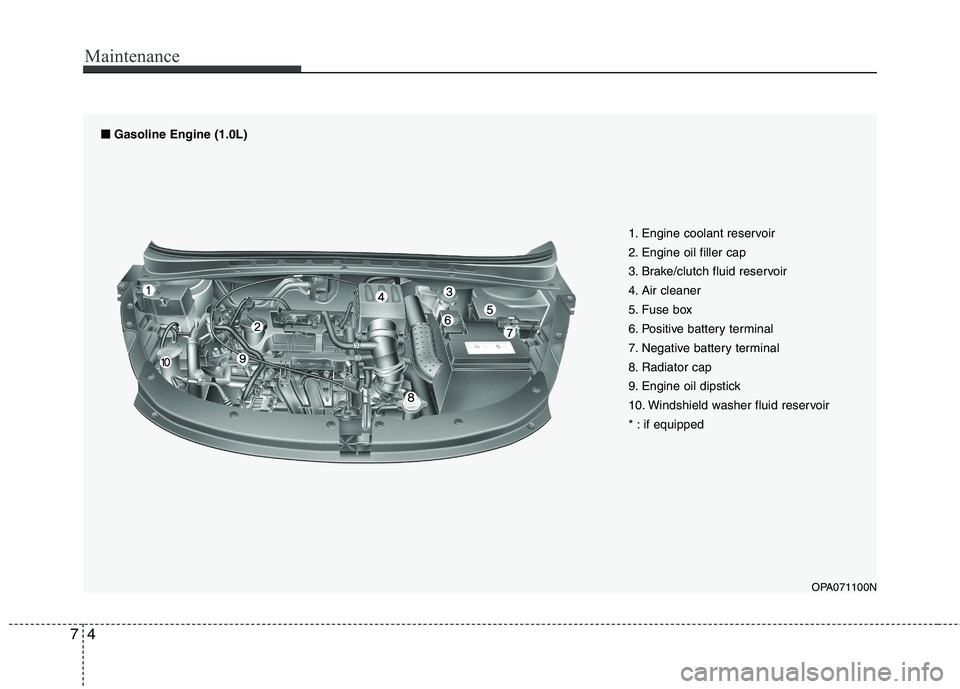
1. Engine coolant reservoir
2. Engine oil filler cap
3. Brake/clutch fluid reservoir
4. Air cleaner
5. Fuse box
6. Positive battery terminal
7. Negative battery terminal
8. Radiator cap
9. Engine oil dipstick
10. Windshield washer fluid reservoir
* : if equipped
■
■
Gasoline Engine (1.0L)
OPA071100N