door HYUNDAI I10 2016 Owners Manual
[x] Cancel search | Manufacturer: HYUNDAI, Model Year: 2016, Model line: I10, Model: HYUNDAI I10 2016Pages: 343, PDF Size: 9.14 MB
Page 12 of 343
Your vehicle at a glance
2 2
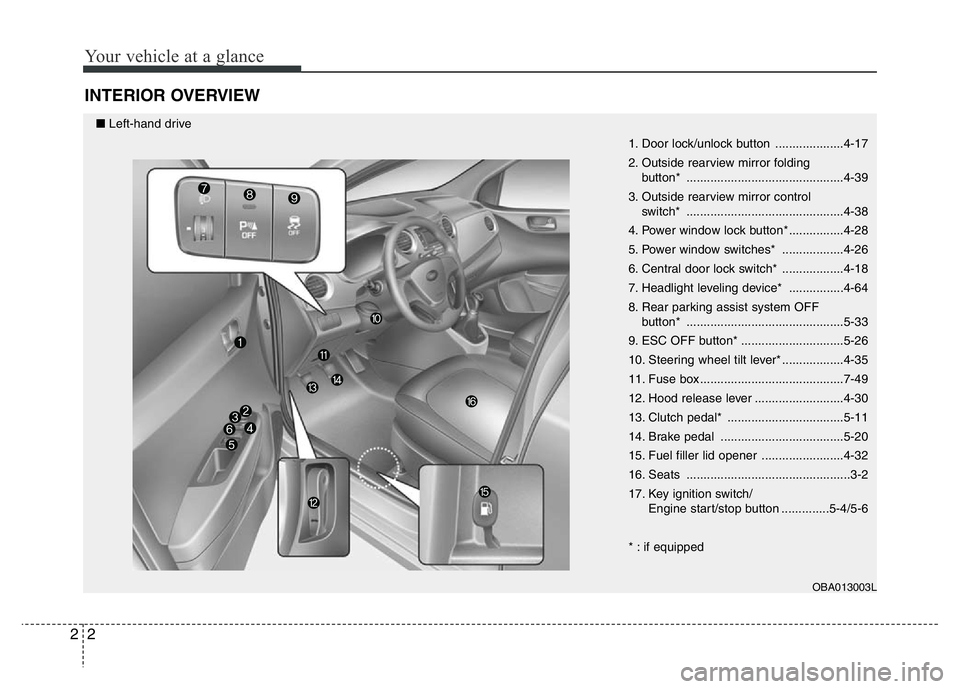
INTERIOR OVERVIEW
1. Door lock/unlock button ....................4-17
2. Outside rearview mirror folding
button* ..............................................4-39
3. Outside rearview mirror control
switch* ..............................................4-38
4. Power window lock button* ................4-28
5. Power window switches* ..................4-26
6. Central door lock switch* ..................4-18
7. Headlight leveling device* ................4-64
8. Rear parking assist system OFF
button* ..............................................5-33
9. ESC OFF button* ..............................5-26
10. Steering wheel tilt lever* ..................4-35
11. Fuse box ..........................................7-49
12. Hood release lever ..........................4-30
13. Clutch pedal* ..................................5-11
14. Brake pedal ....................................5-20
15. Fuel filler lid opener ........................4-32
16. Seats ................................................3-2
17. Key ignition switch/
Engine start/stop button ..............5-4/5-6
* : if equipped
OBA013003L
■Left-hand drive
Page 13 of 343
23
Your vehicle at a glance
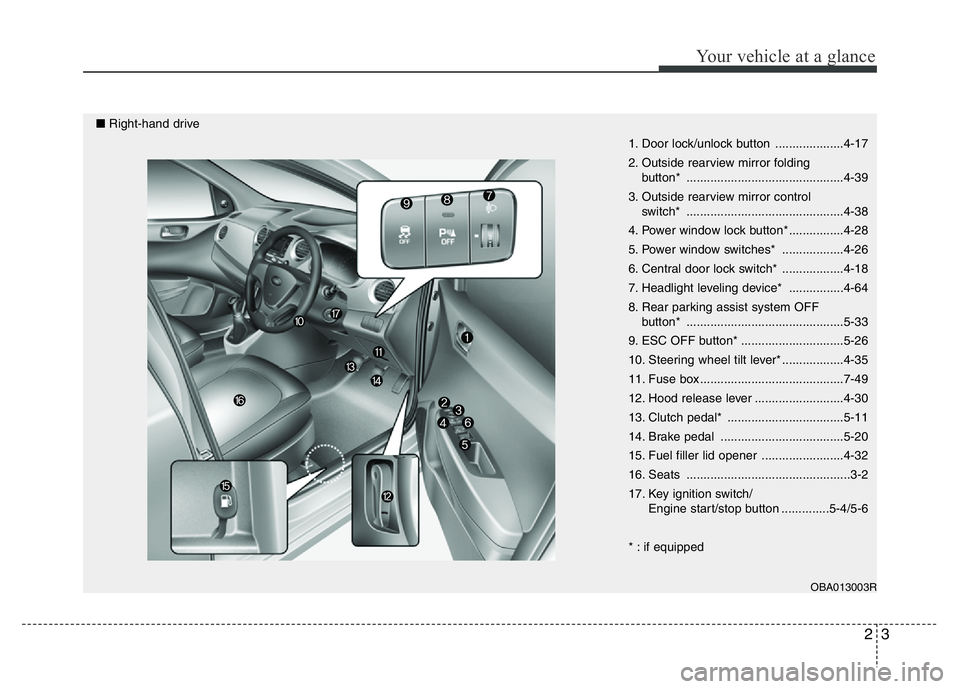
1. Door lock/unlock button ....................4-17
2. Outside rearview mirror folding
button* ..............................................4-39
3. Outside rearview mirror control
switch* ..............................................4-38
4. Power window lock button* ................4-28
5. Power window switches* ..................4-26
6. Central door lock switch* ..................4-18
7. Headlight leveling device* ................4-64
8. Rear parking assist system OFF
button* ..............................................5-33
9. ESC OFF button* ..............................5-26
10. Steering wheel tilt lever* ..................4-35
11. Fuse box ..........................................7-49
12. Hood release lever ..........................4-30
13. Clutch pedal* ..................................5-11
14. Brake pedal ....................................5-20
15. Fuel filler lid opener ........................4-32
16. Seats ................................................3-2
17. Key ignition switch/
Engine start/stop button ..............5-4/5-6
* : if equipped
OBA013003R
■Right-hand drive
Page 29 of 343
313
Safety system of your vehicle
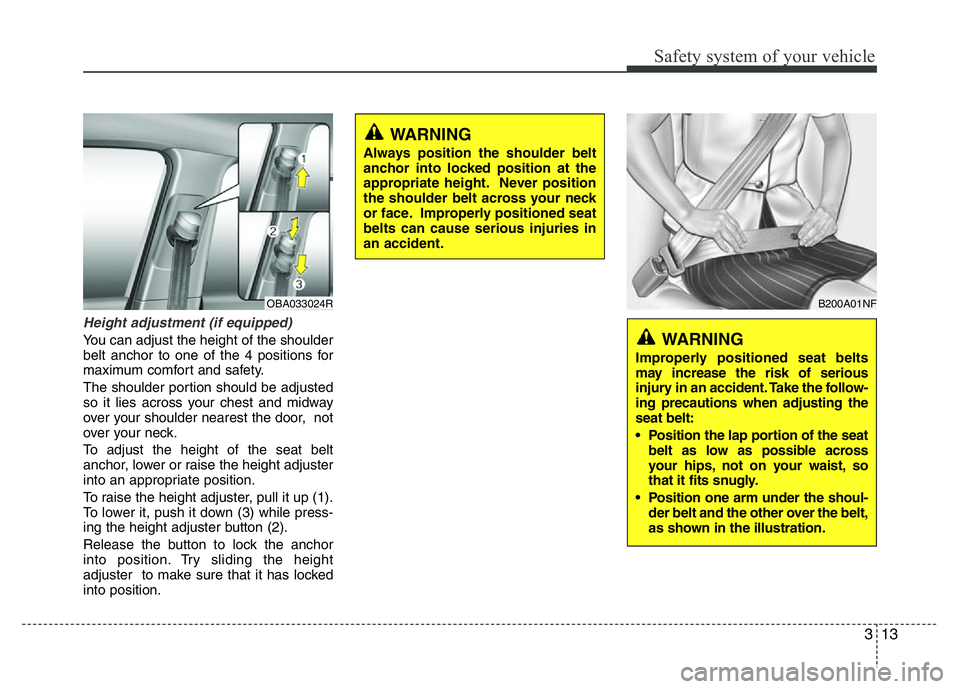
Height adjustment (if equipped)
You can adjust the height of the shoulder
belt anchor to one of the 4 positions for
maximum comfort and safety.
The shoulder portion should be adjusted
so it lies across your chest and midway
over your shoulder nearest the door, not
over your neck.
To adjust the height of the seat belt
anchor, lower or raise the height adjuster
into an appropriate position.
To raise the height adjuster, pull it up (1).
To lower it, push it down (3) while press-
ing the height adjuster button (2).
Release the button to lock the anchor
into position. Try sliding the height
adjuster to make sure that it has locked
into position.
WARNING
Always position the shoulder belt
anchor into locked position at the
appropriate height. Never position
the shoulder belt across your neck
or face. Improperly positioned seat
belts can cause serious injuries in
an accident.
B200A01NF
WARNING
Improperly positioned seat belts
may increase the risk of serious
injury in an accident. Take the follow-
ing precautions when adjusting the
seat belt:
• Position the lap portion of the seat
belt as low as possible across
your hips, not on your waist, so
that it fits snugly.
• Position one arm under the shoul-
der belt and the other over the belt,
as shown in the illustration.
OBA033024R
Page 36 of 343
Safety system of your vehicle
20 3
Care of seat belts
Seat belt systems should never be disas-
sembled or modified. In addition, care
should be taken to assure that seat belts
and belt hardware are not damaged by
seat hinges, doors or other abuse.
Periodic inspection
All seat belts should be inspected peri-
odically for wear or damage of any kind.
Any damaged parts should be replaced
as soon as possible.
Keep belts clean and dry
Seat belts should be kept clean and dry.
If belts become dirty, they can be
cleaned by using a mild soap solution
and warm water. Bleach, dye, strong
detergents or abrasives should not be
used because they may damage and
weaken the fabric.
When to replace seat belts
The entire seat belt assembly or assem-
blies should be replaced if the vehicle
has been involved in an accident. This
should be done even if no damage is vis-
ible. We recommend that you consult an
authorized HYUNDAI dealer.
Page 45 of 343
329
Safety system of your vehicle
The front air bags are designed to sup-
plement the three-point seat belts. For
these air bags to provide protection, the
seat belts must be worn at all times when
driving.
You can be severely injured or killed in an
accident if you are not wearing a seat
belt. Air bags are designed to supple-
ment seat belts, but do not replace them.
Also, air bags are not designed to deploy
in every collision. In some accidents, the
seat belts are the only restraint protect-
ing you.
WARNING- AIR BAG SAFETY PRECAUTIONS
• ALWAYS use seat belts and child restraints - every trip, every time, every-
one! Even with air bags, you can be seriously injured or killed in a collision
if you are improperly belted or not wearing your seat belt when the air bag
inflates.
• NEVER place a child in any child restraint or booster seat in the front pas-
senger seat. An inflating air bag could forcefully strike the infant or child
causing serious or fatal injuries.
• ABC - Always Buckle Children under age 13 in the back seat. It is the safest
place for children of any age to ride. If a child age 13 or older must be seat-
ed in the front seat, he or she must be properly belted and the seat should
be moved as far back as possible.
• All occupants should sit upright with the seatback in an upright position,
centered on the seat cushion with their seat belt on, legs comfortably
extended and their feet on the floor until the vehicle is parked and the
engine is turned off. If an occupant is out of position during an accident,
the rapidly deploying air bag may forcefully contact the occupant causing
serious or fatal injuries.
• You and your passengers should never sit or lean unnecessarily close to
the air bags or lean against the door or center console.
Move your seat as far back as possible from front air bags, while still main-
taining control of the vehicle. It is recommended that drivers allow at least
25 cm (10 inches) between the center of the steering wheel and the chest.
Page 46 of 343
Safety system of your vehicle
30 3
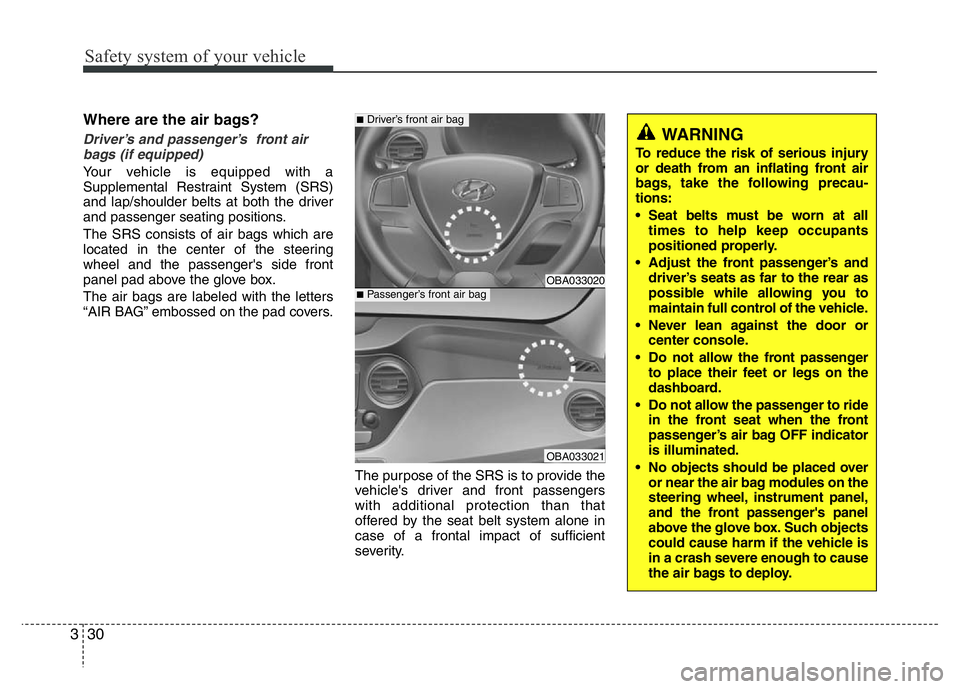
Where are the air bags?
Driver’s and passenger’s front air
bags (if equipped)
Your vehicle is equipped with a
Supplemental Restraint System (SRS)
and lap/shoulder belts at both the driver
and passenger seating positions.
The SRS consists of air bags which are
located in the center of the steering
wheel and the passenger's side front
panel pad above the glove box.
The air bags are labeled with the letters
“AIR BAG” embossed on the pad covers.
The purpose of the SRS is to provide the
vehicle's driver and front passengers
with additional protection than that
offered by the seat belt system alone in
case of a frontal impact of sufficient
severity.
WARNING
To reduce the risk of serious injury
or death from an inflating front air
bags, take the following precau-
tions:
• Seat belts must be worn at all
times to help keep occupants
positioned properly.
• Adjust the front passenger’s and
driver’s seats as far to the rear as
possible while allowing you to
maintain full control of the vehicle.
• Never lean against the door or
center console.
• Do not allow the front passenger
to place their feet or legs on the
dashboard.
• Do not allow the passenger to ride
in the front seat when the front
passenger’s air bag OFF indicator
is illuminated.
• No objects should be placed over
or near the air bag modules on the
steering wheel, instrument panel,
and the front passenger's panel
above the glove box. Such objects
could cause harm if the vehicle is
in a crash severe enough to cause
the air bags to deploy.
OBA033020
OBA033021
■Driver’s front air bag
■Passenger’s front air bag
Page 51 of 343
335
Safety system of your vehicle
What to expect after an air bag
inflates
After a frontal or side impact air bag
inflates, it will deflate very quickly. Air bag
inflation will not prevent the driver from see-
ing out of the windshield or being able to
steer. Curtain air bags may remain partially
inflated for some time after they deploy.
Noise and smoke from inflating air
bag
When the air bags inflate, they make a
loud noise and they leave smoke and
powder in the air inside of the vehicle.
This is normal and is a result of the igni-
tion of the air bag inflator. After the air
bag inflates, you may feel substantial dis-
comfort in breathing because of the con-
tact of your chest with both the seat belt
and the air bag, as well as from breathing
the smoke and powder. The powder may
aggravate asthma for some people. If you
experience breathing problems after an
air bag deployment, seek medical atten-
tion immediately.
Though the smoke and powder are non-
toxic, they may cause irritation to the
skin, eyes, nose, throat, etc. If this is the
case, wash and rinse with cold water
immediately and seek medical attention
if the symptoms persist.
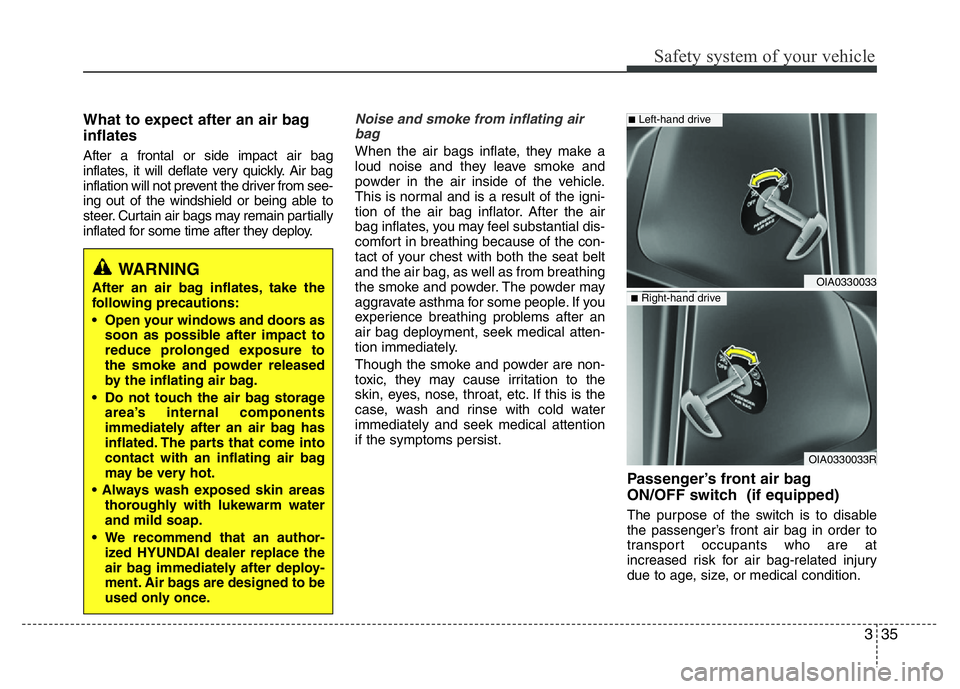
Passenger’s front air bag
ON/OFF switch (if equipped)
The purpose of the switch is to disable
the passenger’s front air bag in order to
transport occupants who are at
increased risk for air bag-related injury
due to age, size, or medical condition.
WARNING
After an air bag inflates, take the
following precautions:
• Open your windows and doors as
soon as possible after impact to
reduce prolonged exposure to
the smoke and powder released
by the inflating air bag.
• Do not touch the air bag storage
area’s internal components
immediately after an air bag has
inflated. The parts that come into
contact with an inflating air bag
may be very hot.
• Always wash exposed skin areas
thoroughly with lukewarm water
and mild soap.
• We recommend that an author-
ized HYUNDAI dealer replace the
air bag immediately after deploy-
ment. Air bags are designed to be
used only once.
OIA0330033R
OIA0330033
■Left-hand drive
■Right-hand drive
Page 55 of 343
339
Safety system of your vehicle
12
OBA033014R/OBA033015R/OBA033016
12
OBA033014/OBA033015/OBA033016
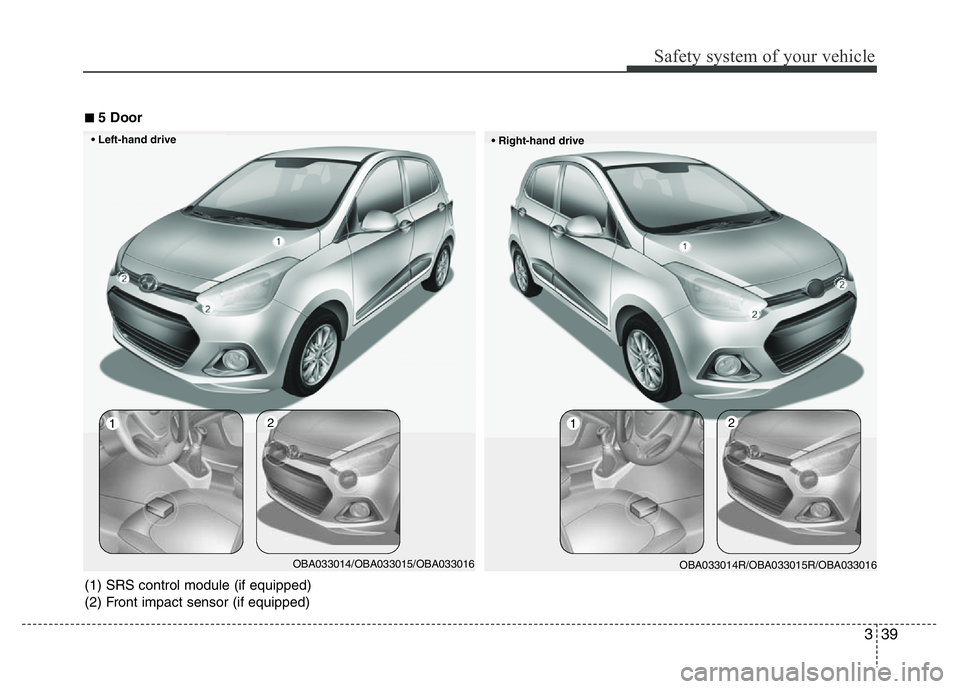
■5 Door
• Right-hand drive • Left-hand drive
(1) SRS control module (if equipped)
(2) Front impact sensor (if equipped)
Page 56 of 343
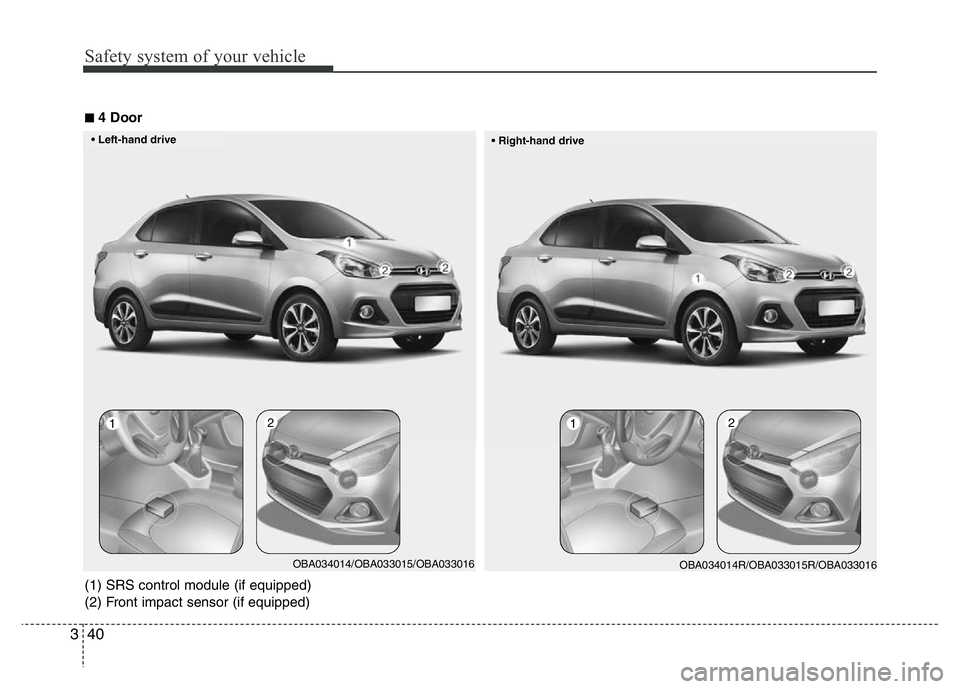
Safety system of your vehicle
40 3
12
OBA034014R/OBA033015R/OBA033016
12
OBA034014/OBA033015/OBA033016
■4 Door
• Right-hand drive • Left-hand drive
(1) SRS control module (if equipped)
(2) Front impact sensor (if equipped)
Page 62 of 343
Features of your vehicle
KEYS . . . . . . . . . . . . . . . . . . . . . . . . . . . . . . . . . . . . . 4-3
• Record your key number . . . . . . . . . . . . . . . . . . . . . . . 4-3
• Key operations . . . . . . . . . . . . . . . . . . . . . . . . . . . . . . . . 4-3
• Immobilizer system . . . . . . . . . . . . . . . . . . . . . . . . . . . . 4-4
REMOTE KEYLESS ENTRY . . . . . . . . . . . . . . . . 4-7
• Remote keyless entry system operations . . . . . . . . . . . 4-7
• Battery replacement . . . . . . . . . . . . . . . . . . . . . . . . . . . 4-9
SMART KEY . . . . . . . . . . . . . . . . . . . . . . . . . . . . . 4-11
• Smart key function . . . . . . . . . . . . . . . . . . . . . . . . . . . 4-11
• Door lock/unlock in an emergency situation . . . . . . 4-13
THEFT-ALARM SYSTEM . . . . . . . . . . . . . . . . . . 4-14
• Armed stage . . . . . . . . . . . . . . . . . . . . . . . . . . . . . . . . . 4-14
• Theft-alarm stage . . . . . . . . . . . . . . . . . . . . . . . . . . . . 4-15
• Disarmed stage. . . . . . . . . . . . . . . . . . . . . . . . . . . . . . . 4-15
DOOR LOCKS . . . . . . . . . . . . . . . . . . . . . . . . . . . 4-16
• From outside the vehicle . . . . . . . . . . . . . . . . . . . . . . 4-16
• From inside the vehicle . . . . . . . . . . . . . . . . . . . . . . . . 4-17
• Impact sensing door unlock system . . . . . . . . . . . . . . 4-20
• Speed sensing door lock system . . . . . . . . . . . . . . . . . 4-20
• Child-protector rear door lock . . . . . . . . . . . . . . . . . 4-20
TRUNK . . . . . . . . . . . . . . . . . . . . . . . . . . . . . . . . . . 4-21
• Opening the trunk . . . . . . . . . . . . . . . . . . . . . . . . . . . . 4-21
• Closing the trunk . . . . . . . . . . . . . . . . . . . . . . . . . . . . . 4-22
TAILGATE . . . . . . . . . . . . . . . . . . . . . . . . . . . . . . . 4-23
• Opening the tailgate . . . . . . . . . . . . . . . . . . . . . . . . . . 4-23
• Closing the tailgate . . . . . . . . . . . . . . . . . . . . . . . . . . . 4-23
WINDOWS . . . . . . . . . . . . . . . . . . . . . . . . . . . . . . 4-24
• Power windows . . . . . . . . . . . . . . . . . . . . . . . . . . . . . . 4-26
• Manual windows . . . . . . . . . . . . . . . . . . . . . . . . . . . . . 4-29
HOOD . . . . . . . . . . . . . . . . . . . . . . . . . . . . . . . . . . . 4-30
• Opening the hood . . . . . . . . . . . . . . . . . . . . . . . . . . . . 4-30
• Closing the hood . . . . . . . . . . . . . . . . . . . . . . . . . . . . . 4-31
FUEL FILLER LID . . . . . . . . . . . . . . . . . . . . . . . 4-32
• Opening the fuel filler lid . . . . . . . . . . . . . . . . . . . . . . 4-32
• Closing the fuel filler lid . . . . . . . . . . . . . . . . . . . . . . . 4-33
STEERING WHEEL . . . . . . . . . . . . . . . . . . . . . . . 4-35
• Electric power steering . . . . . . . . . . . . . . . . . . . . . . . . 4-35
• Horn . . . . . . . . . . . . . . . . . . . . . . . . . . . . . . . . . . . . . . . 4-36
MIRRORS . . . . . . . . . . . . . . . . . . . . . . . . . . . . . . . 4-37
• Inside rearview mirror . . . . . . . . . . . . . . . . . . . . . . . . 4-37
• Outside rearview mirror . . . . . . . . . . . . . . . . . . . . . . 4-37
INSTRUMENT CLUSTER . . . . . . . . . . . . . . . . . . 4-41
• Gauges . . . . . . . . . . . . . . . . . . . . . . . . . . . . . . . . . . . . . 4-42
• Warnings and indicators. . . . . . . . . . . . . . . . . . . . . . . 4-48
HAZARD WARNING FLASHER . . . . . . . . . . . . 4-58
4