height HYUNDAI I30 2011 Owner's Manual
[x] Cancel search | Manufacturer: HYUNDAI, Model Year: 2011, Model line: I30, Model: HYUNDAI I30 2011Pages: 635, PDF Size: 40.66 MB
Page 420 of 635
37
Safety system of your vehicle
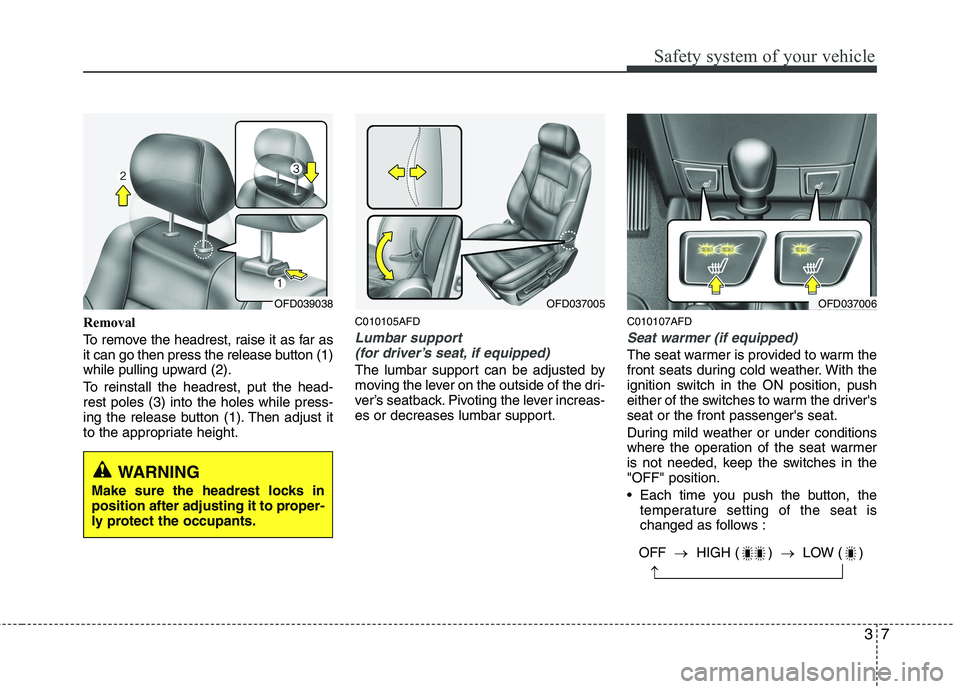
Removal
To remove the headrest, raise it as far as
it can go then press the release button (1)
while pulling upward (2).
To reinstall the headrest, put the head- rest poles (3) into the holes while press-
ing the release button (1). Then adjust it
to the appropriate height.C010105AFD
Lumbar support
(for driver’s seat, if equipped)
The lumbar support can be adjusted by
moving the lever on the outside of the dri-
ver’s seatback. Pivoting the lever increas-
es or decreases lumbar support. C010107AFD
Seat warmer (if equipped)
The seat warmer is provided to warm the
front seats during cold weather. With the
ignition switch in the ON position, push
either of the switches to warm the driver'sseat or the front passenger's seat.
During mild weather or under conditions
where the operation of the seat warmer
is not needed, keep the switches in the"OFF" position.
Each time you push the button, the
temperature setting of the seat is
changed as follows :
OFD037005OFD039038OFD037006
OFF �HIGH ( ) �LOW ( )
�
WARNING
Make sure the headrest locks in
position after adjusting it to proper-
ly protect the occupants.
Page 422 of 635
39
Safety system of your vehicle
Rear seat adjustment C010303BFD
Headrest
The rear seat is equipped with headrests
in all the seating positions for the occu-
pant's safety and comfort.
The headrest not only provides comfort for
passengers, but also helps to protect the
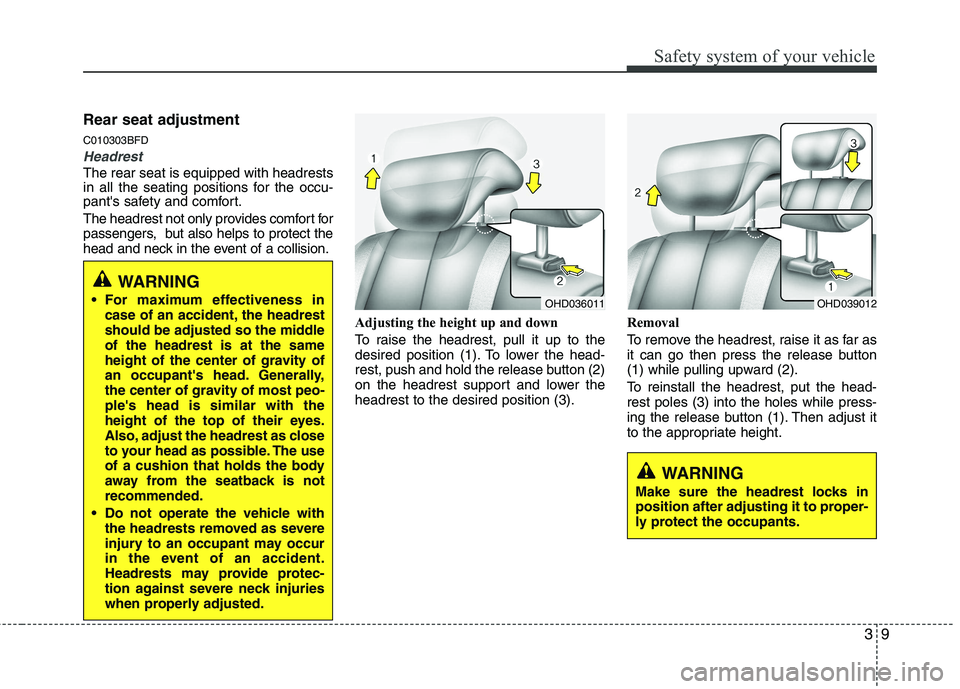
head and neck in the event of a collision.Adjusting the height up and down
To raise the headrest, pull it up to the
desired position (1). To lower the head-
rest, push and hold the release button (2)
on the headrest support and lower theheadrest to the desired position (3).Removal
To remove the headrest, raise it as far as
it can go then press the release button
(1) while pulling upward (2).
To reinstall the headrest, put the head- rest poles (3) into the holes while press-
ing the release button (1). Then adjust it
to the appropriate height.
OHD036011OHD039012
WARNING
For maximum effectiveness in case of an accident, the headrest
should be adjusted so the middleof the headrest is at the same
height of the center of gravity of
an occupant's head. Generally,
the center of gravity of most peo-ple's head is similar with the
height of the top of their eyes.
Also, adjust the headrest as close
to your head as possible. The use
of a cushion that holds the body
away from the seatback is notrecommended.
Do not operate the vehicle with the headrests removed as severe
injury to an occupant may occur
in the event of an accident.
Headrests may provide protec-
tion against severe neck injuries
when properly adjusted.
WARNING
Make sure the headrest locks in
position after adjusting it to proper-
ly protect the occupants.
Page 430 of 635
317
Safety system of your vehicle
✽✽NOTICE
If you are not able to pull out the seat
belt from the retractor, firmly pull the
belt out and release it. Then you will be
able to pull the belt out smoothly.
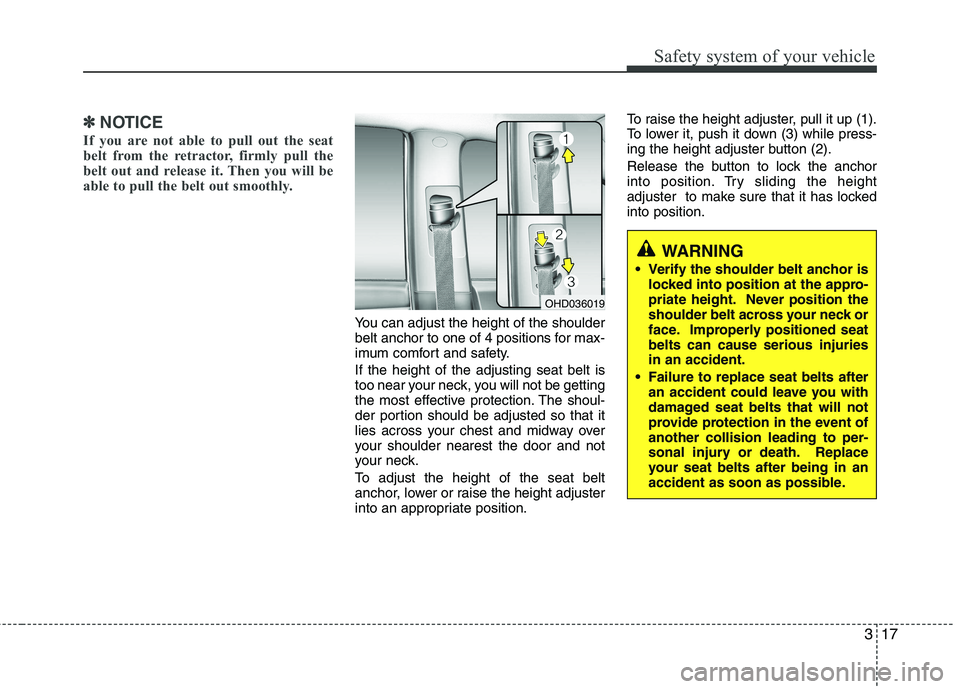
You can adjust the height of the shoulder
belt anchor to one of 4 positions for max-
imum comfort and safety. If the height of the adjusting seat belt is
too near your neck, you will not be getting
the most effective protection. The shoul-
der portion should be adjusted so that it
lies across your chest and midway over
your shoulder nearest the door and not
your neck.
To adjust the height of the seat belt
anchor, lower or raise the height adjuster
into an appropriate position. To raise the height adjuster, pull it up (1).
To lower it, push it down (3) while press-
ing the height adjuster button (2).
Release the button to lock the anchor
into position. Try sliding the height
adjuster to make sure that it has lockedinto position.
WARNING
Verify the shoulder belt anchor is locked into position at the appro-
priate height. Never position the
shoulder belt across your neck or
face. Improperly positioned seatbelts can cause serious injuriesin an accident.
Failure to replace seat belts after an accident could leave you with
damaged seat belts that will not
provide protection in the event ofanother collision leading to per-
sonal injury or death. Replace
your seat belts after being in an
accident as soon as possible.
OHD036019
Page 438 of 635
325
Safety system of your vehicle
C020300AUN Seat belt precautionsC020306AUN
Infant or small child
You should be aware of the specific
requirements in your country. Child
and/or infant seats must be properly
placed and installed in the rear seat. For
more information about the use of these
restraints, refer to “Child restraint sys-
tem” in this section.
✽✽
NOTICE
Small children are best protected from
injury in an accident when properly
restrained in the rear seat by a child
restraint system that meets the require-
ments of the Safety Standards of your
country. Before buying any child
restraint system, make sure that it has a
label certifying that it meets Safety
Standards of your country. The restraint
must be appropriate for your child's
height and weight. Check the label on
the child restraint for this information.
Refer to “Child restraint system” in this
section.
WARNING
All occupants of the vehicle must wear their seat belts at all times.
Seat belts and child restraintsreduce the risk of serious or fatal
injuries for all occupants in the
event of a collision or sudden stop.
Without a seat belt, occupants
could be shifted too close to a
deploying air bag, strike the interior
structure or be thrown from the
vehicle. Properly worn seat belts
greatly reduce these hazards.
Always follow the precautions
about seat belts, air bags and occu-
pant seat contained in this manual.
WARNING
Every person in your vehicle needs
to be properly restrained at all
times, including infants and chil-
dren. Never hold a child in yourarms or lap when riding in a vehi-
cle. The violent forces created dur-
ing a crash will tear the child from
your arms and throw the child
against the interior. Always use a
child restraint appropriate for your
child's height and weight.
Page 449 of 635
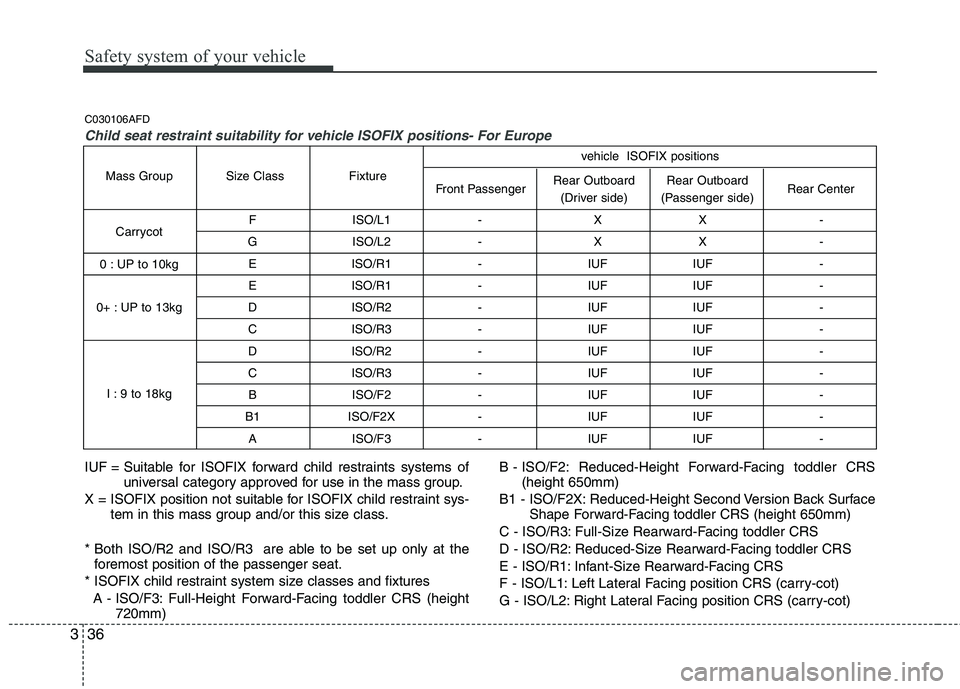
Safety system of your vehicle
36
3
F ISO/L1 - X X -
G ISO/L2 - X X - E ISO/R1 - IUF IUF -
E ISO/R1 - IUF IUF -
D ISO/R2 - IUF IUF -
C ISO/R3 - IUF IUF -
D ISO/R2 - IUF IUF -
C ISO/R3 - IUF IUF -
B ISO/F2 - IUF IUF -
B1 ISO/F2X - IUF IUF - A ISO/F3 - IUF IUF -
Rear Outboard
(Passenger side)
Rear Outboard
(Driver side)
Front Passenger
Fixture
Size Class
Mass Group
Carrycot
0 : UP to 10kg
0+ : UP to 13kg
I : 9 to 18kg Rear Center
vehicle ISOFIX positions
IUF = Suitable for ISOFIX forward child restraints systems of
universal category approved for use in the mass group.
X = ISOFIX position not suitable for ISOFIX child restraint sys- tem in this mass group and/or this size class.
* Both ISO/R2 and ISO/R3 are able to be set up only at the foremost position of the passenger seat.
* ISOFIX child restraint system size classes and fixtures A - ISO/F3: Full-Height Forward-Facing toddler CRS (height 720mm) B - ISO/F2: Reduced-Height Forward-Facing toddler CRS
(height 650mm)
B1 - ISO/F2X: Reduced-Height Second Version Back Surface Shape Forward-Facing toddler CRS (height 650mm)
C - ISO/R3: Full-Size Rearward-Facing toddler CRS
D - ISO/R2: Reduced-Size Rearward-Facing toddler CRS
E - ISO/R1: Infant-Size Rearward-Facing CRS
F - ISO/L1: Left Lateral Facing position CRS (carry-cot)
G - ISO/L2: Right Lateral Facing position CRS (carry-cot)
C030106AFD
Child seat restraint suitability for vehicle ISOFIX positions- For Europe
Page 471 of 635
Safety system of your vehicle
58
3
C041300AUN
Additional safety precautions Never let passengers ride in the
cargo area or on top of a folded-
down back seat. All occupants should
sit upright, fully back in their seats with
their seat belts on and their feet on the
floor.
Passengers should not move out of
or change seats while the vehicle is
moving. A passenger who is not wear-
ing a seat belt during a crash or emer-
gency stop can be thrown against the
inside of the vehicle, against other
occupants, or out of the vehicle.
Each seat belt is designed torestrain one occupant. If more than
one person uses the same seat belt,
they could be seriously injured or killedin a collision.
Do not use any accessories on seatbelts. Devices claiming to improve
occupant comfort or reposition the seat
belt can reduce the protection provided
by the seat belt and increase the
chance of serious injury in a crash.
Passengers should not place hardor sharp objects between them-
selves and the air bags. Carrying
hard or sharp objects on your lap or in
your mouth can result in injuries if an
air bag inflates.
Keep occupants away from the air
bag covers. All occupants should sit
upright, fully back in their seats with
their seat belts on and their feet on the
floor. If occupants are too close to the
air bag covers, they could be injured if
the air bags inflate.
Do not attach or place objects on or
near the air bag covers. Any object
attached to or placed on the front or
side air bag covers could interfere with
the proper operation of the air bags.
Do not modify the front seats.Modification of the front seats could
interfere with the operation of the sup-
plemental restraint system sensing
components or side air bags.
Do not place items under the frontseats. Placing items under the front
seats could interfere with the operation
of the supplemental restraint system
sensing components and wiring har-
nesses.
Never hold an infant or child on yourlap. The infant or child could be seri-
ously injured or killed in the event of a
crash. All infants and children should
be properly restrained in appropriate
child safety seats or seat belts in therear seat. C041400AUN
Adding equipment to or modify-
ing your air bag-equipped vehicle
If you modify your vehicle by changing
your vehicle's frame, bumper system,
front end or side sheet metal or ride
height, this may affect the operation of
your vehicle's air bag system.
WARNING
Sitting improperly or out of posi- tion can cause occupants to be
shifted too close to a deploying
air bag, strike the interior struc-
ture or be thrown from the vehicle
resulting in serious injury ordeath.
Always sit upright with the seat- back in an upright position, cen-tered on the seat cushion with
your seat belt on, legs comfort-
ably extended and your feet on
the floor.
Page 501 of 635
429
Features of your vehicle
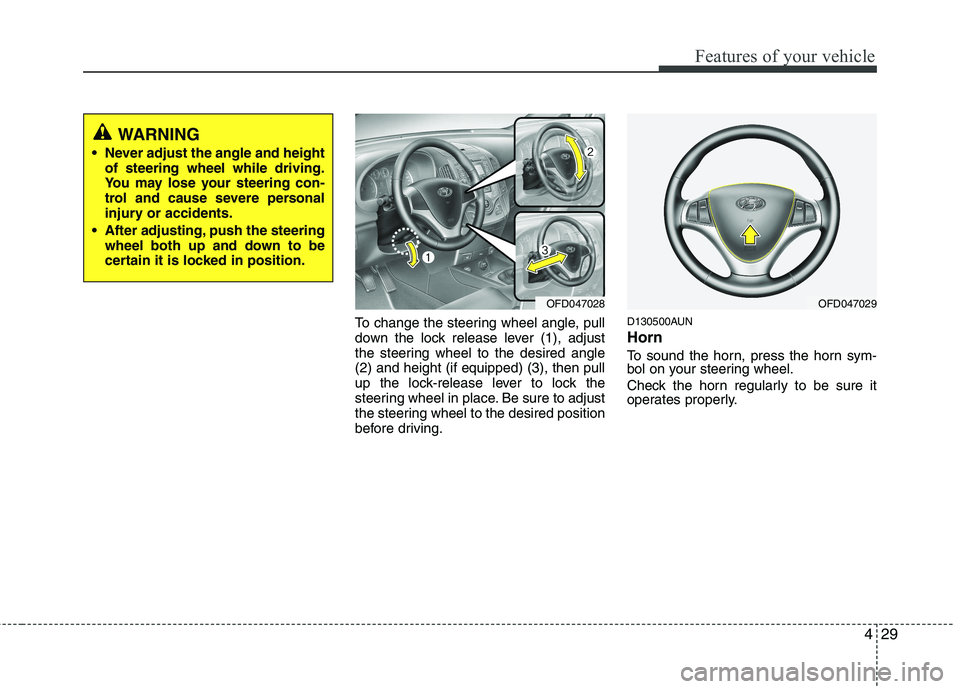
To change the steering wheel angle, pull
down the lock release lever (1), adjust
the steering wheel to the desired angle(2) and height (if equipped) (3), then pull
up the lock-release lever to lock the
steering wheel in place. Be sure to adjust
the steering wheel to the desired position
before driving.D130500AUN Horn
To sound the horn, press the horn sym-
bol on your steering wheel.
Check the horn regularly to be sure it
operates properly.
WARNING
Never adjust the angle and height of steering wheel while driving.
You may lose your steering con-
trol and cause severe personal
injury or accidents.
After adjusting, push the steering wheel both up and down to be
certain it is locked in position.
OFD047028OFD047029
Page 524 of 635
Features of your vehicle
52
4
D170200AEN Non-operational conditions of rear parking assist system
The rear parking assist system may
not operate properly when:
1. Moisture is frozen to the sensor. (It will
operate normally when the moisture has been cleared.)
2. The sensor is covered with foreign matter, such as snow or water, or the
sensor cover is blocked. (It will operate
normally when the material is removed
or the sensor is no longer blocked.)
3. Driving on uneven road surfaces (unpaved roads, gravel, bumps, gradi-ent).
4. Objects generating excessive noise (vehicle horns, loud motorcycle
engines, or truck air brakes) are within
range of the sensor.
5. Heavy rain or water spray exists.
6. Wireless transmitters or mobile phones are within range of the sensor.
7. The sensor is covered with snow.
8. Trailer towing The detecting range may decrease when:
1. The sensor is stained with foreign mat-
ter such as snow or water. (The sens-
ing range will return to normal when
removed.)
2. Outside air temperature is extremely hot or cold.
The following objects may not be rec-
ognized by the sensor:
1. Sharp or slim objects such as ropes, chains or small poles.
2. Objects which tend to absorb the sen- sor frequency such as clothes, spongy
material or snow.
3. Undetectable objects smaller than 1 m (40 in.) in height and narrower than 14
cm (6 in.) in diameter. D170300AEN Rear parking assist system pre- cautions
The rear parking assist system may
not sound sequentially depending on the speed and shapes of the objectsdetected.
The rear parking assist system may malfunction if the vehicle bumperheight or sensor installation has been
modified or damaged. Any non-factory
installed equipment or accessories
may also interfere with the sensor per-
formance.
The sensor may not recognize objects less than 40 cm (15 in.) from the sen-
sor, or it may sense an incorrect dis-
tance. Use caution.
When the sensor is frozen or stained with snow, dirt, or water, the sensor
may be inoperative until the stains are
removed using a soft cloth.
Do not push, scratch or strike the sen- sor. Sensor damage could occur.
Page 575 of 635
4103
Features of your vehicle
✽✽NOTICE
If you install an aftermarket HID head
lamp, your vehicle’s audio and electron-
ic device may malfunction.
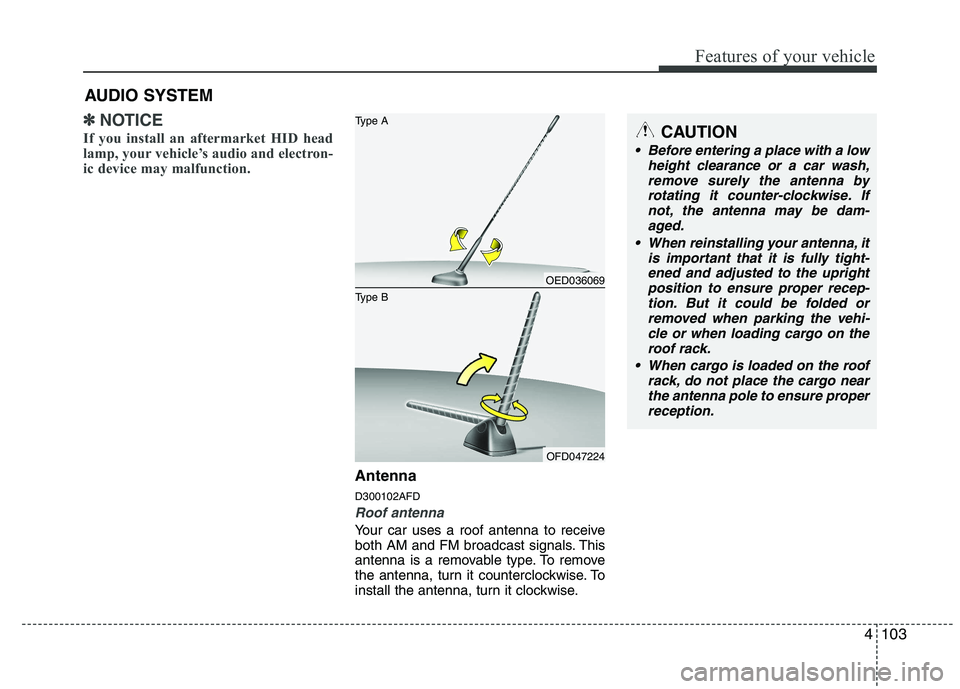
Antenna D300102AFD
Roof antenna
Your car uses a roof antenna to receive
both AM and FM broadcast signals. This
antenna is a removable type. To remove
the antenna, turn it counterclockwise. To
install the antenna, turn it clockwise.
AUDIO SYSTEM
CAUTION
• Before entering a place with a low
height clearance or a car wash,
remove surely the antenna by rotating it counter-clockwise. Ifnot, the antenna may be dam-aged.
When reinstalling your antenna, it is important that it is fully tight-ened and adjusted to the upright position to ensure proper recep-
tion. But it could be folded or removed when parking the vehi-cle or when loading cargo on the roof rack.
When cargo is loaded on the roof rack, do not place the cargo nearthe antenna pole to ensure properreception.
OED036069
OFD047224
Type B Type A