ECO mode HYUNDAI I30 2018 User Guide
[x] Cancel search | Manufacturer: HYUNDAI, Model Year: 2018, Model line: I30, Model: HYUNDAI I30 2018Pages: 659, PDF Size: 17.14 MB
Page 222 of 659
3-72
Convenient features of your vehicle
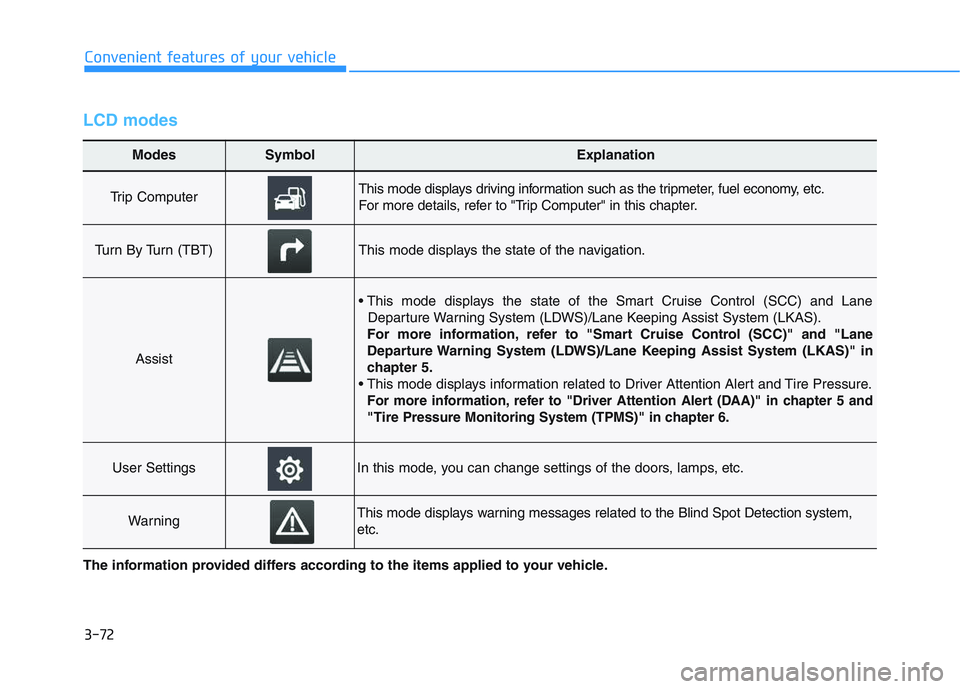
LCD modes
Modes SymbolExplanation
Trip Computer This mode displays driving information such as the tripmeter, fuel economy, etc.
For more details, refer to "Trip Computer" in this chapter.
Turn By Turn (TBT)This mode displays the state of the navigation.
Assist
• This mode displays the state of the Smart Cruise Control (SCC) and LaneDeparture Warning System (LDWS)/Lane Keeping Assist System (LKAS).
For more information, refer to "Smart Cruise Control (SCC)" and "Lane
Departure Warning System (LDWS)/Lane Keeping Assist System (LKAS)" in
chapter 5.
For more information, refer to "Driver Attention Alert (DAA)"in chapter 5 and
"Tire Pressure Monitoring System (TPMS)"in chapter 6.
User SettingsIn this mode, you can change settings of the doors, lamps, etc.
WarningThis mode displays warning messages related to the Blind Spot Detection system,
etc.
The information provided differs according to the items applied to your vehicle.
Page 223 of 659
3-73
Convenient features of your vehicle
3
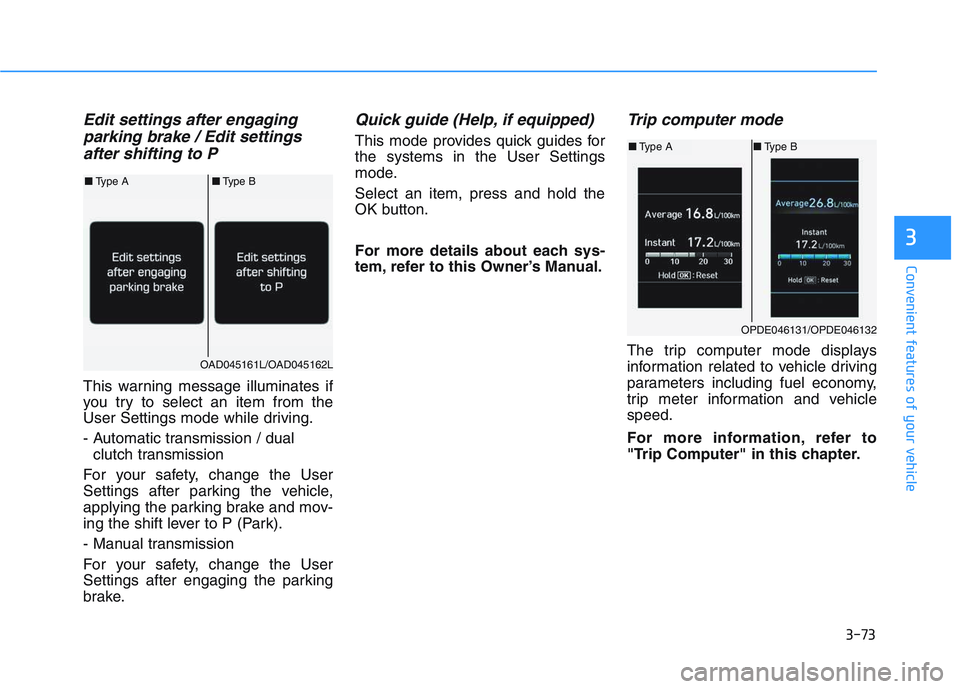
Edit settings after engaging parking brake / Edit settingsafter shifting to P
This warning message illuminates if
you try to select an item from the
User Settings mode while driving.
- Automatic transmission / dual
clutch transmission
For your safety, change the User
Settings after parking the vehicle,
applying the parking brake and mov-
ing the shift lever to P (Park).
- Manual transmission
For your safety, change the User
Settings after engaging the parking
brake.
Quick guide (Help, if equipped)
This mode provides quick guides for
the systems in the User Settings
mode.
Select an item, press and hold the
OK button.
For more details about each sys-
tem, refer to this Owner’s Manual.
Trip computer mode
The trip computer mode displays
information related to vehicle driving
parameters including fuel economy,
trip meter information and vehicle
speed.
For more information, refer to
"Trip Computer" in this chapter.
OPDE046131/OPDE046132
■ Type A ■Type B
OAD045161L/OAD045162L
■Type A ■Type B
Page 225 of 659
3-75
Convenient features of your vehicle
3
Warning message mode
If one of followings occurs, warning
messages will be displayed in the
information mode for several seconds.
- Low washer fluid (if equipped)
- Smart high beam malfunction (if equipped)
- Blind Spot Detection (BSD) mal- function (if equipped)
- Autonomous Emergency Braking (AEB) malfunction (if equipped)
- Speed Limit Information Function (SLIF) malfunction (if equipped)
- Advanced Smart Cruise Control malfunction (if equipped)
- Tire Pressure Monitoring System (TPMS, if equipped)
User settings mode
In this mode, you can change the
setting of the instrument cluster,
doors, lamps, etc.
1. Driving Assist
2. Door
3. Lights
4. Sound
5. Convenience
6. Service Interval
7. Other Features
8. Reset
The information provided differs
according to the items applied to
your vehicle.
1. Driving Assist
- Lane Departure Warning/StandardLKA/Active LKA
To adjust the sensitivity of the Lane
Keeping Assist System.
For more information, refer to the
"Lane Keeping Assist System" in
chapter 5.
To adjust the sensitivity of the Driver
Attention Alert (DAA).
- Off/Normal/Early
For more information, refer to the
"Driver Attention Alert (DAA)" in
chapter 5.
- Slow/Normal/Fast
To adjust the sensitivity of the
Smart Cruise Control system.
For more information, refer to the
"Smart Cruise Control" in chapter 5.
To activate or deactivate the
Autonomous Emergency Braking
(AEB).
For more information, refer to
"Autonomous Emergency Braking
(AEB)" in chapter 5.
Page 228 of 659
3-78
Convenient features of your vehicle
When activated, the gear position
will be displayed on the LCD display.
(if equipped with automatic transmis-
sion/dual clutch transmission)
6. Service Interval
To activate or deactivate the service
interval function.
If the service interval menu is acti-
vated, you may adjust the time and
distance.
Information
To use the service interval menu, con-
sult an authorized HYUNDAI dealer.
If the service interval is activated and
the time and distance is adjusted,
messages are displayed in the fol-
lowing situations each time the vehi-
cle is turned on.
- Service in : Displayed to inform the driver theremaining mileage and days to
service. - Service required
: Displayed when the mileage anddays to service has been reached
or passed.
Information
If any of the following conditions
occur, the mileage and number of days
to service may be incorrect.
- The battery cable is disconnected.
- The fuse switch is turned off.
- The battery is discharged.
7. Other Features
- Off: The average fuel economy will not reset automatically whenever
refueling.
- After Ignition: The average fuel economy will reset automatically
whenever it has passed 4 hours
after turning OFF the engine.
- After Refueling: The average fuel economy will reset automatically
when refueling.
For more information, refer to
"Trip Computer" in this chapter.
To select the fuel economy unit.
(km/L, L/100, MPG)
To select the temperature unit.
(°C,°F)
To select the tire pressure unit.
(psi, kPa, bar)
8. Reset
You can reset the menus in the User
Settings Mode. All menus in the User
Settings Mode are initialized, except
language and service interval.
i
i
Page 229 of 659
3-79
Convenient features of your vehicle
3
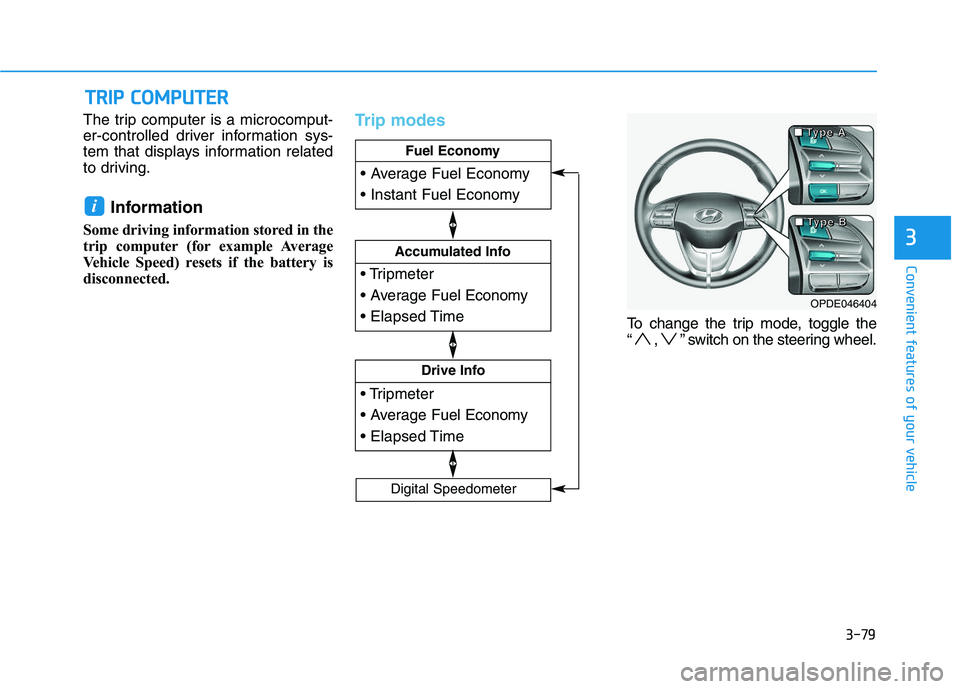
The trip computer is a microcomput-
er-controlled driver information sys-
tem that displays information related
to driving.
Information
Some driving information stored in the
trip computer (for example Average
Vehicle Speed) resets if the battery is
disconnected.
Trip modes
To change the trip mode, toggle the
“ , ” switch on the steering wheel.
i
T
T R
R I
I P
P
C
C O
O M
M P
P U
U T
T E
E R
R
Drive Info
Accumulated Info
Fuel Economy
Digital Speedometer
OPDE046404
■
■
■
■
T
T
T
T
y
y
y
y
p
p
p
p
e
e
e
e
A
A
A
A
■
■
■
■
T
T
T
T
y
y
y
y
p
p
p
p
e
e
e
e
B
B
B
B
Page 230 of 659
3-80
Convenient features of your vehicle
Fuel economy
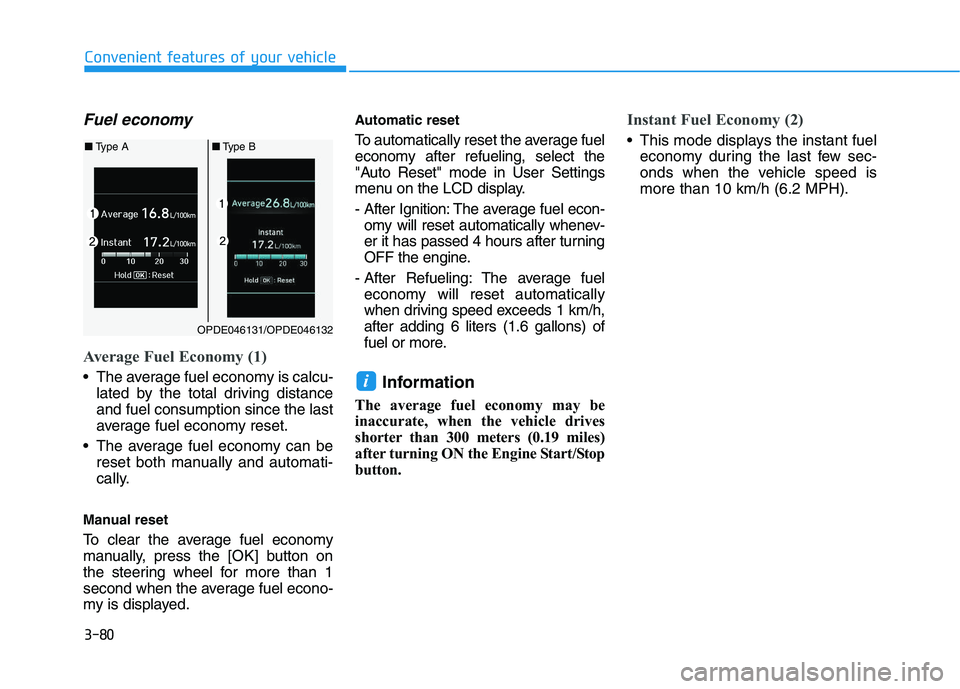
Average Fuel Economy (1)
The average fuel economy is calcu-lated by the total driving distance
and fuel consumption since the last
average fuel economy reset.
The average fuel economy can be reset both manually and automati-
cally.
Manual reset
To clear the average fuel economy
manually, press the [OK] button on
the steering wheel for more than 1
second when the average fuel econo-
my is displayed.
Automatic reset
To automatically reset the average fuel
economy after refueling, select the
"Auto Reset" mode in User Settings
menu on the LCD display.
- After Ignition: The average fuel econ- omy will reset automatically whenev-
er it has passed 4 hours after turning
OFF the engine.
- After Refueling: The average fuel economy will reset automatically
when driving speed exceeds 1 km/h,
after adding 6 liters (1.6 gallons) of
fuel or more.
Information
The average fuel economy may be
inaccurate, when the vehicle drives
shorter than 300 meters (0.19 miles)
after turning ON the Engine Start/Stop
button.
Instant Fuel Economy (2)
This mode displays the instant fuel economy during the last few sec-
onds when the vehicle speed is
more than 10 km/h (6.2 MPH).
i
OPDE046131/OPDE046132
■ Type A ■Type B
Page 236 of 659
Steering wheel audio control
(if equipped)
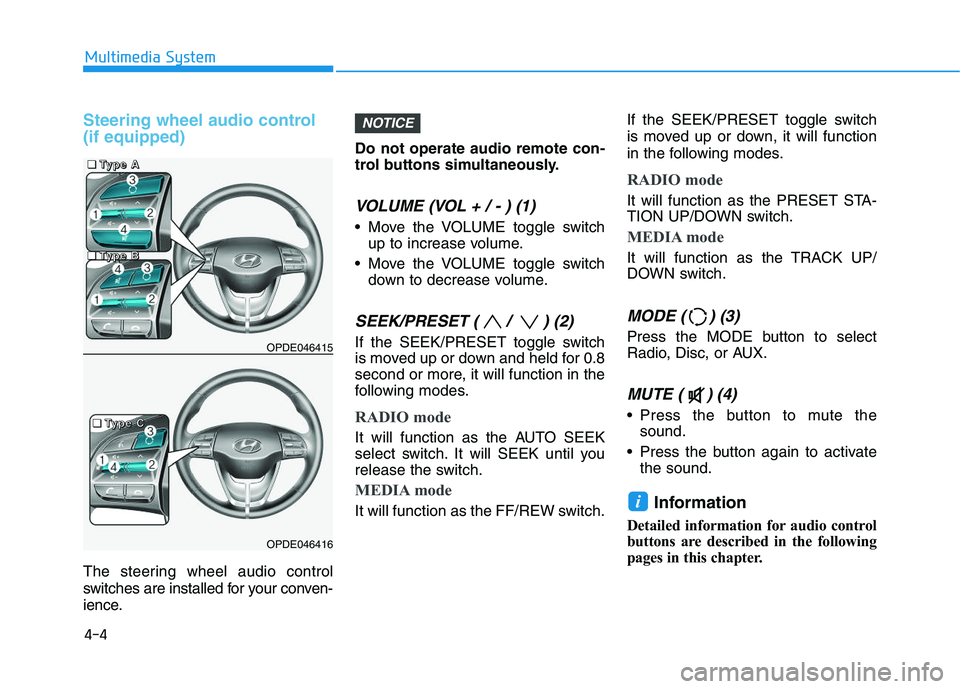
The steering wheel audio control
switches are installed for your conven-
ience.Do not operate audio remote con-
trol buttons simultaneously.
VOLUME (VOL + / - ) (1)
Move the VOLUME toggle switch
up to increase volume.
Move the VOLUME toggle switch down to decrease volume.
SEEK/PRESET ( / ) (2)
If the SEEK/PRESET toggle switch
is moved up or down and held for 0.8
second or more, it will function in the
following modes.
RADIO mode
It will function as the AUTO SEEK
select switch. It will SEEK until you
release the switch.
MEDIA mode
It will function as the FF/REW switch. If the SEEK/PRESET toggle switch
is moved up or down, it will function
in the following modes.
RADIO mode
It will function as the PRESET STA-
TION UP/DOWN switch.
MEDIA mode
It will function as the TRACK UP/
DOWN switch.
MODE ( ) (3)
Press the MODE button to select
Radio, Disc, or AUX.
MUTE ( ) (4)
Press the button to mute the
sound.
Press the button again to activate the sound.
Information
Detailed information for audio control
buttons are described in the following
pages in this chapter.
i
NOTICE
OPDE046415
OPDE046416
4-4
Multimedia System
■
■
■
■
T
T
T
T
y
y
y
y
p
p
p
p
e
e
e
e
A
A
A
A
■
■
■
■
T
T
T
T
y
y
y
y
p
p
p
p
e
e
e
e
C
C
C
C
■
■
■
■
T
T
T
T
y
y
y
y
p
p
p
p
e
e
e
e
B
B
B
B
Page 248 of 659
(5)CALL (if equipped)
Pressing the button - If not in Bluetooth
®Handsfree
mode or receiving a phone call.
First press: Display Dial Number
screen.
Second press: Automatically dis-
play the most recently Dialed
Call number.
Third press: Dial the phone num-
ber entered.
- Press in the Incoming Call notifi- cation screen to accept the
phone call.
- Press in Bluetooth
®Handsfree
mode to switch to the waiting
call.
Pressing and holding the button - If not in Bluetooth
®Handsfree
mode or receiving a phone call,
the most recently Dialed Call
number is dialed.
- Press in Bluetooth
®Handsfree
mode to transfer the call to your
cell phone.
- Press in cell phone mode to switch to Bluetooth
®Handsfree
mode. (6)
END (if equipped)
Press in Bluetooth
®Handsfree
mode to end the phone call.
Press in the incoming call screen to reject the call.
4-16
Multimedia System
Page 258 of 659
4-26
Multimedia System
Information
- Using the iPod®Devices
• To use the audio system’s iPod
®con-
trol function, use the dedicated
cable provided with your iPod
®.
• Connecting the iPod
®to the vehicle
during play may result in a loud
noise that lasts about one to two sec-
onds. Connect the iPod
®to the vehi-
cle after stopping or pausing play.
• Connect the iPod
®with the vehicle
in the ACC ON state to begin charg-
ing.
• When connecting the iPod
®cable,
be sure to fully push the cable into
the port.
• When EQ effects are enabled simul- taneously on external devices, such
as iPod
®s and the audio system, the
EQ effects may overlap, causing
sound quality deterioration or dis-
tortion. Deactivate the EQ function
for all external devices, if possible.
• Noise may occur when your iPod
®
or the AUX port is connected.
Disconnect and store separately
when not in use. (Continued)(Continued)
• There may be noise if the audio sys-
tem is used with an iPod
®or AUX
external device connected to the
power jack. In these cases, discon-
nect the iPod
®or external device
from the power jack.
• Play may be interrupted, or device malfunctions may occur depending
on the characteristics of your
iPod
®/iPhone®.
• Play may fail if your iPhone
®is con-
nected through both Bluetooth®and
USB. In this case, select Dock con-
nector or Bluetooth
®on your
iPhone®to change the sound output
settings.
• If your software version does not support the communication proto-
col or your iPod
®is not recognized
due to device failure, anomalies or
defects, iPod
®mode cannot be used.
• iPod
®nano (5th generation) devices
may not be recognized if the battery
is low. Charge sufficiently before
use.
(Continued)(Continued)
• The search and song play order in
the iPod
®device may be different
from the search order in the audio
system.
• If the iPod
®has failed due to an
internal defect, please reset the
iPod
®(consult your iPod®manual).
• Depending on the software version, the iPod
®may fail to sync with the
system. If the media is removed or
disconnected before recognition, the
previous mode may not be restored
(iPad
®cannot be charged).
• Cables other than the 1-meter cable provided with iPod
®/iPhone®prod-
ucts may not be recognized.
• When other music apps are used on your iPod
®, the system sync func-
tion may fail due to malfunction of
the iPod
®application.
i
Page 267 of 659
![HYUNDAI I30 2018 User Guide 4-35
Multimedia System
4
Information
The 6-digit passkey in the image
above is an example. Refer to your
vehicle for the actual passkey.
Pairing a second Bluetooth®device
Press the [SETUP/CLOCK] butt HYUNDAI I30 2018 User Guide 4-35
Multimedia System
4
Information
The 6-digit passkey in the image
above is an example. Refer to your
vehicle for the actual passkey.
Pairing a second Bluetooth®device
Press the [SETUP/CLOCK] butt](/img/35/56149/w960_56149-266.png)
4-35
Multimedia System
4
Information
The 6-digit passkey in the image
above is an example. Refer to your
vehicle for the actual passkey.
Pairing a second Bluetooth®device
Press the [SETUP/CLOCK] button
on the audio system ➟Select
[Bluetooth] ➟Select [Connections]
➟ Select [Add new device].
- The pairing procedure from this point is identical to [Pairing the first
Bluetooth device].
Information
• Bluetooth®standby mode lasts for
three minutes. If a device is not
paired within three minutes, pairing
is canceled. Start over from the
beginning.
• For most Bluetooth
®devices, a con-
nection is established automatically
after pairing. Some devices, howev-
er, require separate confirmation
when connecting after pairing. Be
sure to check your Bluetooth
®
device after pairing to confirm that
it has connected.
Connecting Bluetooth®devices
If there are no connected devices
Press the [PHONE]button on the
audio system or the [CALL]button in
the steering wheel remote control ➟
List of paired Bluetooth
®devices ➟
Select the desired Bluetooth®device
from the list ➟Connect Bluetooth®.
ii