release HYUNDAI I30 2021 User Guide
[x] Cancel search | Manufacturer: HYUNDAI, Model Year: 2021, Model line: I30, Model: HYUNDAI I30 2021Pages: 659, PDF Size: 17.14 MB
Page 46 of 659
2-26
Safety system of your vehicle
If you are not able to smoothly pull
enough of the seat belt out from
the retractor, firmly pull the seat
belt out and release it. After
release, you will be able to pull the
belt out smoothly.
Height adjustment
You can adjust the height of the
shoulder belt anchor to one of the
four different positions for maximum
comfort and safety.
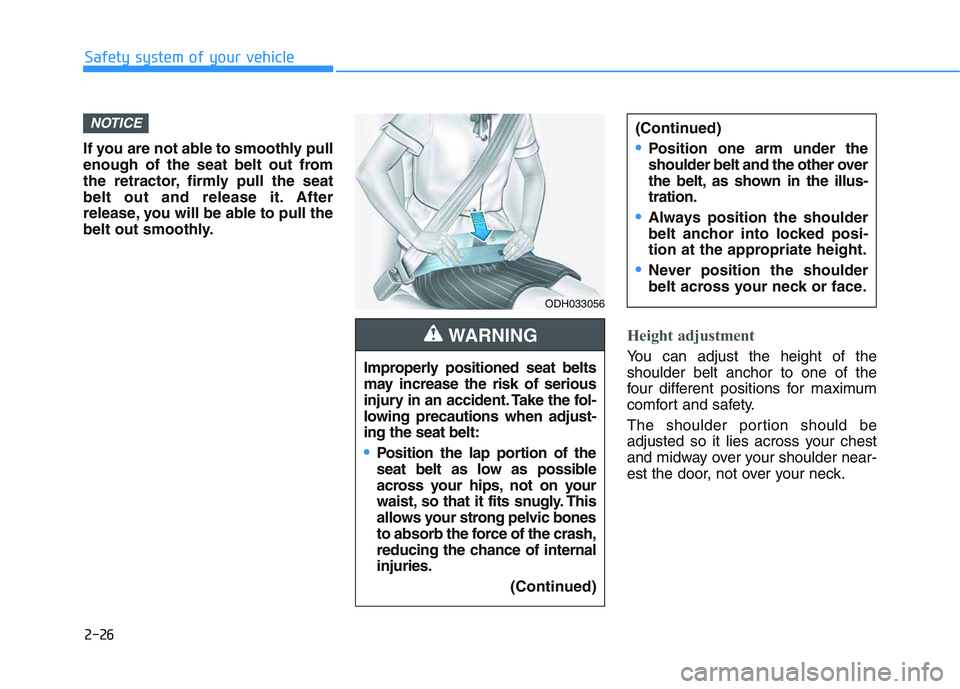
The shoulder portion should be
adjusted so it lies across your chest
and midway over your shoulder near-
est the door, not over your neck.
NOTICE
ODH033056
Improperly positioned seat belts
may increase the risk of serious
injury in an accident. Take the fol-
lowing precautions when adjust-
ing the seat belt:
Position the lap portion of the
seat belt as low as possible
across your hips, not on your
waist, so that it fits snugly. This
allows your strong pelvic bones
to absorb the force of the crash,
reducing the chance of internal
injuries. (Continued)
WARNING
(Continued)
Position one arm under the
shoulder belt and the other over
the belt, as shown in the illus-
tration.
Always position the shoulder
belt anchor into locked posi-
tion at the appropriate height.
Never position the shoulder
belt across your neck or face.
Page 47 of 659
2-27
Safety system of your vehicle
2
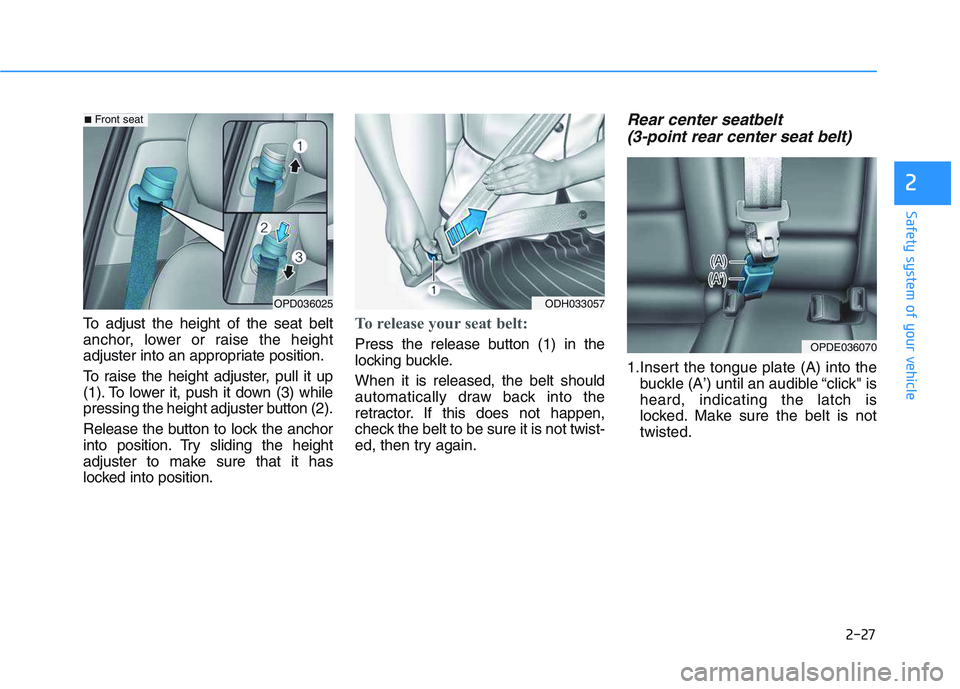
To adjust the height of the seat belt
anchor, lower or raise the height
adjuster into an appropriate position.
To raise the height adjuster, pull it up
(1). To lower it, push it down (3) while
pressing the height adjuster button (2).
Release the button to lock the anchor
into position. Try sliding the height
adjuster to make sure that it has
locked into position.To release your seat belt:
Press the release button (1) in the
locking buckle.
When it is released, the belt should
automatically draw back into the
retractor. If this does not happen,
check the belt to be sure it is not twist-
ed, then try again.
Rear center seatbelt (3-point rear center seat belt)
1.Insert the tongue plate (A) into the
buckle (A’) until an audible “click" is
heard, indicating the latch is
locked. Make sure the belt is not
twisted.
OPD036025
■Front seat
ODH033057
OPDE036070
Page 48 of 659
2-28
Safety system of your vehicle
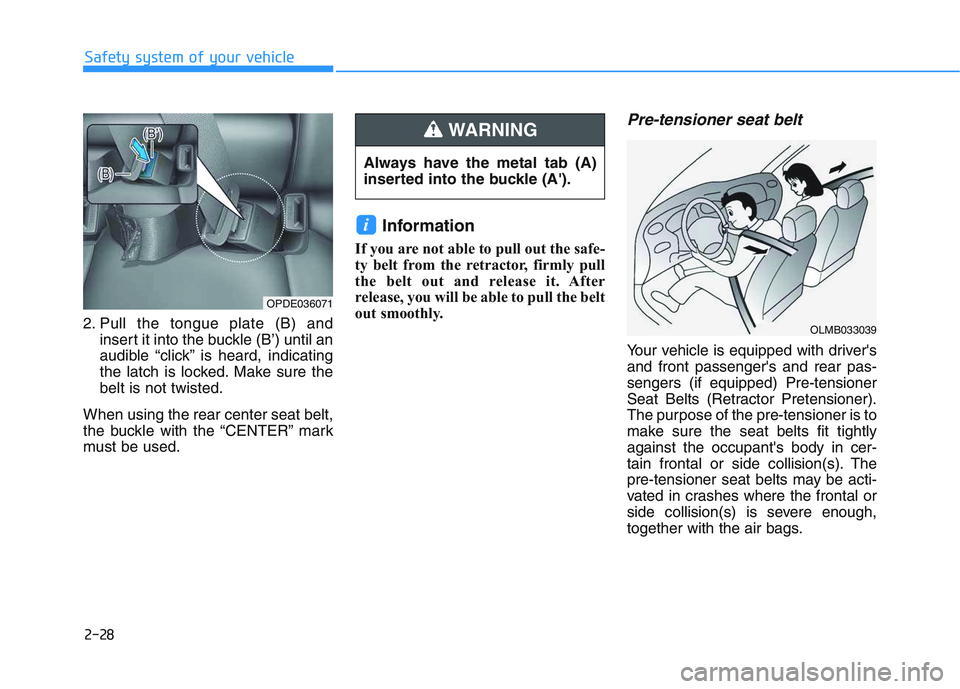
2. Pull the tongue plate (B) and insert it into the buckle (B’) until an
audible “click” is heard, indicating
the latch is locked. Make sure the
belt is not twisted.
When using the rear center seat belt,
the buckle with the “CENTER” mark
must be used.
Information
If you are not able to pull out the safe-
ty belt from the retractor, firmly pull
the belt out and release it. After
release, you will be able to pull the belt
out smoothly.
Pre-tensioner seat belt
Your vehicle is equipped with driver's
and front passenger's and rear pas-
sengers (if equipped) Pre-tensioner
Seat Belts (Retractor Pretensioner).
The purpose of the pre-tensioner is to
make sure the seat belts fit tightly
against the occupant's body in cer-
tain frontal or side collision(s). The
pre-tensioner seat belts may be acti-
vated in crashes where the frontal or
side collision(s) is severe enough,
together with the air bags.
i
OLMB033039
OPDE036071
Always have the metal tab (A)
inserted into the buckle (A').
WARNING
Page 49 of 659
2-29
Safety system of your vehicle
2
When the vehicle stops suddenly, or
if the occupant tries to lean forward
too quickly, the seat belt retractor will
lock into position. In certain frontal
collisions, the pre-tensioner will acti-
vate and pull the seat belt into tighter
contact against the occupant's body.
If the system senses excessive tension
on the driver or passenger's seat belt
when the pre-tensioner system acti-
vates, the load limiter inside the retrac-
tor pre-tensioner will release some of
the pressure on the affected seat belt.Do not touch the pre-tensioner
seat belt assemblies for several
minutes after they have been
activated. When the pre-ten-
sioner seat belt mechanism
deploys during a collision, the
pre-tensioner can become hot
and can burn you.WARNING
Body work on the front area of
the vehicle may damage the
pre-tensioner seat belt system.
Therefore, we recommend the
system to be serviced by an
authorized HYUNDAI dealer.
CAUTION
Always wear your seat belt and
sit properly in your seat.
Do not use the seat belt if it is
loose or twisted. A loose or
twisted seat belt will not pro-
tect you properly in an acci-
dent.
Do not place anything near the
buckle. This may adversely
affect the buckle and cause it
to function improperly.
Always replace your pre-ten-
sioners after activation or an
accident.
NEVER inspect, service, repair
or replace the pre-tensioners
yourself. This must be done by
an authorized HYUNDAI dealer.
Do not hit the seat belt assem-
blies.
WARNING
Page 62 of 659
2-42
Safety system of your vehicle
Securing a Child RestraintSystem with a lap/shoulder belt
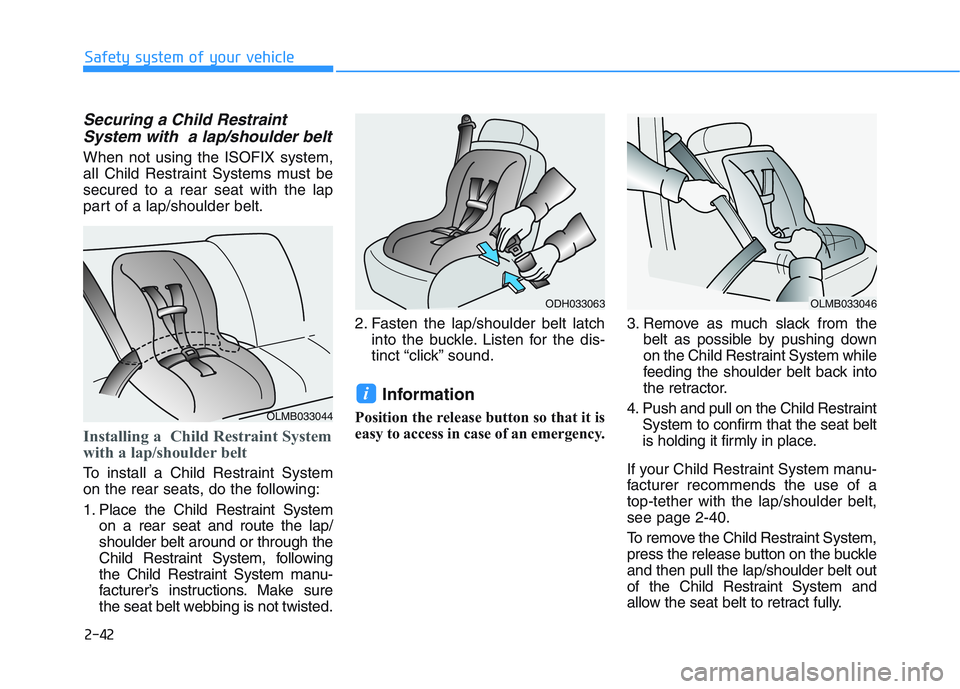
When not using the ISOFIX system,
all Child Restraint Systems must be
secured to a rear seat with the lap
part of a lap/shoulder belt.
Installing a Child Restraint System
with a lap/shoulder belt
To install a Child Restraint System
on the rear seats, do the following:
1. Place the Child Restraint System
on a rear seat and route the lap/
shoulder belt around or through the
Child Restraint System, following
the Child Restraint System manu-
facturer’s instructions. Make sure
the seat belt webbing is not twisted. 2. Fasten the lap/shoulder belt latch
into the buckle. Listen for the dis-
tinct “click” sound.
Information
Position the release button so that it is
easy to access in case of an emergency. 3. Remove as much slack from the
belt as possible by pushing down
on the Child Restraint System while
feeding the shoulder belt back into
the retractor.
4. Push and pull on the Child Restraint System to confirm that the seat belt
is holding it firmly in place.
If your Child Restraint System manu-
facturer recommends the use of a
top-tether with the lap/shoulder belt,
see page 2-40.
To remove the Child Restraint System,
press the release button on the buckle
and then pull the lap/shoulder belt out
of the Child Restraint System and
allow the seat belt to retract fully.
i
OLMB033044
ODH033063OLMB033046
Page 76 of 659
2-56
Safety system of your vehicle
What to expect after an air bag
inflates
After a frontal or side air bag inflates,
it will deflate very quickly. Air bag
inflation will not prevent the driver
from seeing out of the windshield or
being able to steer. Curtain air bags
may remain partially inflated for
some time after they deploy.
Noise and smoke from inflatingair bag
When the air bags inflate, they make
a loud noise and may produce smoke
and powder in the air inside of the
vehicle. This is normal and is a result
of the ignition of the air bag inflator.
After the air bag inflates, you may feel
substantial discomfort in breathing
because of the contact of your chest
with both the seat belt and the air
bag, as well as from breathing the
smoke and powder. The powder may
aggravate asthma for some people. If
you experience breathing problems
after an air bag deployment, seek
medical attention immediately.
Though the smoke and powder are
nontoxic, they may cause irritation to
the skin, eyes, nose, throat, etc. If this
is the case, wash and rinse with cold
water immediately and seek medical
attention if the symptoms persist.
After an air bag inflates, take
the following precautions:
Open your windows and doors
as soon as possible after
impact to reduce prolonged
exposure to the smoke and
powder released by the inflat-
ing air bag.
Do not touch the air bag stor-
age area’s internal compo-
nents immediately after an air
bag has inflated. The parts
that come into contact with an
inflating air bag may be very
hot.
Always wash exposed skin
areas thoroughly with cold
water and mild soap.
We recommend that an author-
ized HYUNDAI dealer replace
the air bag immediately after
deployment. Air bags are
designed to be used only once.
WARNING
To prevent objects from becom-
ing dangerous projectiles when
the passenger's air bag inflates:
Do not install or place any
objects (drink holder, CD hold-
er, stickers, etc.) on the front
passenger's panel above the
glove box where the passen-
ger's air bag is located.
Do not install a container of
liquid air freshener near the
instrument cluster or on the
instrument panel surface.
WARNING
Page 87 of 659
3-85
Convenient features of your vehicle
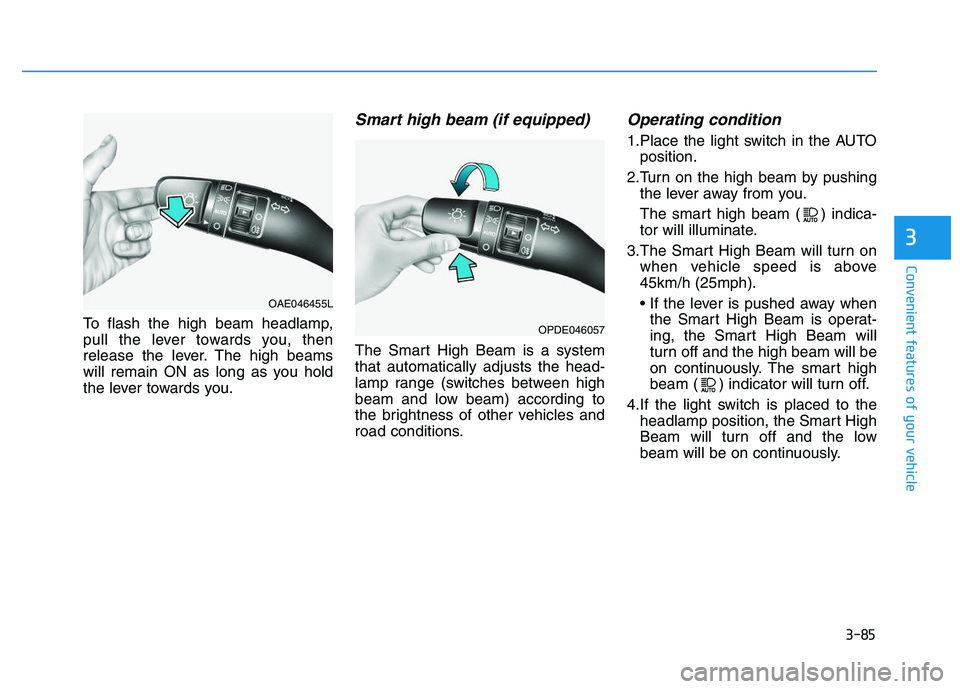
To flash the high beam headlamp,
pull the lever towards you, then
release the lever. The high beams
will remain ON as long as you hold
the lever towards you.
Smart high beam (if equipped)
The Smart High Beam is a system
that automatically adjusts the head-
lamp range (switches between high
beam and low beam) according to
the brightness of other vehicles and
road conditions.
Operating condition
1.Place the light switch in the AUTOposition.
2.Turn on the high beam by pushing the lever away from you.
The smart high beam ( ) indica-
tor will illuminate.
3.The Smart High Beam will turn on when vehicle speed is above
45km/h (25mph).
• If the lever is pushed away whenthe Smart High Beam is operat-
ing, the Smart High Beam will
turn off and the high beam will be
on continuously. The smart high
beam ( ) indicator will turn off.
4.If the light switch is placed to the headlamp position, the Smart High
Beam will turn off and the low
beam will be on continuously.
3
OAE046455L
OPDE046057
Page 90 of 659
3-88
Convenient features of your vehicle
Turn signals and lane changesignals
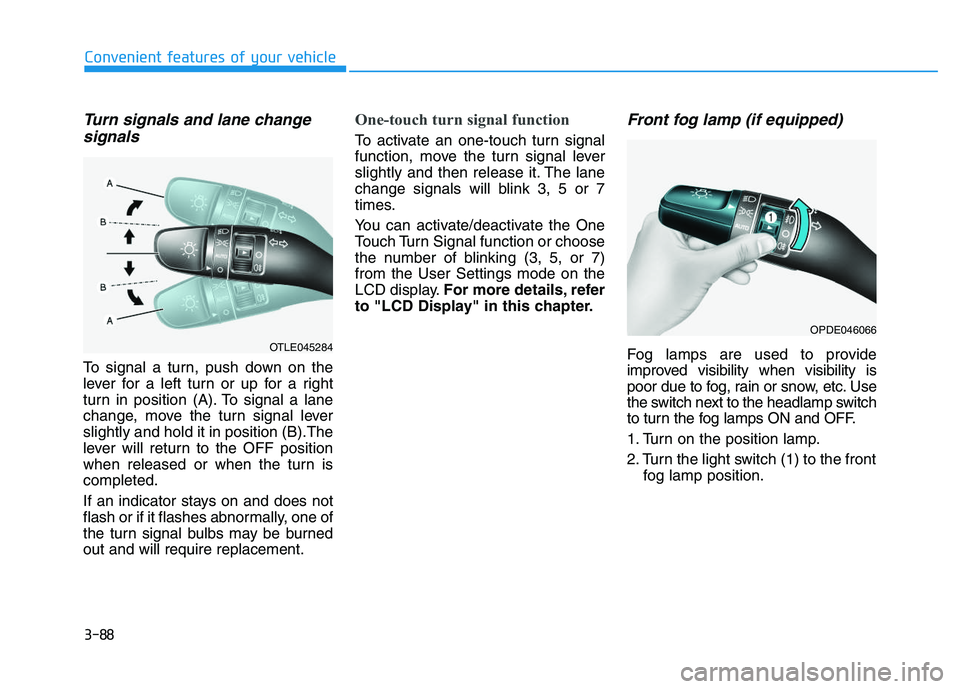
To signal a turn, push down on the
lever for a left turn or up for a right
turn in position (A). To signal a lane
change, move the turn signal lever
slightly and hold it in position (B).The
lever will return to the OFF position
when released or when the turn is
completed.
If an indicator stays on and does not
flash or if it flashes abnormally, one of
the turn signal bulbs may be burned
out and will require replacement.
One-touch turn signal function
To activate an one-touch turn signal
function, move the turn signal lever
slightly and then release it. The lane
change signals will blink 3, 5 or 7
times.
You can activate/deactivate the One
Touch Turn Signal function or choose
the number of blinking (3, 5, or 7)
from the User Settings mode on the
LCD display. For more details, refer
to "LCD Display" in this chapter.
Front fog lamp (if equipped)
Fog lamps are used to provide
improved visibility when visibility is
poor due to fog, rain or snow, etc. Use
the switch next to the headlamp switch
to turn the fog lamps ON and OFF.
1. Turn on the position lamp.
2. Turn the light switch (1) to the front fog lamp position.
OPDE046066
OTLE045284
Page 100 of 659
3-98
Convenient features of your vehicle
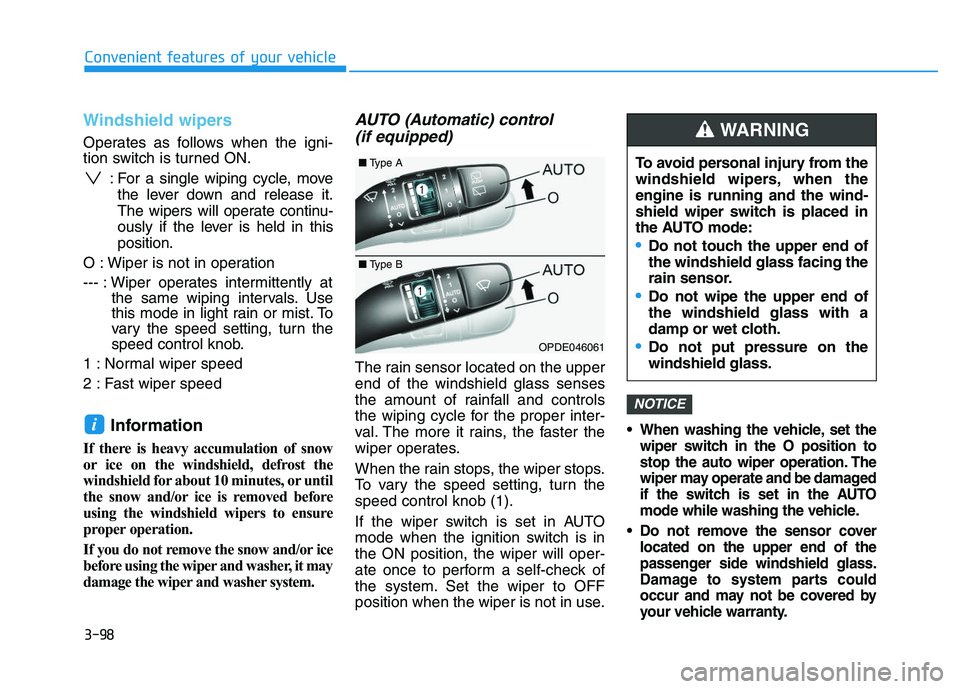
Windshield wipers
Operates as follows when the igni-
tion switch is turned ON.: For a single wiping cycle, movethe lever down and release it.
The wipers will operate continu-
ously if the lever is held in this
position.
O : Wiper is not in operation
--- : Wiper operates intermittently at the same wiping intervals. Use
this mode in light rain or mist. To
vary the speed setting, turn the
speed control knob.
1 : Normal wiper speed
2 : Fast wiper speed
Information
If there is heavy accumulation of snow
or ice on the windshield, defrost the
windshield for about 10 minutes, or until
the snow and/or ice is removed before
using the windshield wipers to ensure
proper operation.
If you do not remove the snow and/or ice
before using the wiper and washer, it may
damage the wiper and washer system.
AUTO (Automatic) control (if equipped)
The rain sensor located on the upper
end of the windshield glass senses
the amount of rainfall and controls
the wiping cycle for the proper inter-
val. The more it rains, the faster the
wiper operates.
When the rain stops, the wiper stops.
To vary the speed setting, turn the
speed control knob (1).
If the wiper switch is set in AUTO
mode when the ignition switch is in
the ON position, the wiper will oper-
ate once to perform a self-check of
the system. Set the wiper to OFF
position when the wiper is not in use.
When washing the vehicle, set the
wiper switch in the O position to
stop the auto wiper operation. The
wiper may operate and be damaged
if the switch is set in the AUTO
mode while washing the vehicle.
Do not remove the sensor cover located on the upper end of the
passenger side windshield glass.
Damage to system parts could
occur and may not be covered by
your vehicle warranty.
NOTICE
i
OPDE046061
To avoid personal injury from the
windshield wipers, when the
engine is running and the wind-
shield wiper switch is placed in
the AUTO mode:
Do not touch the upper end of
the windshield glass facing the
rain sensor.
Do not wipe the upper end of
the windshield glass with a
damp or wet cloth.
Do not put pressure on the
windshield glass.
WARNING
■ Type A
■Type B
Page 101 of 659
3-99
Convenient features of your vehicle
3
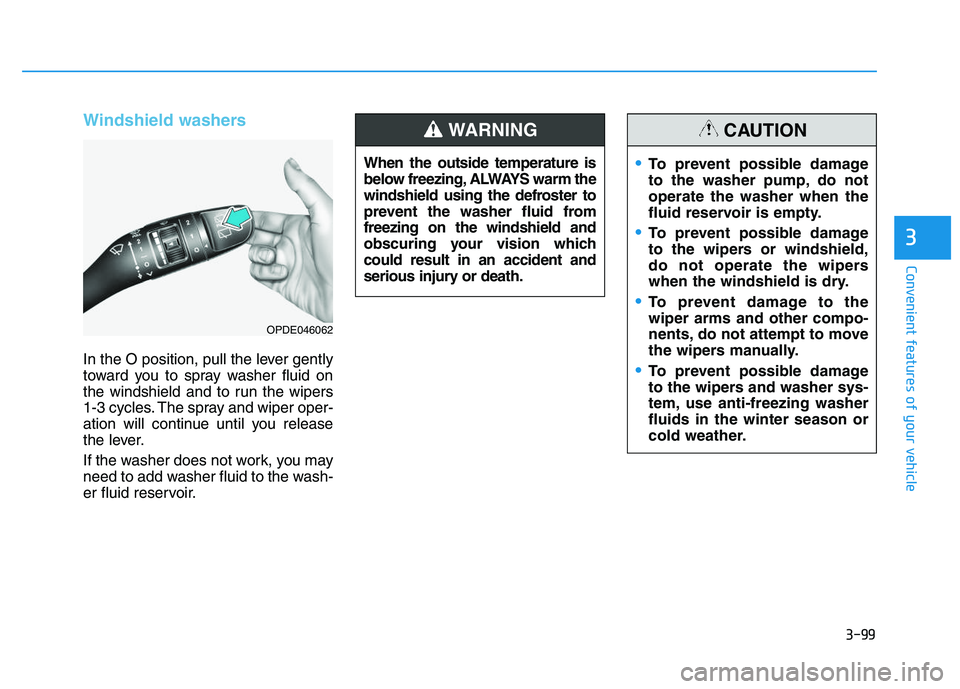
Windshield washers
In the O position, pull the lever gently
toward you to spray washer fluid on
the windshield and to run the wipers
1-3 cycles. The spray and wiper oper-
ation will continue until you release
the lever.
If the washer does not work, you may
need to add washer fluid to the wash-
er fluid reservoir.When the outside temperature is
below freezing, ALWAYS warm the
windshield using the defroster to
prevent the washer fluid from
freezing on the windshield and
obscuring your vision which
could result in an accident and
serious injury or death.
WARNING
To prevent possible damage
to the washer pump, do not
operate the washer when the
fluid reservoir is empty.
To prevent possible damage
to the wipers or windshield,
do not operate the wipers
when the windshield is dry.
To prevent damage to the
wiper arms and other compo-
nents, do not attempt to move
the wipers manually.
To prevent possible damage
to the wipers and washer sys-
tem, use anti-freezing washer
fluids in the winter season or
cold weather.
CAUTION
OPDE046062