set clock HYUNDAI I30 2022 Owners Manual
[x] Cancel search | Manufacturer: HYUNDAI, Model Year: 2022, Model line: I30, Model: HYUNDAI I30 2022Pages: 659, PDF Size: 17.14 MB
Page 148 of 659
![HYUNDAI I30 2022 Owners Manual 3-146
Clock
Vehicles with Audio system
Select the [SETUP/CLOCK ] button on
the audio system ➟Select [Date/Time].
Set time: Set the time displayed on
the audio screen.
Time format: Choose between 1 HYUNDAI I30 2022 Owners Manual 3-146
Clock
Vehicles with Audio system
Select the [SETUP/CLOCK ] button on
the audio system ➟Select [Date/Time].
Set time: Set the time displayed on
the audio screen.
Time format: Choose between 1](/img/35/56145/w960_56145-147.png)
3-146
Clock
Vehicles with Audio system
Select the [SETUP/CLOCK ] button on
the audio system ➟Select [Date/Time].
Set time: Set the time displayed on
the audio screen.
Time format: Choose between 12- hour and 24-hour time formats.
Vehicles with Navigation system
Select the Settings menu on the
Navigation system ➟Select
[Date/Time].
GPS time: Displays time according to the received GNSS time.
24-hour: Switches to 12 hour or 24 hour.
For more details, please refer to
the separate manual that was sup-
plied with your vehicle.
Clothes hanger (if equipped)
These hangers are not designed to
hold large or heavy items.
Convenient features of your vehicle
Do not adjust the clock while
driving. You may lose your steer-
ing control and cause severe
personal injury or accidents.
WARNING
OPD046411
■ Type A
■Type BOPDE046050
Do not hang other objects such
as hangers or hard objects
except clothes. Also, do not put
heavy, sharp or breakable
objects in the clothe pockets. In
an accident or when the curtain
air bag is inflated, it may cause
vehicle damage or personal
injury.
WARNING
Page 152 of 659
Interior lights ....................................................................3-93
Wipers and washers ............................................3-97
Windshield wipers ..........................................................3-98
Windshield washers .......................................................3-99
Rear window wiper and washer switch ..................3-100
Driver assist system ..........................................3-101
Rear view camera ........................................................3-101
Rear parking assist system ........................................3-102
Parking assist system .................................................3-106
Defroster .............................................................3-109
Rear window defroster ...............................................3-109
Manual climate control system........................3-111
Heating and air conditioning......................................3-112
System operation ..........................................................3-116
System maintenance ....................................................3-118
Automatic climate control system ...................3-121
Automatic heating and air conditioning ..................3-122
Manual heating and air conditioning .......................3-123
System operation ..........................................................3-128
System maintenance ....................................................3-131
Windshield defrosting and defogging ............3-133
Manual climate control system .................................3-133
Automatic climate control system ............................3-134
Defogging logic ............................................................3-135
Auto defogging system
(only for automatic climate control system) .........3-136
Climate control additional features.................3-137
Cluster ionizer ..............................................................3-137
Automatic ventilation ..................................................3-137
To cancel or set the automatic ventilation ............3-137
Sunroof inside air recirculation ...............................3-137
Storage compartment ........................................3-138
Center console storage ...............................................3-138
Glove box ........................................................................3-138
Sunglass holder ............................................................3-139
Multi box ........................................................................3-139
Interior features ...............................................3-140
Ashtray ...........................................................................3-140
Cup holder.......................................................................3-140
Sliding armrest .............................................................3-141
Sunvisor ...........................................................................3-142
Power outlet .................................................................3-142
Cigarette lighter ...........................................................3-144
Wireless cellular phone charging system ..............3-144
Clock .................................................................................3-146
Clothes hanger .............................................................3-146
Floor mat anchor(s) ....................................................3-147
Luggage net (holder) ...................................................3-147
Cargo area cover .........................................................3-148
Exterior features ...............................................3-149
Mounting bracket for roof carrier ..........................3-149
3
Page 191 of 659

3-41
Convenient features of your vehicle
3
Closing the fuel filler door
1. To install the fuel tank cap, turn itclockwise until it “clicks” one time.
2. Close the fuel filler door until it is latched securely.
Gasoline is highly flammable
and explosive. Failure to follow
these guidelines may result in
SERIOUS INJURY or DEATH:
Read and follow all warnings
posted at the gas station.
Before refueling, note the
location of the Emergency
Gasoline Shut-Off, if available,
at the gas station.
Before touching the fuel noz-
zle, you should eliminate the
potential build-up of static
electricity by touching a metal
part of the vehicle, a safe dis-
tance away from the fuel filler
neck, nozzle, or other gas
source, with your bare hand. (Continued)
WARNING
(Continued)
When refueling, always move
the shift lever to the P (Park)
position (for automatic transmis-
sion/
dual clutch transmission)
or first gear or R (Reverse, for
manual transmission), set the
parking brake, and place the
ignition switch to the LOCK/OFF
position. Sparks produced by
electrical components related to
the engine can ignite fuel vapors
causing a fire.
When using an approved
portable fuel container, be sure
to place the container on the
ground prior to refueling. Static
electricity discharge from the
container can ignite fuel vapors
causing a fire. Once refueling
has begun, contact between
your bare hand and the vehicle
should be maintained until the
filling is complete.
(Continued)
(Continued)
Do not use cellular phones
while refueling. Electric cur-
rent and/or electronic interfer-
ence from cellular phones can
potentially ignite fuel vapors
and cause a fire.
Do not get back into a vehicle
once you have begun refuel-
ing. You can generate a build-
up of static electricity by touch-
ing, rubbing or sliding against
any item or fabric capable of
producing static electricity.
Static electricity discharge can
ignite fuel vapors causing a
fire. If you must re-enter the
vehicle, you should once again
eliminate potentially danger-
ous static electricity discharge
by touching a metal part of the
vehicle, away from the fuel filler
neck, nozzle or other gasoline
source, with your bare hand.(Continued)
Page 243 of 659
4-11
Multimedia System
4
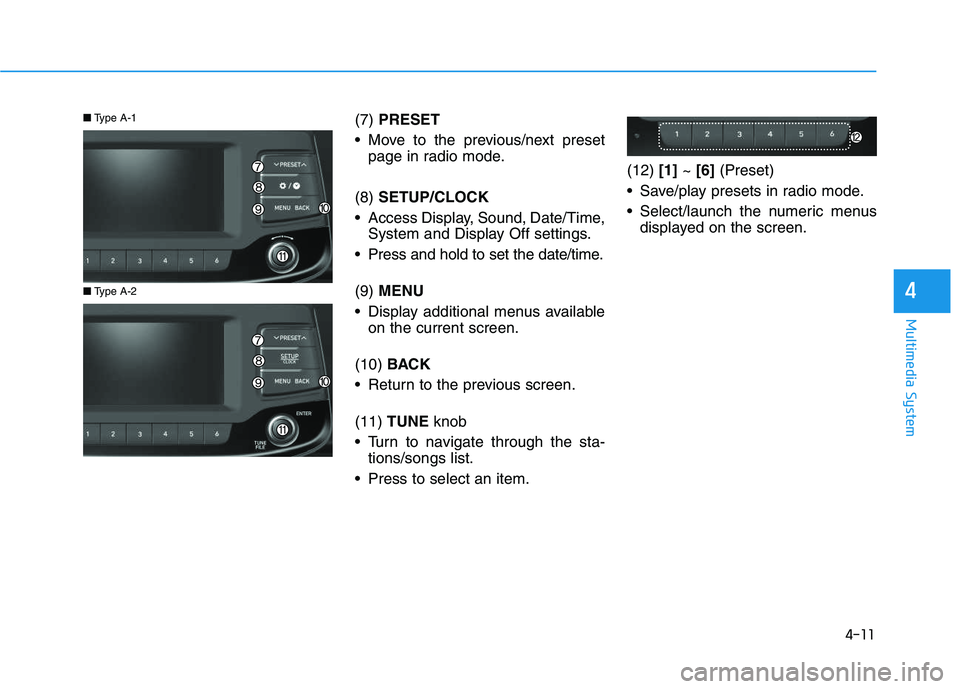
(7) PRESET
Move to the previous/next preset page in radio mode.
(8) SETUP/CLOCK
Access Display, Sound, Date/Time, System and Display Off settings.
Press and hold to set the date/time.
(9) MENU
Display additional menus available on the current screen.
(10) BACK
Return to the previous screen.
(11) TUNE knob
Turn to navigate through the sta- tions/songs list.
Press to select an item. (12)
[1]~ [6] (Preset)
Save/play presets in radio mode.
Select/launch the numeric menus displayed on the screen.
■ Type A-2
■Type A-1
Page 246 of 659
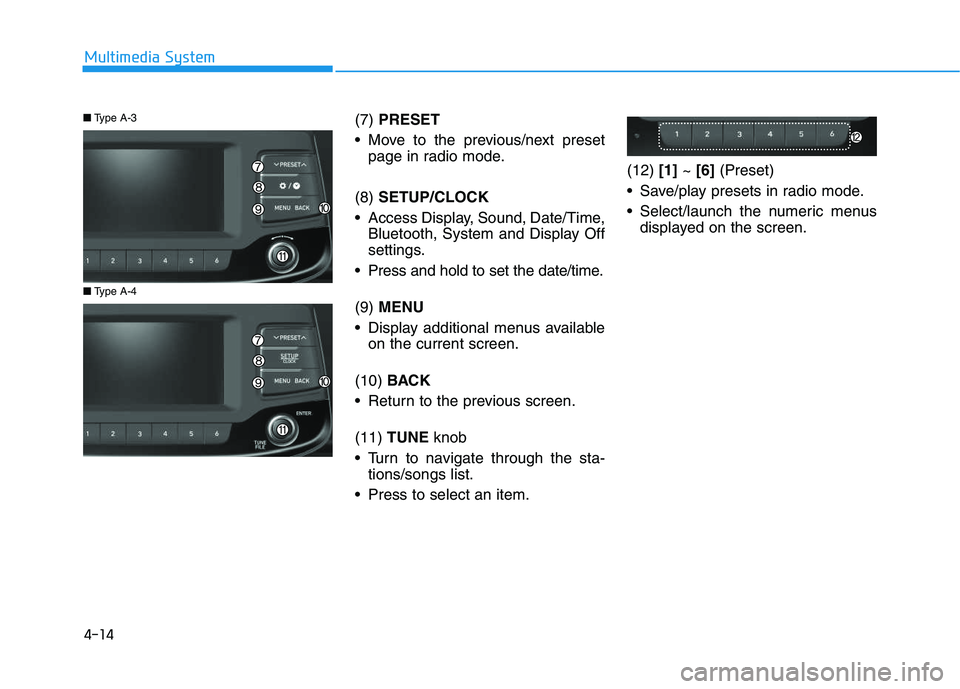
(7) PRESET
Move to the previous/next preset page in radio mode.
(8) SETUP/CLOCK
Access Display, Sound, Date/Time, Bluetooth, System and Display Off
settings.
Press and hold to set the date/time.
(9) MENU
Display additional menus available on the current screen.
(10) BACK
Return to the previous screen.
(11) TUNE knob
Turn to navigate through the sta- tions/songs list.
Press to select an item. (12)
[1]~ [6] (Preset)
Save/play presets in radio mode.
Select/launch the numeric menus displayed on the screen.
■ Type A-4
■Type A-3
4-14
Multimedia System
Page 267 of 659
![HYUNDAI I30 2022 Owners Manual 4-35
Multimedia System
4
Information
The 6-digit passkey in the image
above is an example. Refer to your
vehicle for the actual passkey.
Pairing a second Bluetooth®device
Press the [SETUP/CLOCK] butt HYUNDAI I30 2022 Owners Manual 4-35
Multimedia System
4
Information
The 6-digit passkey in the image
above is an example. Refer to your
vehicle for the actual passkey.
Pairing a second Bluetooth®device
Press the [SETUP/CLOCK] butt](/img/35/56145/w960_56145-266.png)
4-35
Multimedia System
4
Information
The 6-digit passkey in the image
above is an example. Refer to your
vehicle for the actual passkey.
Pairing a second Bluetooth®device
Press the [SETUP/CLOCK] button
on the audio system ➟Select
[Bluetooth] ➟Select [Connections]
➟ Select [Add new device].
- The pairing procedure from this point is identical to [Pairing the first
Bluetooth device].
Information
• Bluetooth®standby mode lasts for
three minutes. If a device is not
paired within three minutes, pairing
is canceled. Start over from the
beginning.
• For most Bluetooth
®devices, a con-
nection is established automatically
after pairing. Some devices, howev-
er, require separate confirmation
when connecting after pairing. Be
sure to check your Bluetooth
®
device after pairing to confirm that
it has connected.
Connecting Bluetooth®devices
If there are no connected devices
Press the [PHONE]button on the
audio system or the [CALL]button in
the steering wheel remote control ➟
List of paired Bluetooth
®devices ➟
Select the desired Bluetooth®device
from the list ➟Connect Bluetooth®.
ii
Page 272 of 659
![HYUNDAI I30 2022 Owners Manual 4-40
Multimedia System
Setup
Access Display, Sound, Date/Time,
Bluetooth*, System and Display Off
settings.
Press the[SETUP/CLOCK] button
on the audio system.
* if equipped
Display
Press the [SETUP/C HYUNDAI I30 2022 Owners Manual 4-40
Multimedia System
Setup
Access Display, Sound, Date/Time,
Bluetooth*, System and Display Off
settings.
Press the[SETUP/CLOCK] button
on the audio system.
* if equipped
Display
Press the [SETUP/C](/img/35/56145/w960_56145-271.png)
4-40
Multimedia System
Setup
Access Display, Sound, Date/Time,
Bluetooth*, System and Display Off
settings.
Press the[SETUP/CLOCK] button
on the audio system.
* if equipped
Display
Press the [SETUP/CLOCK] button
on the audio system ➟Select
[Display].
Dimming mode: Audio screen brightness can be adjusted to the
time of day.
Brightness: The brightness of the audio screen can be changed.
Screensaver: Set the information displayed when the audio system
is switched off or the screen is
turned off.
Sound
Press the [SETUP/CLOCK] button
on the audio system ➟Select
[Sound].
Position: Sound balance and pan- ning can be adjusted.
Equaliser: Sound tone color can be adjusted.
Rear parking sensors prioritised: Automatically lower audio volume
while reversing.
Speed dependent volume control: Automatically adjust volume based
on vehicle speed.
Date/Time
Press the [SETUP/CLOCK] button
on the audio system ➟Select
[Date/Time].
Set time: Set the time displayed on the audio screen.
Time format: Choose betw een 12-
hour and 24-hour time formats.
Set date: Set the date displayed on the audio screen.
Bluetooth (if equipped)
Press the [SETUP/CLOCK] button
➟ Select [Bluetooth].
Connections: Control pairing, dele- tion, connection and disconnection
of Bluetooth
®devices.
Auto connection priority: Set the connection priority of Bluetooth
®
devices when the vehicle is started.
Update contacts: Contacts can be
downloaded from connected
Bluetooth
®devices.
Bluetooth voice guidance: Play or mute voice prompts for Bluetooth
®
device pairing, connection and
errors.
Page 273 of 659
4-41
Multimedia System
4
Information
• When paired devices are deleted,the call history and contacts of the
device saved to the audio system are
deleted.
• For Bluetooth
®connections with
low connection priority, some time
may be required for the connection
to be established.
• Contacts can be downloaded only from the currently connected
Bluetooth
®device.
• If no Bluetooth
®device is connected,
the Download Contacts button is
disabled.
• If the language setting is Slovakian, Hungarian or Korean, Bluetooth
voice guidance is not supported.
System
Press the [SETUP/CLOCK] button
on the audio system ➟Select
[System].
Memory information: View My Music memory usage.
Language: Change the user lan- guage.
Default: Reset the audio system.
Information
The system resets to the default val-
ues, and all saved data and settings
are lost.
Display Off
To prevent glare, the screen can be
turned off with the audio system in
operation.
Press the [SETUP/CLOCK] button
on the audio system ➟Select
[Display Off].
Information
Use ‘Screensaver’ to set the informa-
tion to be displayed when the screen is
turned off.
i
i
i
Page 303 of 659
4-71
Multimedia System
4
Information
• When paired devices are deleted,the call history and contacts of the
device saved to the audio system are
deleted.
• For Bluetooth
®connections with
low connection priority, some time
may be required for the connection
to be established.
• Contacts can be downloaded only from the currently connected
Bluetooth
®device.
• If no Bluetooth
®device is connected,
the Download Contacts button is
disabled.
• If the language setting is Slovakian, Hungarian or Korean, Bluetooth
voice guidance is not supported.
System
Press the [SETUP]button on the
audio system ➟Select [System].
Memory information: View My Music memory usage.
Language: Change the user lan- guage.
Default: Reset the audio system.
Information
The system resets to the default val-
ues, and all saved data and settings
are lost.
Screensaver
Set the information displayed when
the audio system is switched off or
the screen is turned off.
Press the [SETUP]button on the
audio system ➟Select [Screensaver].
Analogue: An analog clock is dis-
played.
Digital: A digital clock is displayed.
None: No information is displayed.
Display Off
To prevent glare, the screen can be
turned off with the audio system in
operation.
Press the [SETUP]button on the
audio system ➟Select [Display Off].
Information
Use ‘Screensaver’ to set the informa-
tion to be displayed when the screen is
turned off.
i
i
i
Page 477 of 659
6-7
What to do in an emergency
6
If your temperature gauge indicates
overheating, you experience a loss
of power, or hear loud pinging or
knocking, the engine may be over-
heating. If this happens, you should:
1. Pull off the road and stop as soonas it is safe to do so.
2. Place the shift lever in P (Park, for automatic transmission/dual clutch
transmission vehicle) or neutral (for
manual transmission/dual clutch
transmission vehicle) and set the
parking brake. If the air condition-
ing is ON, turn it OFF.
3. If engine coolant is running out under the vehicle or steam is com-
ing out from the hood, stop the
engine. Do not open the hood until
the coolant has stopped running
or the steaming has stopped. If
there is no visible loss of engine
coolant and no steam, leave the
engine running and check to be
sure the engine cooling fan is
operating. If the fan is not running,
turn the engine off. 4. Check for coolant leaking from the
radiator, hoses or under the vehi-
cle. (If the air conditioning had been
in use, it is normal for cold water to
be draining from it when you stop.)
5. If engine coolant is leaking out, stop the engine immediately and we rec-
ommend that you call an authorized
HYUNDAI dealer for assistance.
I
I F
F
T
T H
H E
E
E
E N
N G
G I
I N
N E
E
O
O V
V E
E R
R H
H E
E A
A T
T S
S
While the engine is
running, keep hands,
clothing and tools
away from the mov-
ing parts such as the
cooling fan and drive
belt to prevent seri-
ous injury.
WARNING
NEVER remove the
radiator cap or the
drain plug while the
engine and radiator
are hot. Hot coolant
and steam may blow out under
pressure, causing serious injury.
Turn the engine off and wait
until the engine cools down.
Use extreme care when remov-
ing the radiator cap. Wrap a
thick towel around it, and turn it
counterclockwise slowly to the
first stop. Step back while the
pressure is released from the
cooling system. When you are
sure all the pressure has been
released, press down on the
cap, using a thick towel, and
continue turning counterclock-
wise to remove it.
WARNING