instrument cluster HYUNDAI I30 2023 Owners Manual
[x] Cancel search | Manufacturer: HYUNDAI, Model Year: 2023, Model line: I30, Model: HYUNDAI I30 2023Pages: 533, PDF Size: 59.13 MB
Page 18 of 533
1-5
Your vehicle at a glance
1
I IN
NS
ST
TR
RU
UM
ME
EN
NT
T
P
PA
AN
NE
EL
L
O
OV
VE
ER
RV
VI
IE
EW
W
(
(I
I)
)
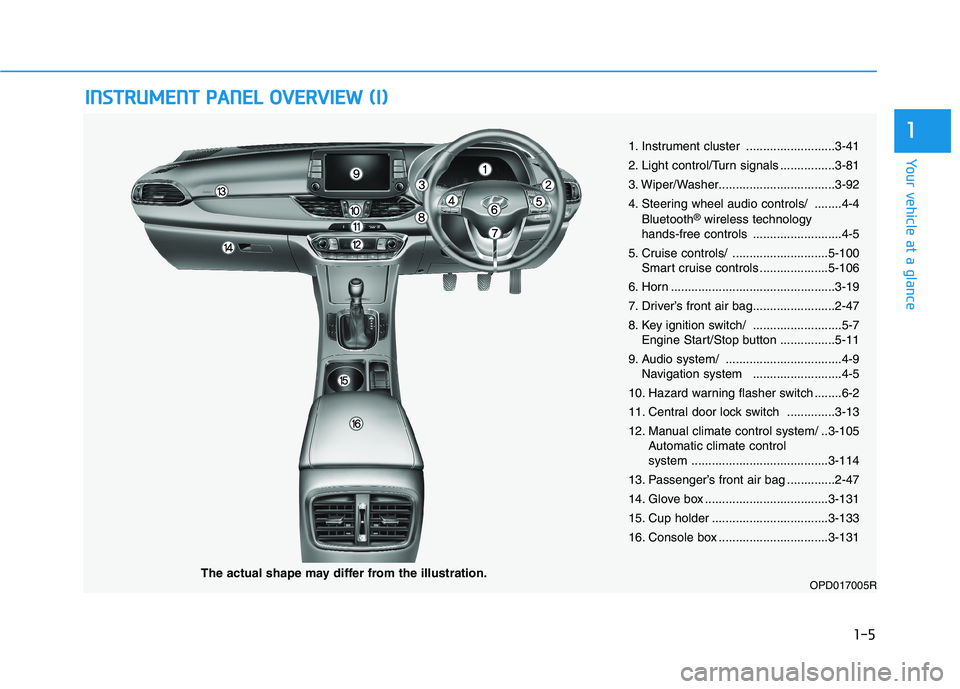
1. Instrument cluster ..........................3-41
2. Light control/Turn signals ................3-81
3. Wiper/Washer..................................3-92
4. Steering wheel audio controls/ ........4-4
Bluetooth
®wireless technology
hands-free controls ..........................4-5
5. Cruise controls/ ............................5-100
Smart cruise controls ....................5-106
6. Horn ................................................3-19
7. Driver’s front air bag........................2-47
8. Key ignition switch/ ..........................5-7
Engine Start/Stop button ................5-11
9. Audio system/ ..................................4-9
Navigation system ..........................4-5
10. Hazard warning flasher switch ........6-2
11. Central door lock switch ..............3-13
12. Manual climate control system/ ..3-105
Automatic climate control
system ........................................3-114
13. Passenger’s front air bag ..............2-47
14. Glove box ....................................3-131
15. Cup holder ..................................3-133
16. Console box ................................3-131
OPD017005RThe actual shape may differ from the illustration.
Page 45 of 533
2-24
Safety system of your vehicle
Seat belt warning light
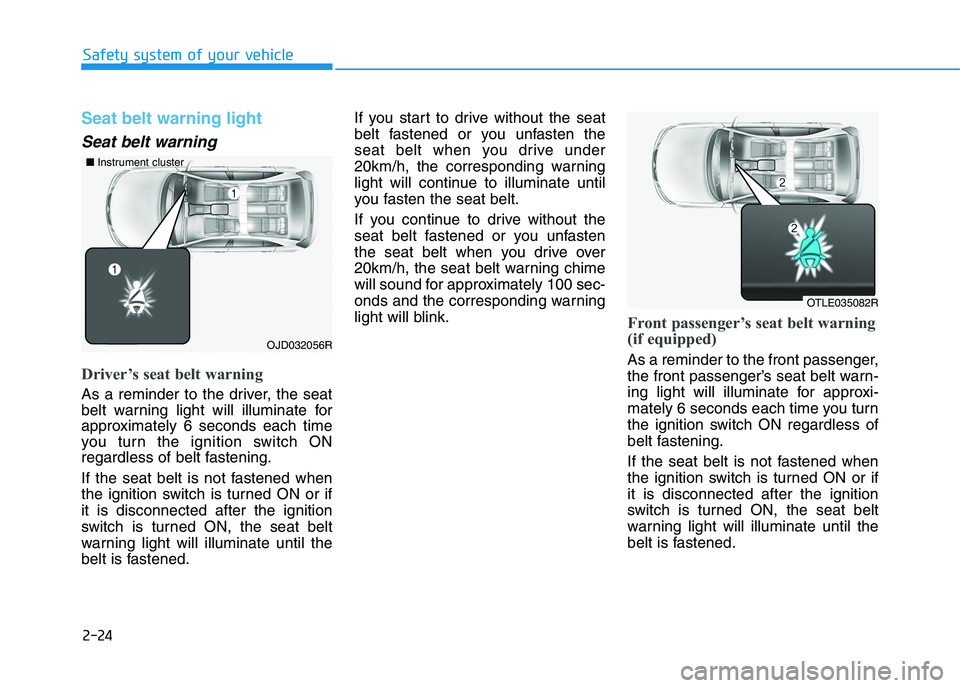
Seat belt warning
Driver’s seat belt warning
As a reminder to the driver, the seat
belt warning light will illuminate for
approximately 6 seconds each time
you turn the ignition switch ON
regardless of belt fastening.
If the seat belt is not fastened when
the ignition switch is turned ON or if
it is disconnected after the ignition
switch is turned ON, the seat belt
warning light will illuminate until the
belt is fastened.If you start to drive without the seat
belt fastened or you unfasten the
seat belt when you drive under
20km/h, the corresponding warning
light will continue to illuminate until
you fasten the seat belt.
If you continue to drive without the
seat belt fastened or you unfasten
the seat belt when you drive over
20km/h, the seat belt warning chime
will sound for approximately 100 sec-
onds and the corresponding warning
light will blink.
Front passenger’s seat belt warning
(if equipped)
As a reminder to the front passenger,
the front passenger’s seat belt warn-
ing light will illuminate for approxi-
mately 6 seconds each time you turn
the ignition switch ON regardless of
belt fastening.
If the seat belt is not fastened when
the ignition switch is turned ON or if
it is disconnected after the ignition
switch is turned ON, the seat belt
warning light will illuminate until the
belt is fastened.
OTLE035082R
OJD032056R ■Instrument cluster
Page 51 of 533
2-30
Safety system of your vehicle
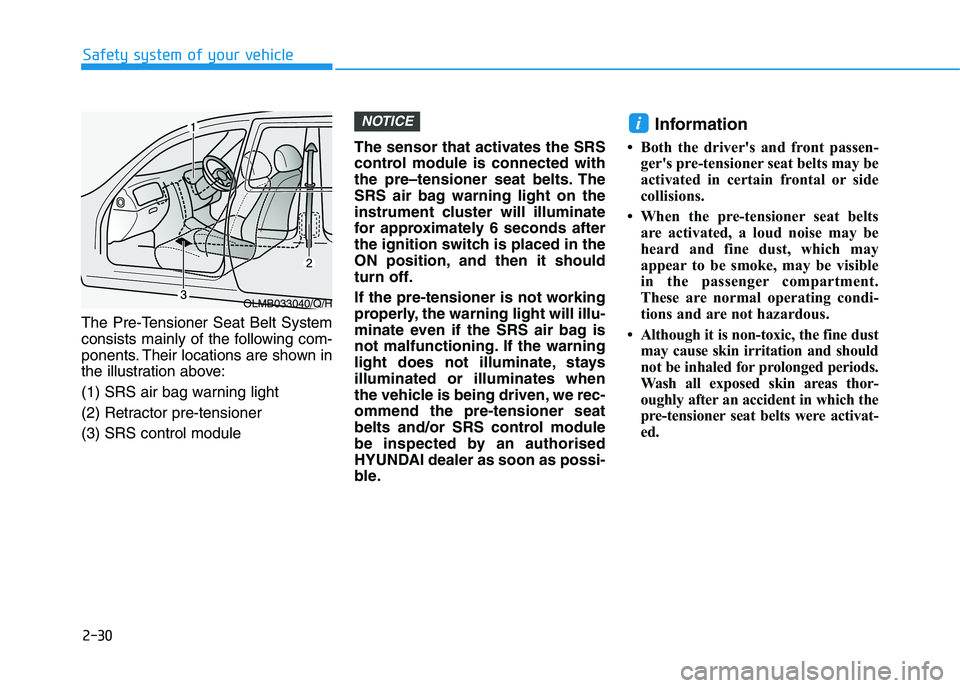
The Pre-Tensioner Seat Belt System
consists mainly of the following com-
ponents. Their locations are shown in
the illustration above:
(1) SRS air bag warning light
(2) Retractor pre-tensioner
(3) SRS control moduleThe sensor that activates the SRS
control module is connected with
the pre–tensioner seat belts. The
SRS air bag warning light on the
instrument cluster will illuminate
for approximately 6 seconds after
the ignition switch is placed in the
ON position, and then it should
turn off.
If the pre-tensioner is not working
properly, the warning light will illu-
minate even if the SRS air bag is
not malfunctioning. If the warning
light does not illuminate, stays
illuminated or illuminates when
the vehicle is being driven, we rec-
ommend the pre-tensioner seat
belts and/or SRS control module
be inspected by an authorised
HYUNDAI dealer as soon as possi-
ble.
Information
• Both the driver's and front passen-
ger's pre-tensioner seat belts may be
activated in certain frontal or side
collisions.
• When the pre-tensioner seat belts
are activated, a loud noise may be
heard and fine dust, which may
appear to be smoke, may be visible
in the passenger compartment.
These are normal operating condi-
tions and are not hazardous.
• Although it is non-toxic, the fine dust
may cause skin irritation and should
not be inhaled for prolonged periods.
Wash all exposed skin areas thor-
oughly after an accident in which the
pre-tensioner seat belts were activat-
ed.
iNOTICE
OLMB033040/Q/H
Page 75 of 533
2-54
Safety system of your vehicle
What to expect after an air bag
inflates
After a frontal or side air bag inflates,
it will deflate very quickly. Air bag
inflation will not prevent the driver
from seeing out of the windscreen or
being able to steer. Curtain air bags
may remain partially inflated for
some time after they deploy. To prevent objects from becom-
ing dangerous projectiles when
the passenger's air bag inflates:
Do not install or place any
objects (drink holder, CD hold-
er, stickers, etc.) on the front
passenger's panel above the
glove box where the passen-
ger's air bag is located.
Do not install a container of
liquid air freshener near the
instrument cluster or on the
instrument panel surface.
WARNING
After an air bag inflates, take
the following precautions:
Open your windows and doors
as soon as possible after
impact to reduce prolonged
exposure to the smoke and
powder released by the inflat-
ing air bag.
Do not touch the air bag stor-
age area’s internal compo-
nents immediately after an air
bag has inflated. The parts
that come into contact with an
inflating air bag may be very
hot.
Always wash exposed skin
areas thoroughly with cold
water and mild soap.
We recommend that an autho-
rised HYUNDAI dealer replace
the air bag immediately after
deployment. Air bags are
designed to be used only once.
WARNING
Page 84 of 533
Convenient features of your vehicle
Accessing your vehicle .........................................3-3
Remote key .........................................................................3-3
Smart key ............................................................................3-6
Immobiliser system .........................................................3-10
Door locks .............................................................3-11
Operating door locks from outside the vehicle ......3-11
Operating door locks from inside the vehicle .........3-12
Auto door lock/unlock features..................................3-15
Child-protector rear door locks ..................................3-15
Theft-alarm system.............................................3-16
Steering wheel......................................................3-17
Electric power steering (EPS) ......................................3-17
Tilt steering / Telescopic steering ..............................3-18
Horn ....................................................................................3-19
Mirrors ...................................................................3-20
Inside rearview mirror....................................................3-20
Outside rearview mirror ................................................3-21
Reverse parking aid function.......................................3-24
Windows ................................................................3-25
Power windows ................................................................3-25
Remote window closing function ................................3-29
Panorama sunroof ...............................................3-30
Sunshade ...........................................................................3-31
Sliding the sunroof .........................................................3-31
Tilting the sunroof ..........................................................3-32
Closing the sunroof ........................................................3-32
Resetting the sunroof ....................................................3-33
Sunroof open warning ...................................................3-34
Exterior features .................................................3-35
Bonnet................................................................................3-35
Tailgate...............................................................................3-36
Fuel filler door .................................................................3-38
Instrument cluster................................................3-41
Instrument cluster control ............................................3-42
Gauges ...............................................................................3-43
Transmission shift indicator .........................................3-46
Warning and indicator lights ........................................3-48
LCD display messages ....................................................3-62
LCD Display ...........................................................3-68
LCD display control.........................................................3-68
LCD display modes ..........................................................3-69
Trip computer .......................................................3-77
Trip modes ........................................................................3-77
Lighting..................................................................3-81
Exterior lights ..................................................................3-81
Welcome system..............................................................3-87
Interior lights ....................................................................3-88
3
Page 125 of 533
3-42
Convenient features of your vehicle
Instrument cluster control
Instrument panel illumination
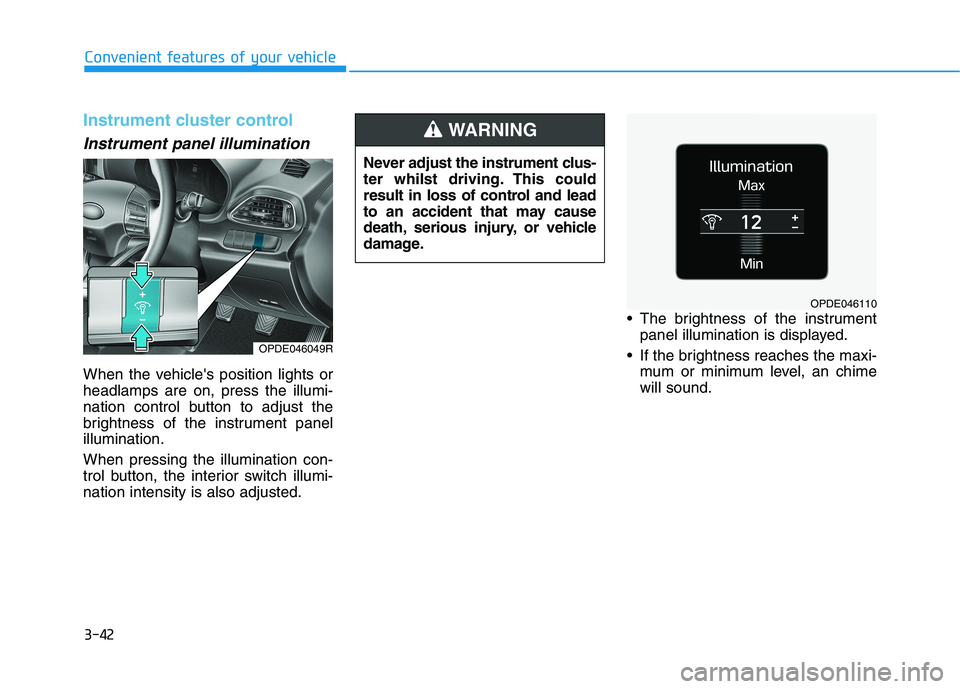
When the vehicle's position lights or
headlamps are on, press the illumi-
nation control button to adjust the
brightness of the instrument panel
illumination.
When pressing the illumination con-
trol button, the interior switch illumi-
nation intensity is also adjusted. The brightness of the instrument
panel illumination is displayed.
If the brightness reaches the maxi-
mum or minimum level, an chime
will sound. Never adjust the instrument clus-
ter whilst driving. This could
result in loss of control and lead
to an accident that may cause
death, serious injury, or vehicle
damage.
WARNING
OPDE046110
OPDE046049R
Page 147 of 533
3-64
Convenient features of your vehicle
Press START button again
(for smart key system)
This message is displayed if you
were unable to start the vehicle when
the Engine Start/Stop button was
pressed.
If this occurs, attempt to start the
engine by pressing the Engine
Start/Stop button again.
If the warning message appears
each time you press the Engine
Start/Stop button, we recommend
that you have your vehicle inspected
by an authorised HYUNDAI dealer.
Check BRAKE SWITCH fuse
(for smart key system and auto-
matic transmission/dual clutch
transmission)
This warning message is displayed if
the brake switch fuse is disconnected.
You need to replace the fuse with a
new one. If that is not possible, you
can start the engine by pressing the
Engine Start/Stop button for 10 sec-
onds in the ACC position.
Shift to P or N to start engine
(for smart key system and auto-
matic transmission/dual clutch
transmission)
This warning message is displayed if
you try to start the engine with the
shift lever not in the P (Park) or N
(Neutral) position.
Information
You can start the engine with the shift
lever in the N (Neutral) position. But,
for your safety, we recommend that
you start the engine with the shift
lever in the P (Park) position.
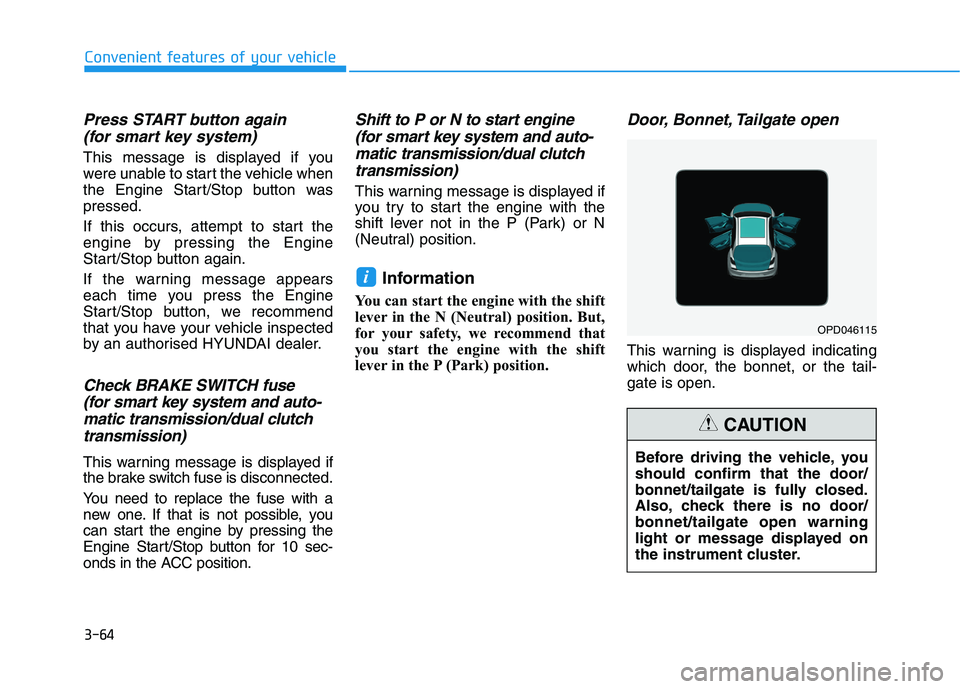
Door, Bonnet, Tailgate open
This warning is displayed indicating
which door, the bonnet, or the tail-
gate is open.
i
Before driving the vehicle, you
should confirm that the door/
bonnet/tailgate is fully closed.
Also, check there is no door/
bonnet/tailgate open warning
light or message displayed on
the instrument cluster.
CAUTION
OPD046115
Page 155 of 533
3-72
Convenient features of your vehicle
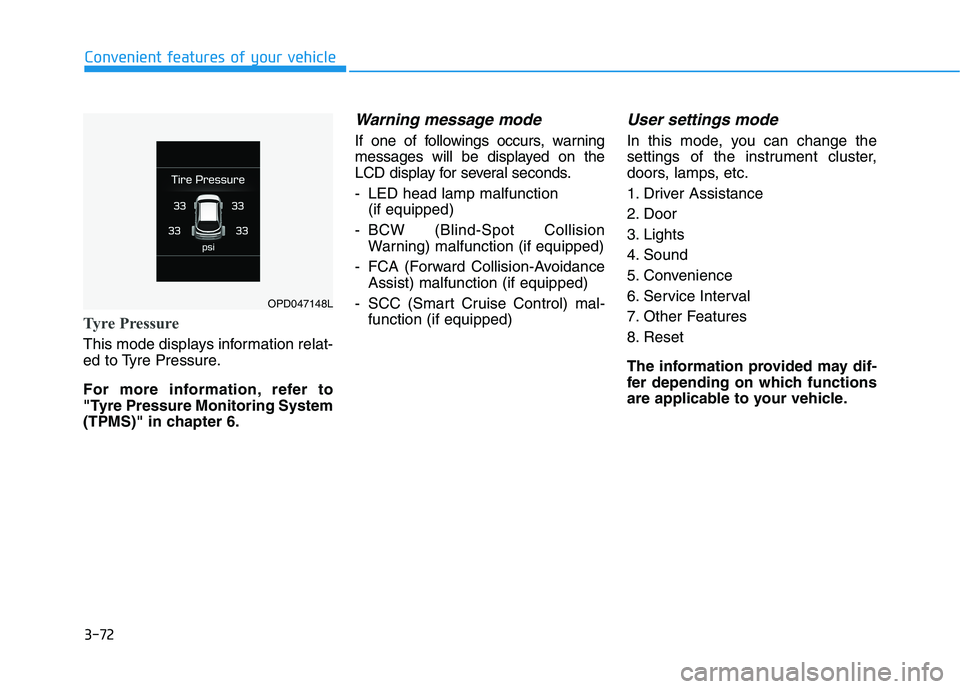
Tyre Pressure
This mode displays information relat-
ed to Tyre Pressure.
For more information, refer to
"Tyre Pressure Monitoring System
(TPMS)" in chapter 6.
Warning message mode
If one of followings occurs, warning
messages will be displayed on the
LCD display for several seconds.
- LED head lamp malfunction
(if equipped)
- BCW (Blind-Spot Collision
Warning) malfunction (if equipped)
- FCA (Forward Collision-Avoidance
Assist) malfunction (if equipped)
- SCC (Smart Cruise Control) mal-
function (if equipped)
User settings mode
In this mode, you can change the
settings of the instrument cluster,
doors, lamps, etc.
1. Driver Assistance
2. Door
3. Lights
4. Sound
5. Convenience
6. Service Interval
7. Other Features
8. Reset
The information provided may dif-
fer depending on which functions
are applicable to your vehicle.
OPD047148L
Page 202 of 533
3-119
Convenient features of your vehicle
3
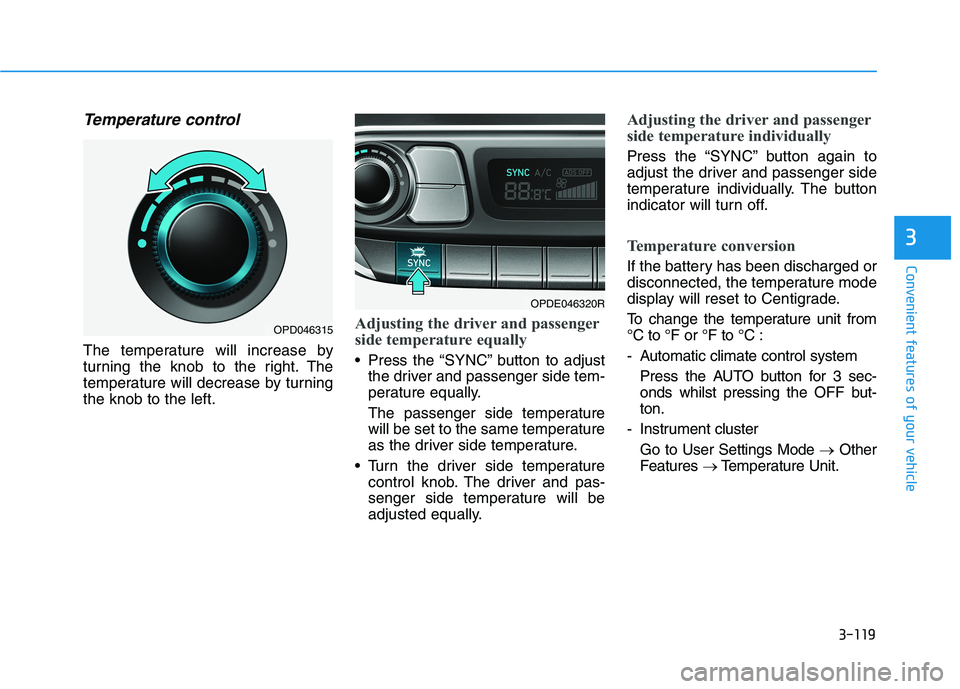
Temperature control
The temperature will increase by
turning the knob to the right. The
temperature will decrease by turning
the knob to the left.
Adjusting the driver and passenger
side temperature equally
Press the “SYNC” button to adjust
the driver and passenger side tem-
perature equally.
The passenger side temperature
will be set to the same temperature
as the driver side temperature.
Turn the driver side temperature
control knob. The driver and pas-
senger side temperature will be
adjusted equally.
Adjusting the driver and passenger
side temperature individually
Press the “SYNC” button again to
adjust the driver and passenger side
temperature individually. The button
indicator will turn off.
Temperature conversion
If the battery has been discharged or
disconnected, the temperature mode
display will reset to Centigrade.
To change the temperature unit from
°C to °F or °F to °C :
- Automatic climate control system
Press the AUTO button for 3 sec-
onds whilst pressing the OFF but-
ton.
- Instrument cluster
Go to User Settings Mode →Other
Features →Temperature Unit.
OPDE046320R
OPD046315
Page 221 of 533
3-138
Convenient features of your vehicle
To charge a mobile phone
The wireless mobile phone charging
system charges only the Qi-enabled
mobile phones ( ). Read the label
on the mobile phone accessory
cover or visit your mobile phone
manufacturer’s website to check
whether your mobile phone supports
the Qi technology.
The wireless charging process starts
when you put a Qi-enabled mobile
phone on the wireless charging unit.
1. Remove other items, including the
smart key, from the wireless charg-
ing unit. If not, the wireless charg-
ing process may be interrupted.
2. The indicator illuminates in orange
during the charging process. The
indicator colour changes to green,
when the charging process is
completed.
3. You can turn ON or OFF the wire-
less charging function in the User
Settings mode on the instrument
cluster. For further information,
refer to “LCD display Modes” in
this chapter.Slightly change the mobile phone
position, when the mobile phone is
not being charged. Make sure that
the indicator illuminates in orange.
The indicator colour may not change
to green depending on the mobile
phone type, even though the charg-
ing process has been completed.
The indicator blinks orange for 10
seconds when there is a malfunction
with the wireless charging system.
In this case, temporarily stop the
charging process, and re-attempt to
wirelessly charge your mobile phone
again.
The system warns you with a mes-
sage on the LCD display if you do not
remove the cellular phone from the
wireless charging unit, when the front
door is open and the ignition switch is
in the OFF position.
The wireless mobile phone
charging system may not sup-
port certain mobile phones,
which are not verified for the Qi
specification ( ).
(Continued)(Continued)
Locate your mobile phone well in
the middle of the wireless mobile
phone charging system. Even
when your mobile phone locates
slightly to one side, the charging
speed may decrease.
The wireless charging process
may temporarily stop, when a
smart key function operates (i.e.
starting the engine, opening the
doors, closing the doors).
For certain mobile phones, the
indicator colour may not change
to green, even when the wireless
charging process is properly
completed.
The wireless charging process may
temporarily stop, when tempera-
ture abnormally increases inside
the wireless mobile phone charg-
ing system. The wireless charging
process restarts, when tempera-
ture falls to a certain level.
The wireless charging process
may temporarily stop when there
is any metallic item, such as a
coin, between the wireless
mobile phone charging system
and a mobile phone.
NOTICE