check engine HYUNDAI I40 2014 Owners Manual
[x] Cancel search | Manufacturer: HYUNDAI, Model Year: 2014, Model line: I40, Model: HYUNDAI I40 2014Pages: 534, PDF Size: 11.05 MB
Page 481 of 534
Downloaded from www.Manualslib.com manuals search engine Maintenance
76
7
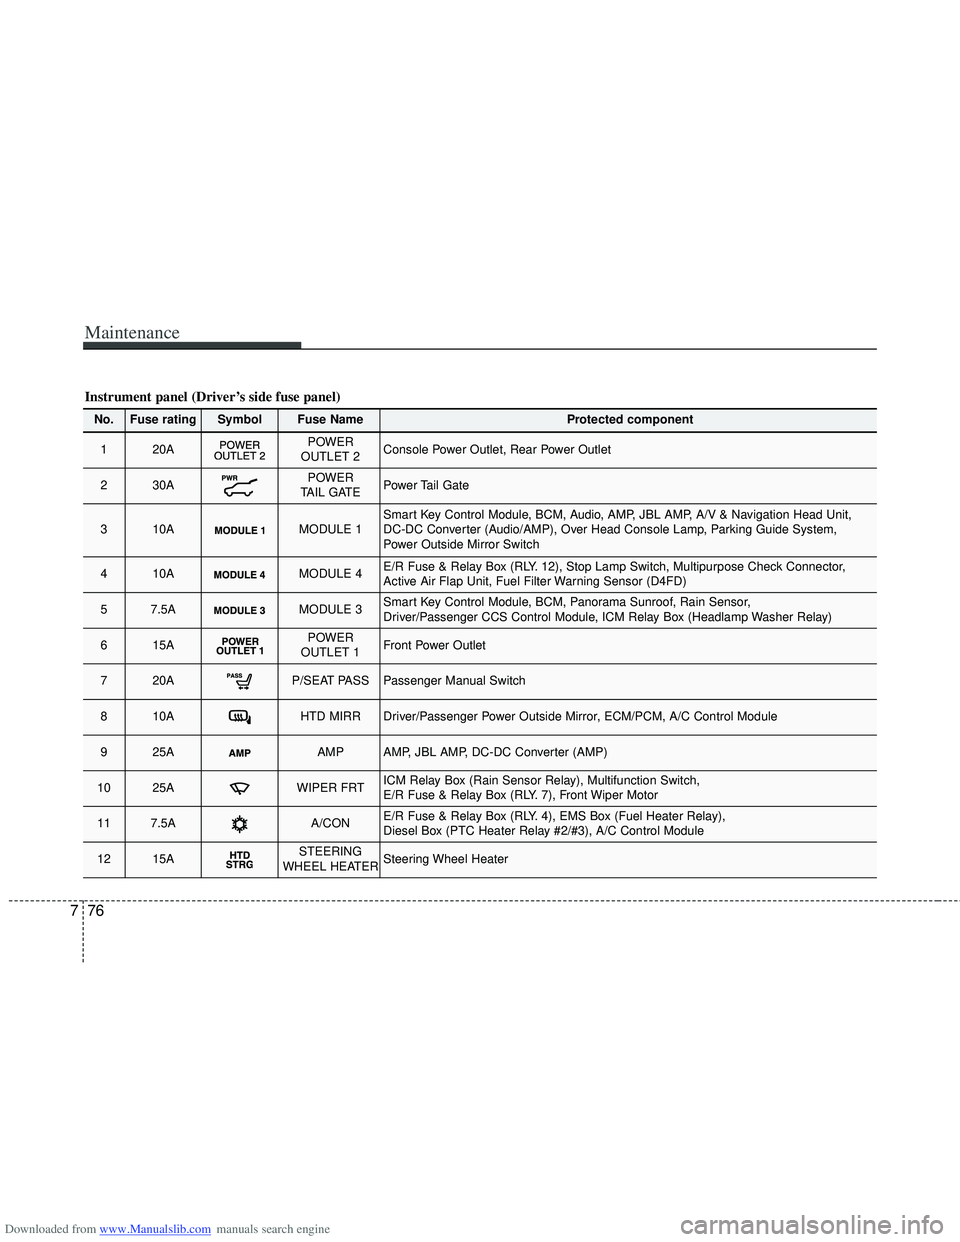
Instrument panel (Driver’s side fuse panel)
No.Fuse ratingSymbol Fuse NameProtected component
120APOWER
OUTLET 2Console Power Outlet, Rear Power Outlet
230APOWER
TAIL GATEPower Tail Gate
310AMODULE 1Smart Key Control Module, BCM, Audio, AMP, JBL AMP, A/V & Navigation Head Unit,
DC-DC Converter (Audio/AMP), Over Head Console Lamp, Parking Guide System,
Power Outside Mirror Switch
410AMODULE 4E/R Fuse & Relay Box (RLY. 12), Stop Lamp Switch, Multipurpose Check Connector,
Active Air Flap Unit, Fuel Filter Warning Sensor (D4FD)
57.5AMODULE 3Smart Key Control Module, BCM, Panorama Sunroof, Rain Sensor,
Driver/Passenger CCS Control Module, ICM Relay Box (Headlamp Washer Relay)
615APOWER
OUTLET 1Front Power Outlet
720AP/SEAT PASSPassenger Manual Switch
810AHTD MIRRDriver/Passenger Power Outside Mirror, ECM/PCM, A/C Control Module
925AAMPAMP, JBL AMP, DC-DC Converter (AMP)
1025AWIPER FRTICM Relay Box (Rain Sensor Relay), Multifunction Switch,
E/R Fuse & Relay Box (RLY. 7), Front Wiper Motor
117.5AA/CONE/R Fuse & Relay Box (RLY. 4), EMS Box (Fuel Heater Relay),
Diesel Box (PTC Heater Relay #2/#3), A/C Control Module
1215ASTEERING
WHEEL HEATERSteering Wheel Heater
Page 485 of 534
Downloaded from www.Manualslib.com manuals search engine Maintenance
80
7
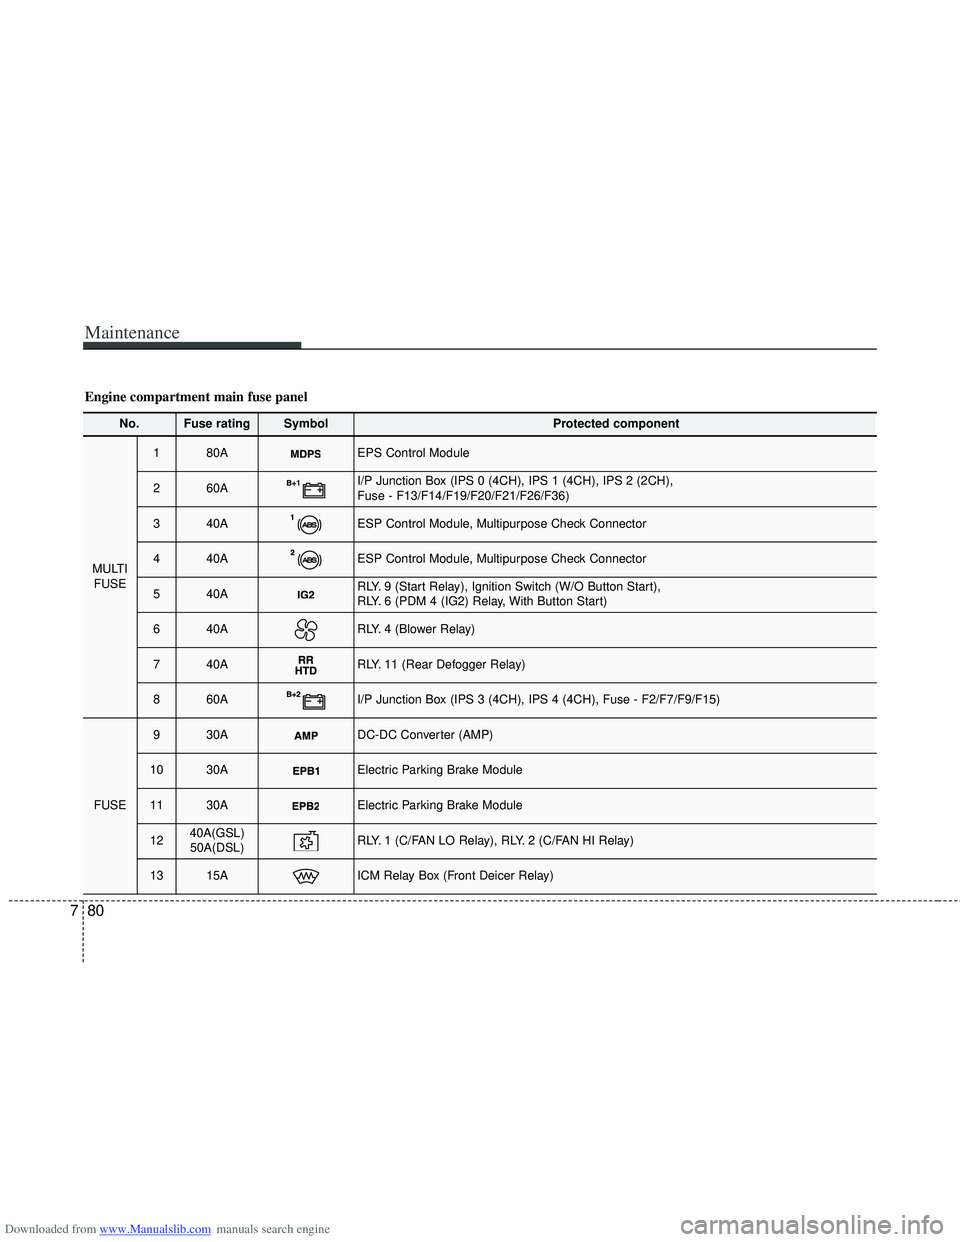
No.Fuse ratingSymbol Protected component
MULTI
FUSE
1 80AEPS Control Module
2 60AI/P Junction Box (IPS 0 (4CH), IPS 1 (4CH), IPS 2 (2CH),
Fuse - F13/F14/F19/F20/F21/F26/F36)
3 40AESP Control Module, Multipurpose Check Connector
440AESP Control Module, Multipurpose Check Connector
540ARLY. 9 (Start Relay), Ignition Switch (W/O Button Start),
RLY. 6 (PDM 4 (IG2) Relay, With Button Start)
640ARLY. 4 (Blower Relay)
740ARLY. 11 (Rear Defogger Relay)
860AI/P Junction Box (IPS 3 (4CH), IPS 4 (4CH), Fuse - F2/F7/F9/F15)
FUSE
930ADC-DC Converter (AMP)
1030AElectric Parking Brake Module
1130AElectric Parking Brake Module
1240A(GSL)50A(DSL)RLY. 1 (C/FAN LO Relay), RLY. 2 (C/FAN HI Relay)
1315AICM Relay Box (Front Deicer Relay)
Engine compartment main fuse panel
Page 490 of 534
Downloaded from www.Manualslib.com manuals search engine 785
Maintenance
LIGHT BULBS
Use only the bulbs of the specifiedwattage.
✽
✽ NOTICE
After driving in heavy rain or washing
the vehicle, headlight and taillight lenses
could appear frosty. This condition is
caused by the temperature difference
between the lamp inside and outside.
This is similar to the condensation on
your windows inside your vehicle during
rain and doesn’t indicate a problem with
your vehicle. If the water leaks into the
lamp bulb circuitry, have the vehicle
checked by an authorized HYUNDAI
dealer.
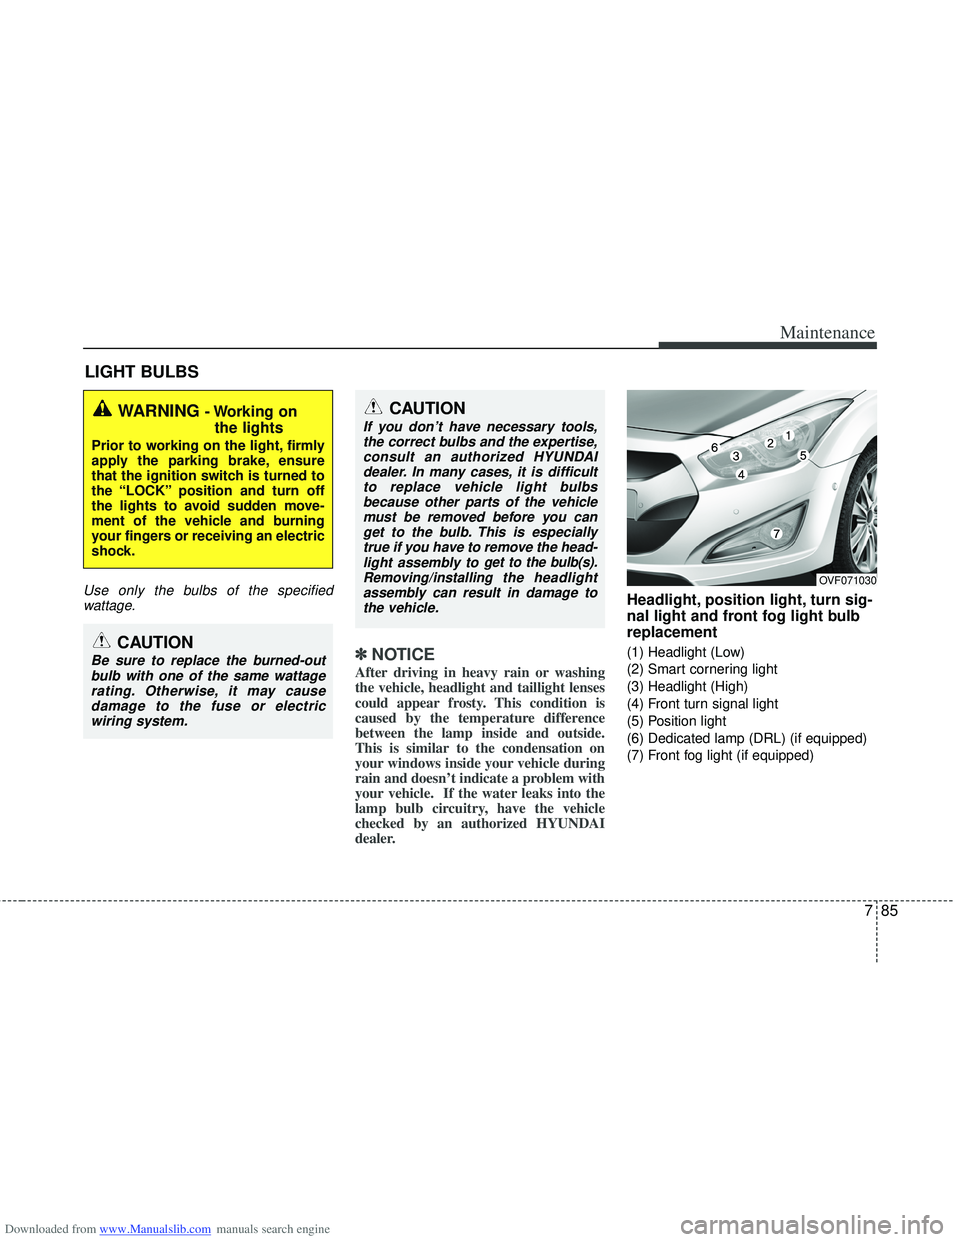
Headlight, position light, turn sig-
nal light and front fog light bulb
replacement
(1) Headlight (Low)
(2) Smart cornering light
(3) Headlight (High)
(4) Front turn signal light
(5) Position light
(6) Dedicated lamp (DRL) (if equipped)
(7) Front fog light (if equipped)
WARNING - Working on
the lights
Prior to working on the light, firmly
apply the parking brake, ensure
that the ignition switch is turned to
the “LOCK” position and turn off
the lights to avoid sudden move-
ment of the vehicle and burning
your fingers or receiving an electric
shock.
CAUTION
Be sure to replace the burned-out
bulb with one of the same wattagerating. Otherwise, it may causedamage to the fuse or electric wiring system.
CAUTION
If you don’t have necessary tools,the correct bulbs and the expertise,consult an authorized HYUNDAIdealer. In many cases, it is difficultto replace vehicle light bulbs because other parts of the vehiclemust be removed before you canget to the bulb. This is especiallytrue if you have to remove the head-light assembly to
get to the bulb(s).
Removing/installingthe headlight
assembly can result in damage to the vehicle.OVF071030
Page 493 of 534
Downloaded from www.Manualslib.com manuals search engine Maintenance
88
7
Headlight (HID type), position light
and dedicated lamp
If the light bulb does not operate, have
the vehicle checked by an authorized
HYUNDAI dealer.
✽ ✽ NOTICE
HID lamps have superior performance
vs. halogen bulbs. HID lamps are esti-
mated by the manufacturer to last twice
as long or longer than halogen bulbs
depending on their frequency of use.
They will probably require replacement
at some point in the life of the vehicle.
Cycling the headlamps on and off more
than typical use will shorten HID lamps
life. HID lamps do not fail in the same
manner as halogen incandescent lamps.
If a headlamp goes out after a period of
operation but will immediately relight
when the headlamp switch is cycled it is
likely the HID lamp needs to be
replaced. HID lighting components are
more complex than conventional halo-
gen bulbs thus have higher replacement
cost.
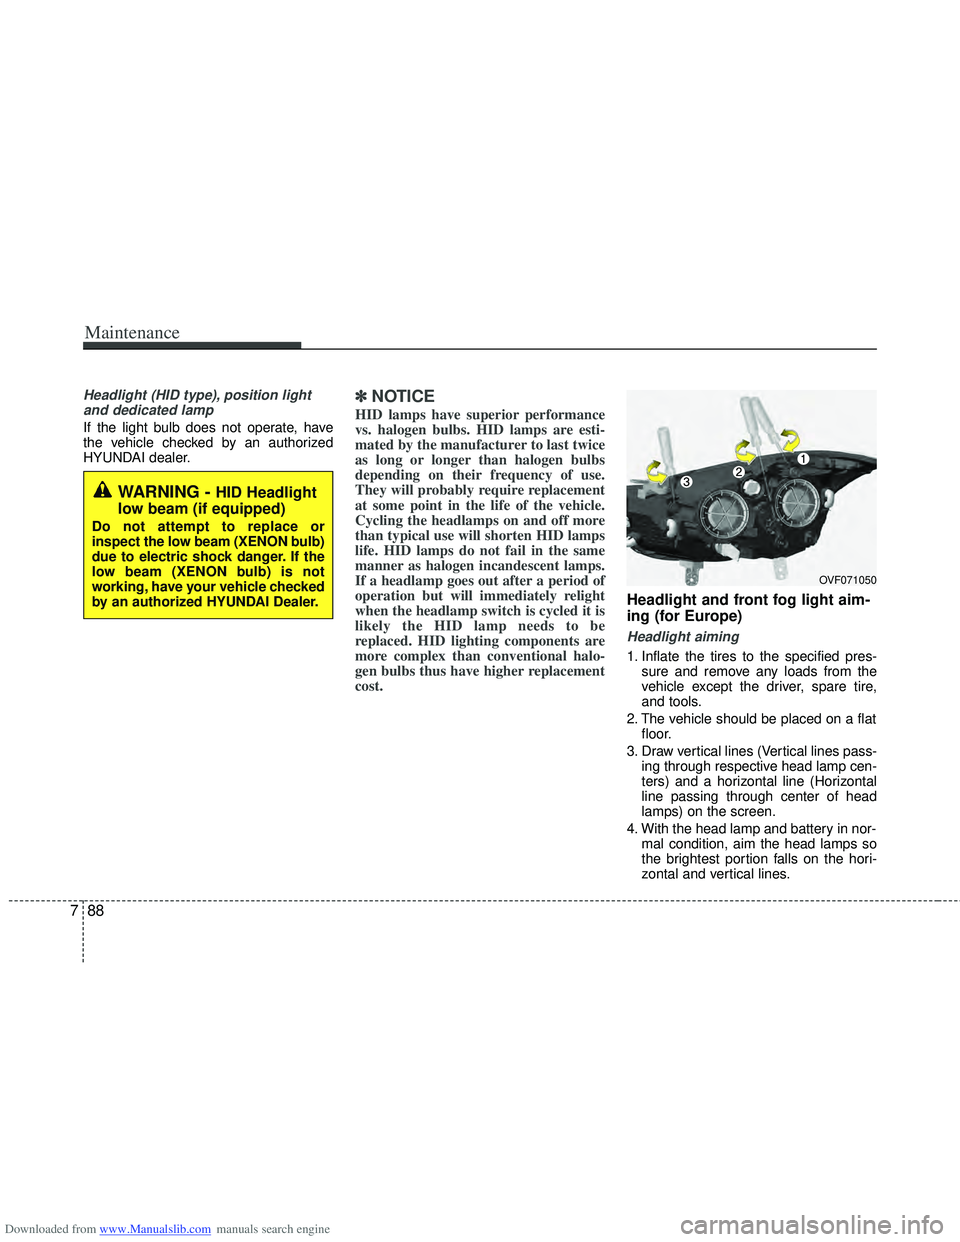
Headlight and front fog light aim-
ing (for Europe)
Headlight aiming
1. Inflate the tires to the specified pres-
sure and remove any loads from the
vehicle except the driver, spare tire,
and tools.
2. The vehicle should be placed on a flat floor.
3. Draw vertical lines (Vertical lines pass- ing through respective head lamp cen-
ters) and a horizontal line (Horizontal
line passing through center of head
lamps) on the screen.
4. With the head lamp and battery in nor- mal condition, aim the head lamps so
the brightest portion falls on the hori-
zontal and vertical lines.
WARNING - HID Headlight
low beam (if equipped)
Do not attempt to replace or
inspect the low beam (XENON bulb)
due to electric shock danger. If the
low beam (XENON bulb) is not
working, have your vehicle checked
by an authorized HYUNDAI Dealer.
OVF071050
Page 499 of 534
Downloaded from www.Manualslib.com manuals search engine Maintenance
94
7
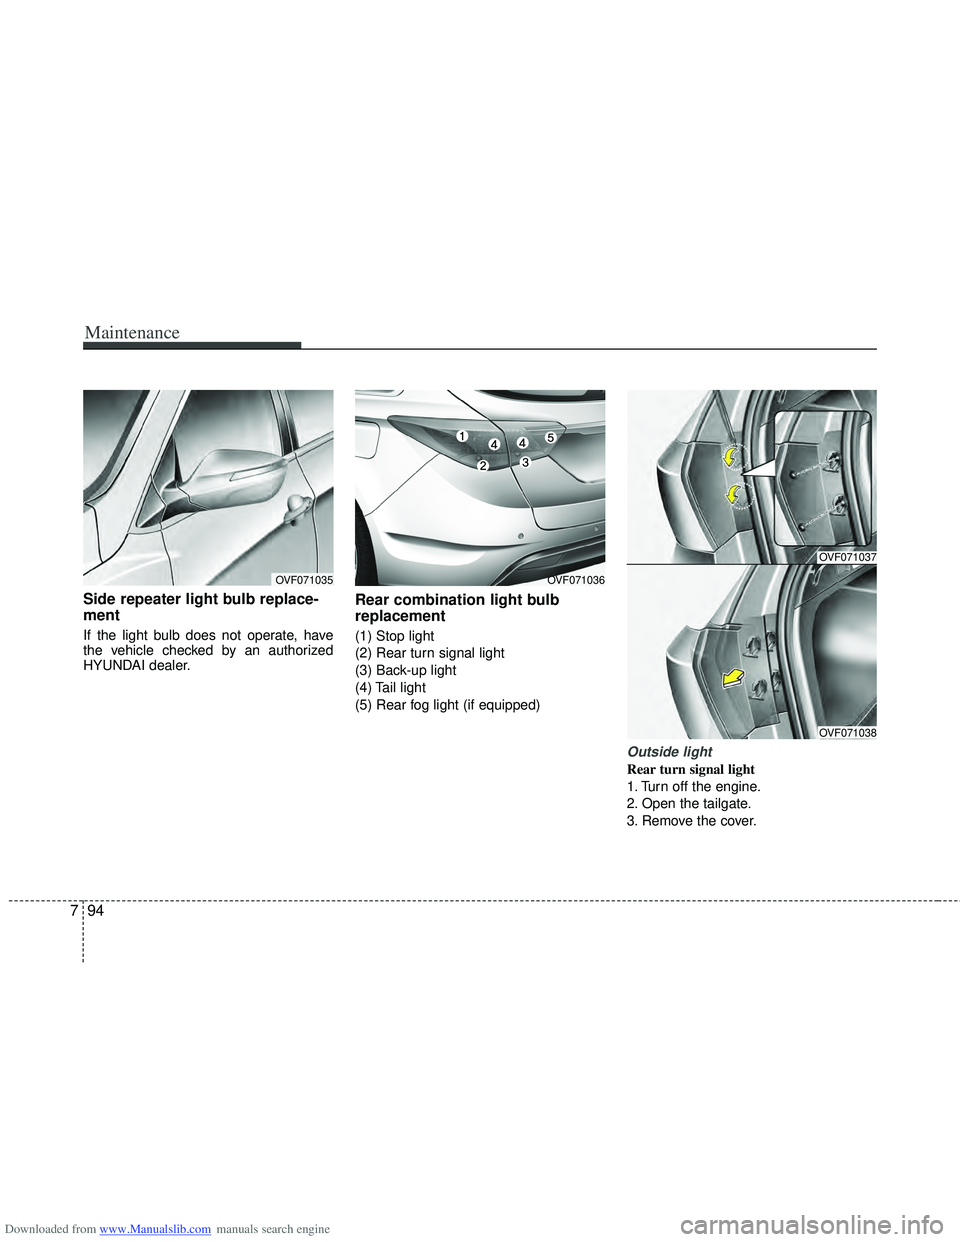
Side repeater light bulb replace-
ment
If the light bulb does not operate, have
the vehicle checked by an authorized
HYUNDAI dealer.
Rear combination light bulb
replacement
(1) Stop light
(2) Rear turn signal light
(3) Back-up light
(4) Tail light
(5) Rear fog light (if equipped)
Outside light
Rear turn signal light
1. Turn off the engine.
2. Open the tailgate.
3. Remove the cover.
OVF071036
OVF071037
OVF071038
OVF071035
Page 502 of 534
Downloaded from www.Manualslib.com manuals search engine 797
Maintenance
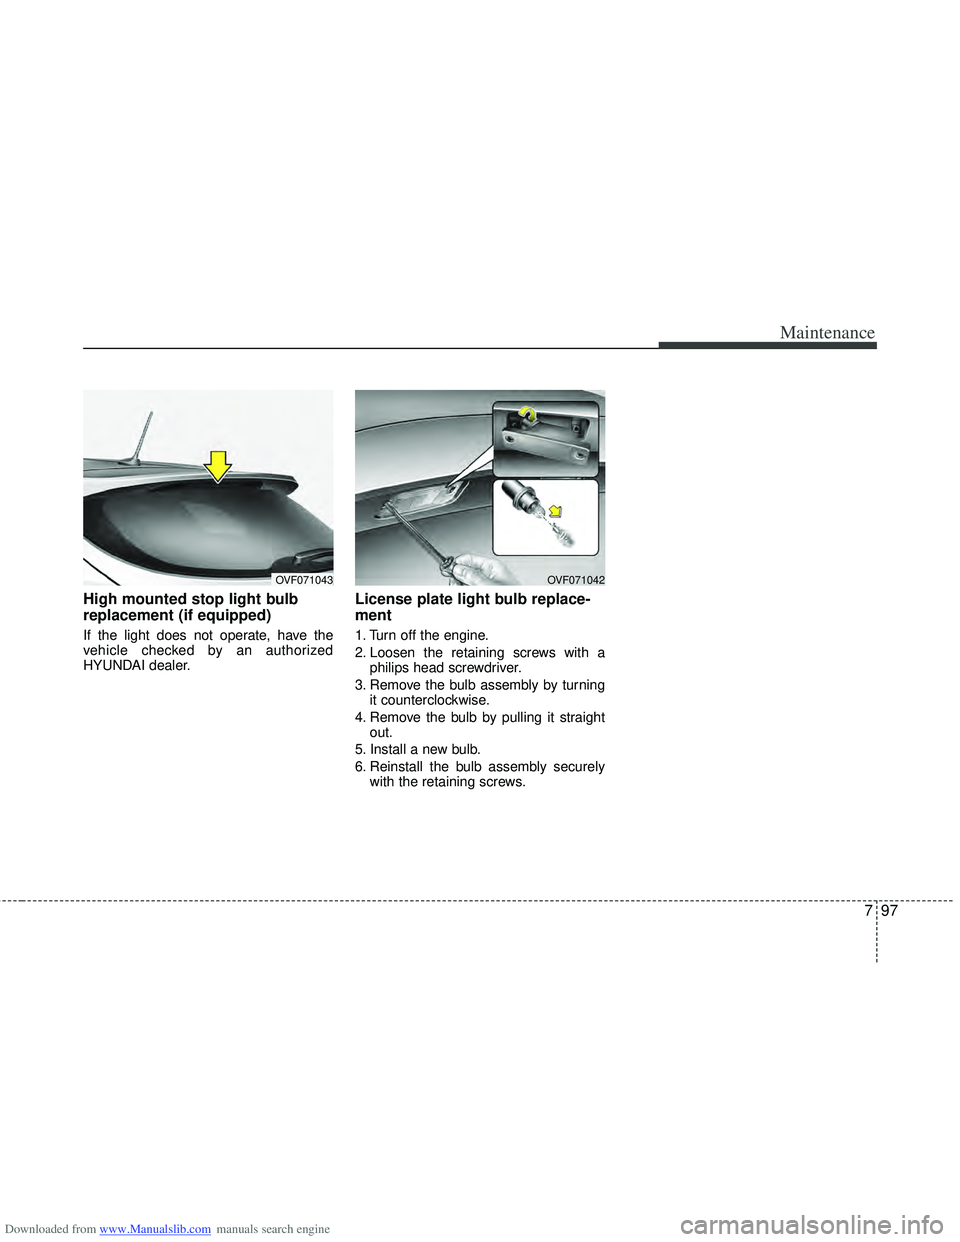
High mounted stop light bulb
replacement (if equipped)
If the light does not operate, have the
vehicle checked by an authorized
HYUNDAI dealer.
License plate light bulb replace-
ment
1. Turn off the engine.
2. Loosen the retaining screws with aphilips head screwdriver.
3. Remove the bulb assembly by turning it counterclockwise.
4. Remove the bulb by pulling it straight out.
5. Install a new bulb.
6. Reinstall the bulb assembly securely with the retaining screws.
OVF071043OVF071042
Page 503 of 534
Downloaded from www.Manualslib.com manuals search engine Maintenance
98
7
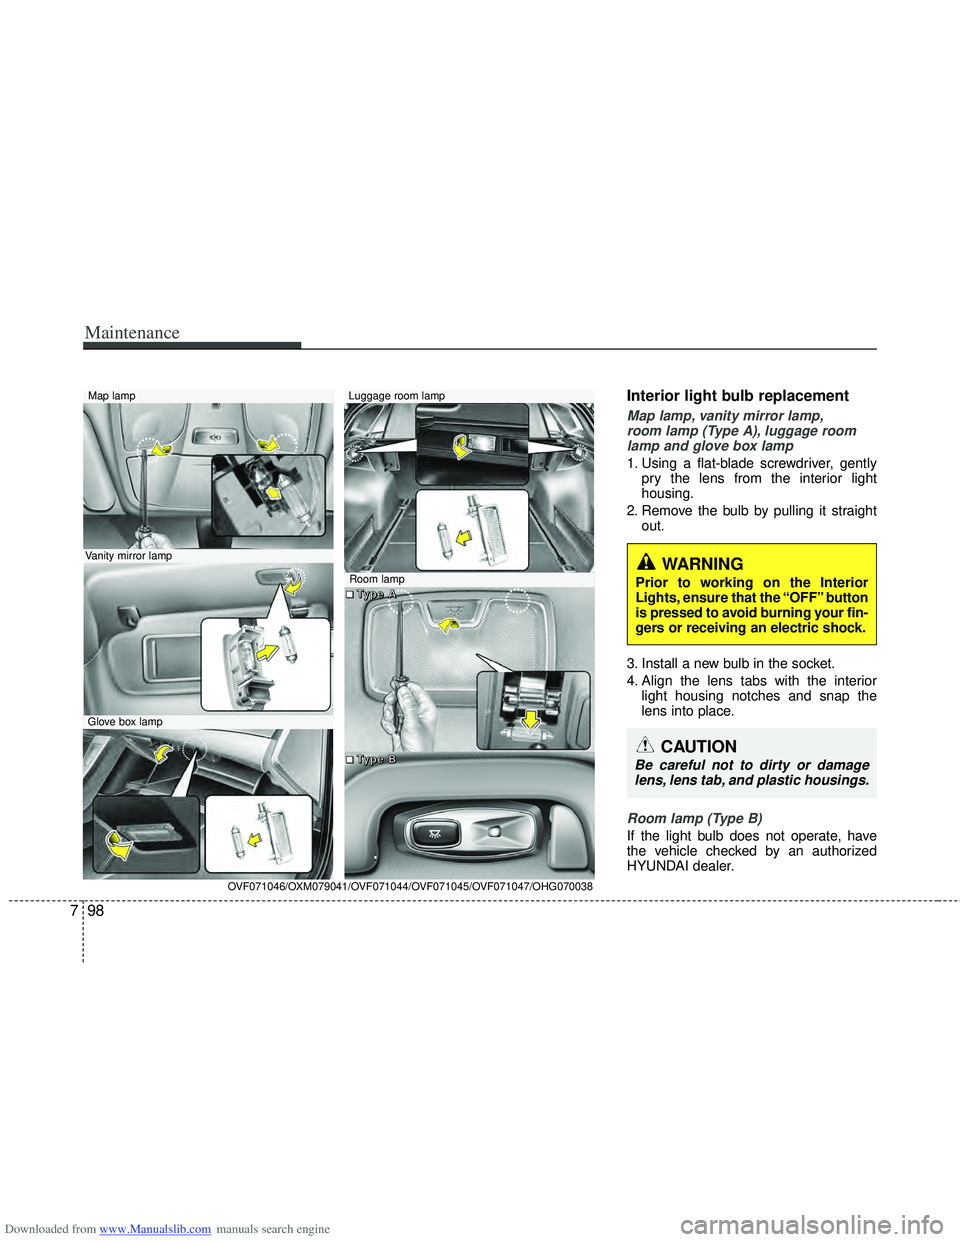
Interior light bulb replacement
Map lamp, vanity mirror lamp,
room lamp (Type A), luggage room lamp and glove box lamp
1. Using a flat-blade screwdriver, gently pry the lens from the interior light
housing.
2. Remove the bulb by pulling it straight out.
3. Install a new bulb in the socket.
4. Align the lens tabs with the interior light housing notches and snap the
lens into place.
Room lamp (Type B)
If the light bulb does not operate, have
the vehicle checked by an authorized
HYUNDAI dealer.
WARNING
Prior to working on the Interior
Lights, ensure that the “OFF” button
is pressed to avoid burning your fin-
gers or receiving an electric shock.
CAUTION
Be careful not to dirty or damagelens, lens tab, and plastic housings.
Map lamp
Glove box lamp
Luggage room lamp
Vanity mirror lamp
Room lamp
OVF071046/OXM079041/OVF071044/OVF071045/OVF071047/OHG070038
■
■
■
■T
T
T
T
y
y
y
y
p
p
p
p
e
e
e
e
A
A
A
A
■
■
■
■T
T
T
T
y
y
y
y
p
p
p
p
e
e
e
e
B
B
B
B
Page 508 of 534
Downloaded from www.Manualslib.com manuals search engine 7103
Maintenance
Keep your car clean
The best way to prevent corrosion is to
keep your car clean and free of corrosive
materials. Attention to the underside of
the car is particularly important.
If you live in a high-corrosion area —where road salts are used, near the
ocean, areas with industrial pollution,
acid rain, etc.—, you should take extra
care to prevent corrosion. In winter,
hose off the underside of your car at
least once a month and be sure to
clean the underside thoroughly when
winter is over.
give particular attention to the compo-
nents under the fenders and other
areas that are hidden from view. Do a
thorough job; just dampening the accu-
mulated mud rather than washing it
away will accelerate corrosion rather
than prevent it. Water under high pres-
sure and steam are particularly effec-
tive in removing accumulated mud and
corrosive materials.
rocker panels and frame members, be
sure that drain holes are kept open so
that moisture can escape and not be
trapped inside to accelerate corrosion. Keep your garage dry
Don't park your car in a damp, poorly
ventilated garage. This creates a favor-
able environment for corrosion. This is
particularly true if you wash your car in
the garage or drive it into the garage
when it is still wet or covered with snow,
ice or mud. Even a heated garage can
contribute to corrosion unless it is well
ventilated so moisture is dispersed.
Keep paint and trim in good condition
Scratches or chips in the finish should be
covered with "touch-up" paint as soon as
possible to reduce the possibility of cor-
rosion. If bare metal is showing through,
the attention of a qualified body and paint
shop is recommended.
Bird droppings : Bird droppings are high-
ly corrosive and may damage painted
surfaces in just a few hours. Always
remove bird droppings as soon as possi-
ble.
Don't neglect the interior
Moisture can collect under the floor mats
and carpeting to cause corrosion. Check
under the mats periodically to be sure
the carpeting is dry. Use particular care if
you carry fertilizers, cleaning materials or
chemicals in the car.
These should be carried only in proper
containers and any spills or leaks should
be cleaned up, flushed with clean water
and thoroughly dried.
Page 511 of 534
Downloaded from www.Manualslib.com manuals search engine Maintenance
106
7
3. Exhaust emission control
system
The Exhaust Emission Control System is
a highly effective system which controls
exhaust emissions while maintaining
good vehicle performance.
Vehicle modifications
This vehicle should not be modified.
Modification of your vehicle could affect
its performance, safety or durability and
may even violate governmental safety
and emissions regulations.
In addition, damage or performance
problems resulting from any modification
may not be covered under warranty.
If you use unauthorized electronic
devices, it may cause the vehicle to
operate abnormally, wire damage, bat-
tery discharge or fire. For your safety,
do not use unauthorized electric
devices.
Engine exhaust gas precautions (carbon monoxide)
Carbon monoxide can be present with other exhaust fumes. Therefore, if you
smell exhaust fumes of any kind inside
your vehicle, have it inspected and
repaired immediately. If you ever sus-
pect exhaust fumes are coming into
your vehicle, drive it only with all the
windows fully open. Have your vehicle
checked and repaired immediately. Do not operate the engine in confined
or closed areas (such as garages) any
more than what is necessary to move
the vehicle in or out of the area.
When the vehicle is stopped in an open area for more than a short time
with the engine running, adjust the
ventilation system (as needed) to draw
outside air into the vehicle.
Never sit in a parked or stopped vehi- cle for any extended time with the
engine running.
When the engine stalls or fails to start, excessive attempts to restart the
engine may cause damage to the
emission control system.
WARNING- Exhaust
Engine exhaust gases contain car-
bon monoxide (CO). Though color-
less and odorless, it is dangerous
and could be lethal if inhaled.
Follow the instructions following to
avoid CO poisoning.
Page 513 of 534
Downloaded from www.Manualslib.com manuals search engine If the malfunction indicator light contin-
ues to be blinked in spite of the proce-
dure, please visit an authorized
HYUNDAI dealer and then check the
DPF system.
If you continue to drive with the malfunc-
tion indicator light blinking for a long
time, the DPF system can be damaged
and fuel consumption can be worsen.
CAUTION - Diesel Fuel
(if equipped with DPF)
It is recommended to use the regu-
lated automotive diesel fuel fordiesel vehicle equipped with theDPF system.
If you use diesel fuel including highsulfur (more than 50 ppm sulfur) and unspecified additives, it cancause the DPF system to be dam-aged and white smoke can be emit-ted.
7108
Maintenance