Inspect HYUNDAI IONIQ 5 2023 Owners Manual
[x] Cancel search | Manufacturer: HYUNDAI, Model Year: 2023, Model line: IONIQ 5, Model: HYUNDAI IONIQ 5 2023Pages: 680, PDF Size: 48.22 MB
Page 649 of 680
Maintenance
9-48
Consult an authorized HYUNDAI dealer
to replace most vehicle light bulbs. It is
difficult to replace vehicle light bulbs
because other parts of the vehicle must
be removed before you can get to the
bulb. This is especially true for removing
the headlamp assembly to get to the
bulb(s).
Removing/installing the headlamp
assembly can result in damage to the
vehicle.
WARNING
• Prior to working on a light, depress
the foot brake, shift to P (Park), apply
the parking brake, press the Start/
Stop button to the OFF position
and take the key with you when
leaving the vehicle to avoid sudden
movement of the vehicle and to
prevent possible electric shock.
• Be aware the bulbs may be hot and
may burn your fingers.
NOTICE
Be sure to replace the burned-out bulb
with one of the same wattage rating.
Otherwise, it may cause damage to the
fuse or electrical wiring system.
NOTICE
To prevent damage, do not clean the
headlamp lens with chemical solvents
or strong detergents.
Information - Headlamp
desiccant (if equipped)
This vehicle is equipped with desiccant to
reduce fogging inside the headlamp due
to moisture. The desiccant is consumable and its performance may change based on
the used period or environment. If fogging
inside the headlamp due to moisture
continues for a long time, consult an
authorized HYUNDAI dealer.
Information
The headlamp and tail lamp lenses could
appear frosty if the vehicle is washed after
driving or the vehicle is driven at night in
wet weather. This condition is caused by
temperature difference between the lamp inside and outside and, it does not indicate
a problem with your vehicle. When
moisture condenses in the lamp, it will be
removed after driving with the headlamp
on. The removable level may differ depending on lamp size, lamp position
and environmental condition. However, if
moisture is not removed, have your vehicle inspected by an authorized HYUNDAI
dealer.
light BulBs
Page 651 of 680
Maintenance
9-50
If the LED lamp does not operate, have
the system inspected by an authorized
HYUNDAI dealer.
The LED lamps cannot be replaced as
a single unit because it is an integrated
unit. The LED lamps has to be replaced with the unit.
A skilled technician should check or
repair the LED lamp, for it may damage
related parts of the vehicle.
Turn signal lamp (bulb type)
1. Engage the parking brake and
disconnect the negative battery cable.
2. Remove wheel guard clips (under the front bumper).
3. Push the wheel guard aside and remove the bulb socket by turning it
counterclockwise.
4. Remove the bulb from the socket
by pressing it in and rotating it
counterclockwise until the tabs on the
bulb align with the slots in the socket.
Pull the bulb out of the socket.
5. Install a new bulb by inserting it into the socket and rotating it until it locks
into place.
6. Push the socket into the assembly and turn the socket clockwise.
7. Install the wheel guard in the reverse
order.
WARNING
• Wear eye protection when changing
a bulb. Allow the bulb to cool down
before handling it.
• Always handle them carefully, and
avoid scratches and abrasions. If
the bulbs are lit, avoid contact with liquids.
• Never touch the glass with bare
hands. Residual oil may cause the
bulb to overheat and burst when lit.
• A bulb should be operated only when
installed in a turn signal lamp.
• If a bulb becomes damaged or
cracked, replace it immediately and
carefully dispose of it.
• Replacing the bulb may cause
damage to the bulb relevant parts
of the vehicle, and also may cause
injuries. To replace the turn signal
lamp, visit an authorized HYUNDAI
dealer.
Page 652 of 680
09
9-51
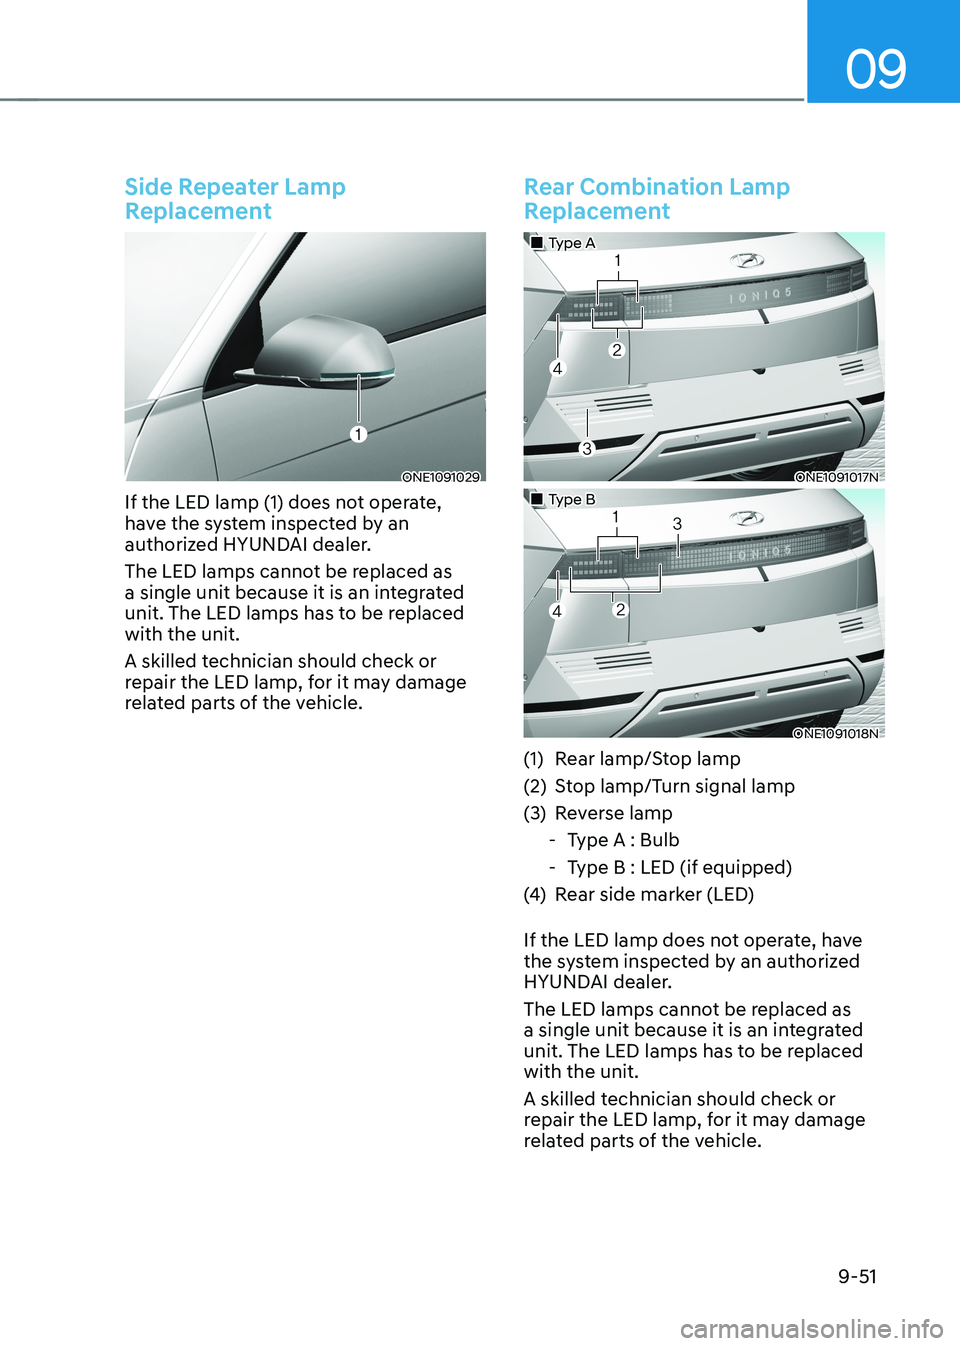
Side Repeater Lamp
Replacement
ONE1091029
If the LED lamp (1) does not operate,
have the system inspected by an
authorized HYUNDAI dealer.
The LED lamps cannot be replaced as
a single unit because it is an integrated
unit. The LED lamps has to be replaced with the unit.
A skilled technician should check or
repair the LED lamp, for it may damage
related parts of the vehicle.
Rear Combination Lamp
Replacement
„„Type A
ONE1091017N
„„Type B
ONE1091018N
(1) Rear lamp/Stop lamp
(2) Stop lamp/Turn signal lamp
(3) Reverse lamp
- Type A : Bulb
- Type B : LED (if equipped)
(4) Rear side marker (LED)
If the LED lamp does not operate, have
the system inspected by an authorized
HYUNDAI dealer.
The LED lamps cannot be replaced as
a single unit because it is an integrated
unit. The LED lamps has to be replaced with the unit.
A skilled technician should check or
repair the LED lamp, for it may damage
related parts of the vehicle.
Page 654 of 680
09
9-53
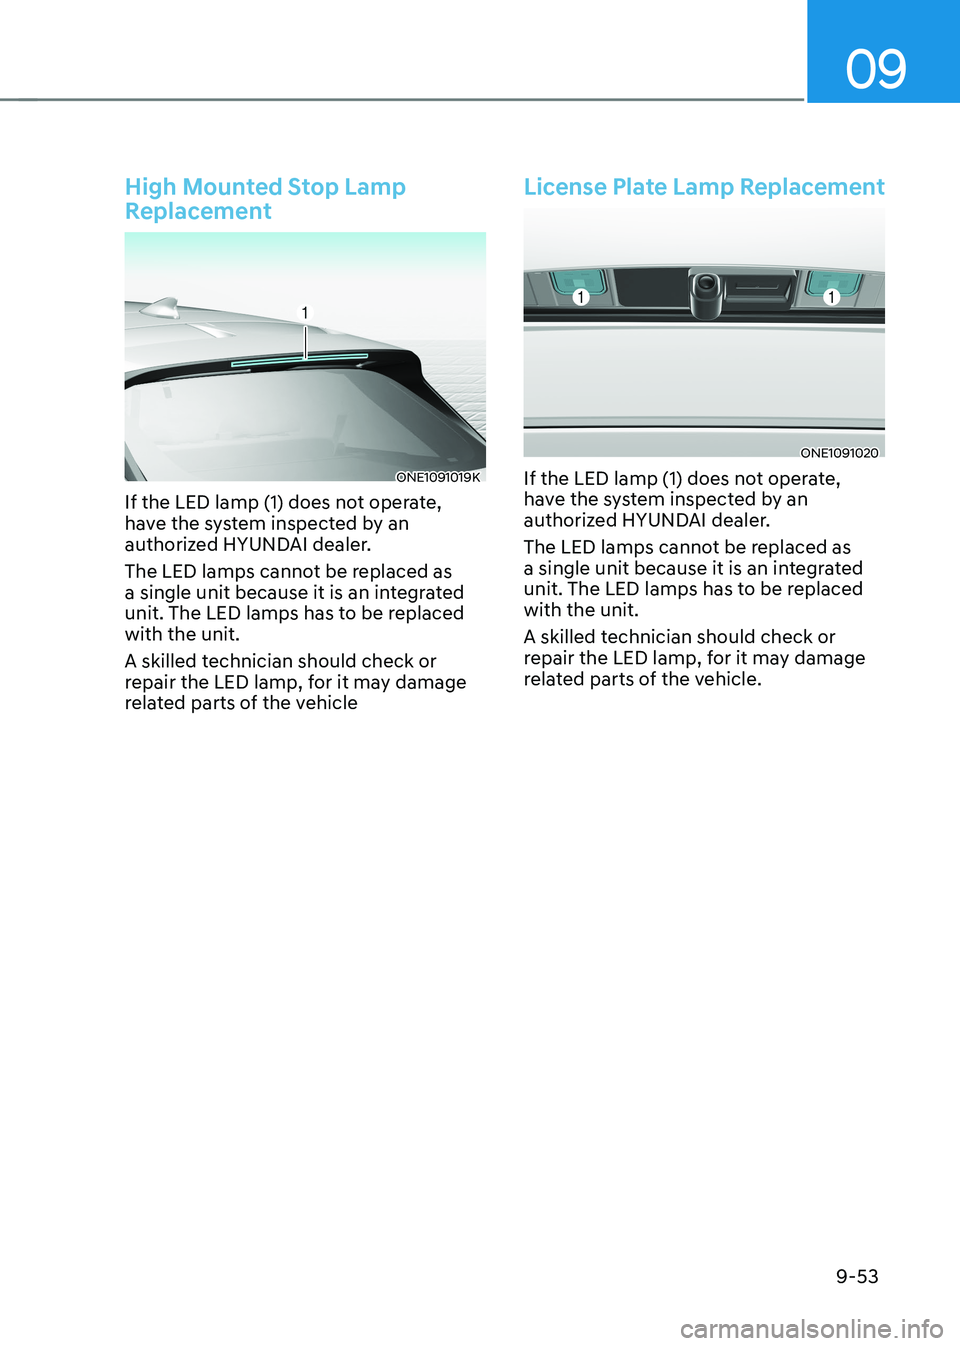
High Mounted Stop Lamp
Replacement
ONE1091019K
If the LED lamp (1) does not operate,
have the system inspected by an
authorized HYUNDAI dealer.
The LED lamps cannot be replaced as
a single unit because it is an integrated
unit. The LED lamps has to be replaced with the unit.
A skilled technician should check or
repair the LED lamp, for it may damage
related parts of the vehicle
License Plate Lamp Replacement
ONE1091020
If the LED lamp (1) does not operate,
have the system inspected by an
authorized HYUNDAI dealer.
The LED lamps cannot be replaced as
a single unit because it is an integrated
unit. The LED lamps has to be replaced with the unit.
A skilled technician should check or
repair the LED lamp, for it may damage
related parts of the vehicle.
Page 655 of 680
Maintenance
9-54
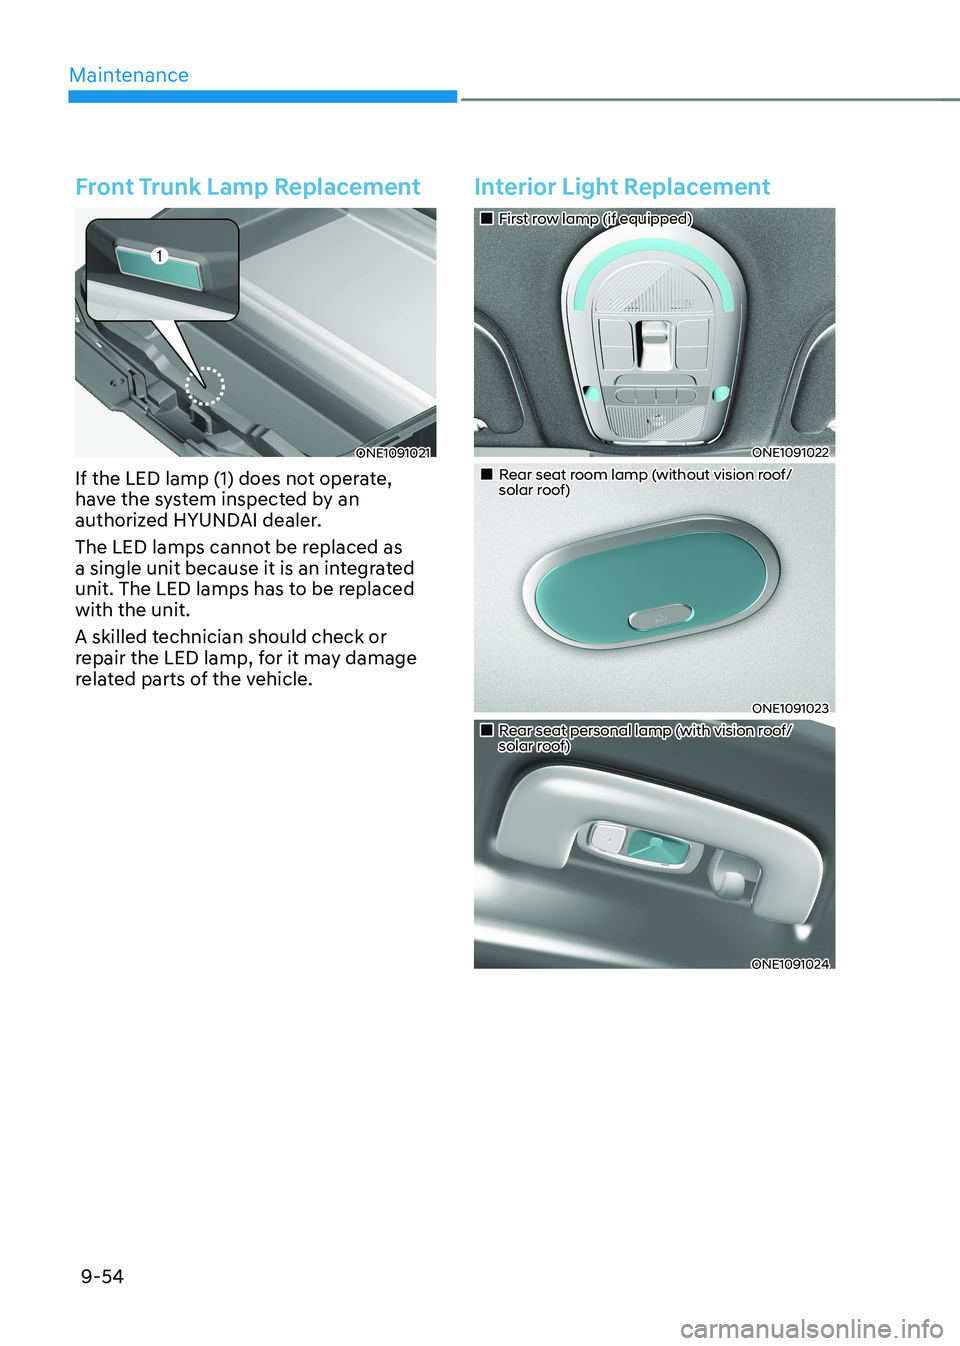
Front Trunk Lamp Replacement
ONE1091021
If the LED lamp (1) does not operate,
have the system inspected by an
authorized HYUNDAI dealer.
The LED lamps cannot be replaced as
a single unit because it is an integrated
unit. The LED lamps has to be replaced with the unit.
A skilled technician should check or
repair the LED lamp, for it may damage
related parts of the vehicle.
Interior Light Replacement
„„First row lamp (if equipped)
ONE1091022
„„Rear seat room lamp (without vision roof/solar roof)
ONE1091023
„„Rear seat personal lamp (with vision roof/solar roof)
ONE1091024
Page 656 of 680
09
9-55
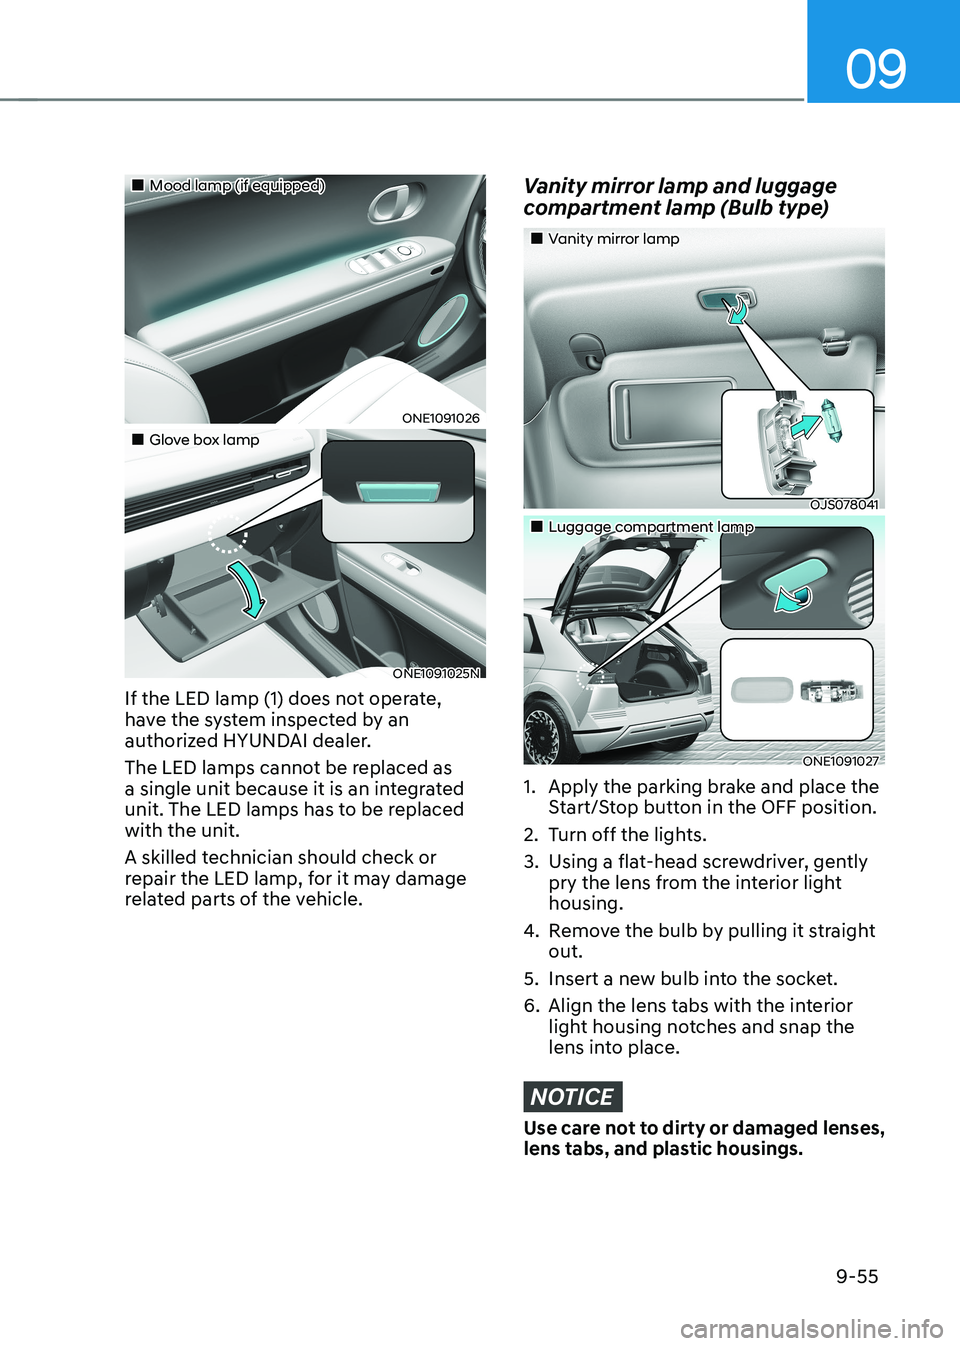
„„Mood lamp (if equipped)
ONE1091026
„„Glove box lamp
ONE1091025N
If the LED lamp (1) does not operate,
have the system inspected by an
authorized HYUNDAI dealer.
The LED lamps cannot be replaced as
a single unit because it is an integrated
unit. The LED lamps has to be replaced with the unit.
A skilled technician should check or
repair the LED lamp, for it may damage
related parts of the vehicle.
Vanity mirror lamp and luggage
compartment lamp (Bulb type)
„„Vanity mirror lamp
OJS078041
„„Luggage compartment lamp
ONE1091027
1. Apply the parking brake and place the Start/Stop button in the OFF position.
2. Turn off the lights.
3. Using a flat-head screwdriver, gently pry the lens from the interior light housing.
4. Remove the bulb by pulling it straight out.
5. Insert a new bulb into the socket.
6. Align the lens tabs with the interior light housing notches and snap the
lens into place.
NOTICE
Use care not to dirty or damaged lenses,
lens tabs, and plastic housings.
Page 669 of 680
Index
I-4
C
Cabin Air Filter .................................................................................................... 9-15
Filter Inspection ................................................................................................ 9-15
Filter Replacement ........................................................................................... 9-15
California Perchlorate Notice .............................................................................. 9-64
Charge Indicator Lamp for Electric Vehicle ........................................................1-25
Charging Status ................................................................................................ 1-25
Front Center Bumper ........................................................................................ 1-25
Charge Types for Electric Vehicle ....................................................................... 1-23
Charging Information ....................................................................................... 1-23
Charging Time Information .............................................................................. 1-23
Charging Types ................................................................................................. 1-24
Charging Connector Lock .................................................................................... 1-26
Locking Charging Cable .................................................................................. 1-26
Charging Electric Vehicle .................................................................................... 1-28
AC Charge ........................................................................................................ 1-30
Charging Precautions ....................................................................................... 1-29
DC Charge ........................................................................................................ 1-34
Electric Charging Door .................................................................................... 1-28
Portable Charge ................................................................................................ 1-36
Unlock Charging Door in Emergency ..............................................................1-30
Charging the Electric Vehicle (abrupt stop) .........................................................1-49
Action to be taken when charging stops abruptly ............................................1-49
Child Restraint System (CRS) ............................................................................. 3-39
Children Always in the Rear ............................................................................ 3-39
Installing a Child Restraint System (CRS) .......................................................3-41
Selecting a Child Restraint System (CRS) .......................................................3-40
Climate Control Additional Features ................................................................. 5-116
Auto Defogging System ................................................................................. 5-116
Auto Dehumidify ............................................................................................ 5-117
Auto. Controls That Use Climate Control Settings (for driver’s seat) ...........5-118
Recirculating Air When Washer Fluid Is Used ..............................................5-118
Smart ventilation ............................................................................................ 5-118
Consumer Information ......................................................................................... 2-16
Coolant ................................................................................................................. 9-12
Page 680 of 680
I
I-15
W
Washer Fluid ........................................................................................................ 9-14
Checking the Washer Fluid Level .................................................................... 9-14
Windows .............................................................................................................. 5-63
Power Windows ................................................................................................ 5-64
Windshield Defrosting and Defogging .............................................................. 5-113
Defogging Logic ............................................................................................ 5-114
Rear Window Defroster .................................................................................. 5-115
To Defog Inside Windshield ........................................................................... 5-113
To Defrost Outside Windshield ...................................................................... 5-114
Winter Driving ..................................................................................................... 6-57
Snow or Icy Conditions .................................................................................... 6-57
Winter Precautions ........................................................................................... 6-60
Wiper Blades ........................................................................................................ 9-16
Blade Inspection ............................................................................................... 9-16
Blade Replacement ........................................................................................... 9-16
Wipers and Washers ............................................................................................. 5-96
Front Windshield Washers ................................................................................ 5-98
Front Windshield Wipers .................................................................................. 5-96